
| TODAY |
| Reviews |
| Gear & Gadgets |
| Computer |
| Furniture |
| Misc |
| Projects |
| Contact Us |
RainyDayMagazine's content can now be licensed for your print magazine or web site. Please contact us directly here. If you want to see something reviewed, then drop us a note with a link and we'll be happy to take a look.
|
||||
| December 11,2009 | ||||
The first snow storm for Boston hit on Saturday. It was wet, sloppy, and pretty soon became more of a pain than pretty. Another wet messy one rolled in on Wednesday. It was quite the morning for those who had to make their way into the office. Fortunately for some, they can work remotely whenever they want.
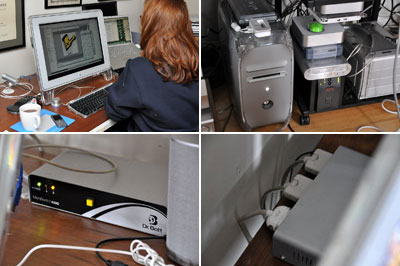
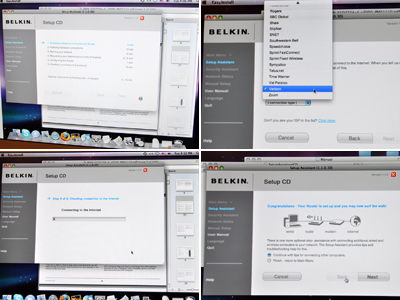
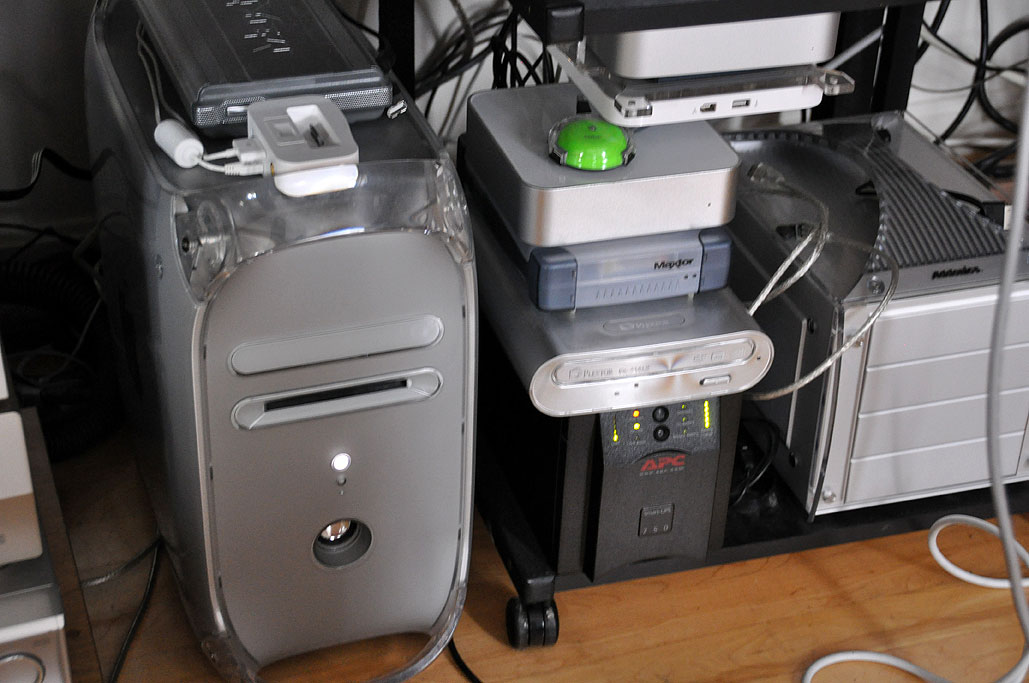
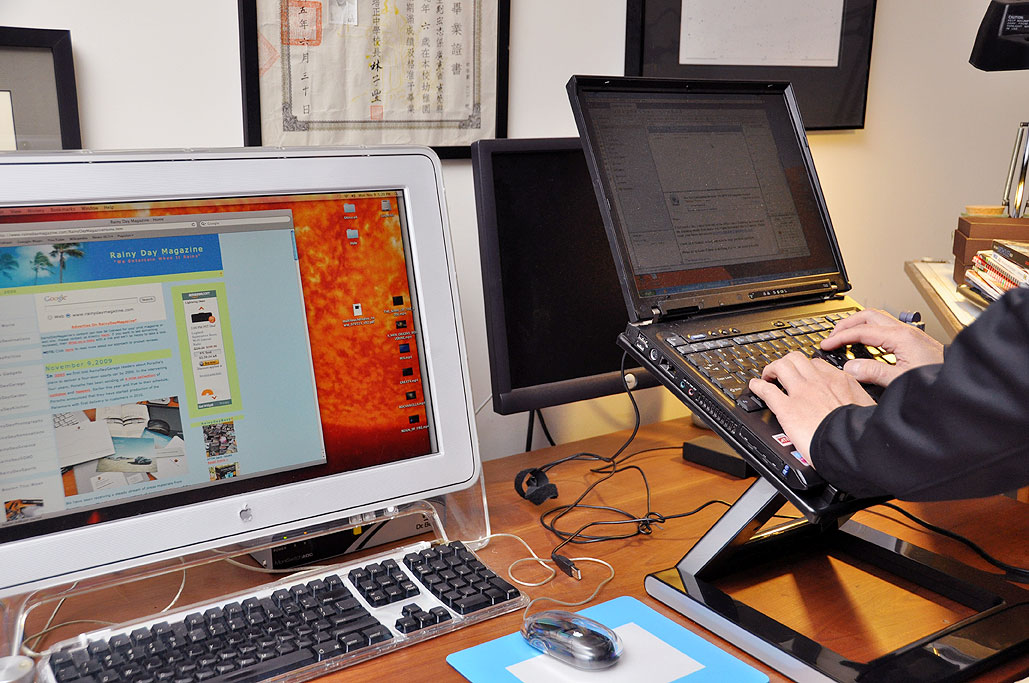
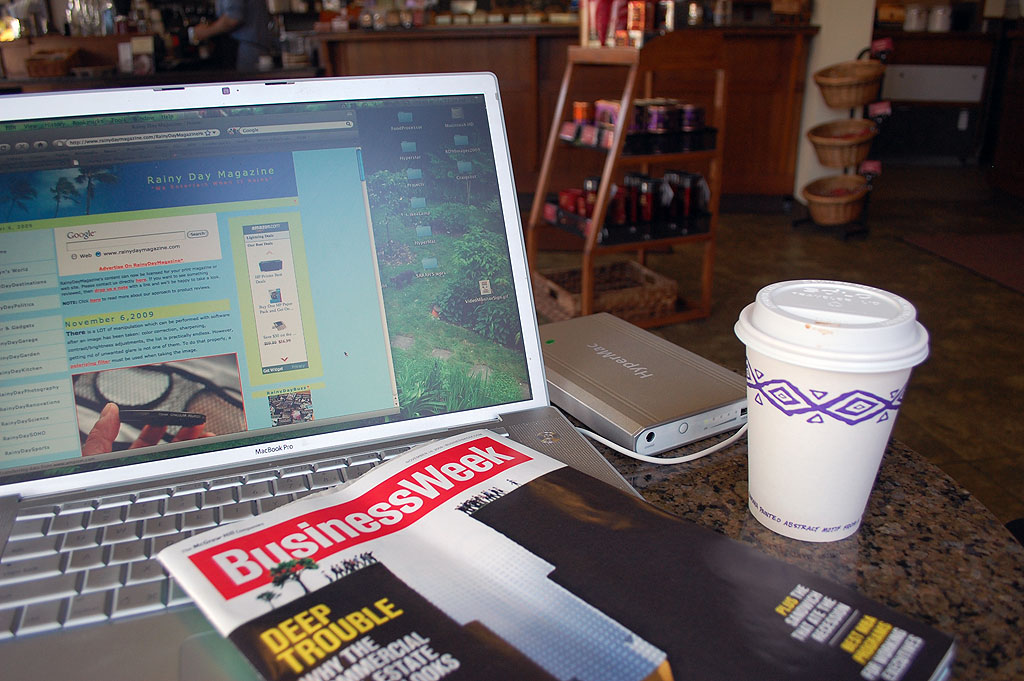
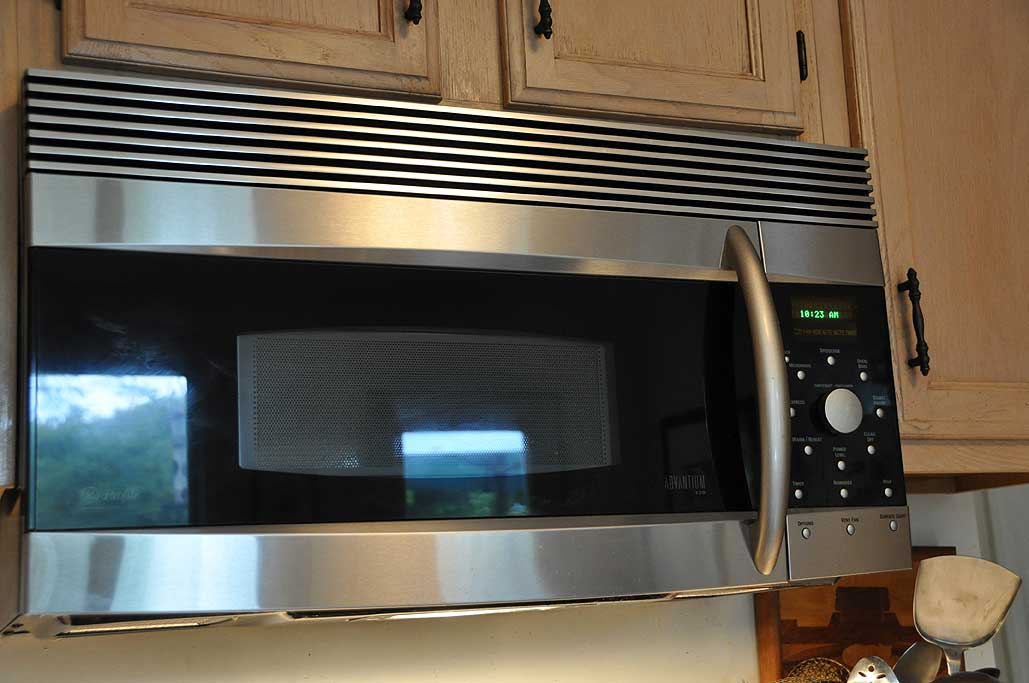
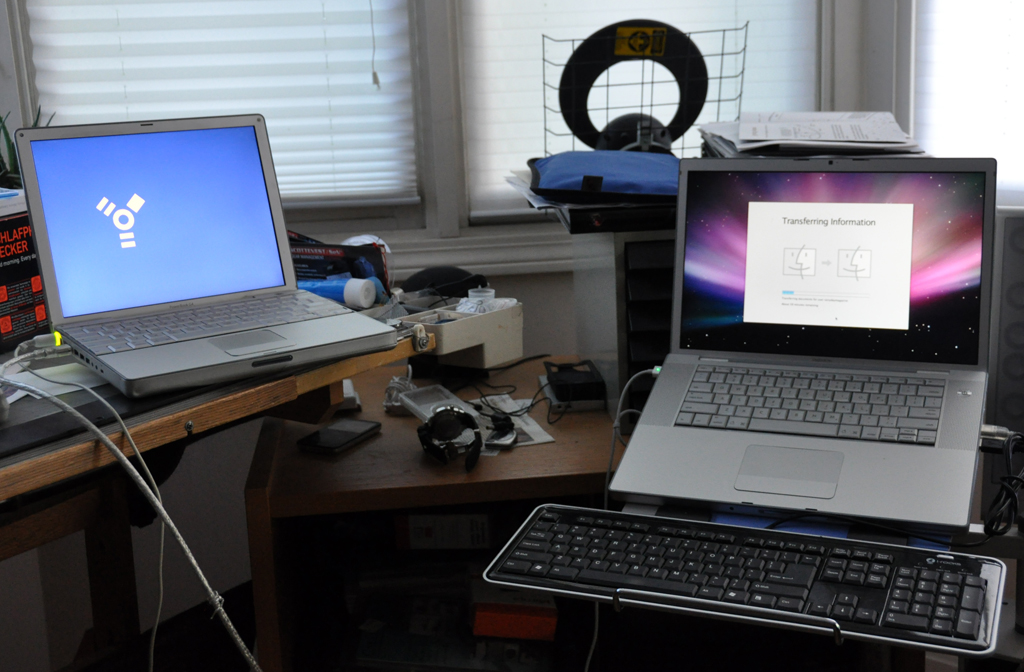
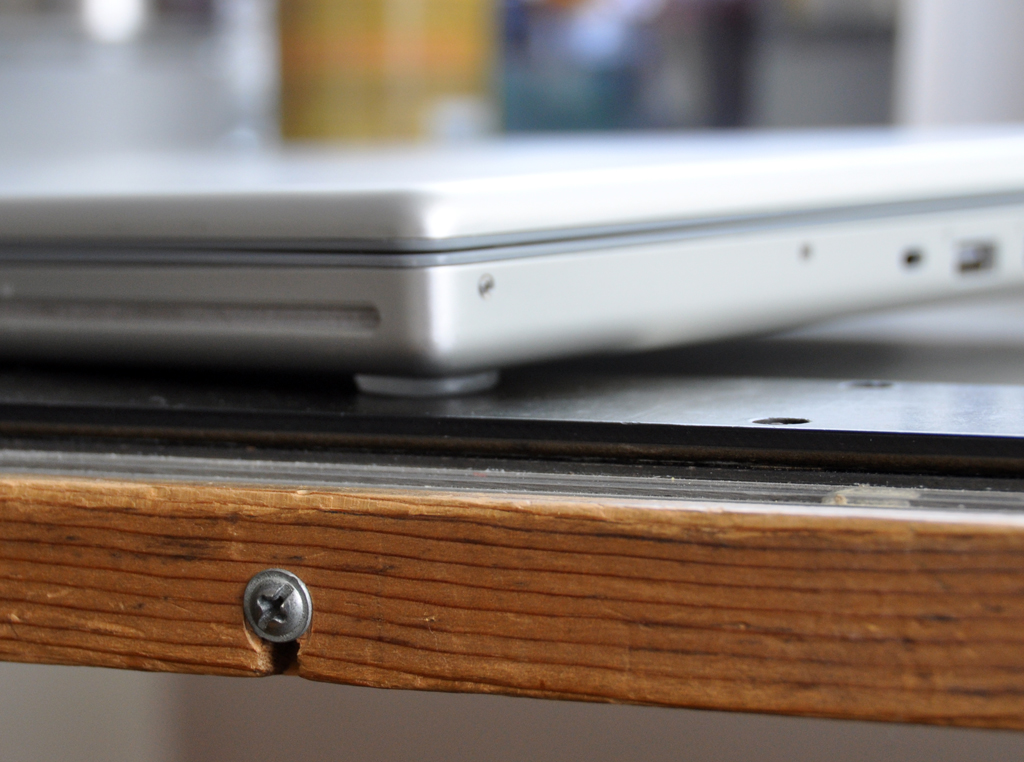
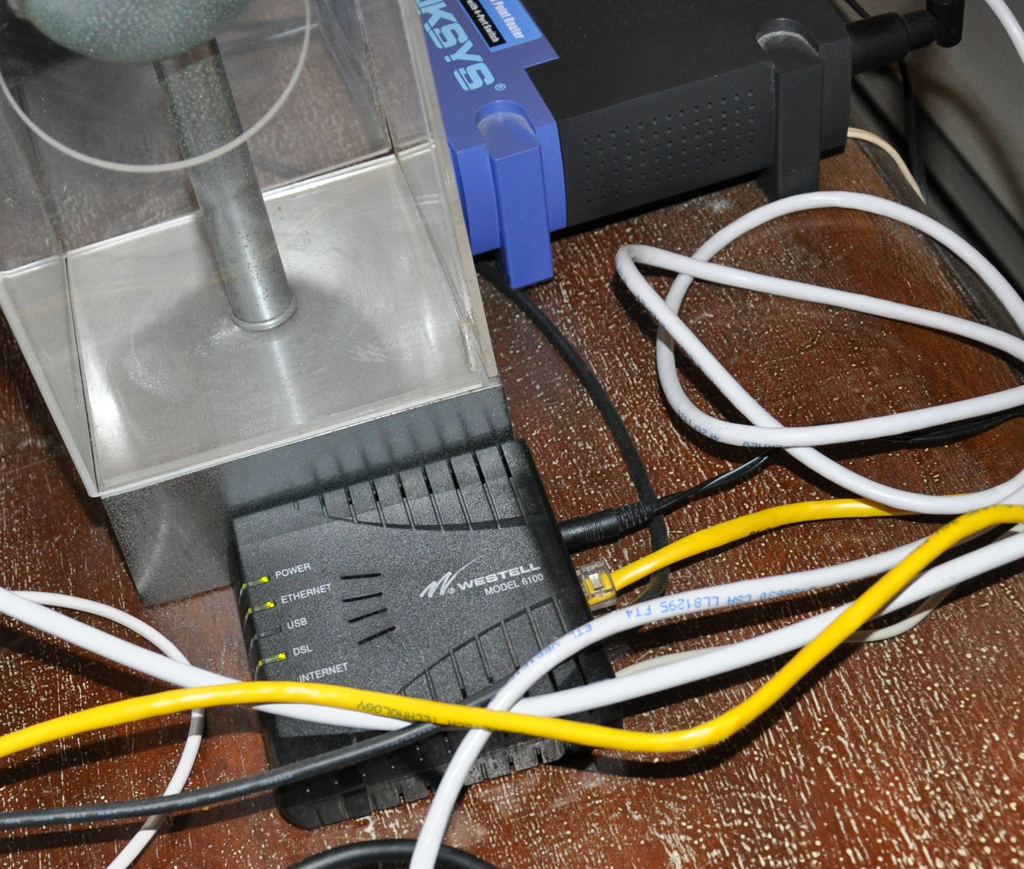
Not everyone is productive working at home. There can be a lot of distractions (pets, snacking, napping, etc...). The key to working at home is to have a small office or home office (SOHO) setup. A SOHO can be a separate room, a separate desk, or just a quiet place to focus. The one thing one really need is to be comfortable, both mentally and ergonomically. However, having the right tools will also help. We sometimes do things which take over our computer's CPU for a long time (batch file conversions, rendering, etc...). Until the process completes, we are pretty much locked out. In those situations, having more than one computer can help us be more productive. Everybody would love to have a huge monitor, but who has the room for multiple 20" screen for each CPU? Our SOHO solution is to use a KVM.
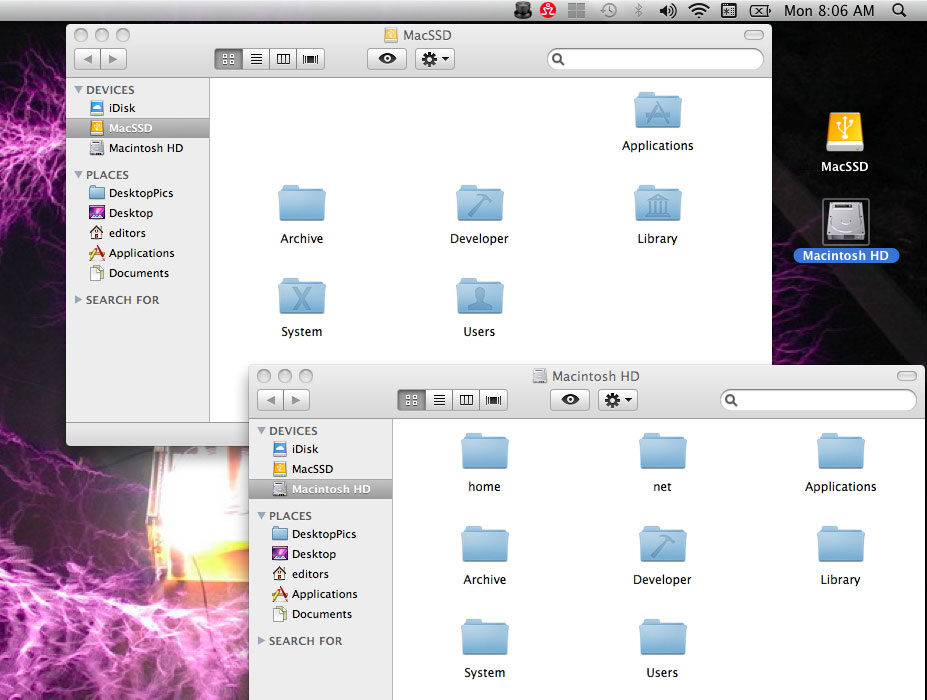
A KVM is a switch that allows the user to run multiple computers simultaneously but control them all by using only one screen and one keyboard. Difficult? No. Expensive? It doesn't have to be. We got our KVM on EBay (complete with all the cables) for $25. New KVMs run in the $50-$150 range depending on the number of CPUs supported. It is a great way to multi-task without having to fork out bucks for multiple monitors. Most used computer equipment sells for very reasonable prices on Craigslist, Apple gear included. The key is to look for discontinued gear that was top of the line in their days. A 20"-23" lucite frame Apple Cinema Display which listed for $2500 new now goes for less than $150 ($100 if you find one with an older style connector). They can be much sharper than new, comparably-sized monitors.
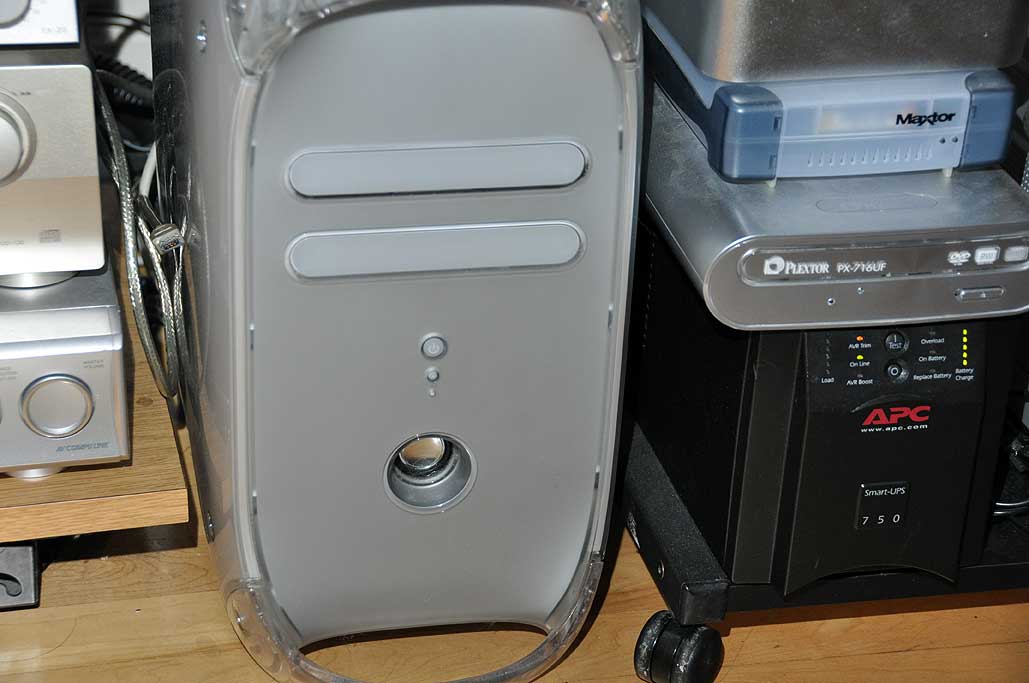
A maxed-out PowerPC G4 tower capable of running OSX 10.5 can be had for just a few hundred. This is because Snow Leopard (10.6) is for Intel processors only. The older PowerPC systems have reached an OS-upgrade dead end. But those older systems still have another five or more years of useful service before they are completely obsolete. We've had ours since 2000 and don't plan on retiring it until something major gets fried. If you have tasks which can be done in parallel, then consider amping up your at-home productivity by putting multiple CPUs to work.
The next time the commute looks like it will suck more time from the day than it's worth, or you just want more time to feed the sparrows, go ahead...work from home. You may find that working smarter can be even more productive than working harder! Nobody should care as long as the projects get completed on time, within budget, and work as advertised. Now, if somebody else gets the credit for them because you weren't there then...well, managing office politics will be covered in a future series :-) [Permalink] -Work smarter, not harder |
||||
| December 8,2009 | ||||
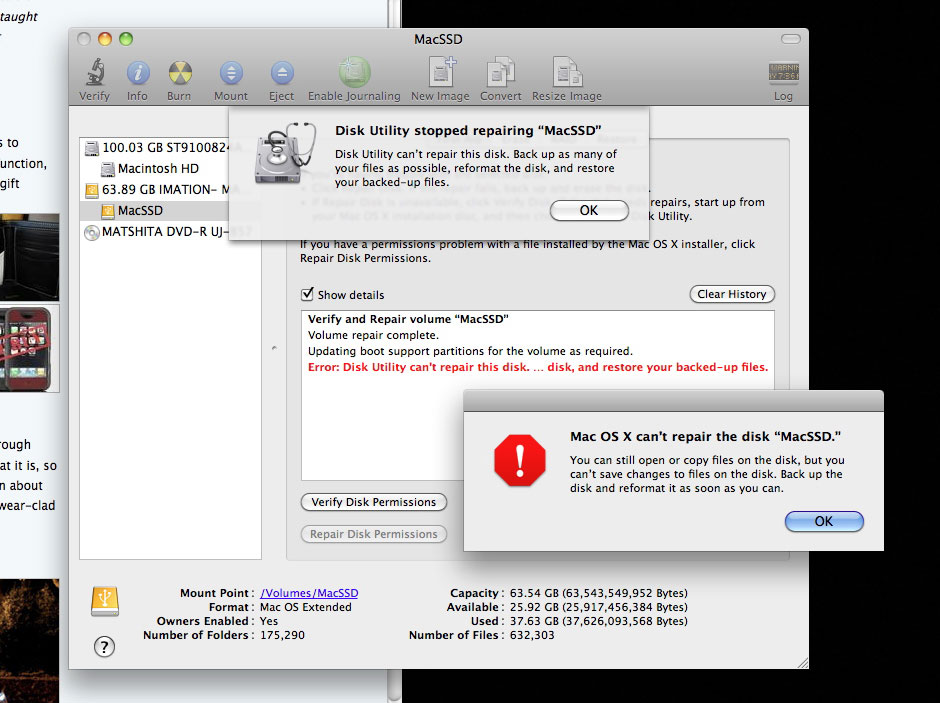
There were a lot of questions and interest regarding the imation SSD write-ups. Some of it we could but many we could not answer at present as we still have the SSD configured as an external drive. All of our testing to date are from booting and running the OS from the SSD as an external device. All our applications appear to function normally. The OS and the apps running on the SSD does boot, run, and shutdown a lot faster compared to the internal hard drive. Originally we had planned to do the physical swap after a few days of burn-in, but have decided to not do that until the next year. There were a few reasons for this decision.
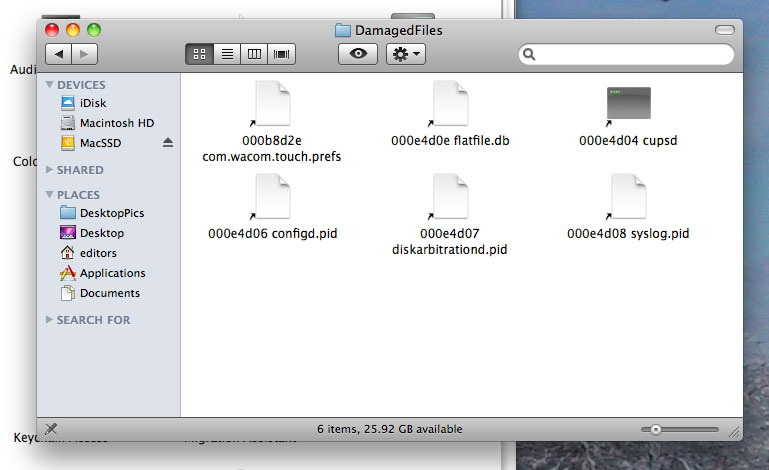
The first reason was we experienced a severe disk corruption a few days into the SSD burn-in test. We tracked down the corrupted files but were not able to determine the root cause of the problem. The decision was to run the SSD in an external configuration for a while just in case the problem surfaces again. It has been more than two weeks since we had the data corruption. Fortunately, there has been no hints of any further issues. However, we'll let it run for a few more weeks just to be sure.
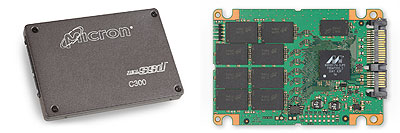
The second reason why we delayed our schedule was because of Micron's recent RealSSD announcement. The RealSSD C300 drives are based on Micron's high-speed MLC NAND, proprietary controller and NAND management technology, and the SATA 6 Gb/s interface. These drives claim to deliver sequential read and write speeds of up to 355 MB/s and 215 MB/s, respectively. All this bandwidth-focused performance could dramatically improve boot and application load times.
We will be doing a side-by-side comparison of the imation SSD with the newly announced Micron RealSSD before we decide which one to use for the MacBook Pro drive swap. Look for it in 2010. [Permalink] -imation SSD Testing |
||||
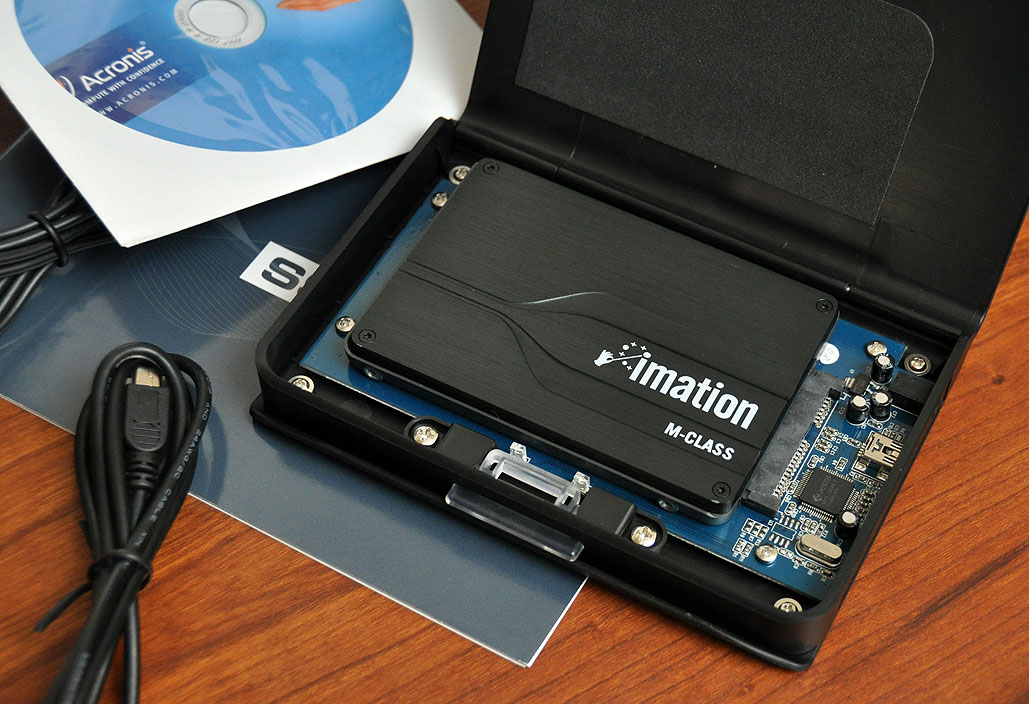
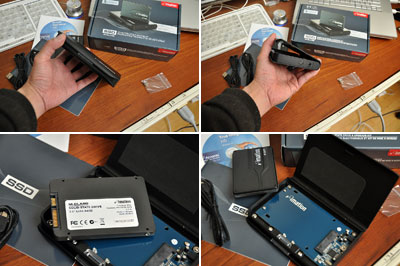
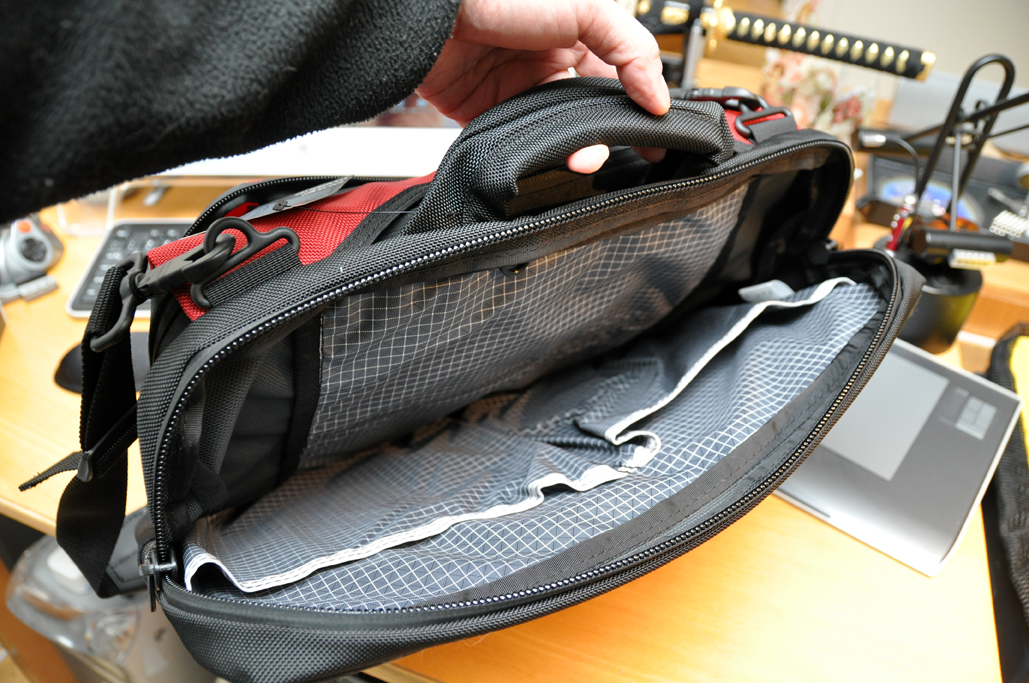
Yesterday we took a FirstLook at the imation SSD upgrade kit. The kit came complete with a 64GB SSD, USB case, cables, and software. Today we are going to take the first step in replacing the internal hard drive of our MacBook Pro with the imation SSD: cloning the drive.
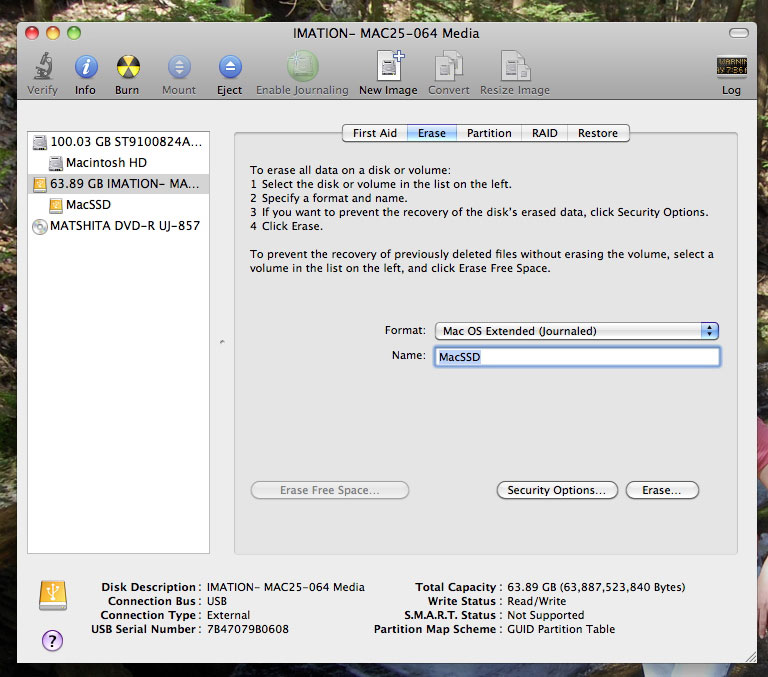
We could have done a fresh install of OSX on the SSD, but then we would've had to reload all of the 3rd party applications and transfer all the user data. Cloning the internal drive is a much simplier method. The process is a bit-for-bit copy of everything from one drive to another. The biggest benefit was that we would not have to deactivate/reactivate any of the 3rd-party applications (Photoshop, Dreamweaver, etc...). A definite time- and hassle-saver. Getting the imation SSD drive prepped was super simple: plug the SSD into the case, attach the USB cable, plug the cable into the laptop. The new external drive was automatically recognized by OSX. However, before we could actually use the SSD, we had to reformat it for the Mac. We used Apple's Disk Utility application and it had no problems erasing and formatting the SSD. The entire sequence took about three minutes!
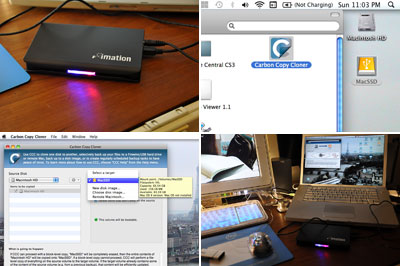
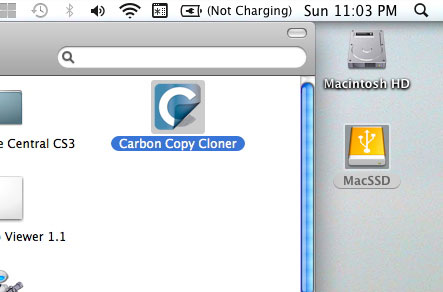
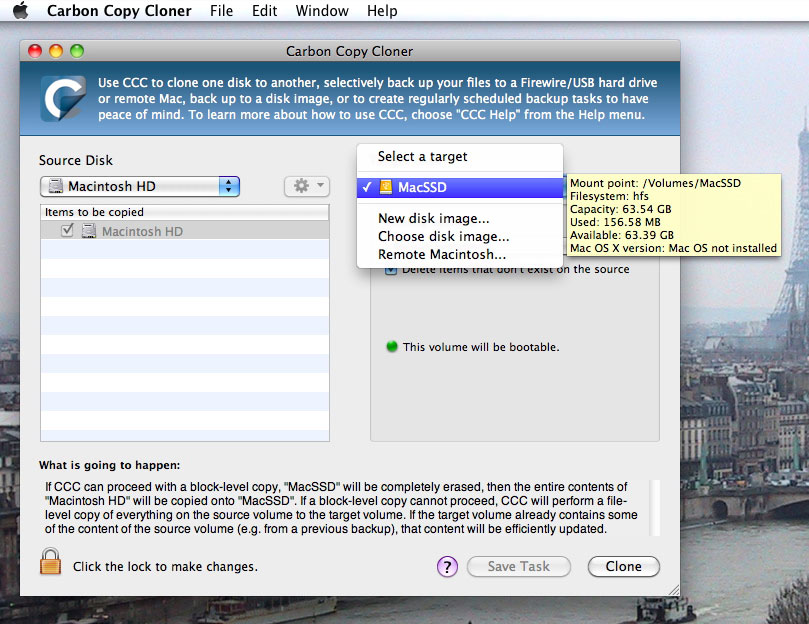
The Acronis cloning software that came with the imation kit is for the Windows platform only. As we were cloning our MacBook Pro, we needed to find something which would work on OSX. A quick search indicated the best shareware was the Carbon Copy Cloner (CCC) application from Bombich Software. The software was quick to download, simple to setup, easy to use, and worked perfectly. It is a solid application and we think imation should include it in their package. We are pretty sure they can come to some arrangement with Mike Bombich :-)
We weren't exactly sure how long the cloning step took, but it was probably about two hours for the 38GB we had on the internal disk. Now that we have cloned the internal disk and successfully booted up the MacBook Pro with the external SSD, we will run off of the SSD for a while to see how it behaves. If everything looks fine after a week, we'll open up the laptop and do the physical drive swap. [Permalink] -imation SSD: drive cloning |
||||
Last Friday we showed readers how to install discontinued hardware to access some 12 year old Zip disks. Today, we are going to jump ahead to the future and talk about Solid State Disks (SSD). SSD drives are available now, but are typically found as options for higher performance machines. However, we believe SSDs will become the new standard as soon as the price/performance of flash memory gets closer to that of spinning drives.
At RainyDayMagazine, we have always advocated upgrading older hardware rather than buying the latest gear. We had purchased an older MacBook Pro a few months back. The first thing we did was to fix the keyboard, max out the RAM, and upgraded the OS to Snow Leopard. The only thing left was to get a upgrade the hard drive. However, instead of getting more space, we decided to go solid state. Why? Faster performance and longer battery life. The two items which, until SSDs, were mutually exclusive. Since SSDs have no moving parts, they consume far less power. SSDs are a simple way to add the performance edge found in today's machines to older hardware.
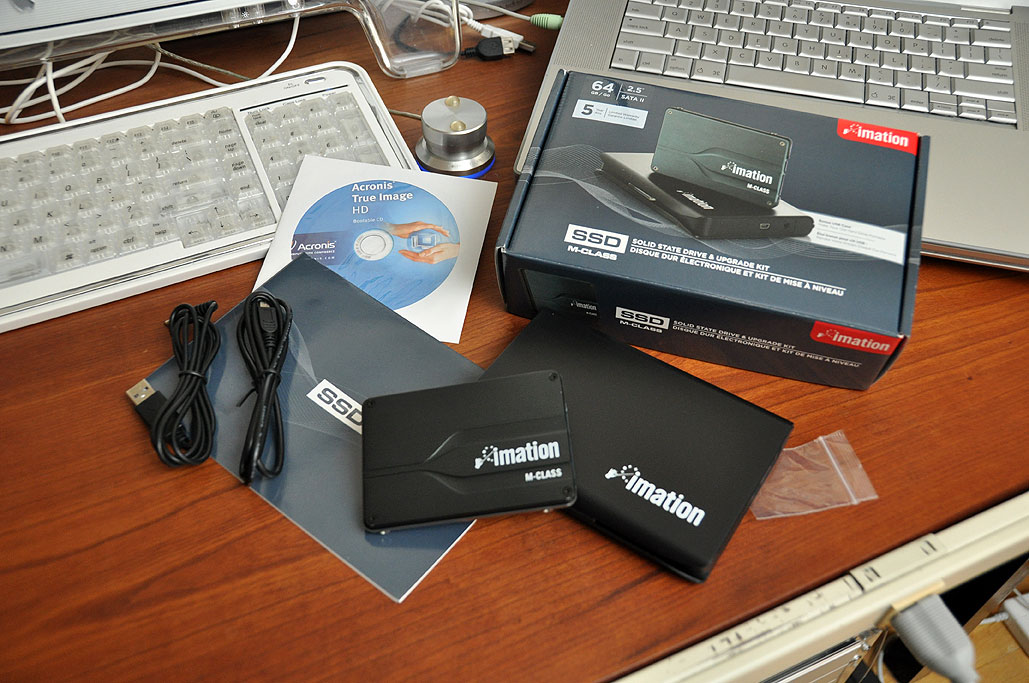
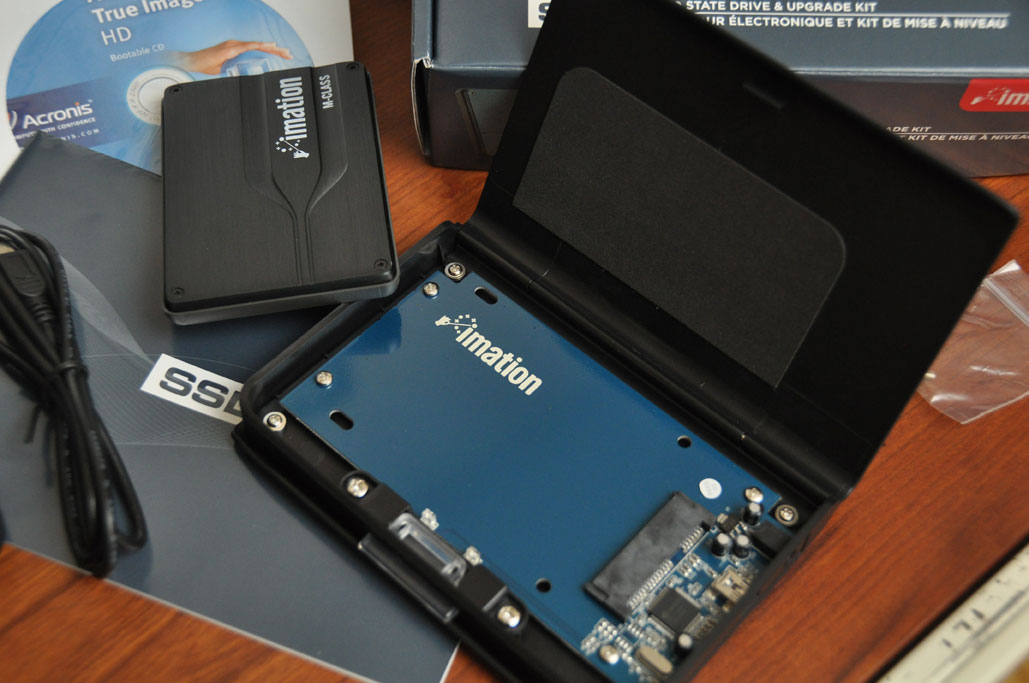
There are a few companies offering SSD drives, but imation has put together a SSD Migration Kits designed to make upgrades simple. The kit consists of a SSD drive, SATA connector and power cables, and easy-to-follow upgrade instructions. The Acronis® True Image HD™ software simplifies data transfer and backup without losing user's current operating system, applications and data. imation's goal is to make it easy for anyone to retrofit their notebook or desktop computer with a high-performance SSD.
The only "hit" we are taking in this upgrade is we will be swapping in a 64GB SSD for a 100GB hard drive. However, the supplied drive enclosure can be use to turn the 100GB hard drive into an external USB drive. So you see, we are not losing anything, we are actually gaining an extra 64GB of storage. We will have a full write-up of the SSD upgrade project in December. [Permalink] -imation SSD upgrade kit |
||||
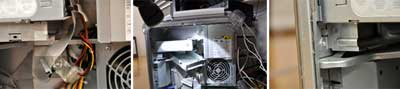
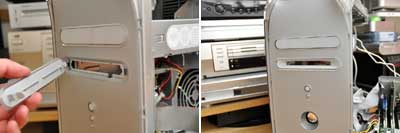
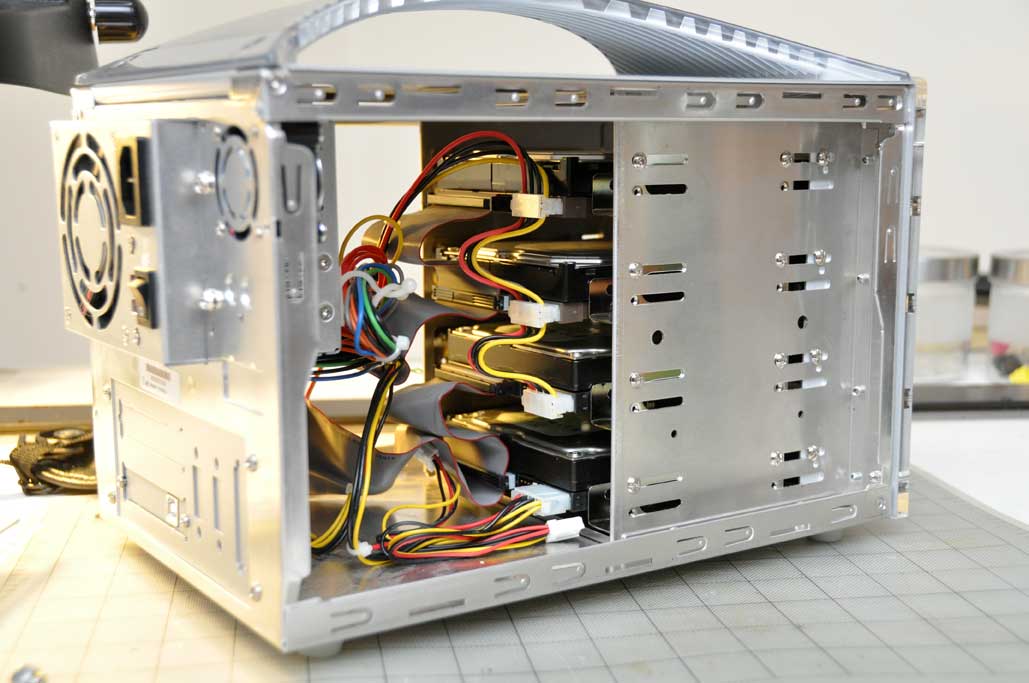
Every once in a awhile, we like to clean up the office. When we do, we inevitably find stuff that has been hidden away for years. This last dust-off was no exception. In one corner of a bookcase, we found a pile of old 100MB Zip disks. All of the labels have been removed. Typically, this meant they were to be reused, but may not necessarily have been wiped.
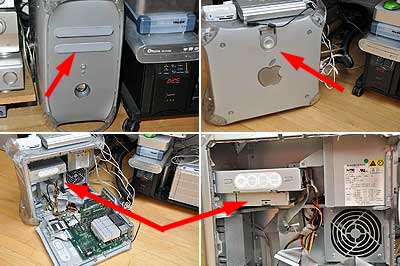
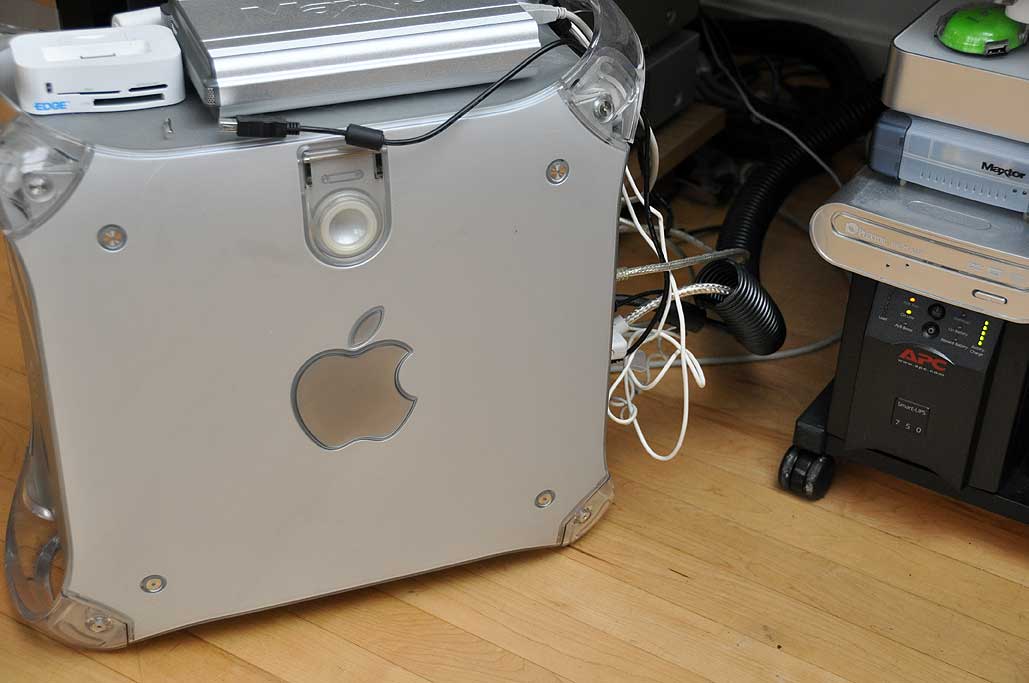
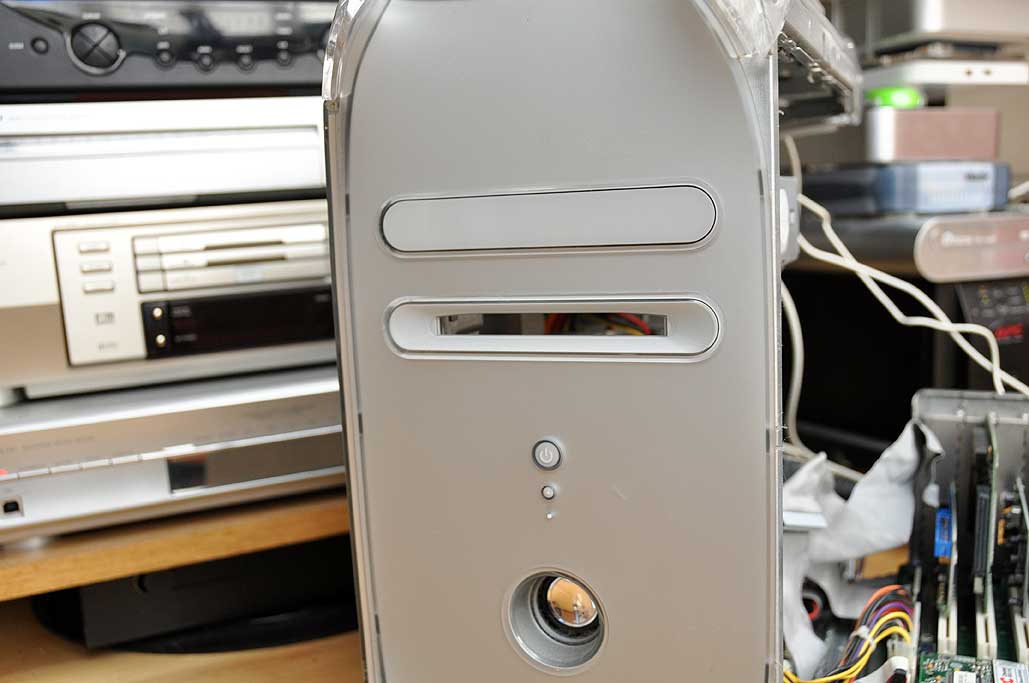
The problem with older media is how to actually read the contents when the drives are no longer standard equipment around the office. Ten years ago, 100MB Zip drives were everywhere. Today, the drives are mostly only available on EBay. We could have just purchased an external one with a USB connection, but thought it would be more fun to get an old ATAPI unit and install it into the empty bay of an old G4, which is still operational as an image server.
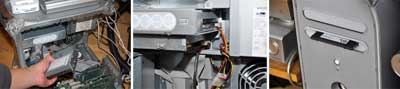
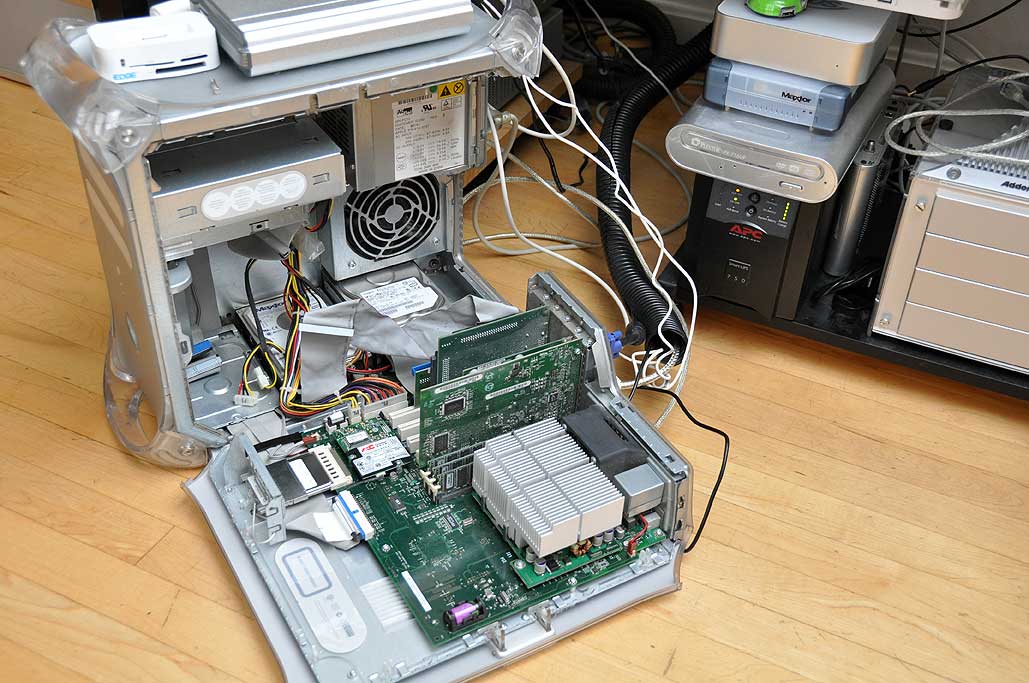
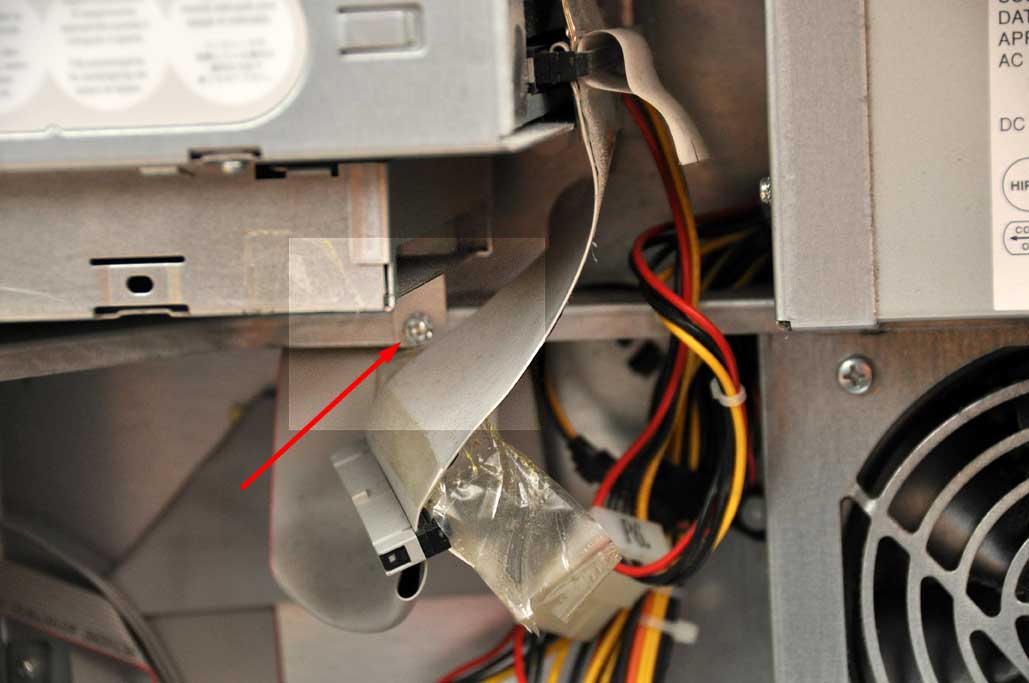
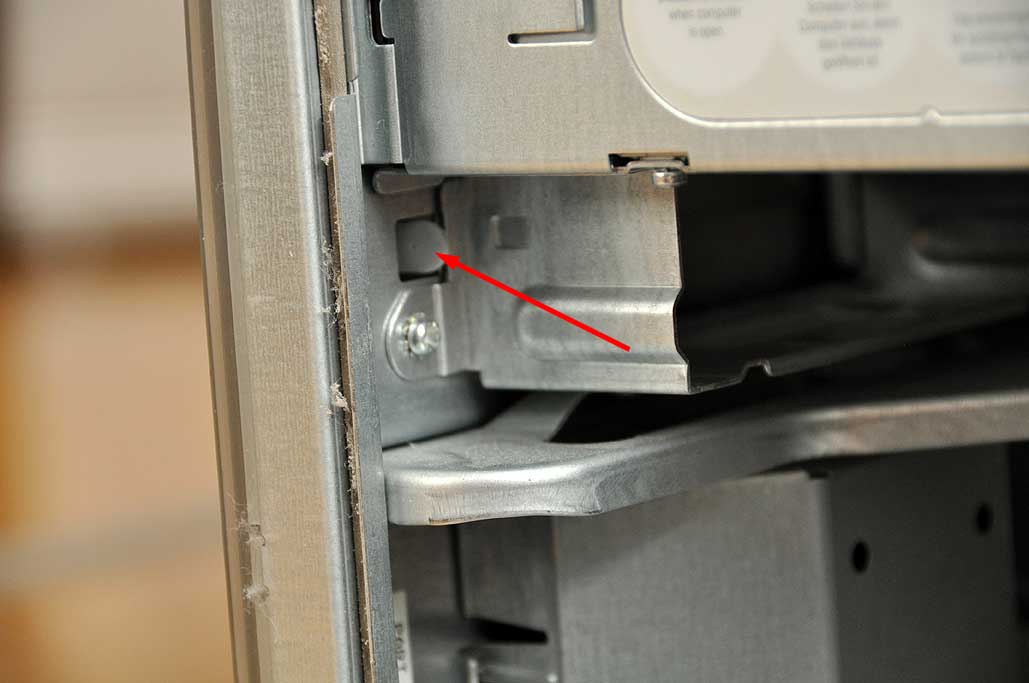
The G4 machine was designed for easy access. No tools were needed to open up the machine, just lift the lever on the side and we were ready to go to work. Installing the drive was just as simple. Only one screw held the drive bay in place. Once loosened, the tray slid right out with no problems.
Unlike the CD-ROM drive's bay cover, the Zip cover does not lift up. The cover to the Zip drive opening was held in place by a tab on the inside. We removed and replaced the cover with a custom-fitted bezel (Ebay, of course) so the disks may be inserted.
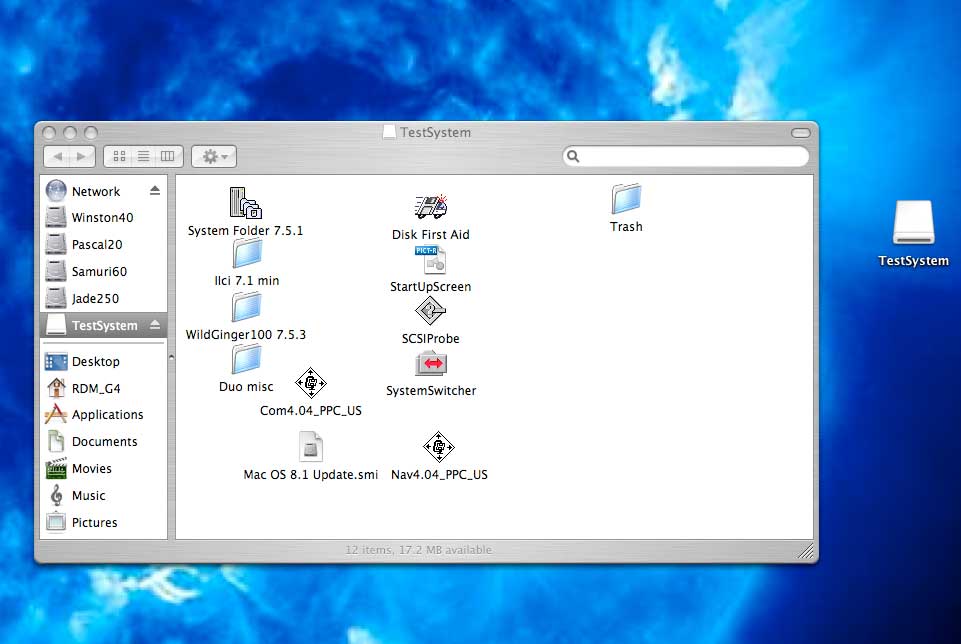
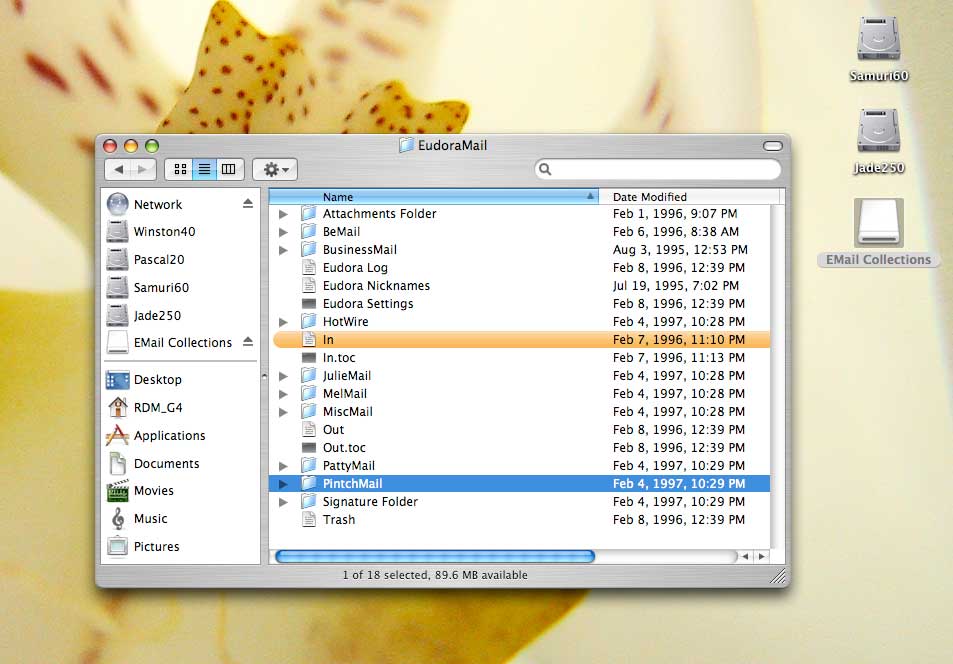
We reinserted the drive, hooked up the cables, and powered everything back up without any problems. The system recognized the disk so we went throught the stack to see if there was anything interesting. Many of the disks were blank, but some did have some pretty interesting stuff still left on them. One had some ancient Mac OS for a IIci machine. Another had a bunch of email archives from 1995! When we have time, we'll see if we can actually reconstitute the archives. There may be some interesting bits tucked away in those emails from 12 years ago!
For readers with old media lying around, it may be a fun project to "downgrade" a machine with some expired hardware and see what is stored on those disks and floppies. The cost of old hardware is pretty much next to nothing. This entire project cost us less than $10. One never knows what one might end up recovering! Wacom. [Permalink] -Iomega Zip 100 Installation |
||||
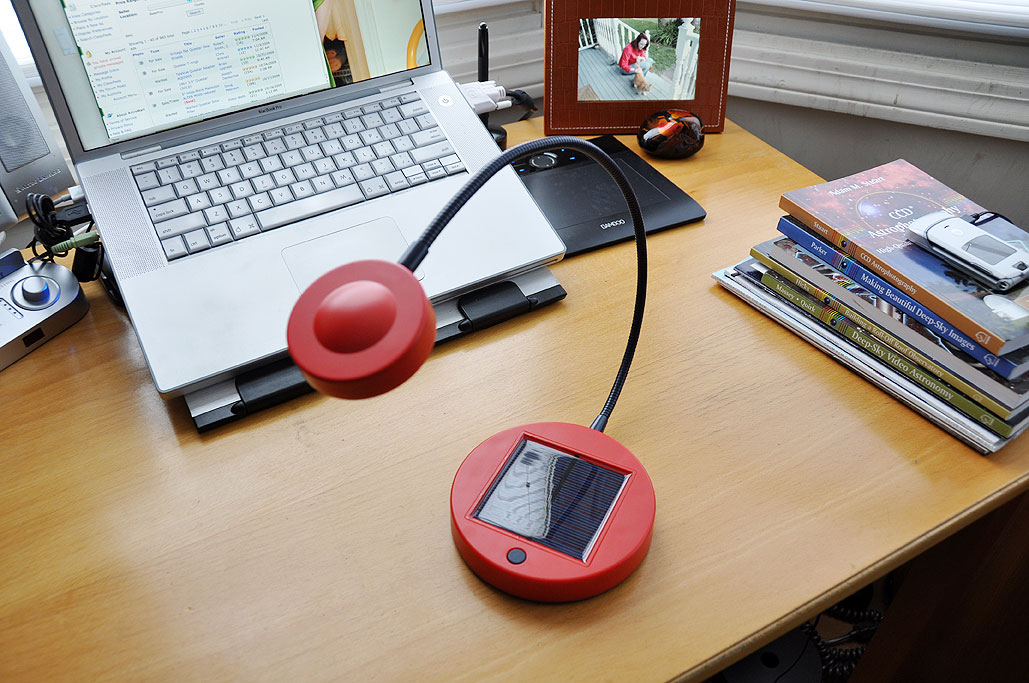
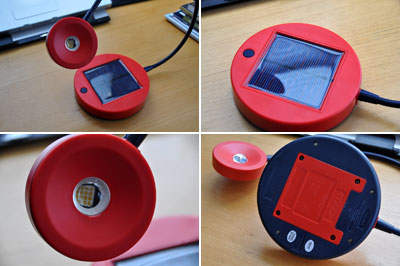
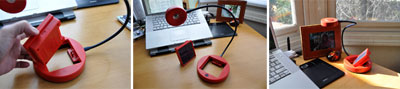
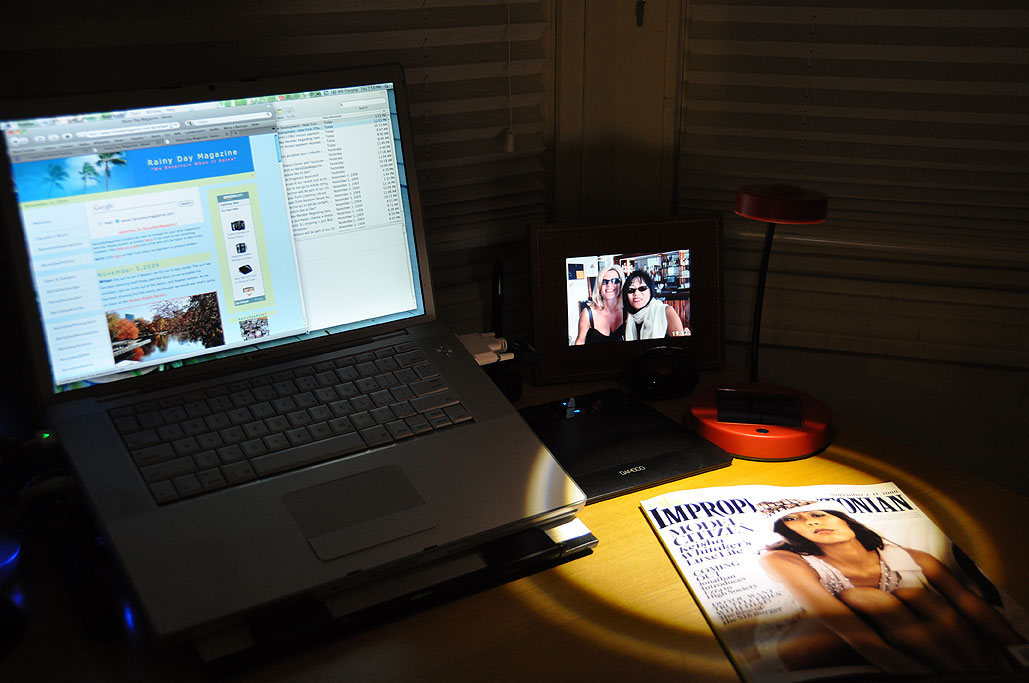
Our "goto" place for all things office and home is IKEA. The store in Stoughton is close enough that we can go there for a $0.99 breakfast, do some shopping, and still get back to the office to put in a full day. OK...a "full" day is a relative term. At any case, we found something so cool at our last IKEA outing that we felt we needed to spread the word. It is the $20 IKEA LED Solar desk lamp.
A desk lamp is an useful item, but as a computer puts out quite a bit of light during use, even at night a lamp is not usually needed. However, there are times when having one is helpful. Like reading hard copy materials. For the times when we do go analog, a small portable desk lamp like the one we found at IKEA is perfect for the job.
The desk lamp is cordless because it is solar powered. The bulb is made of a bunch of super-bright white LEDs. The head is on a flexible arm. The solar panel/rechargeable battery module pops out for convenient placement anywhere (window, desk, deck, etc...) there is sunlight.
The light cone produced by the LED is bright but confined. It was definitely bright enough for reading, but will obviously not light up a room. One of the benefits of LED bulbs is they are very energy efficient. Unlike conventional bulbs, most of the electricity used is converted to light instead of heat, making the LED bulb bright but still cool to the touch. The side-effect is LED bulbs also tend to last a long time, typically for the life of the lamp.
So if you need some spot lighting for the occassional analog reading pf analog material, this IKEA Solar desk lamp will fit the bill nicely. We wish we could have purchased an additional solar panel so we could have one charging at all times, but we didn't see the solar module for sale as a separate item. For now, our suggestion is to leave the solar module by a window to charge and pop it into the lamp only when needed. [Permalink] - IKEA LED Solar Lamp |
||||
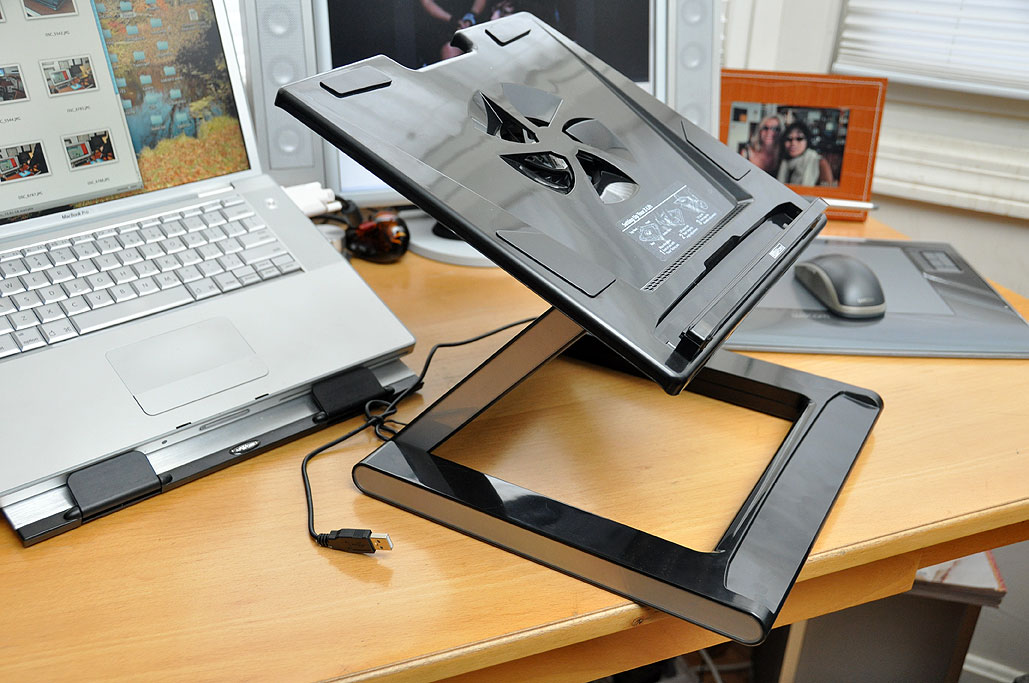
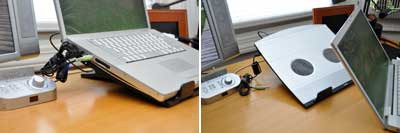
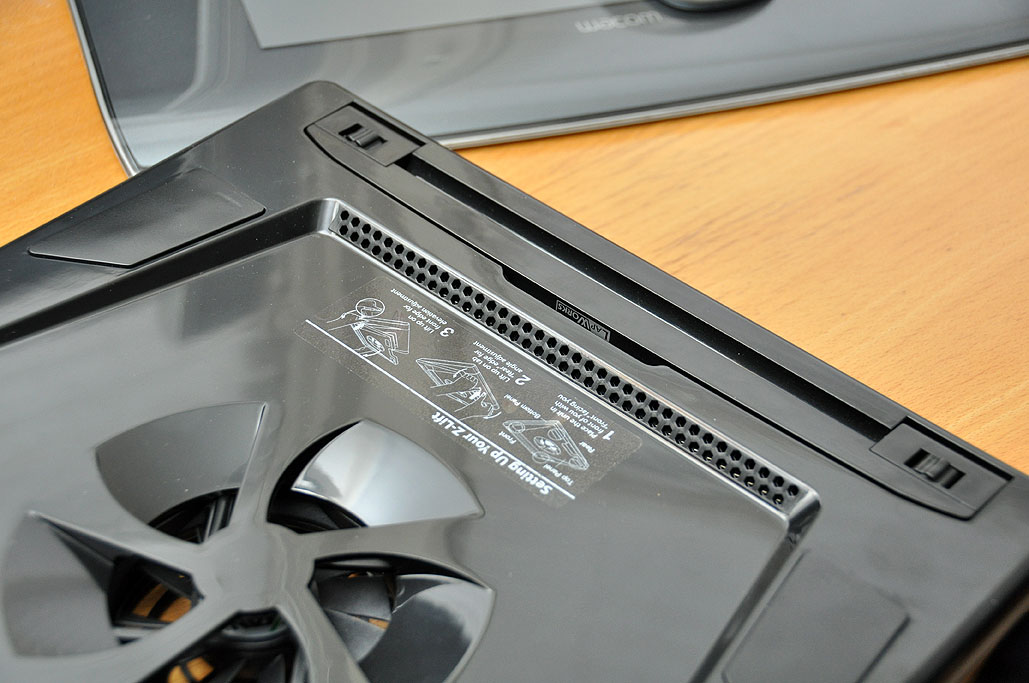
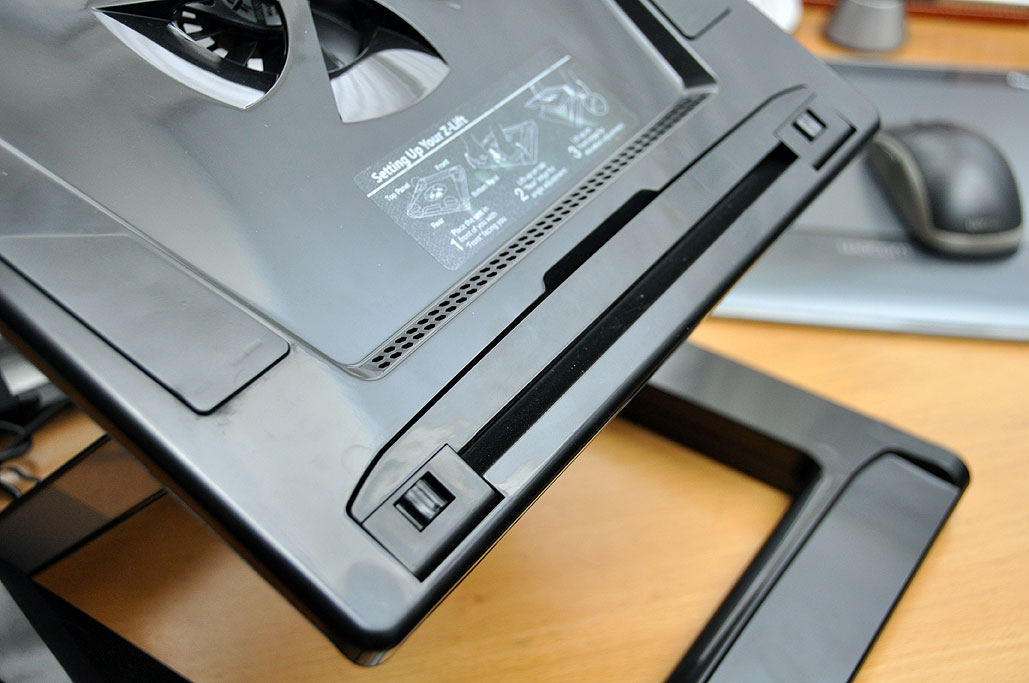
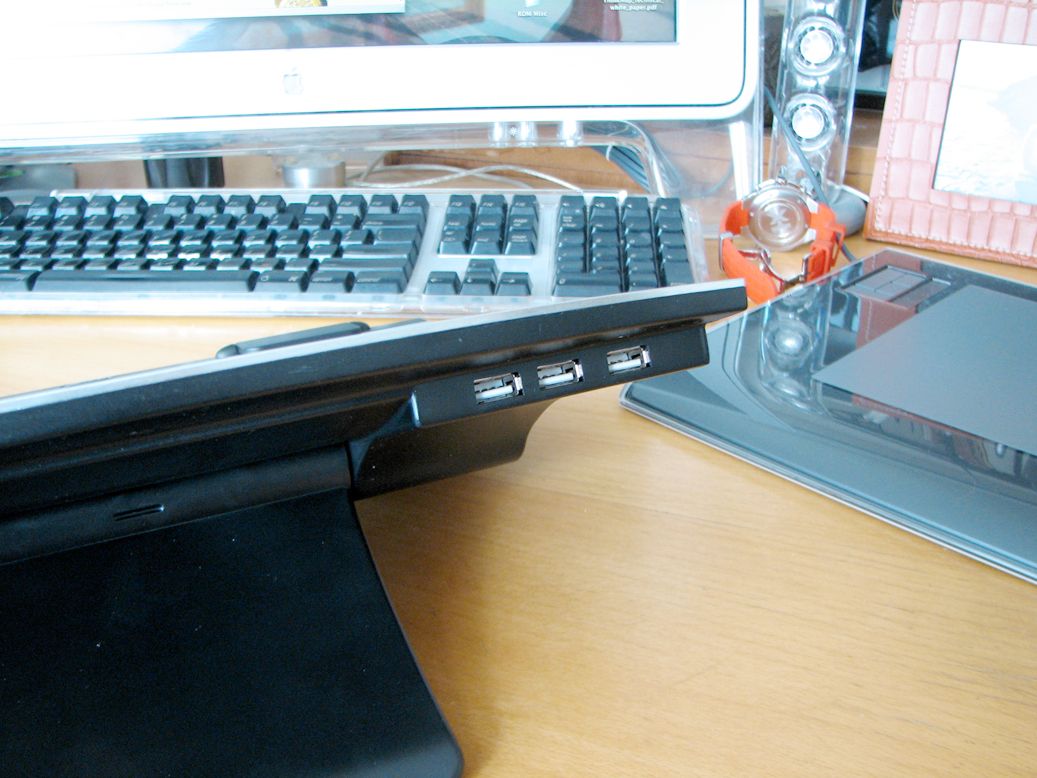
We run an active office. Sometimes getting out of our own way is just as tricky as getting out of somebody else's way. As any visitor will tell you, there are certainly more laptops here than there are desks. Thus, we are always looking for ways to help maximize our space and to work more efficiently. So when we saw the LapWorks Z-Lift, we knew we wanted to give it a test run. After a month of use, we are ready to share some of our thoughts about the Z-Lift.
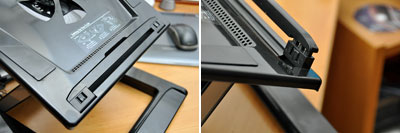
The LapWorks Z-Lift is a heavy-duty notebook stand which can raise a laptop to a comfortable height for a standing user. It has a built-in cooling fan, USB ports, and an easy-to-adjust support mechanism. Note the vents and slight gap designed into the platform. This creates a space for air movement and efficient cooling of the bottom of the notebook.
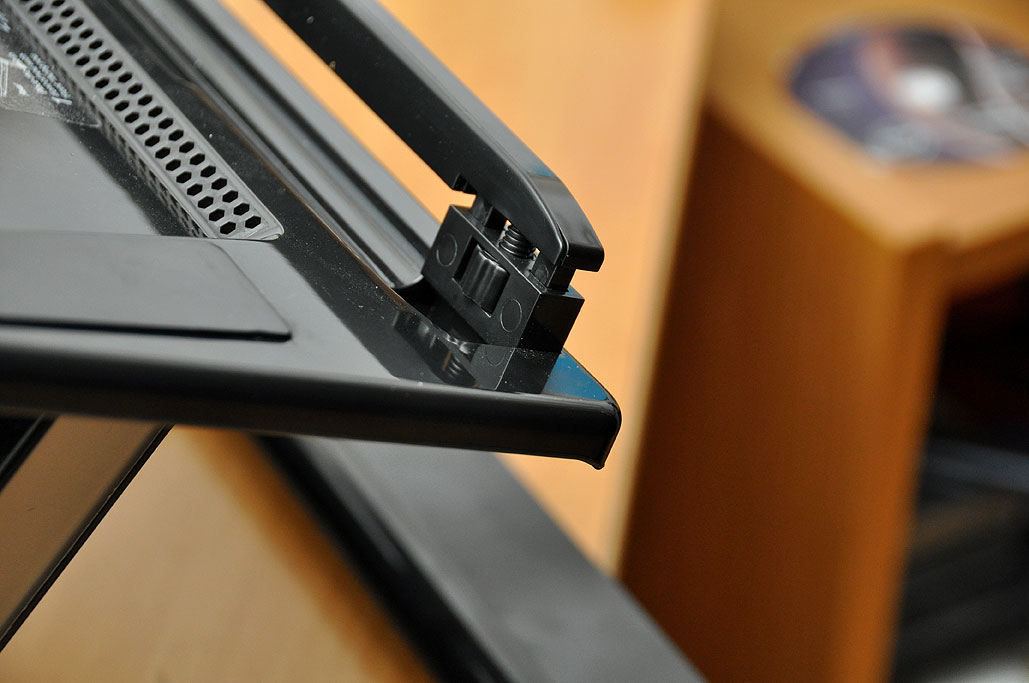
Height and tilt adjustments were a breeze, as the support mechanism does not require the user to tighten knobs or screws. A set of clever tension-locking clamps at the joints keep the angles where they are set...even during "aggressive" use. This is a huge convenience as different users can quickly adjust the stand without tools or fuss.
Generously sized rubber pads and an adjustable lip can keep the heaviest laptops (up to 17lbs) from slipping. The Z-Lift folds flat at a height of a bit more than an inch, but can expand 9.5" vertically to accommodate standing users.
As we had mentioned, we have been using the LapWorks Z-Lift at the RainyDayMagazine office for about a month. The staff here are hard on the gear. We don't take kindly to things which can't handle the abuse. During that time, the Z-Lift has proved itself worthy to run with the crew.
Taller users will find this stand useful for raising a laptop to the proper viewing height during seated use. Others may find it perfect as a stand for a "walk-up" laptop shared amongst a group of users. Whatever your specific needs, if you need an easily adjustible, rugged, desk stand for a laptop, you will not find a better one than this Z-Lift. [Permalink] - LapWorks Z-Lift |
||||
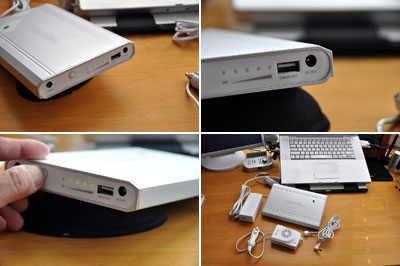
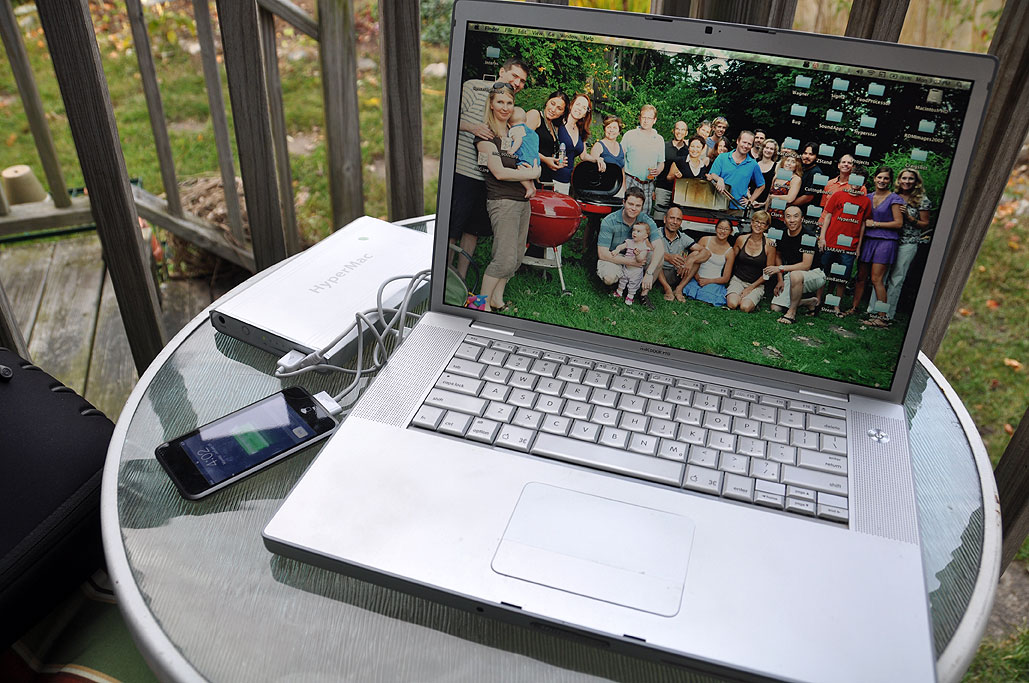
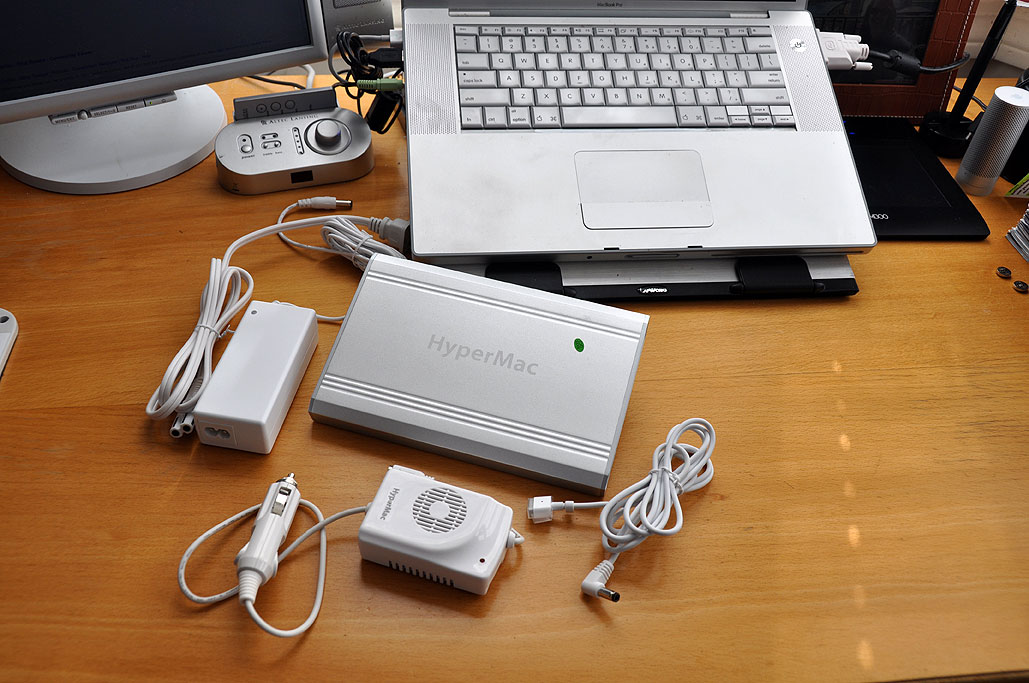
Laptops are great because they let us work where we want. However, they do have one weakness...short battery life. Battery technology has advanced quite a bit over the years, but most laptop batteries have a realistic working duration of only a few hours. Sure we can bring along the AC adapter when we go to a cafe, but there are plenty of times when power outlets are not readily available. Many companies have made a business supplying products to help and we have looked at quite a few of them over the years (XPower, Tekkeon, Brunton), but none of them were designed specifically for Mac laptops...until the HyperMac.
As most Mac owners know, MacBook connectors are "different" and the power requirements of Mac laptops are unique. MacBook Pros actually operate under 2 different voltages. With normal operations the voltage is 16.5V, but when the workload becomes intensive the system switches to 18.5V. Some of the newer MacBooks don't even have removable batteries. What all this means is that the average external battery pack won't cut it for the Mac. So what is different about the HyperMac?
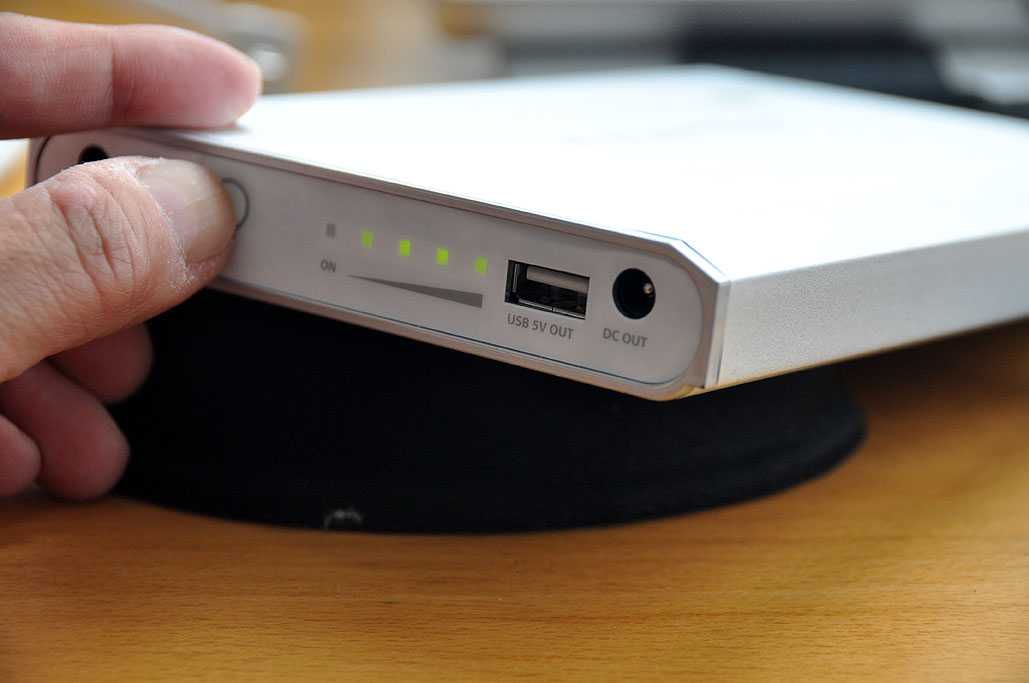
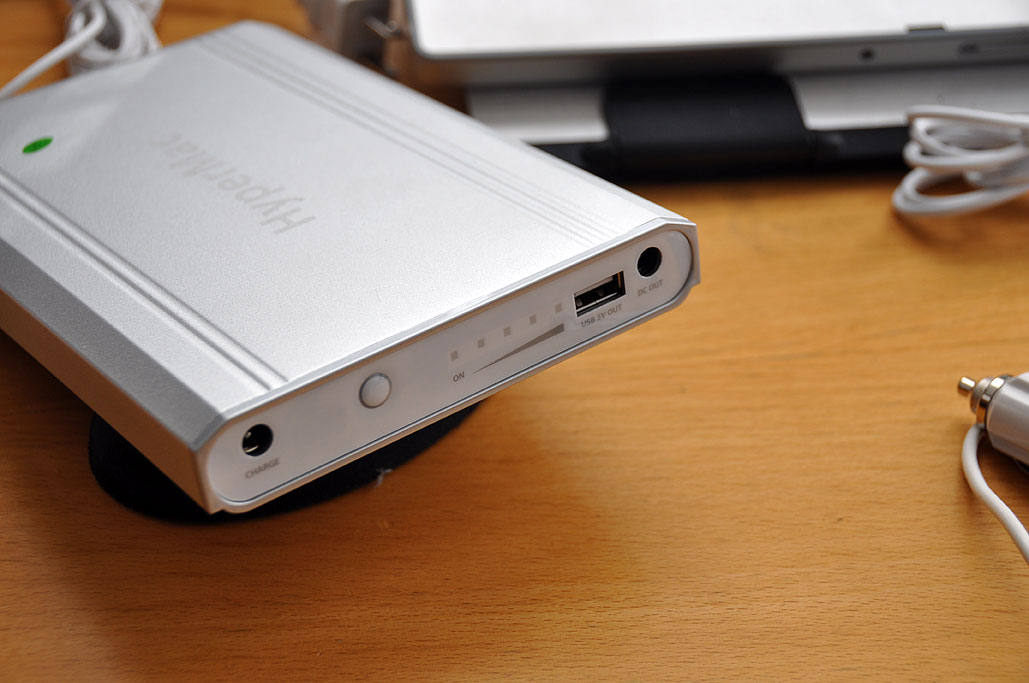
HyperMac's External Battery uses military-grade lithium ion cells and are rechargeable up to 1000 times. LED indicators let us keep an eye on the charge level. The HyperMac not only provides power for the MacBook, it is powerful enough to recharge the internal battery as well. In fact, the internal battery actually thinks it is connected to an AC power source when it is connected to the HyperMac power pack. To complement the distinctive looks of the MacBook, HyperMac batteries are housed in an aluminum enclosure, the logo is laser engraved, and the accessories are wrapped in Apple's iconic white.
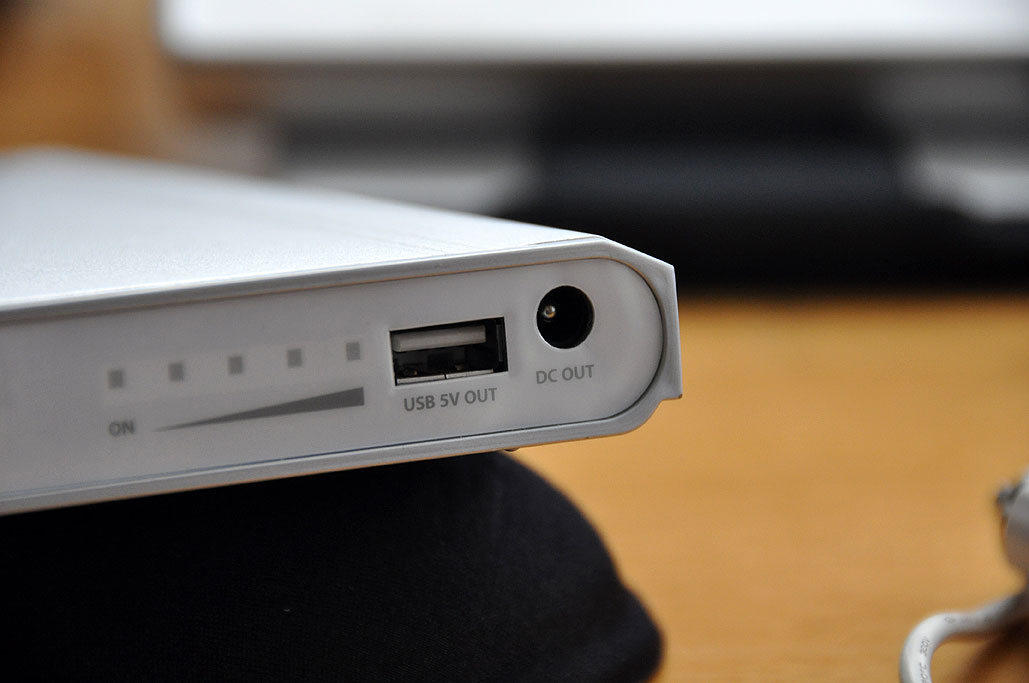
HyperMac External Battery for MacBook comes in four different sizes (60/100/150/222Wh). The one we have is the MBP-100. At 1.6 lbs, the HyperMac is a bit bigger than the internal battery, but it can power the MacBook Pro continuously for over 13 hours! We know because we have been taking the HyperMac with us on our outings to the coffee shops, the cafes, and even just to the back deck.
The HyperMac External Battery came with a USB 5V/1A Power Port so we can power a USB device simultaneously with the MacBook. Very handy for keeping an iPod topped-off. The kit also included an adapter which will work both in the car and on the plane...just in case we are on a cross-country road trip or on a non-stop flight to India.
We have to admit that it is an odd feeling to not have to worry about running out of juice when we are out and about with the laptop. We have never had this freedom before! If you want to roam without the AC leash, you need to head on over to the HyperShop. They are the only ones with the batteries that can REALLY let your MacBook keep on going, and going, and going. [Permalink] - HyperMac battery |
||||
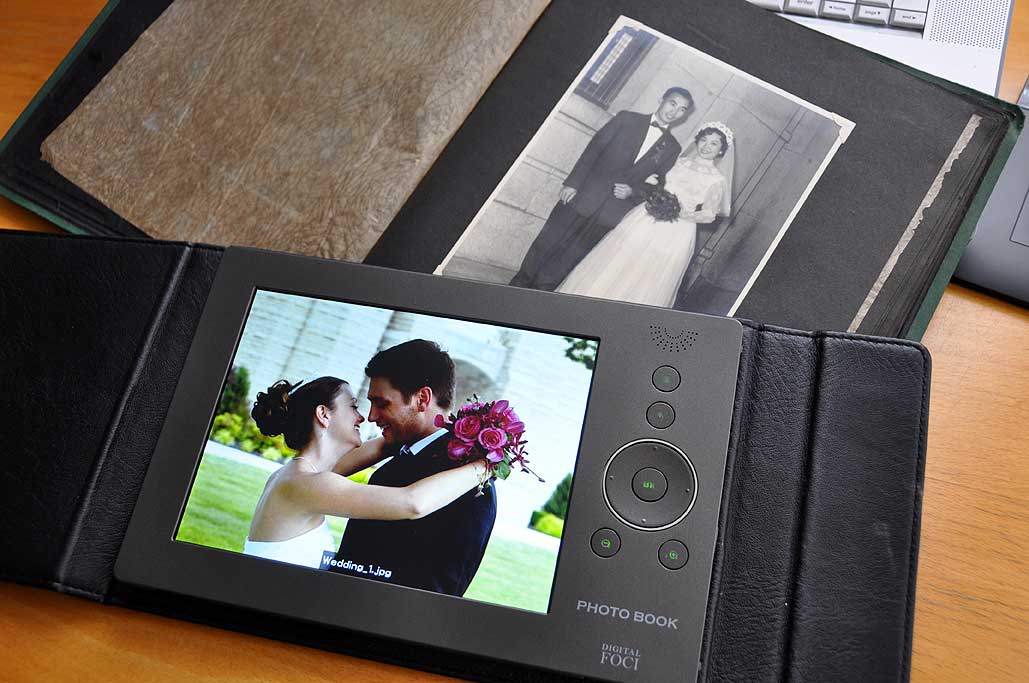
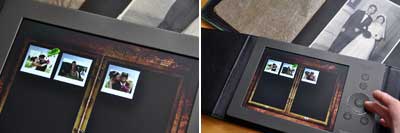
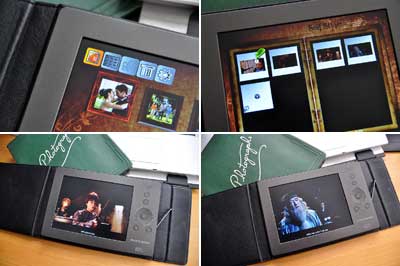
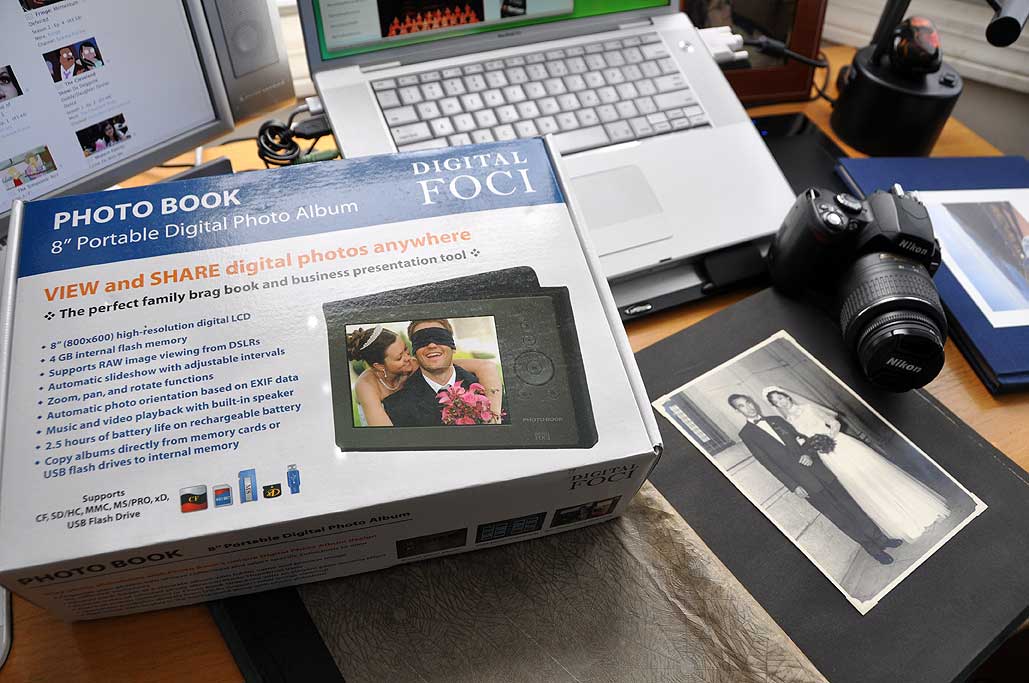
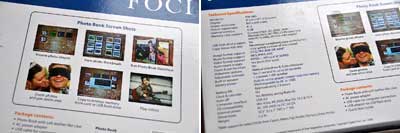
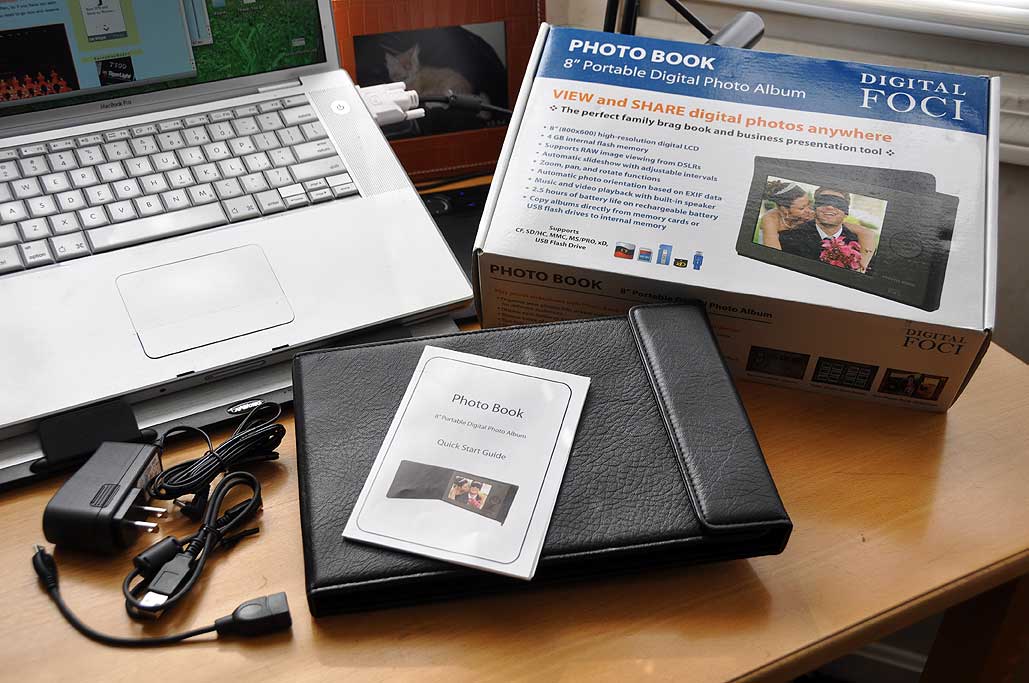
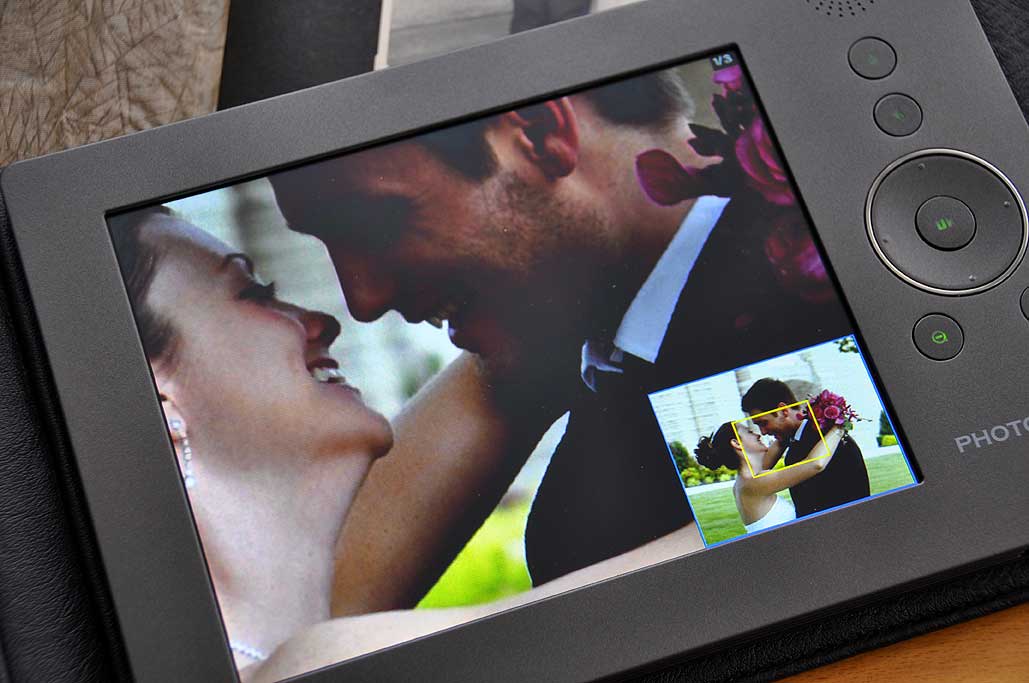
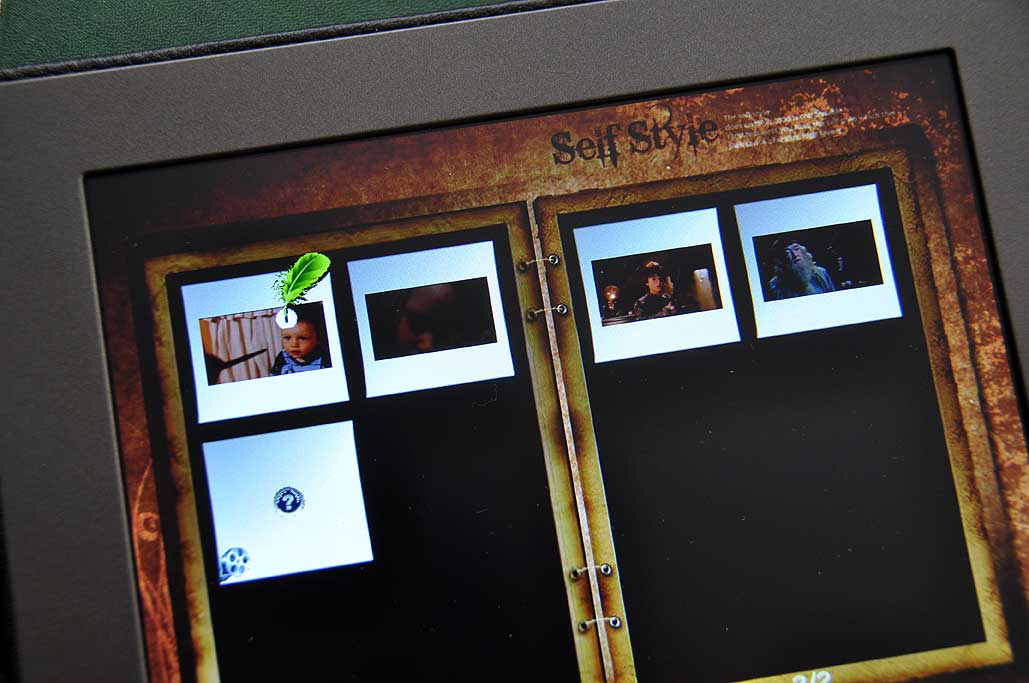
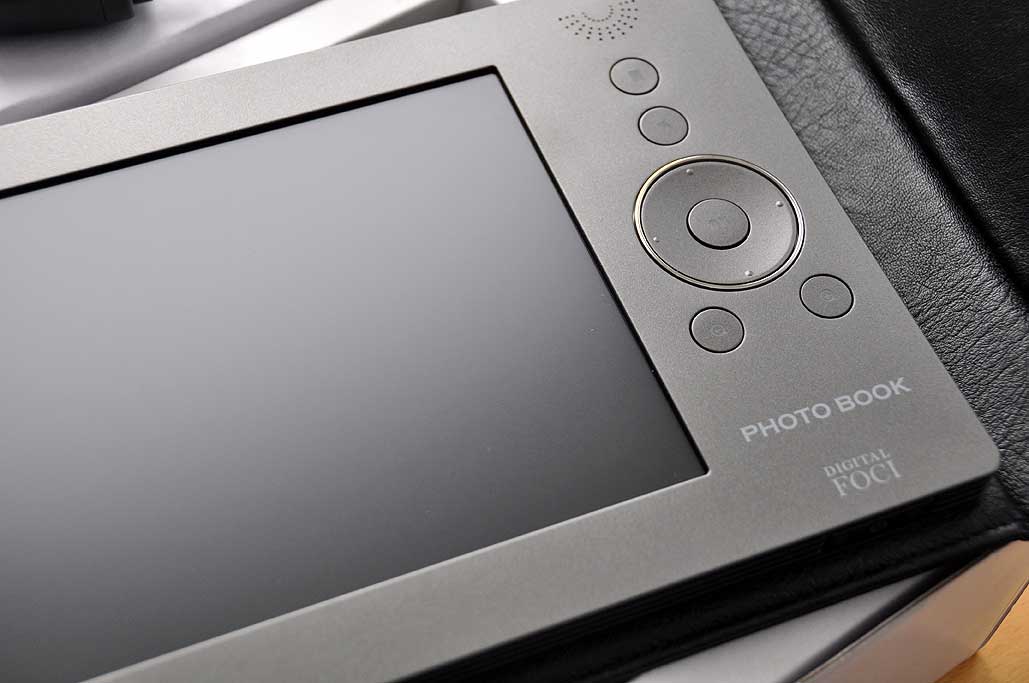
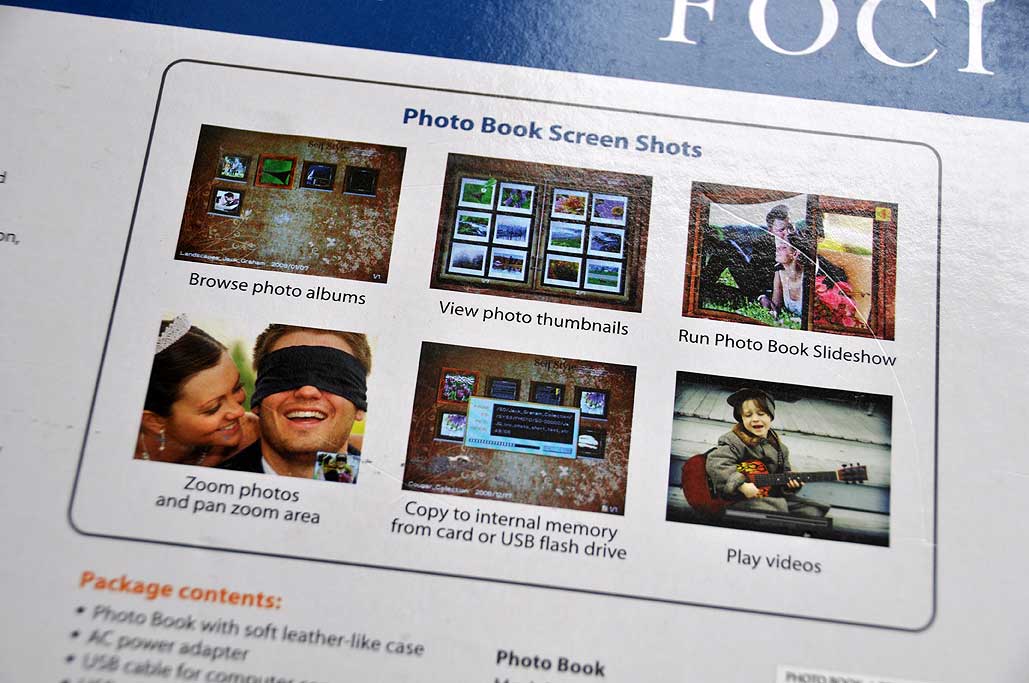
Digital FOCI's PhotoBook is a modern version of the venerable photo album. However, because it is digital, it can do so much more! Like a non-digital version, the PhotoBook can display photos. Unlike its non-digital counterpart, it can play music during the slideshow and play video.
The digital PhotoBook can also zoom into any portion of an image. This is an especially handy feature as most cameras can take photos at a much higher resolution than most displays can show. The ability to "dynamically crop" a photo is definitely cool. Of course, it would be nice if there was some way to "remember" the crop, but unfortunately not in this version :-) The great thing about the digital PhotoBook is the software is upgradeable.
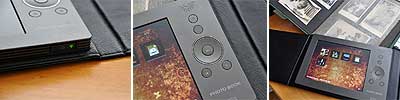
Digital FOCI's UI was very easy to navigate. The response is fast and intuitive. It only took about a minute to put together a slideshow. All of the buttons were backlit for visibility. Personal music may be added to the unit for playback during the slideshow.
The obvious next evoluton is a touch screen so selection and page turning will be more natural. Colored e-paper would also allow multiple pages in a single album. However, we are getting ahead of ourselves. When those technologies are available, we are sure Digital FOCI will put it together into a nice, affordable, package. In the meantime, this digital photo album has all of the fundamental features to let us share our images in ways never before possible.
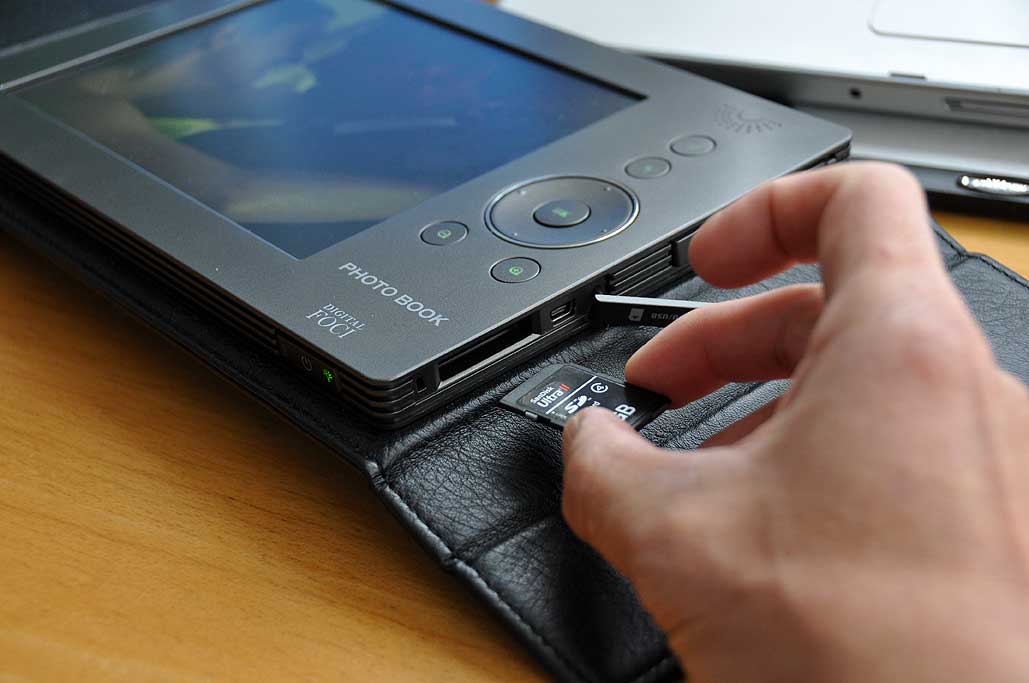
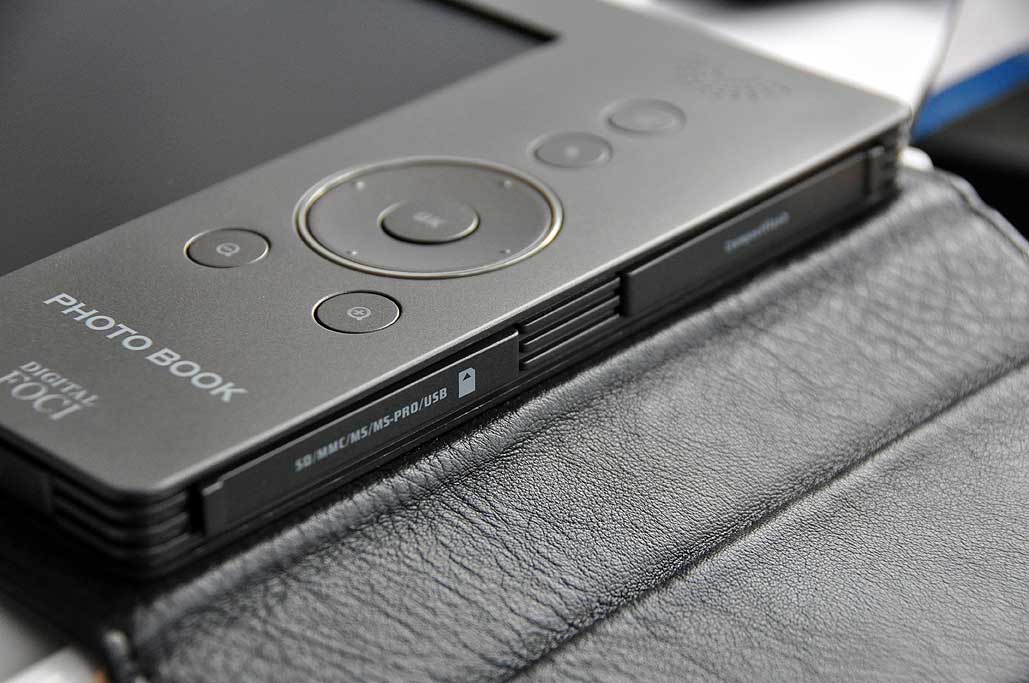
Viewing images right off a camera's memory card in the PhotoBook was very simple. All the popular flash memory formats are supported (CF, SD, etc...). It was pretty much plug-n-play: click on the memory card icon, select the image, hit OK, and view.
SD memory cards are inexpensive. A 1GB card cost just a few dollars. Digital FOCI's PhotoBook makes it so easy to view digital photos that it may make more sense to leave the images on the SD memory cards permanently. Folks may just buy new cards like they used to do with film. In fact, Digital FOCI should add SD card pockets on the inside of the PhotoBook cover. Companies like Lexar and Sandisk should give away PhotoBooks with a bulk purchase of SD cards! If Kodak was on the ball, they would have bought flash memory makers a year ago when their stocks were 1/10 of their current value and get into the "digital film" business :-)
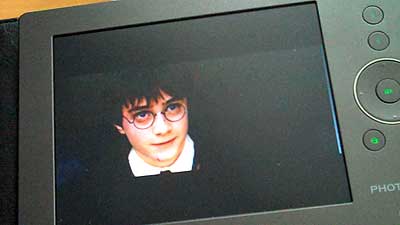
Some readers may remember the scene at the end of Harry Potter and the Sorcerer's Stone where Hagrid gives Harry a photo album. The album was full of images from when Harry was a little boy. The magical thing about the photo album was that all the images in the photos were moving. When we first saw that photo album, we thought...that possibility is not too far off. It seems we were correct. Click on the image below to see what we mean. The resolution of our little movie is kind of low because we down-sampled the video file to shorten the download time. The quality of the video on the actual PhotoBook is MUCH higher.
The Digital FOCI PhotoBook is one of the best uses of LCD display in a consumer product we have seen this year. If you are looking to create truly unique gift for someone special this holiday season, think about making a multimedia photo album using this Digital FOCI PhotoBook. We think it will be a huge hit! [Permalink] - Digital FOCI: PhotoBook FirstUse |
||||
Digital photo frames are popular gifts for the holiday season. The quality of these frames have improved tremedously from a few years ago. We reviewed an excellent digital frame from Parrot in 2007. The Parrot frame was high resolution and used Bluetooth for data transfer. Those features eliminated two of the problems with digital frames: resolution and ease of image updates.
Recently, we learned that Digital FOCI has released a product which addressed the last objection some have with digital photo displays... the power cord. When we took a closer look, we realized that Digital FOCI has not only cut the power cord, but has removed the computer from the process. All one needs is to insert the memory card with the images into the PhotoBook and follow the in-device instructions. Excellent!
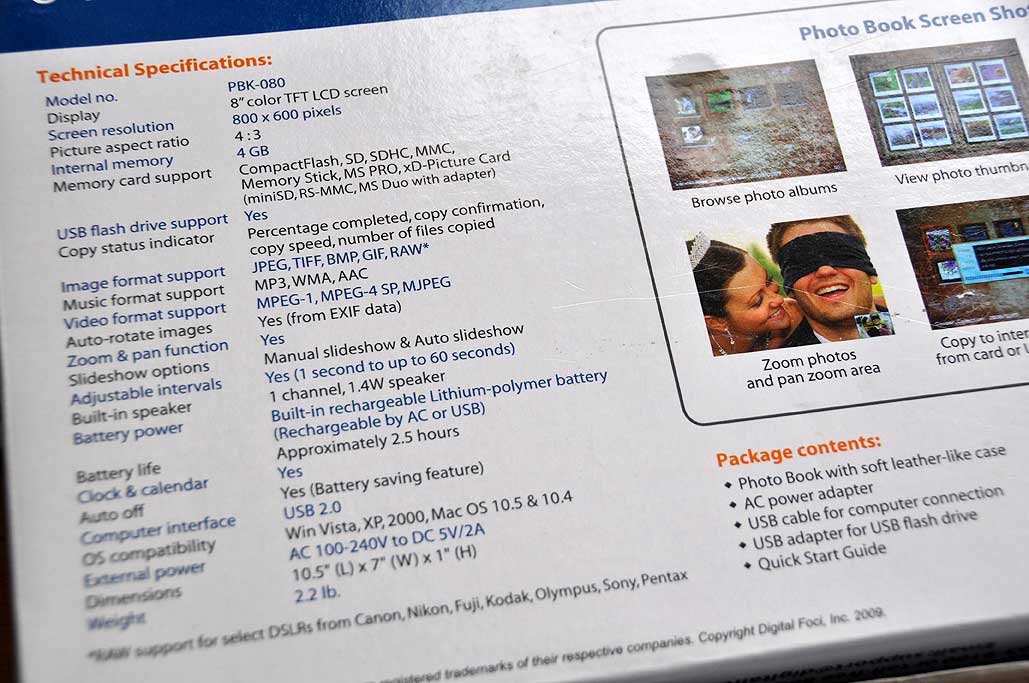
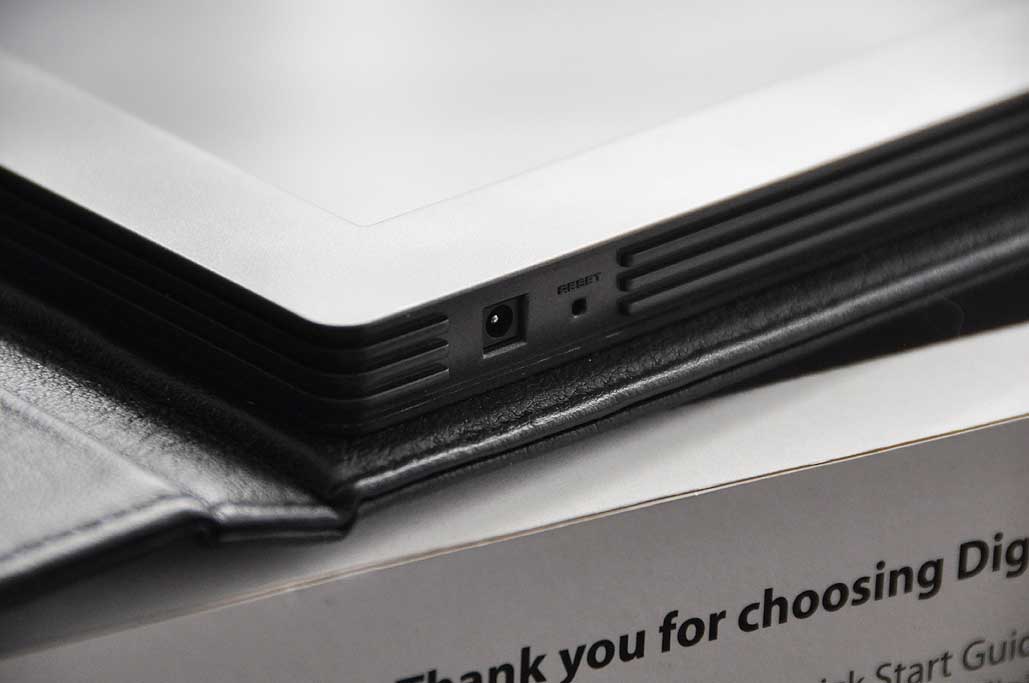
The PhotoBook is, of course, both Mac and PC compatible. Its specs are quite impressive: 8" color TFT LCD screen, 800x600, 4GB of internal flash, and a 2.5 hr internal battery. The Photobook can handle most of the popular memory cards (CF, SD, SDHC, MemoryStick, xD-PictureCard) in use. All of the popular image (JPEG, TIFF, BMP, GIF, RAW), audio (MP3, WMA, AAC) , and video (MPEG-1, MPEG-4) formats are supported. A USB 2.0 port is available for image downloads from a computer.
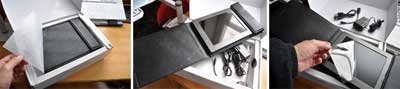
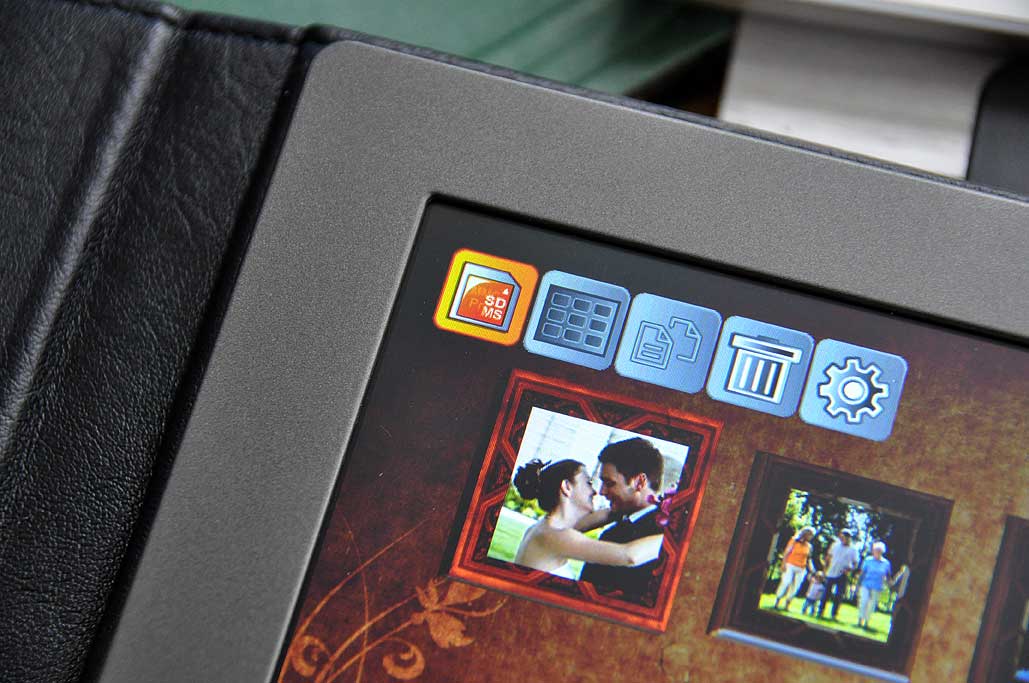
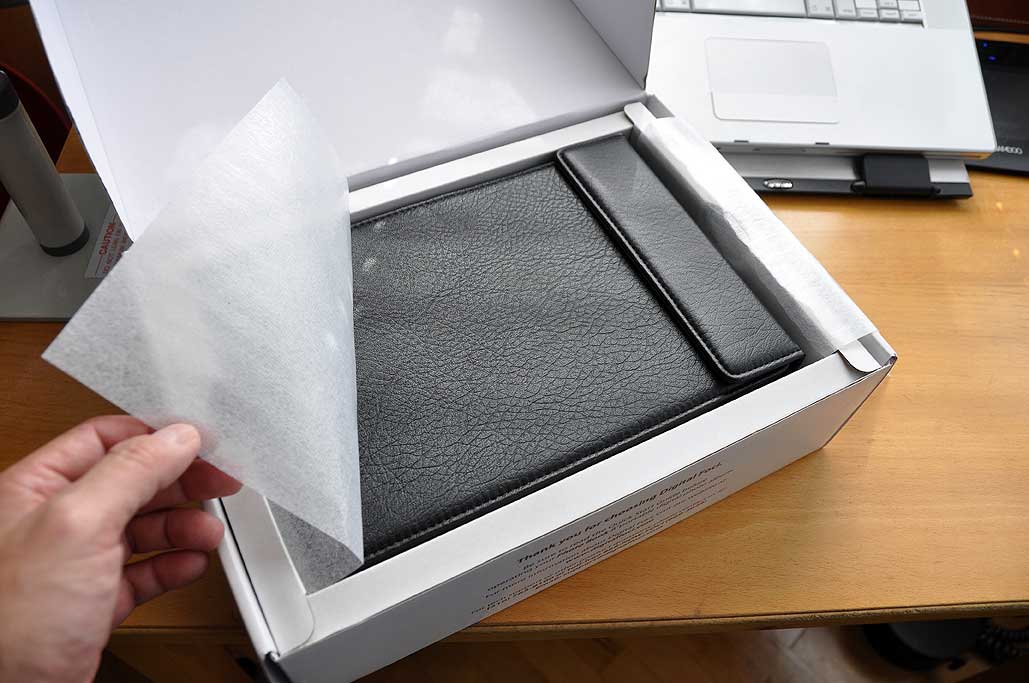
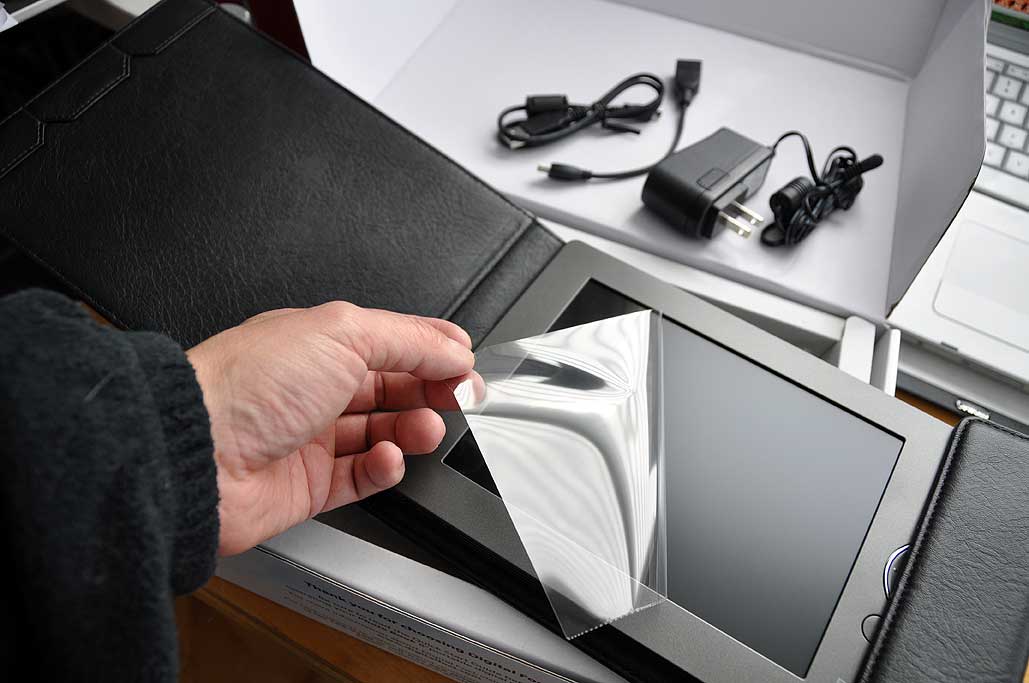
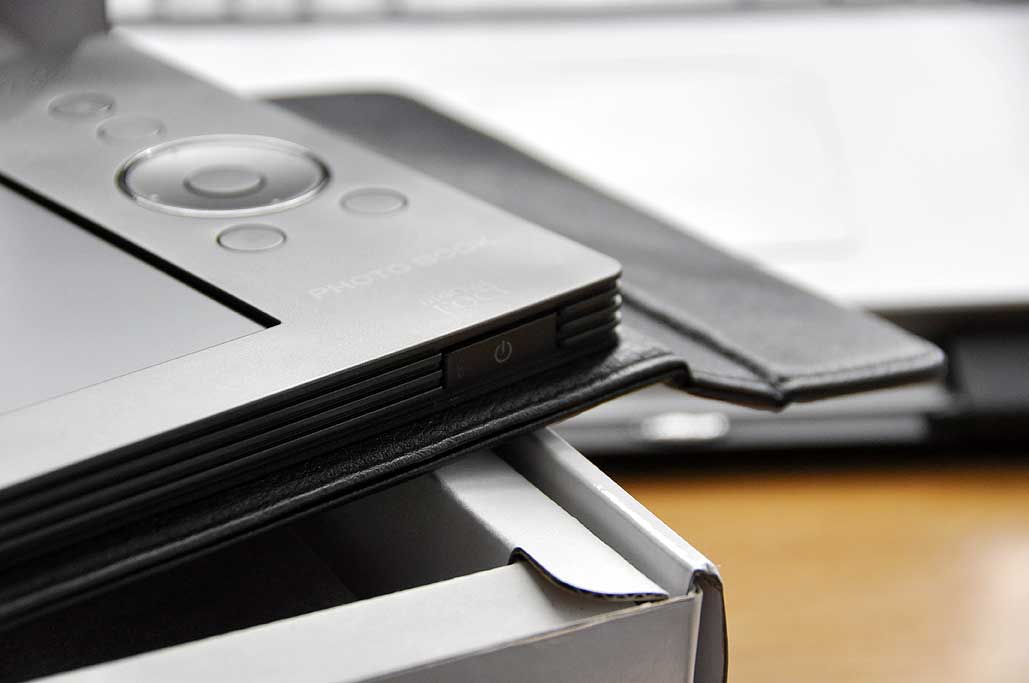
The PhotoBook, like other high-end photo album, is covered by a soft leather-like case. However, underneath is a matte LCD display, simple-to-use navigation buttons, and a lot of technology.
Slots for memory cards, power buttons, and various connectors are on the side. All of the software to run slideshows are built right into the device. The PhotoBook is ready to go out-of-the-box (after charging up the internal batteries).
We will have a full FirstUse run-down on the features of this Digital FOCI PhotoBook next week. It does not take a genius to see that these devices will be commonplace in a few years. However, if you want one this Holiday season, Digital FOCI PhotoBook is the one with all of the "grandparents-friendly" features. [Permalink] - Digital FOCI PhotoBook |
||||
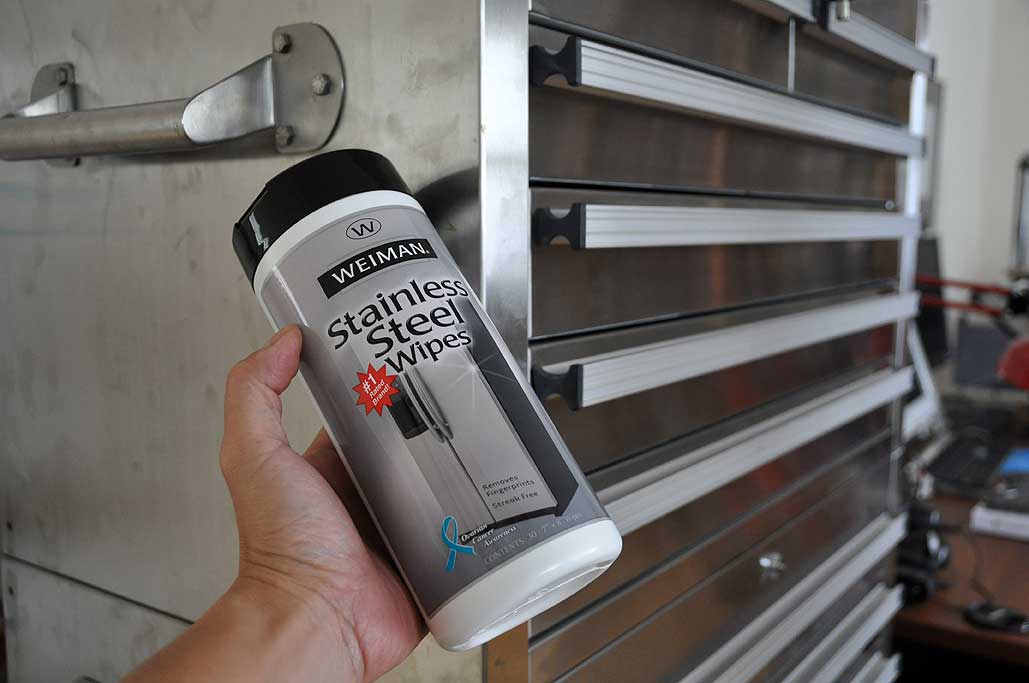
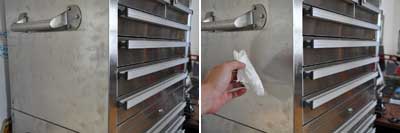
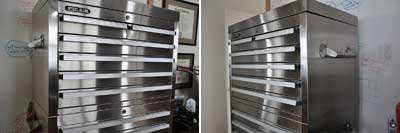
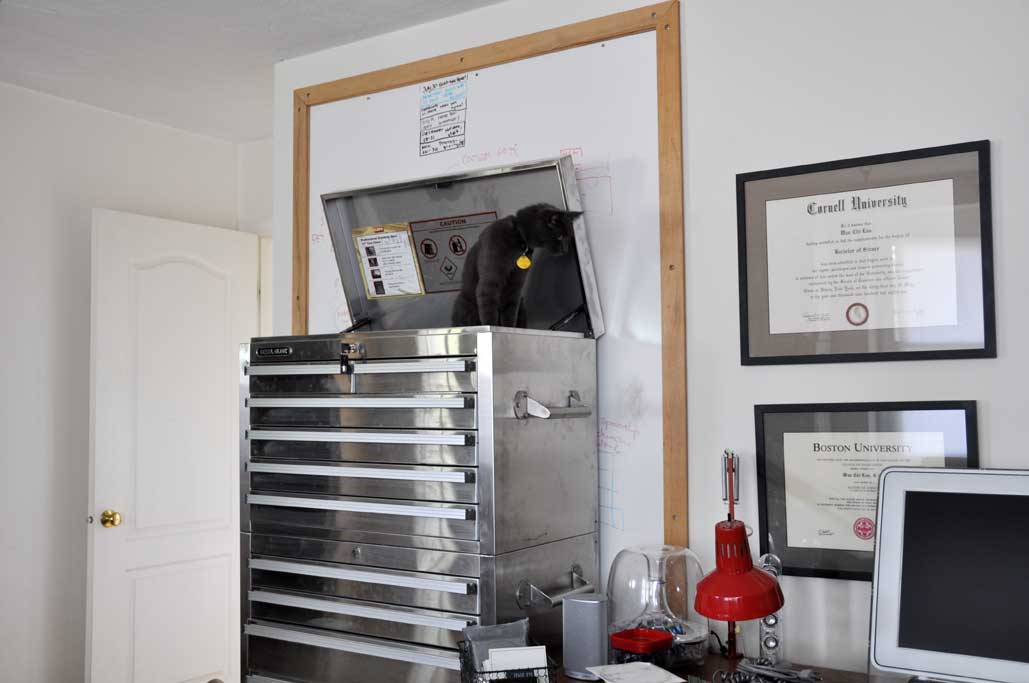
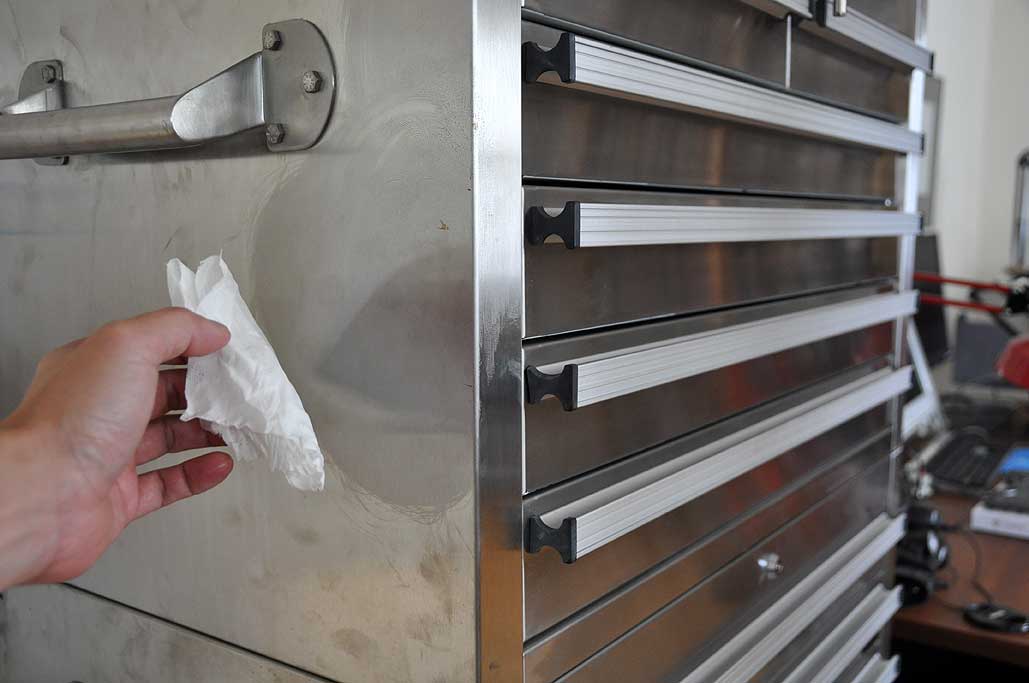
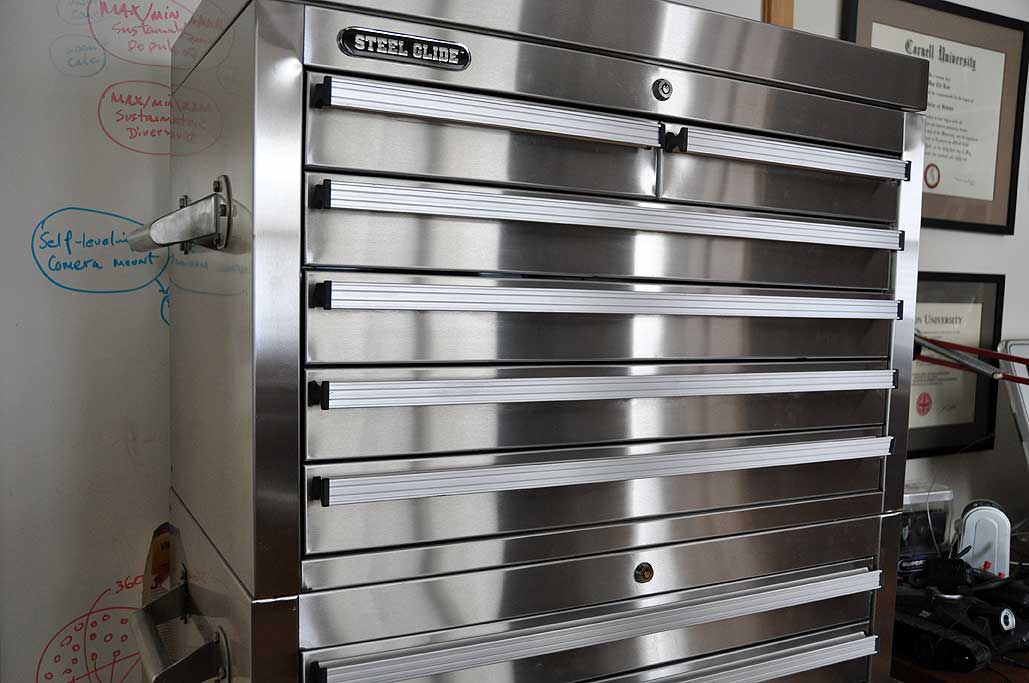
Once in a while, we come across a product that far exceeds our expectations. When we do, we like to show it off :-) The Weiman Stainless Steel Wipes is such a product. It is relatively inexpensive, and it works amazingly well.
While stainless steel surfaces are "stain" resistant, they are actually fingerprint magnets. The oils from the fingers are quite difficult to wipe off and a clean surface will become covered with them quite quickly. No one here can be accused of being a "neat-freak," but we do clean up every once in a while. When we do go on a cleaning bender, we like to get it done with as little work as possible.
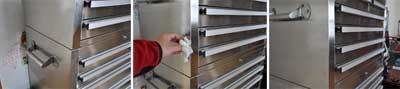
The Weiman wipes definitely made the task of cleaning our stainless steel surfaces a simple wipe-on/wipe-off process...REALLY! The towelettes are pre-moistened with the special cleaning solution. All we had to do was wipe it on in a circular rubbing motion, let it dry, and wipe it off.
The gleam and shine was impressive. The fingerprints completely disappeared. The surface was left clean and smooth. The wipes left a thin layer of protection which is not oily and does not attract dust.
After seeing the results of the Weiman wipes on the tool chest, we went wild and cleaned every stainless steel surface we could find. The results were all equally spectacular: clean, shiny, and gleaming.
Readers know that we like "homebrew" cleaning solutions, but nothing we have tried was as easy or as effective as these Weiman Stainless Steel wipes. If you want to get your stainless steel surfaces shiny and like-new again, give the Weiman wipes a try. We think you will be very impressed. [Permalink] - Weiman Stainless Cleaner FirstUse |
||||
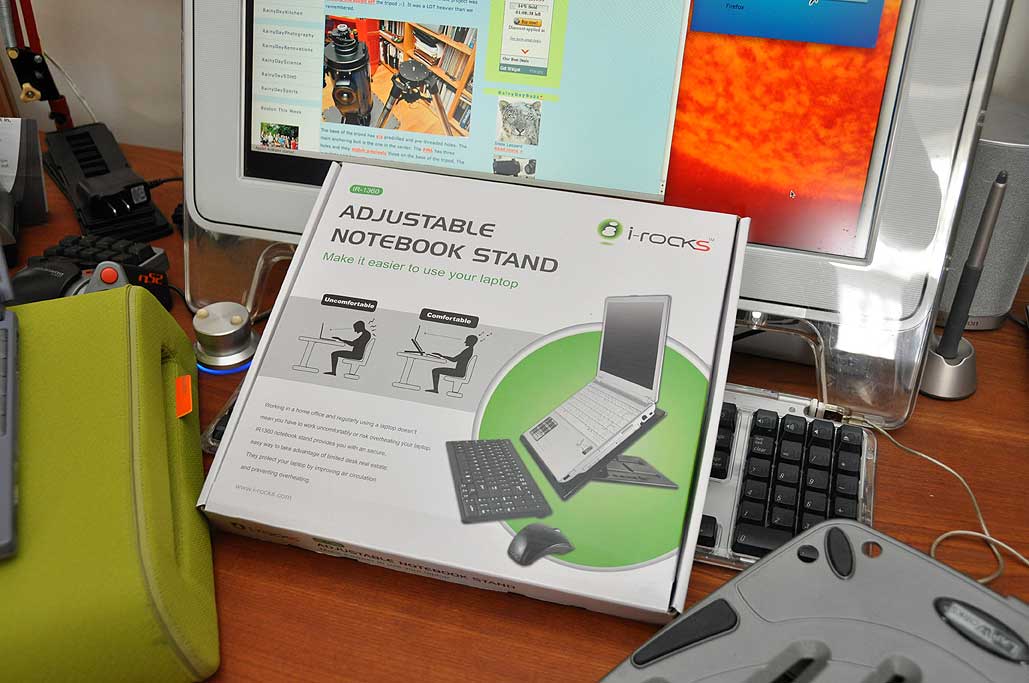
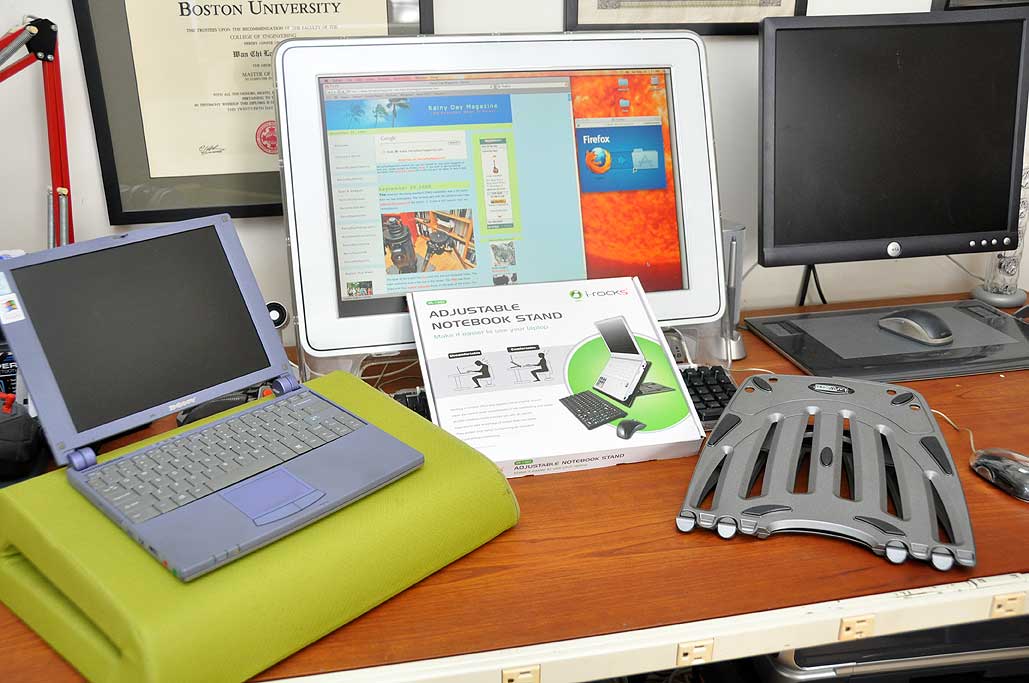
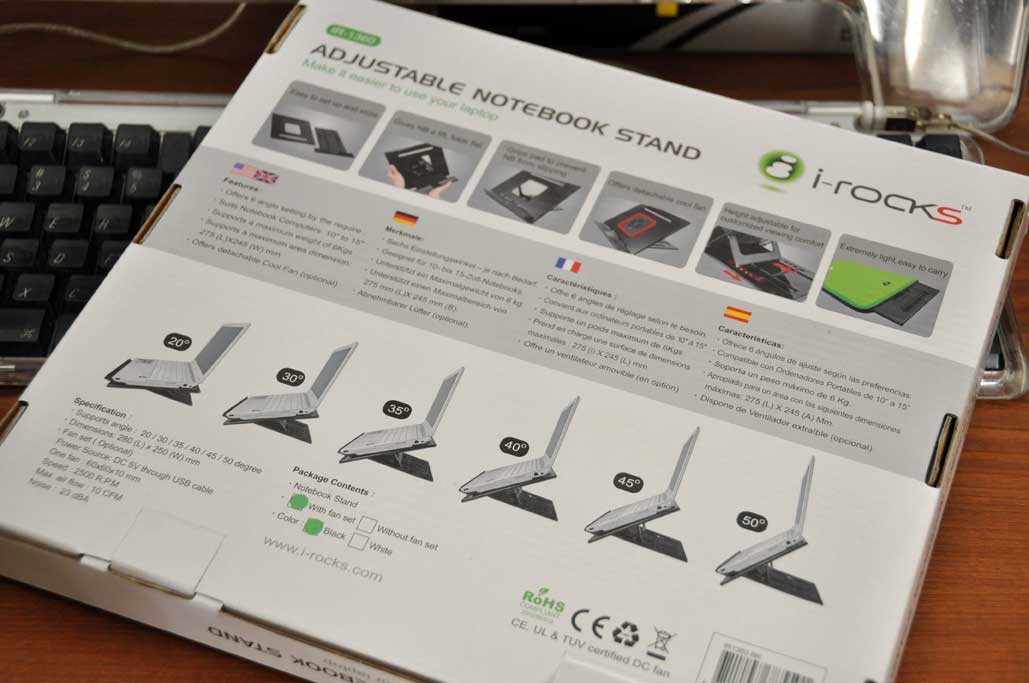
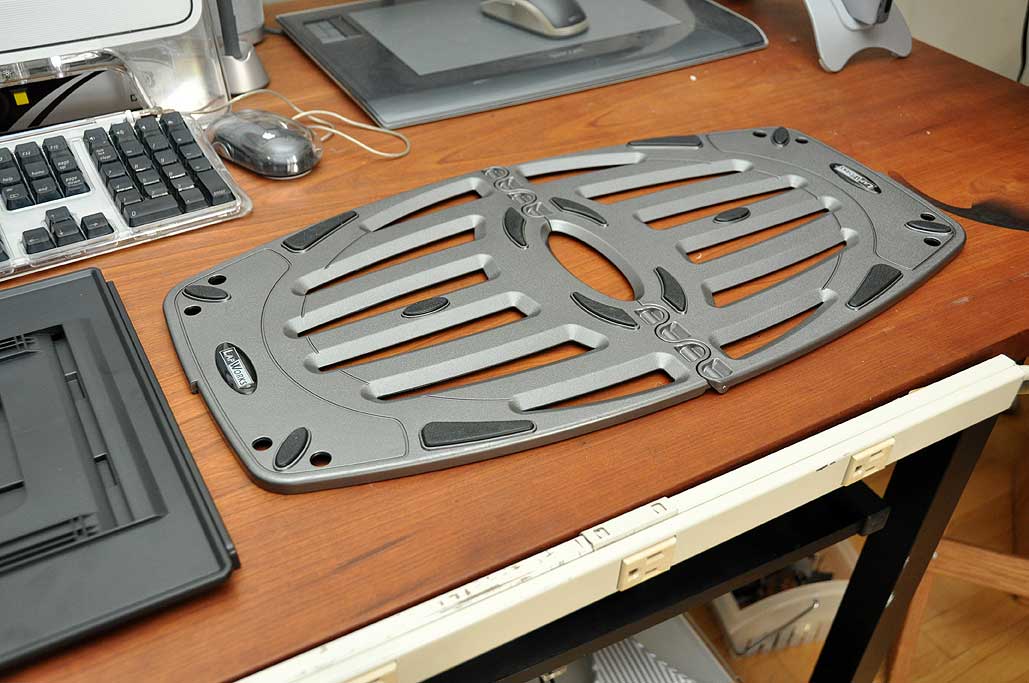
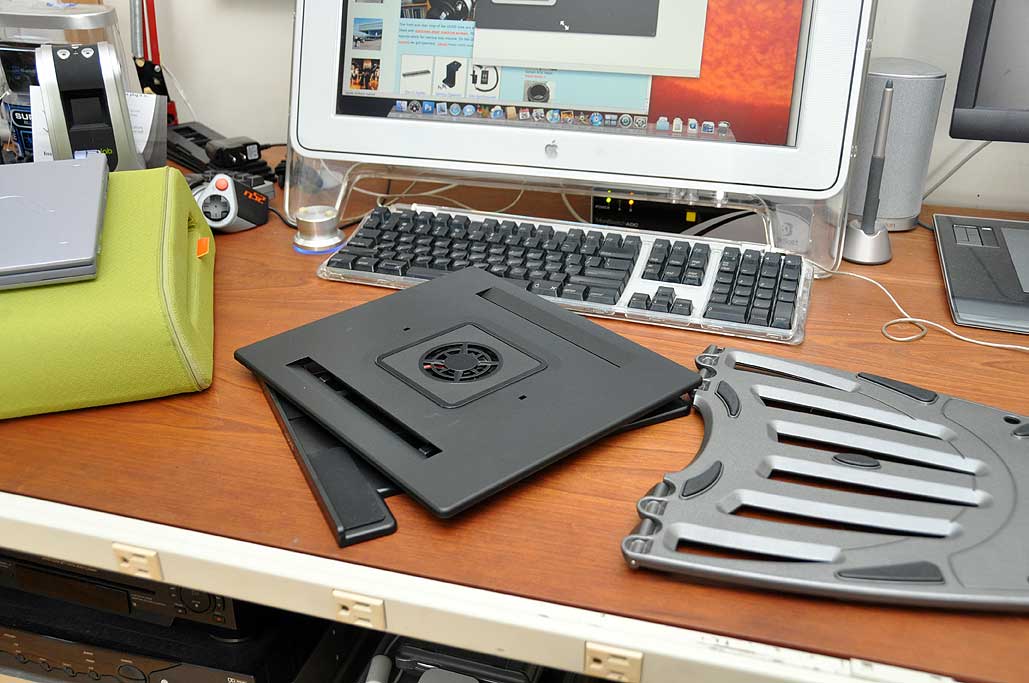
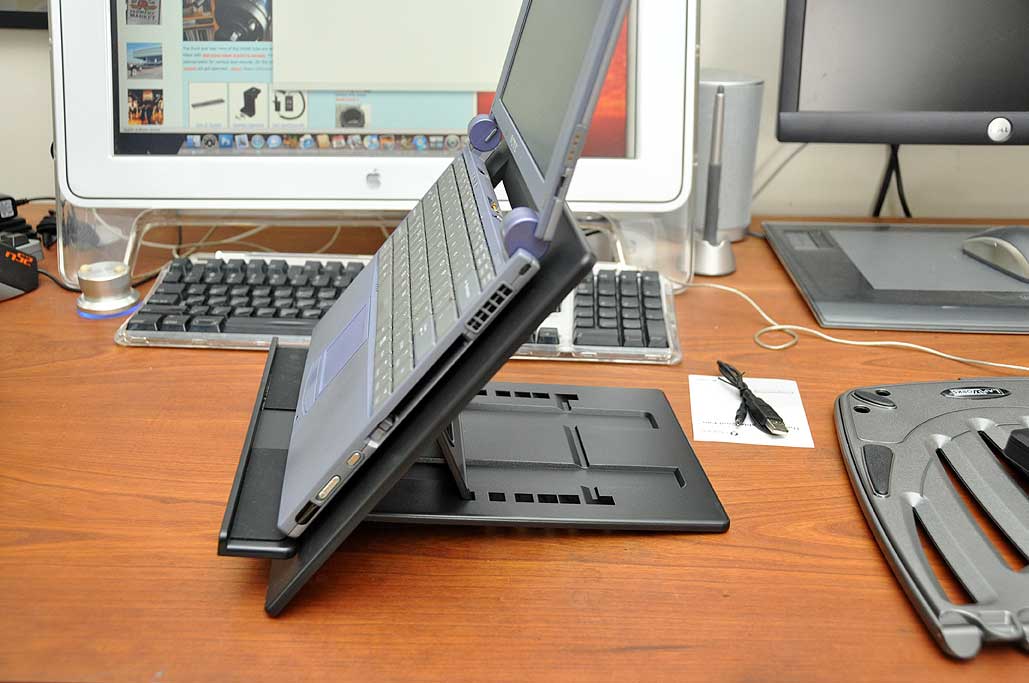
While there are a number of different laptop stands out in the marketplace, there really only two types. One type keeps a hot laptop from burning your thighs and the other type angles the laptop for comfortable use at a desk. We have reviewed both types and actively use both kinds here at RainyDayMagazine.
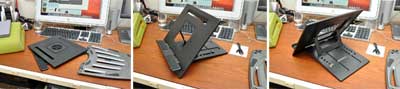
We are always keeping our eyes out for good ones as we are still in search of the perfect one. Last week we got a laptop stand made by iRocks which has some features we have not seen in others. It is not that any of the features are unique, but their combination in one stand is what caught our eye.
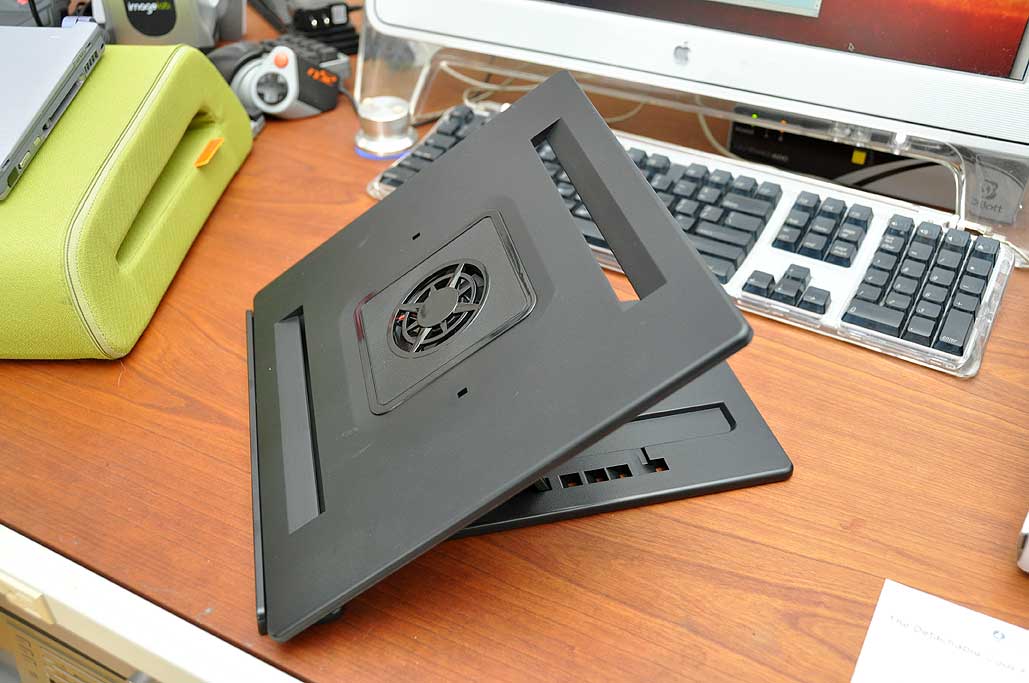
This iRocks stand is designed for use at a desk (Diplomat), not on a lap (CushTop, Futura). While not as solid as the LapWorks Diplomat, it does have features of both the Diplomat and the Futura.
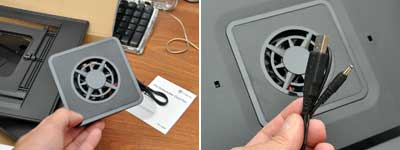
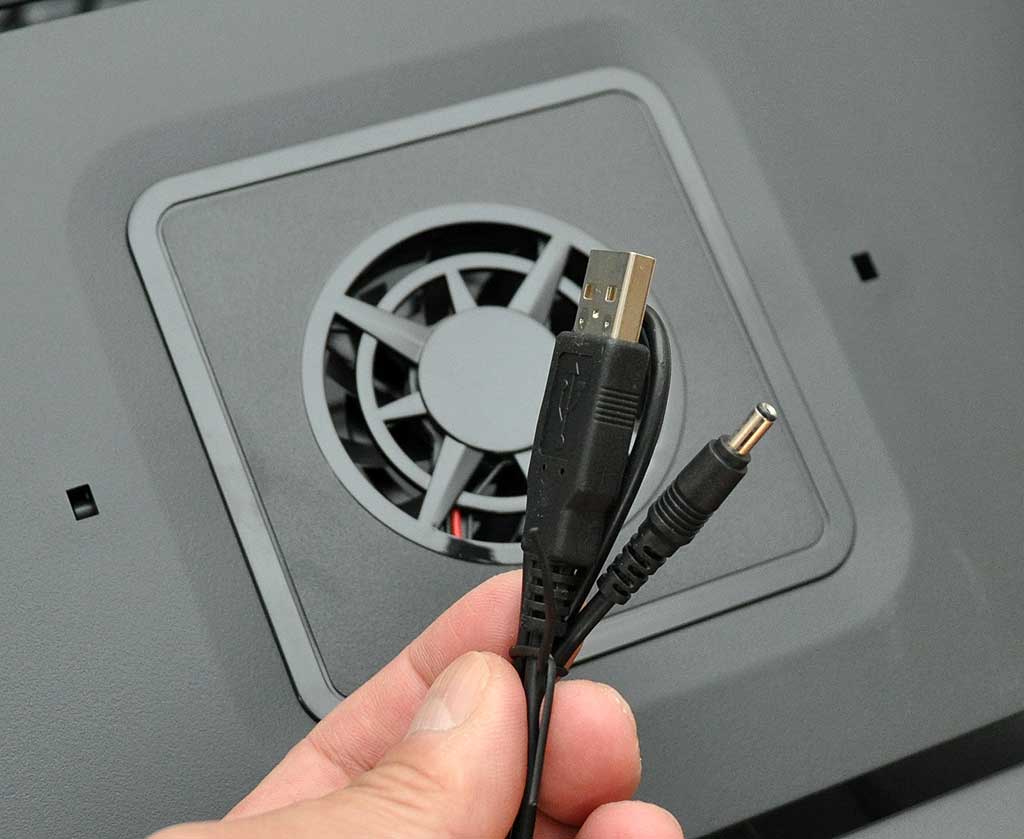
Like the Diplomat and the Futura, the iRocks stand's angle is adjustible. The iRocks has a USB powered fan, but unlike the Diplomat, its fan is removable. It also folds flat, just like the Futura, for travel. All three of these features are useful and the iRocks stand was the first one we have seen which incorporated all of them in one unit. However, it was not designed to span the lap like the CushTop or the Futura so it must be used on a desk.
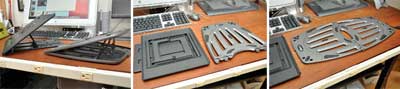
The removable USB-powered fan is an interesting feature choice. It snaps into the central portion of the back rest and snaps out so the stand can fold flat for transport. The only suggestion we would have is to use a regular USB mini-plug instead of a round power plug, as standard USB cables are much easier to find should we lose it. Also, the cable would be able to do double duty in a pinch...always a plus.
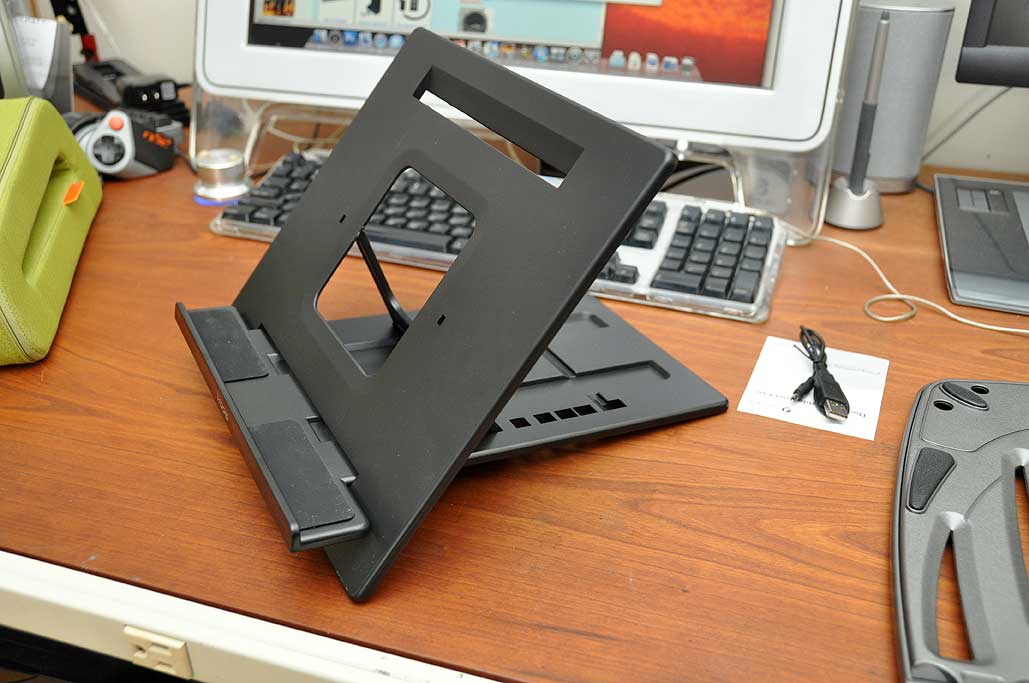
The stand assembles easily. The base slab just slides into the slot of the back panel. There are rubber pads at the lip of the base slab to keep the laptop from sliding forward. The entire stand is very stable when properly put together. We had incorrectly assembled the stand at first and couldn't figure out why it kept falling apart. If not properly assembled, the laptop will not stay on the stand, and the stand can collapse when pushed.
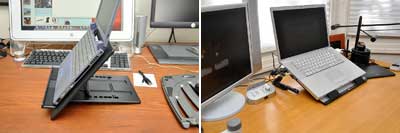
If you like using an external keyboard with a laptop on a desk, you should make sure the screen is at a proper height. The iRocks stand will enable a laptop to be angled quite steeply...much more so than with our current unit. The steeper angle raises the screen height higher, which promotes good posture and relieves typing stress when working at a desk. The iRocks stand is a good solid unit for use at home and on the road. We urge you to check it out. [Permalink] - iRocks Laptop Stand |
||||
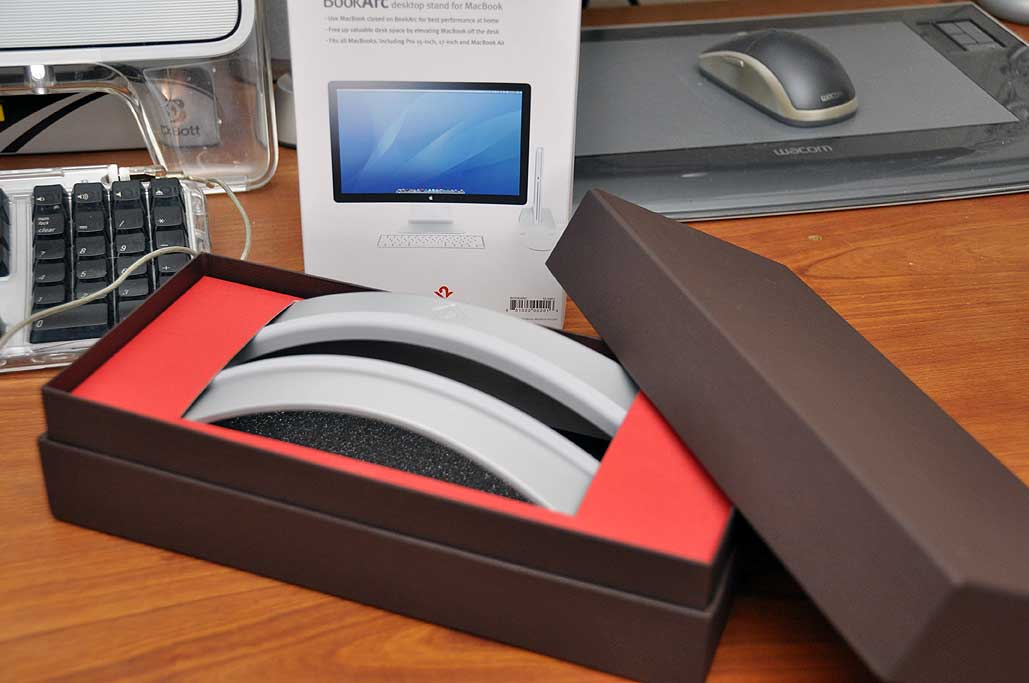
Good design makes the things we use everyday more enjoyable. Apple has been pushing at the limits of good software and hardware design since they introduced the Macintosh to the world. Their efforts have also inspired others to follow suit. Twelve South is one such company. While their product offerings are for the Mac, they are very different from other Mac product companies.
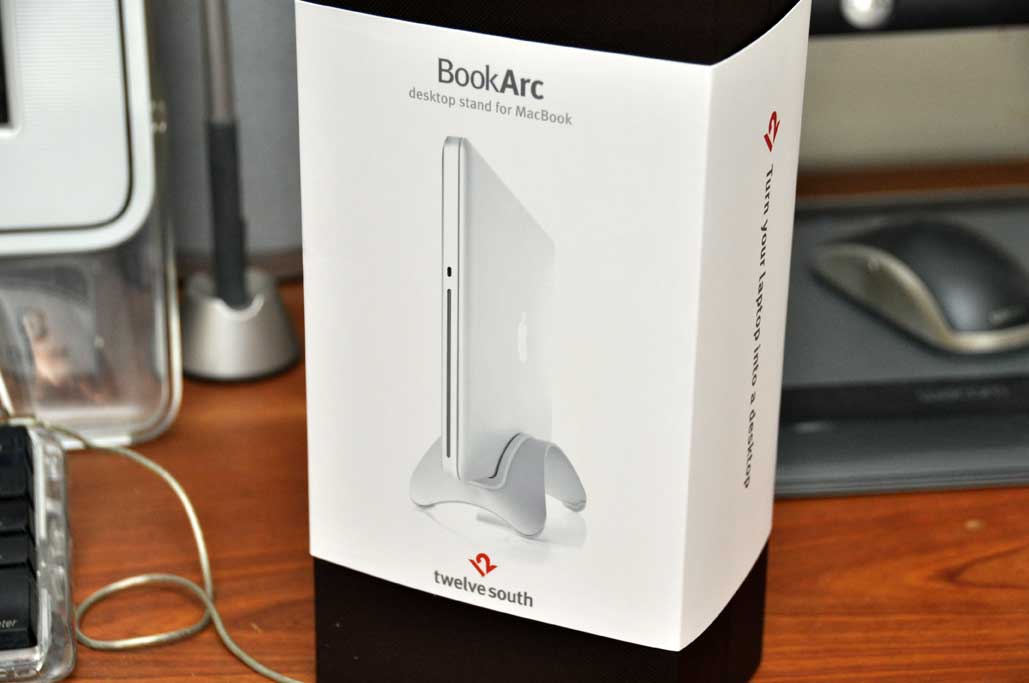
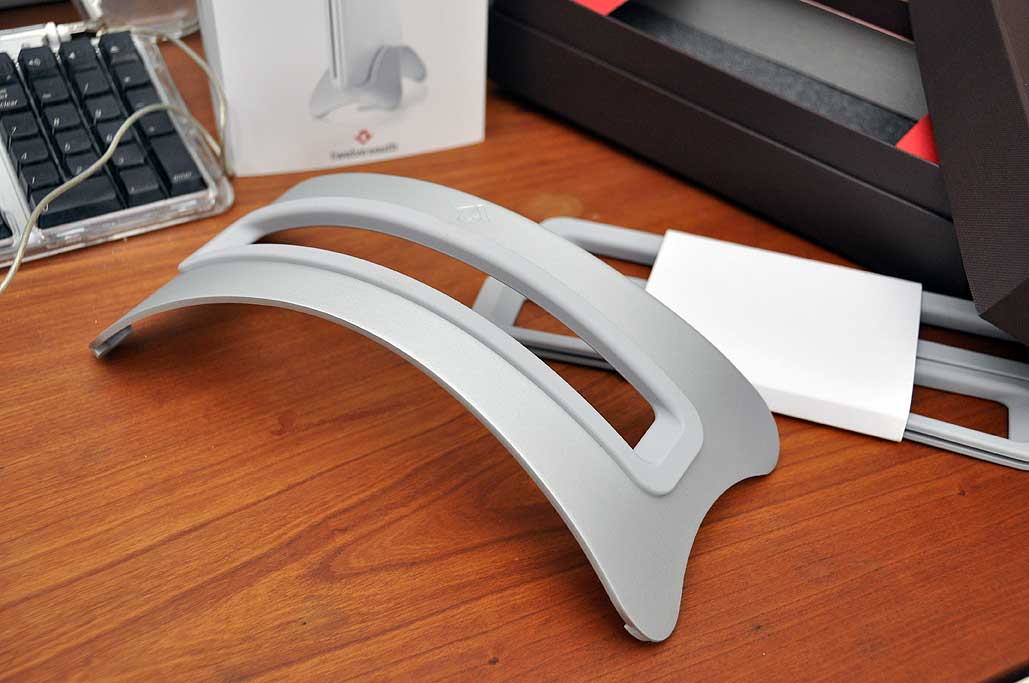
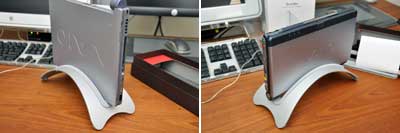
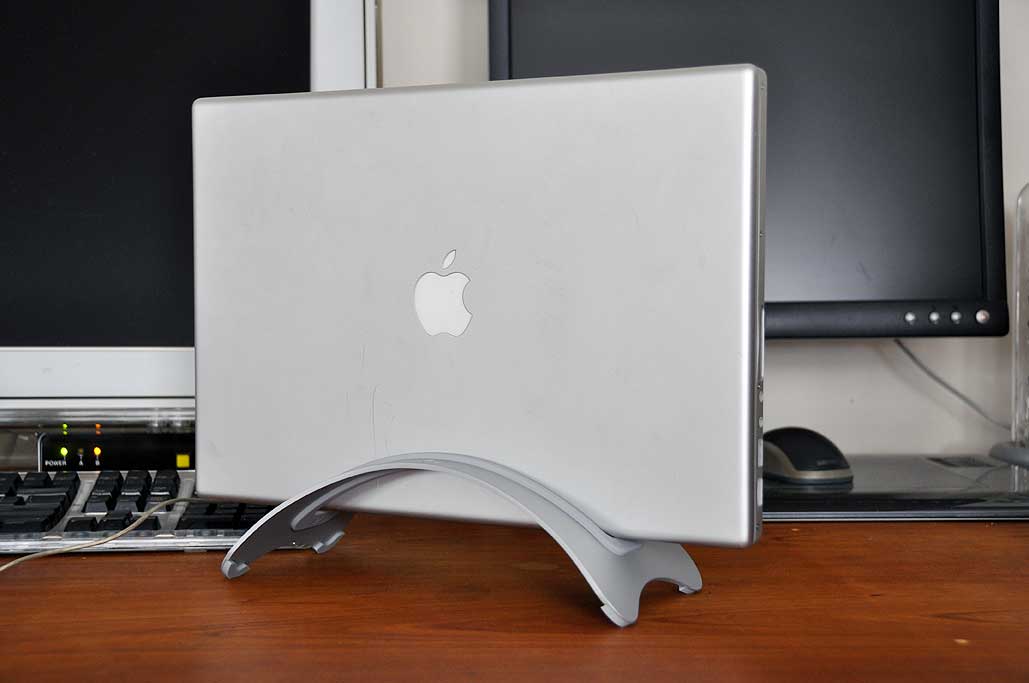
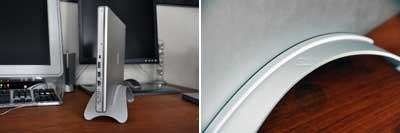
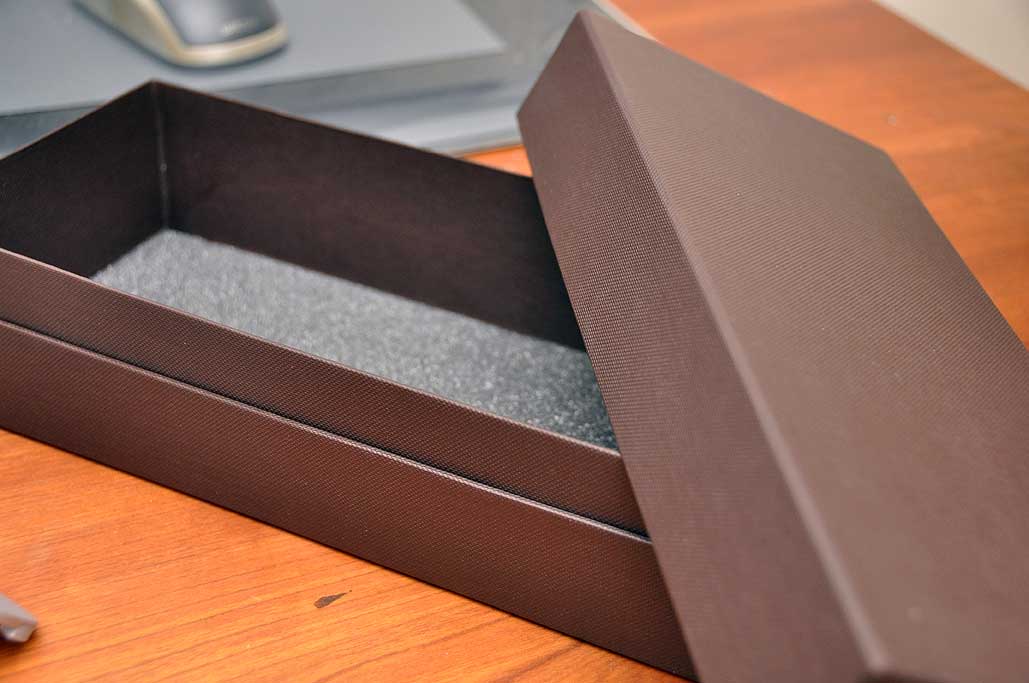
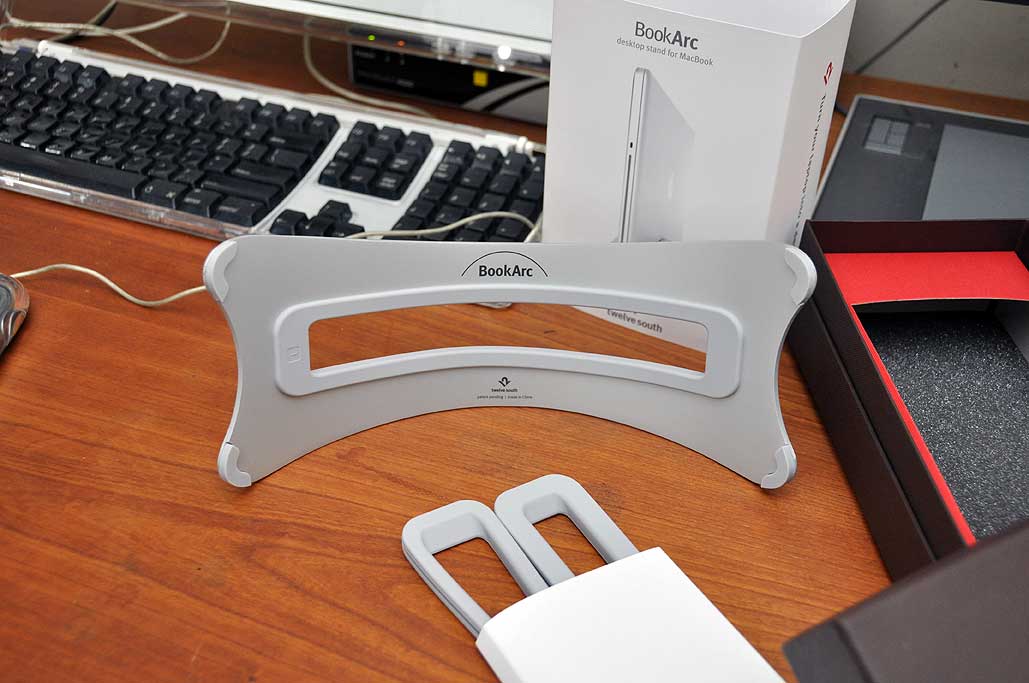
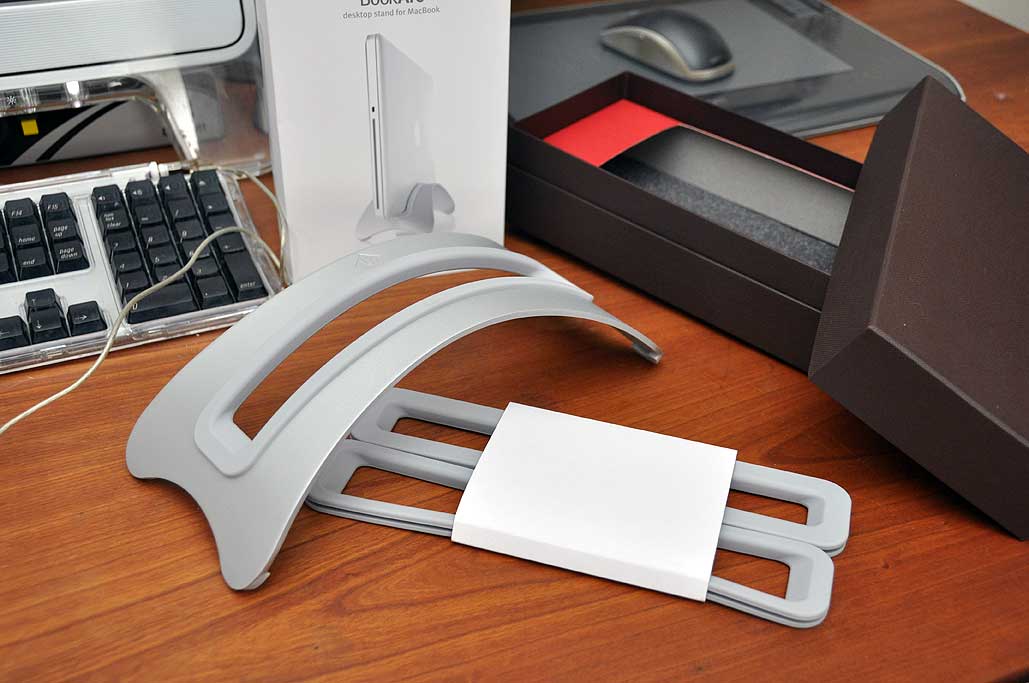
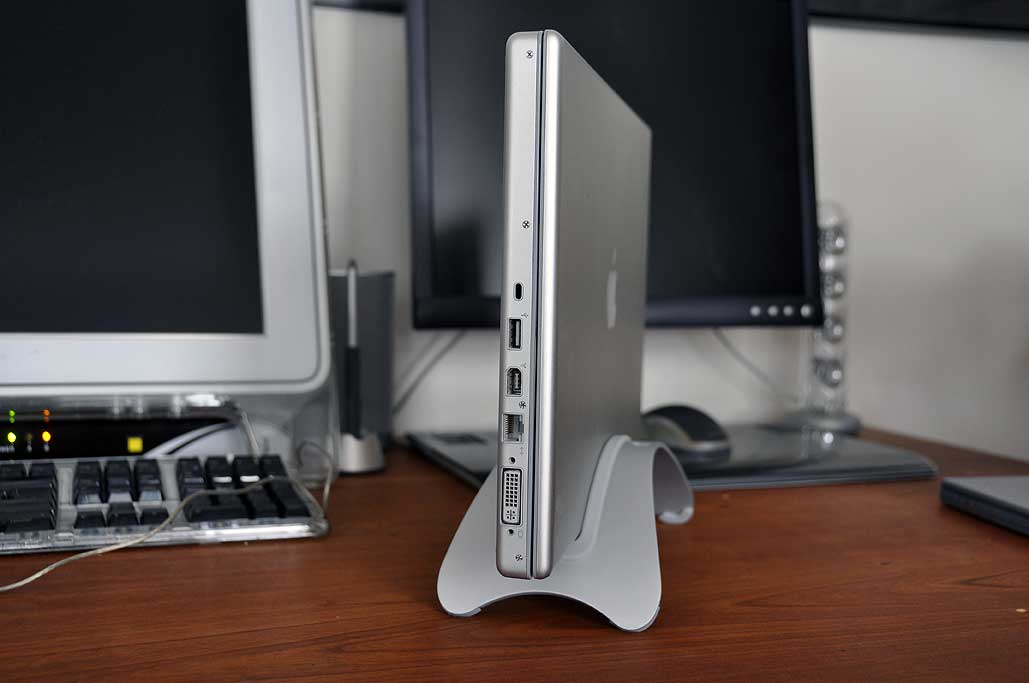
As Twelve South says... they are not just Mac friendly, they are Mac only. This sets them apart from companies who "also" make products designed for the Mac. A quick look at their newest product, the BookArc, will show why.
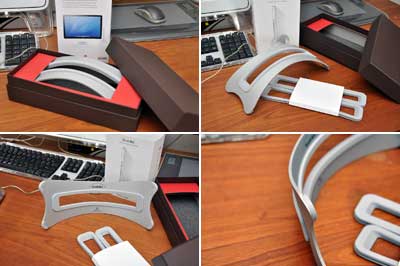
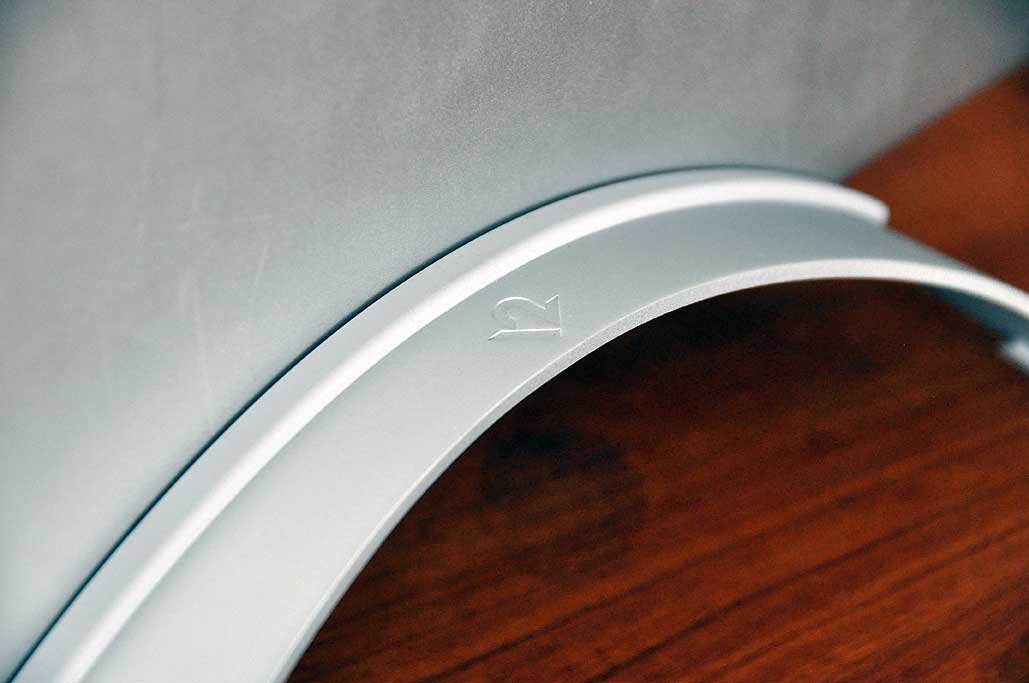
The BookArc is made out of a thick (3.28mm) piece of aluminum curved to form a stand, and padded at the four corners to prevent scratching or slipping. Supplied with the BookArc are three silicone inserts. Each of them is designed to grip a particular laptop (Air, MacBook, MBP). Removing and installing the insert is quick and simple. No tools needed. No fuss.
Twelve South's goal is to "...introduce 12 unique, must-have Mac accessories each year that will be as innovative as the Mac itself. If a PC user wants to use our products, they’ll have to buy a Mac..." We like where these Twelve South guys are going with their company.
Of course, the first thing we checked was whether the BookArc would work for holding PC laptops. None of the IBM or Compaq laptops we had would fit (too thick), but the Sony ones slipped in just fine. They also looked pretty good in the stand.
While the BookArc will support the thinner PC laptops, it was designed for and will fit best with the MacBook and MacBook Pros. The stand is solid and stable. No worries about it accidentally moving, sliding or tipping over. It is the perfect stand for tucking the laptop out of the way when not in use.
There is more to this laptop stand. We'll show you what in our FirstUse report in a few weeks. In the meantime, go check out Twelve South and their growing collection of uniquely clever, well-engineered, mac-centric products. You may find that it is easy to add both functional and visual pleasure to your daily computing environment.
Twelve South has even given some thought to how their customers may reuse the BookArc's packaging. Instead of some flimsy box or Impossible-to-open plastic pac, the BookArc came in a nice solid paper box. A list of "reuse" ideas were included with the owner's guide. We will have to give some thought as to what we would like to do with ours. No need for the usual wise-ass suggestions. I'm sure the interns will come up with something :-) [Permalink] - BookArc FirstLook |
||||
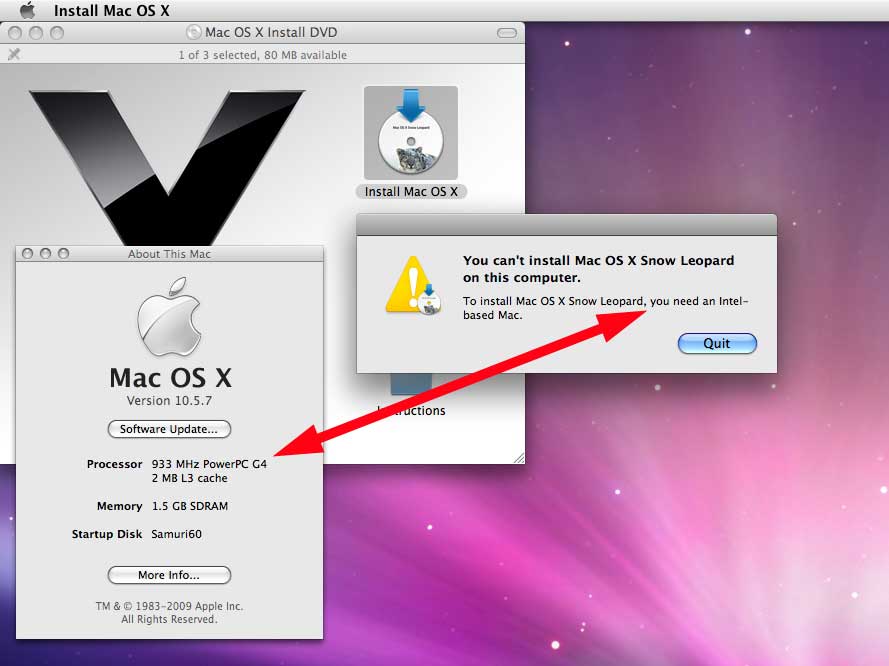
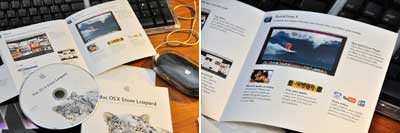
Friday the interns installed Snow Leopard on top of OSX 10.5 on the Mac mini. Yesterday they spent the day playing around with the various enhancements and new features of the upgrade. If you are undecided about whether to install this upgrade, read the rest of today's post, but the short of it is, if you want a faster Mac, this upgrade is the best $30 you could spend. However, if you have an older PowerPC-based Mac, this upgrade is not for you.
There is a lot of buzz about the fact that Snow Leopard (10.6) will install over Tiger (10.4) without first making Mac users upgrade to Leopard. This is true. For those who want to stiff Apple on a few bucks, they can do it without any "real" consequences. However, we believe that this is actually a very clever move on Apple's part to get everyone to FINALLY drop their older PowerPC Macs and buy a newer Intel-based machine :-) While Snow Leopard will install on top of Tiger, it will not install on PPC-based Macs. Our PPC G4 has been a workhorse for us since 2003. We are sad that 10.5.8 will be its last upgrade, but we'll keep it running until it fails (Apple released 10.5.8 as the final patch, which we have not yet installed). Ah, but we digress.
With Snow Leopard up and running, the first thing the interns noticed was the look of the QuickTime icon. Clicking on the icon, they were greeted with an obvious change in the behavior of the dock. The dock menu has a new layout and new functionalities.
We don't have any stats yet, but the launch of various apps feels much faster. Also somebody at Apple has been reading Edward Tufte's
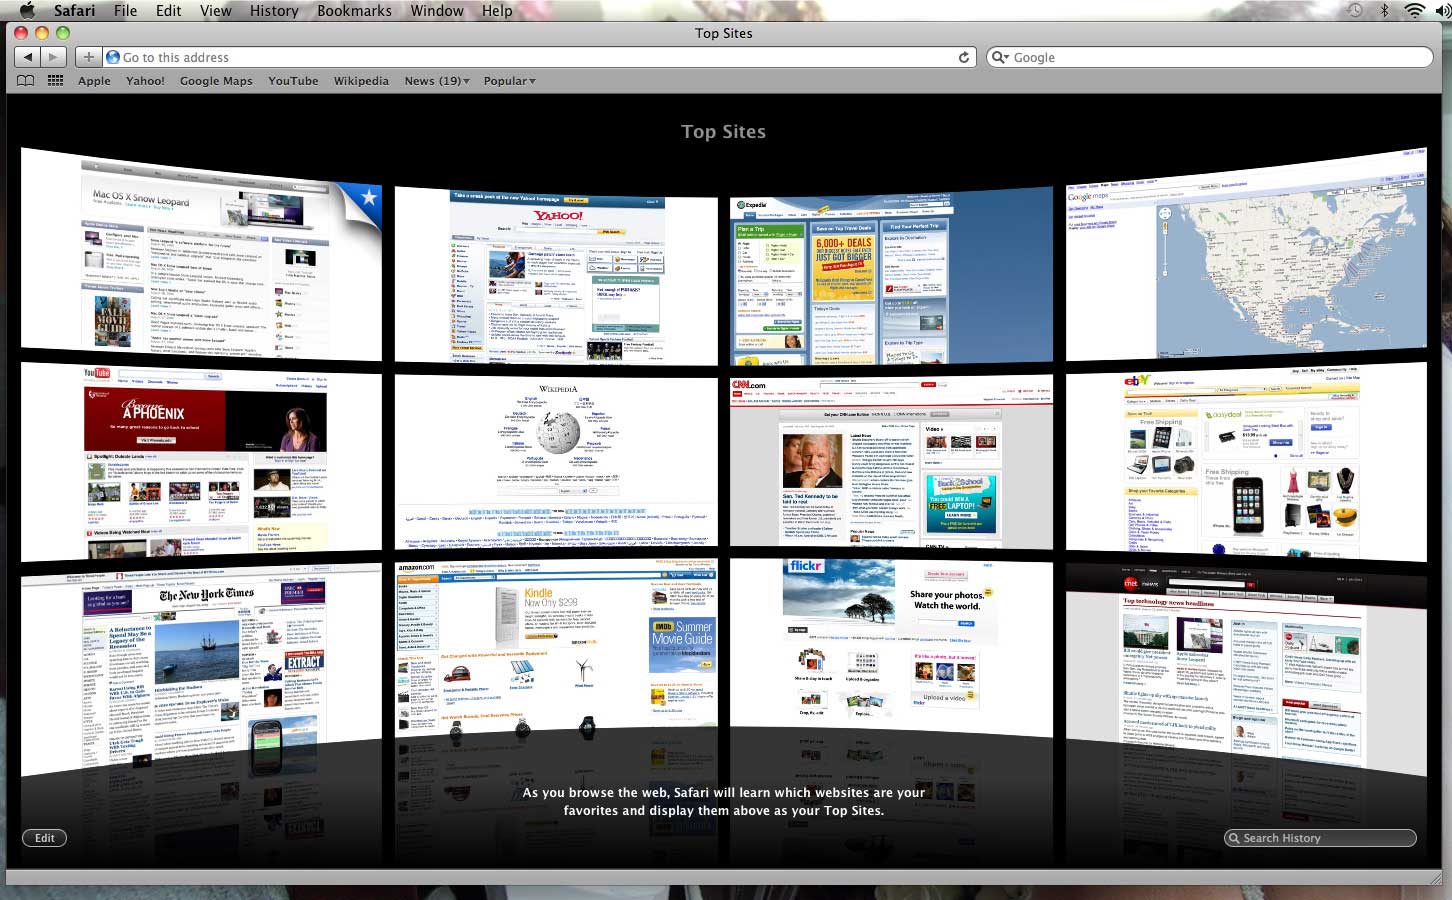
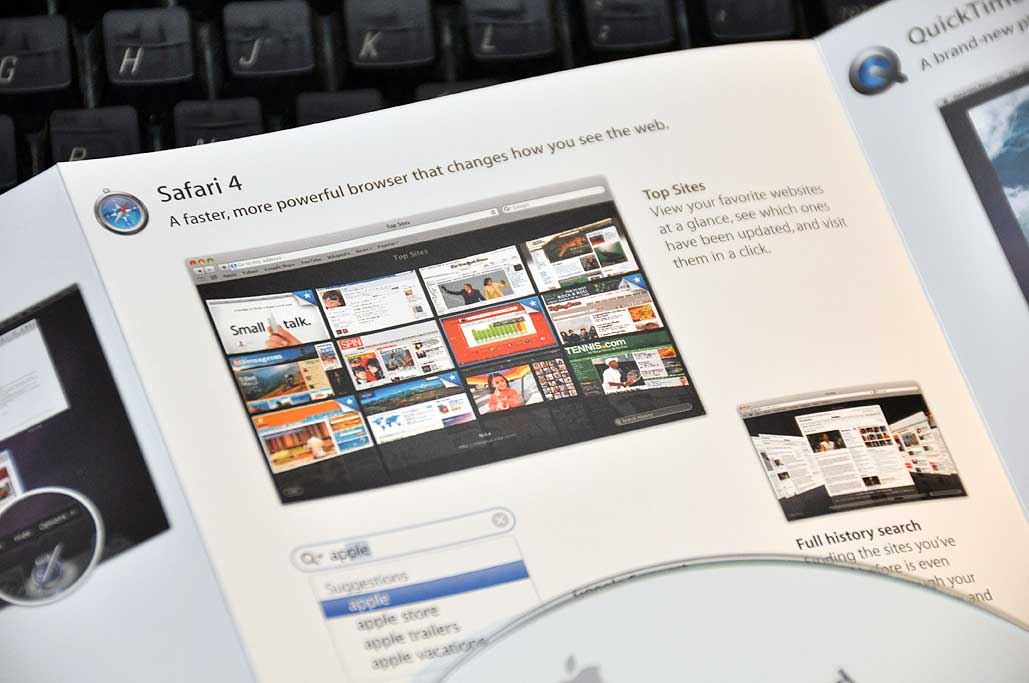
Apple's web browser, Safari, has also been upgraded with a bunch of new capabilities. Safari 4 now uses Google Suggest to anticipate your queries as you type. The feature is based on the popularity of the various search terms so it is constantly being updated. The feature we really like is the "Top Sites" view. This is a page which is an iconized collection of the favorites, allowing us to quickly jump to a page without having to scroll through a menu list. This feature is especially impressive on a large display.
There are LOTS of other features, enhancements, and refinements in Snow Leopard (Expose, MS Exchange support, Universal Access, scrollable stacks, etc...). All of these items will be covered in-depth by many of the dedicated Mac OSX sites on the Web. When we come upon something we think merits extra special mention, we'll highlight it for you. In any case, based on our FirstLook, Snow Leopard is definitely worth the $30 (or $25 via Amazon BTW, if you are wondering whether the apps you use daily are Snow Leopard-friendly, check out this comprehensive compatibility list.[Permalink] - Snow Leopard FirstLook
|
||||
Snow Leopard became available
The Snow Leopard (OSX 10.6) upgrade assumes a working version of 10.5 Leopard. There are some reports that it will install on top of Tiger (10.4). We have Tiger installed on our older G4 unit. We may try the upgrade on that machine if everything goes well with the 10.5 upgrades.
The upgrade has a number of usability refinements and changes under the covers, but the upgrade also has a few changes to such core apps as Safari and QuickTime.
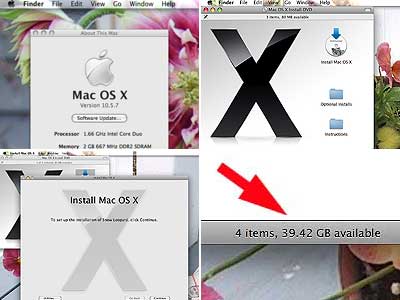
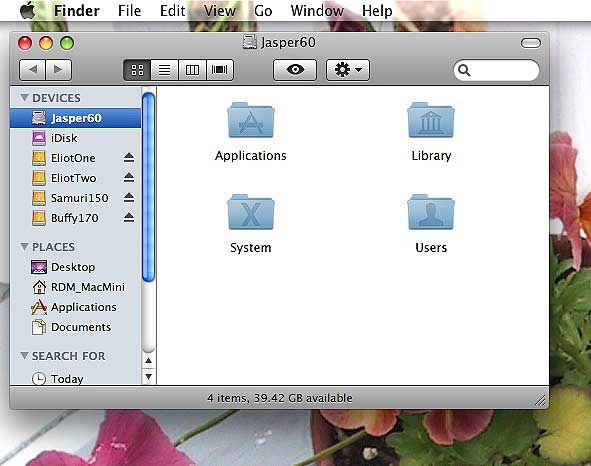
The installation of Snow Leopard was pretty much "click and go." The process took about 30 minutes for the Mac mini. No problems of any kind were encountered.
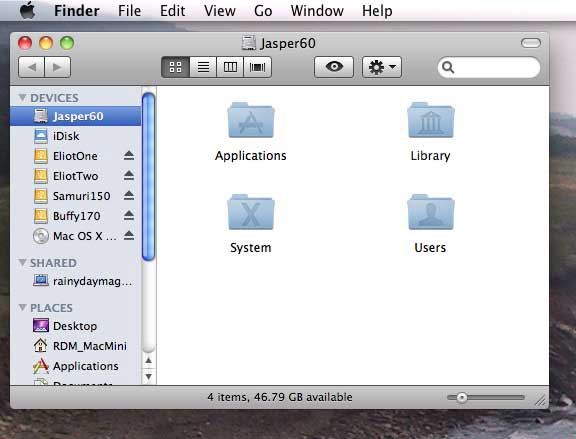
One thing we noticed immediately was that we recovered about 7GB (39GB available before, 46GB available after) of disk space after the upgrade; even though terabyte drives are now around $100, one can never have too much disk space.
The interns will be busy checking out the various Snow Leopard features this weekend. They will post more info tomorrow. The things of interests will be whether the Adobe apps (Dreamweaver, PhotoShop CS3, etc...) all work properly under 10.6. We hope they do as we have no budget allocated for upgrading the Adobe Creative suite anytime soon. [Permalink] - Snow Leopard Installation |
||||
Snow Leopard is officially available
According to the marketing blurb, Snow Leopard is faster, more reliable, and easier to use. We'll see :-) We'll have full write-up on the Snow Leopard installation experience on the Mac mini and the MacBook Pro.
Sometimes it is better to hold off upgrading for a few days after a new version has been released into the just to see if there are any "gotchas." If you can wait a few days, you can pick up a copy even cheaper as Amazon |
||||
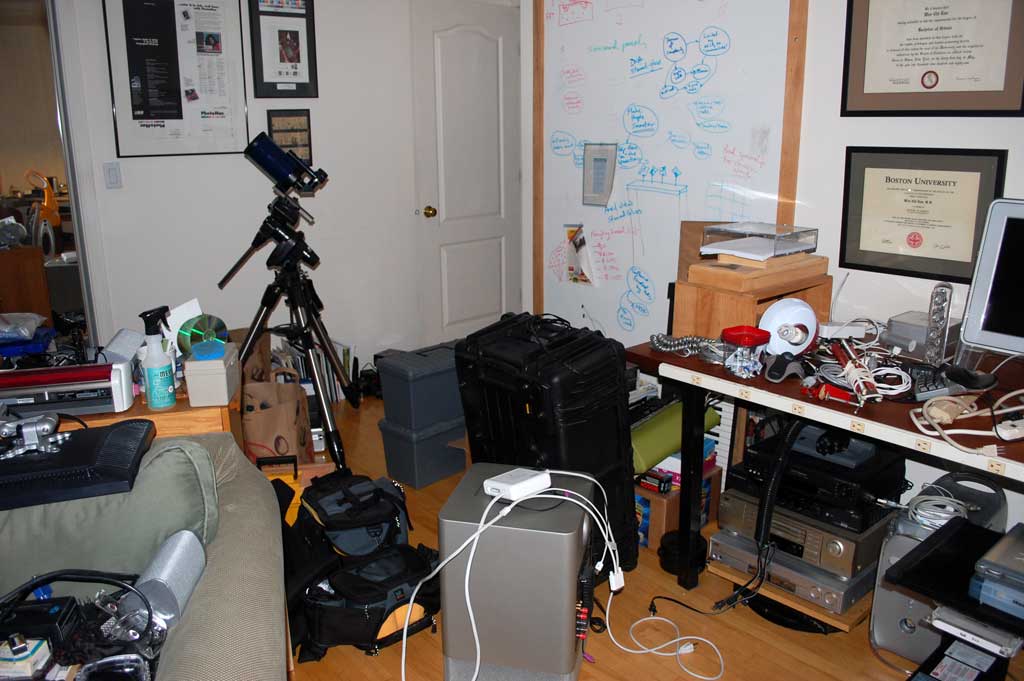
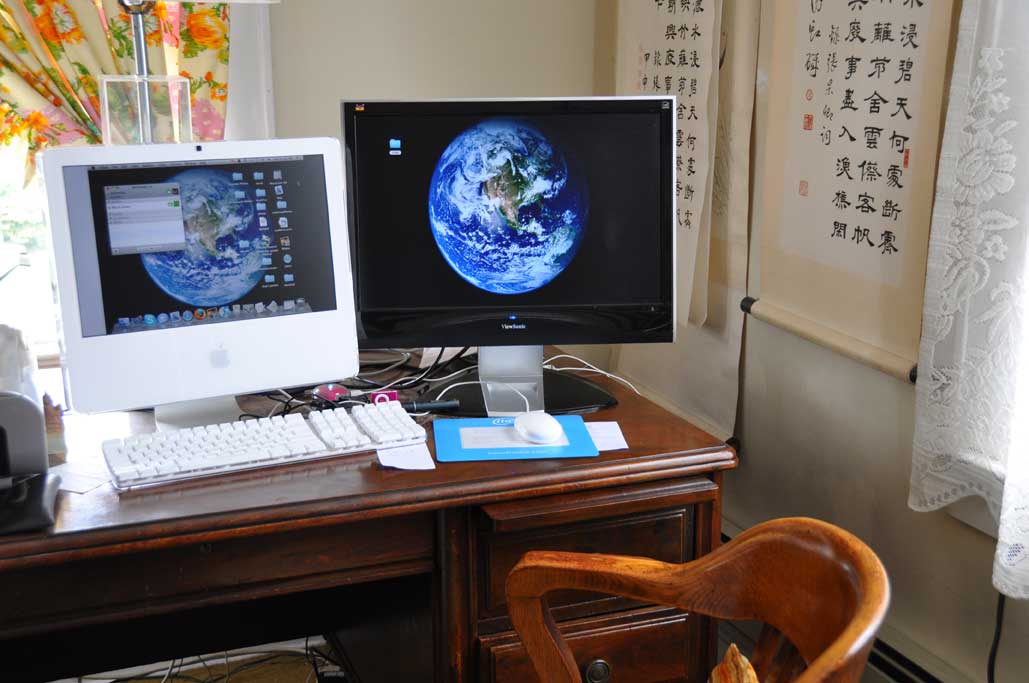
The interns decided to stay late, then worked through the night, and got the office completely back to full operational status by morning. We were treated to a completely refactored workspace with more room, a better layout, and a lot less clutter.
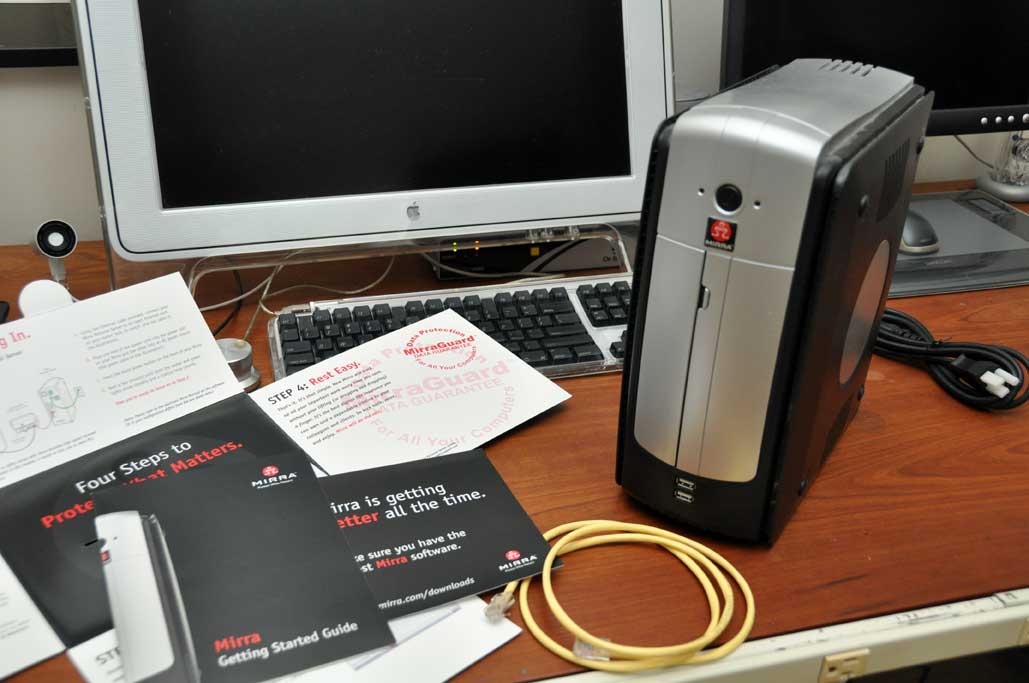
They also took the opportunity to put a few pieces of equipment they found during the clean-up into action. Apparently they found an unused Mirra drive which was reviewed a few years ago, but had never actually been added to our technology setup. This is now part of the automated office backup scheme.
The interns also moved a few drives around, filled up the portable terabyte array, and made a couple of other "tweaks" around the office which they claim we'll "see" eventually.
We have to say that the interns did a fantastic job rearranging the office. Somehow the intern's desk is now facing the window and all of editors desks ended up facing the walls. As the interns did all of the work, none of us could really argue. However, the next time we do this...who are we kidding, we are not going to do this again :-) [Permalink] - Office Reorg Day3 |
||||
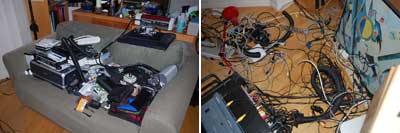
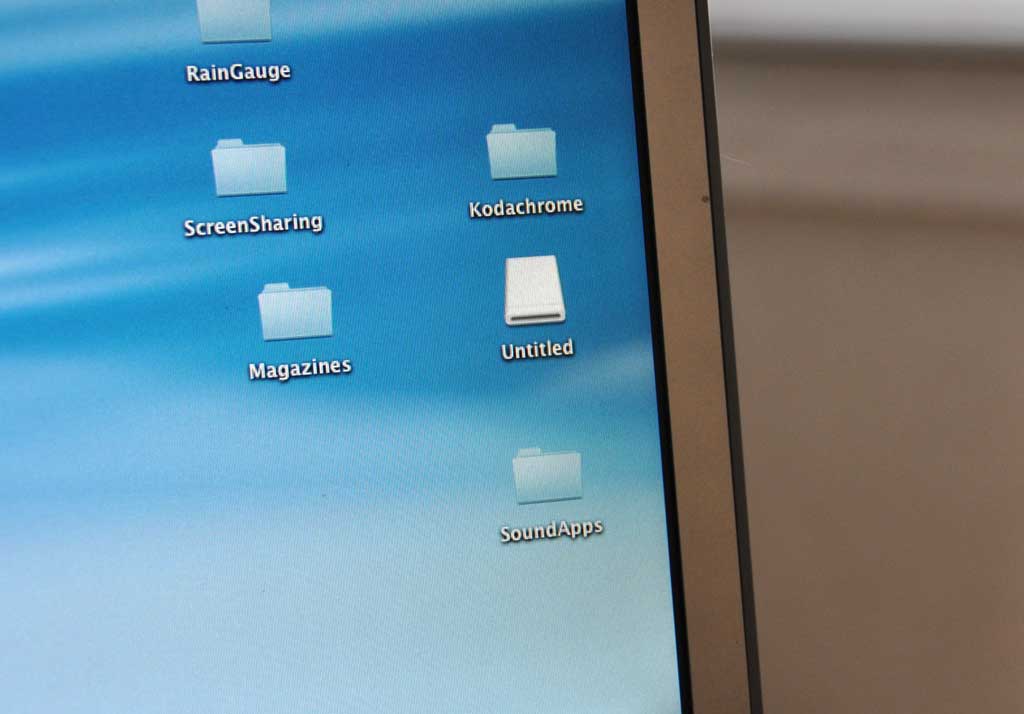
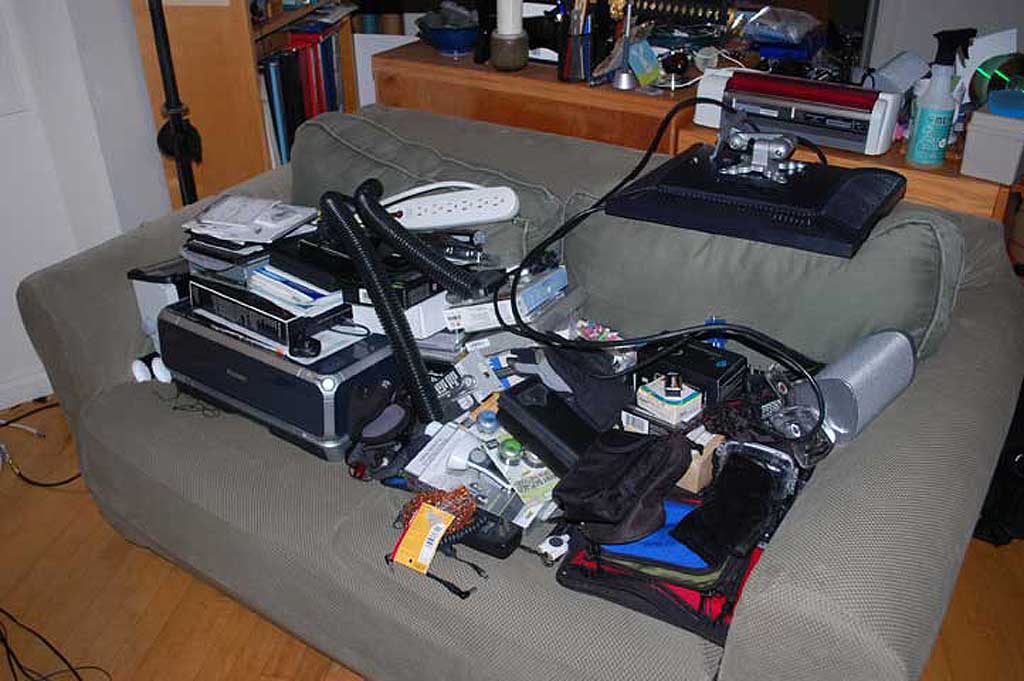
This was Day2 of the RainyDayMagazine Office Reorg. Some pockets of calm have started to emerge from the chaos. However, a well-cropped photo can be deceiving. Moving a bit further back, one gets a fuller picture of the amount of work still awaiting the interns.
Most of the computers, AV gear, and so forth have not been reconnected yet. We do have access on some of the equipment, so we are not totally dark, but our ability to function is still very much compromised. The editors decided it was time for a break and went out for beers, leaving the interns to get on with the business of getting everything squared away.
Tomorrow is trash day, so a lot of unnecessary stuff found its way out to the "recycling" bin. By late afteroon, much of the clutter had been dealt with in some fashion (Craigslist, EBay, trash). By the time upper management returned from their much needed "break", most of the items on the floor had been put away (somewhere). There was also much more space on the "review bench" for incoming items.
While there are still some items on the floor and out in the hallway, the office has returned to some semblance of order. The interns have at least one more day of work left before the office will be fully operational again. The upside is that when we are back, we'll be a lot better laid out and hopefully much more productive! [Permalink] - Office Reorg Day2 |
||||
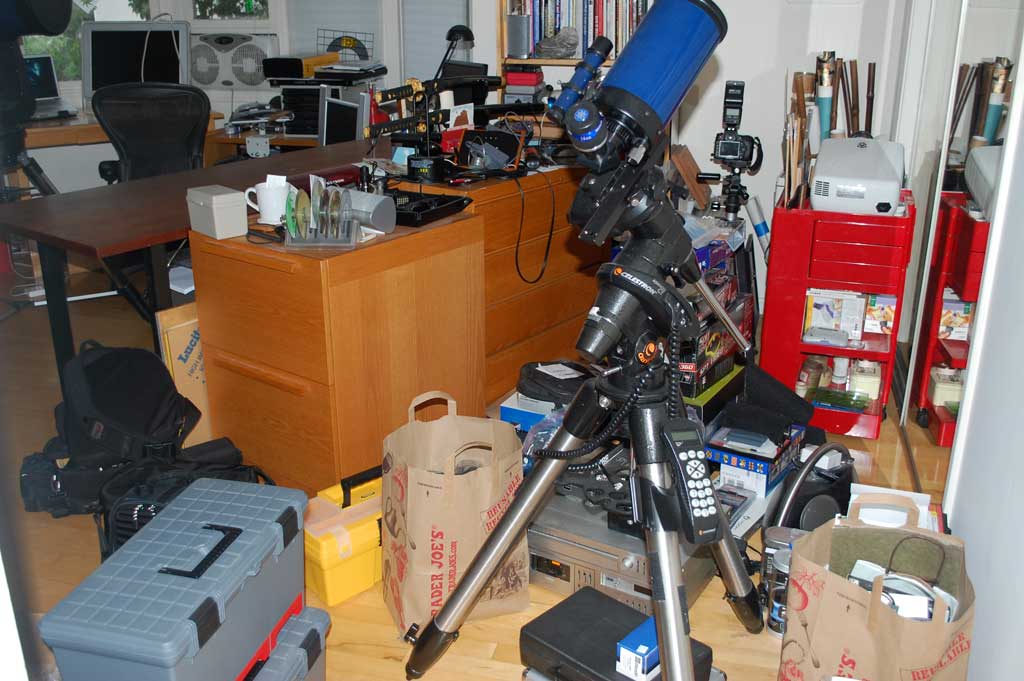
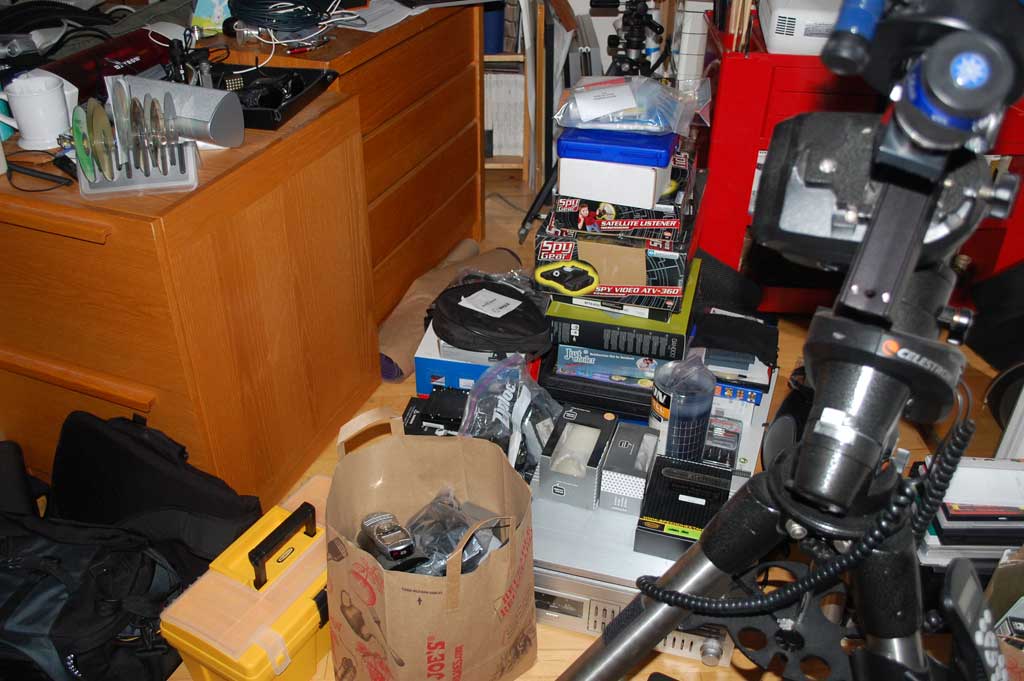
The main office, where everybody congregates (and works), had gotten a bit out of hand. One day, the interns couldn't take it anymore and decided to do a major reorg of all of the computers, AV equipment, and funiture layout while the editors were away on business. They documented the whole effort just to prove that it was as big a job as they had claimed it was.
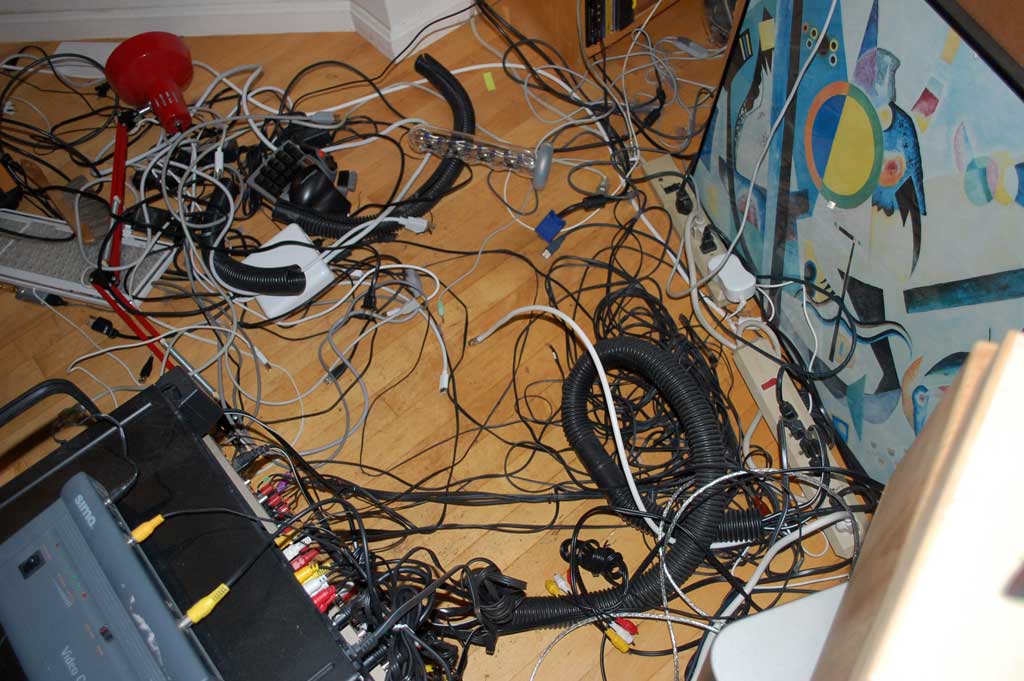
There are always about three weeks of items in the "review pipeline." A lot of them were spread out on various surfaces for testing, photo shoots, and other reasons. In order to move the furniture, all the items had to be moved. The problem was that once the stuff was moved off the desks and onto the floor, there was no room to maneuver. Recognizing the flaw in their strategy, the interns started moving things onto the couch and out into the hallway.
Up until this point, nothing had been disconnected and everything could have been moved back into place. However, seeing that they had the space to move, they started to disconnect the wires. Once that started, they were committed to finishing the reorg :-)
The job was a bit larger than they had anticipated. By the end of the day, the interns did manage to move the furniture around and did manage to settle on an agreeable configuration. However, it appears it will be a few more days before the office will be back to full operational status. [Permalink] - Office Reorg Day1 |
||||
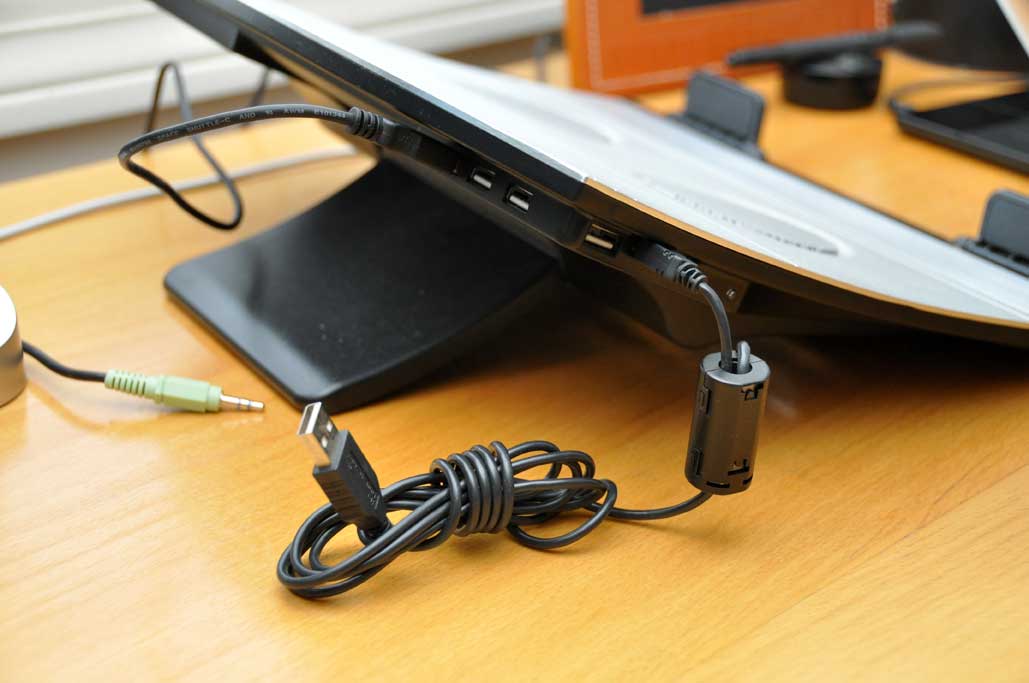
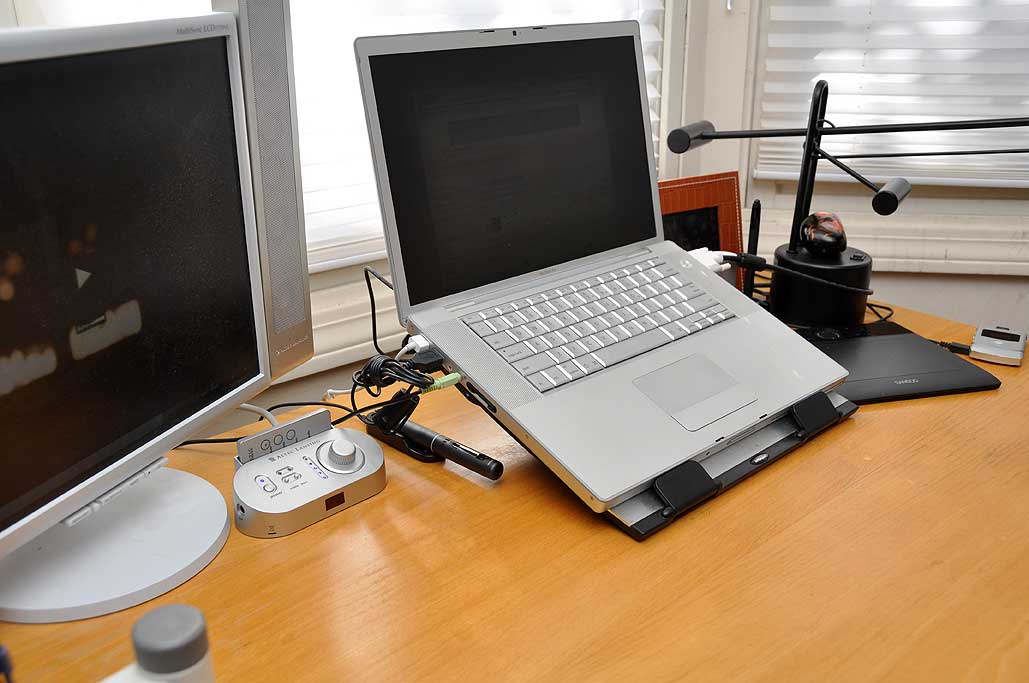
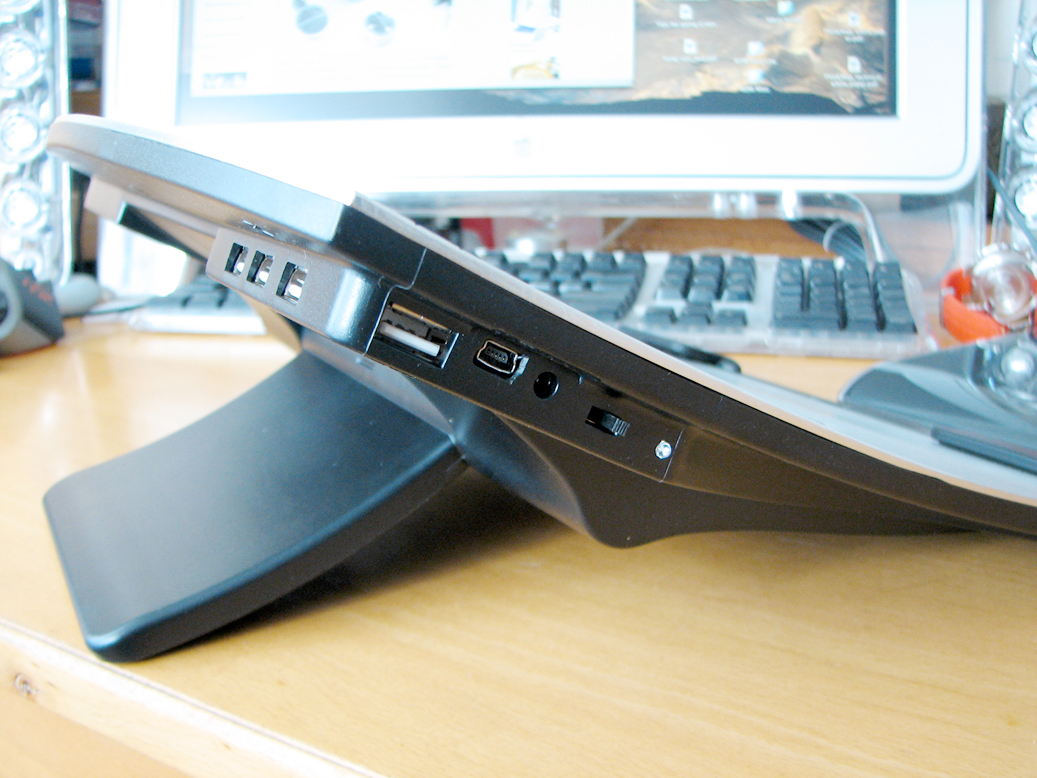
It has been over a year since we reviewed the LapWorks Attache (renamed the Diplomat). We used it on and off for a while, but mostly for its angling capabilities. We didn't really appreciate the Attache's cooling feature until we got the MacBook Pro.
The underside of the MacBook Pro can get pretty hot after extended use, hot enough that it would not be advisable to have it on the lap! The heat is bad for bare skin and is probably not too good for the electronics neither. Remembering we had the Attache, we decided to see if it would cool down the Mac. The Attache worked like a charm. The laptop is still warm to the touch, but the temperature has gone from searing to comfortable.
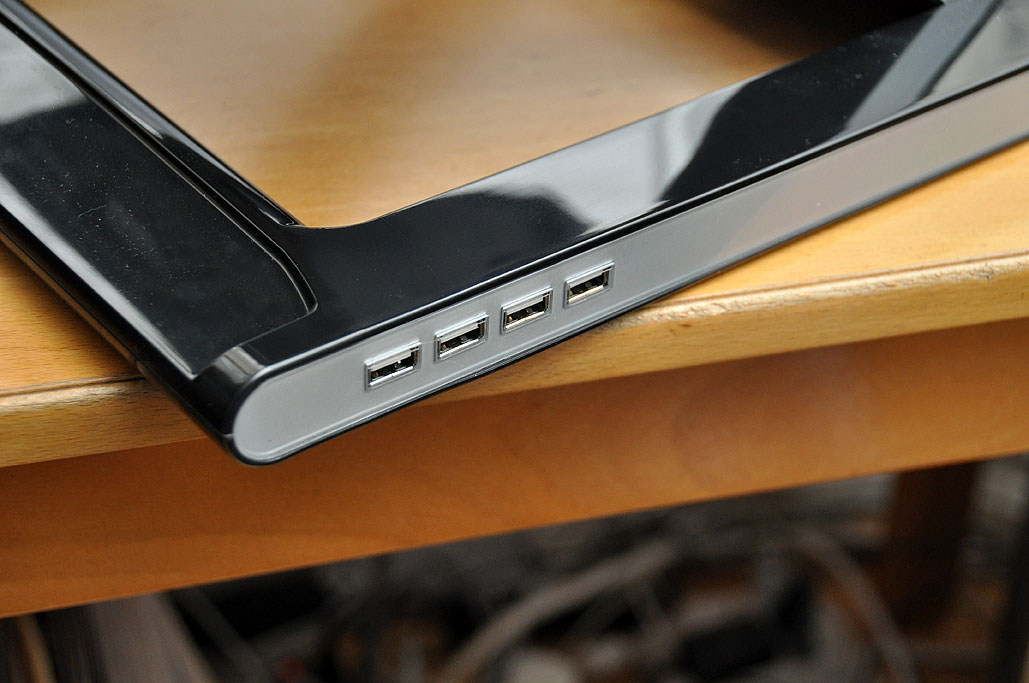
The fans are whisper-quiet. In fact, we often couldn't tell if they were on just by listening. We would have to take the laptop off and visually check to see if the blades were spinning. The power for the fan is from the USB connection to the laptop. In exchange for taking up a port on the computer, LapWorks gives us back four (3 in the back, 1 on the side).
The extra USB ports is a nice feature, one we came to appreciate when we started using the MacBook Pro at the desk more and more. The additional ports meant we did not have to uplug all of the other peripherals when we wanted to take the laptop. It is like having a docking station for the MacBook Pro. OK...not really, but the next best thing. For those using their laptops as their main machine, you should consider adding this LapWorks stand to the mix. The angling will relieve wrist strain, the fans will keep the machine cool, and the extra ports will give you more connection options without sacrificing portability. No matter what you call it, it is a triple win!!! [Permalink] - LapWorks Attache InTheWild |
||||
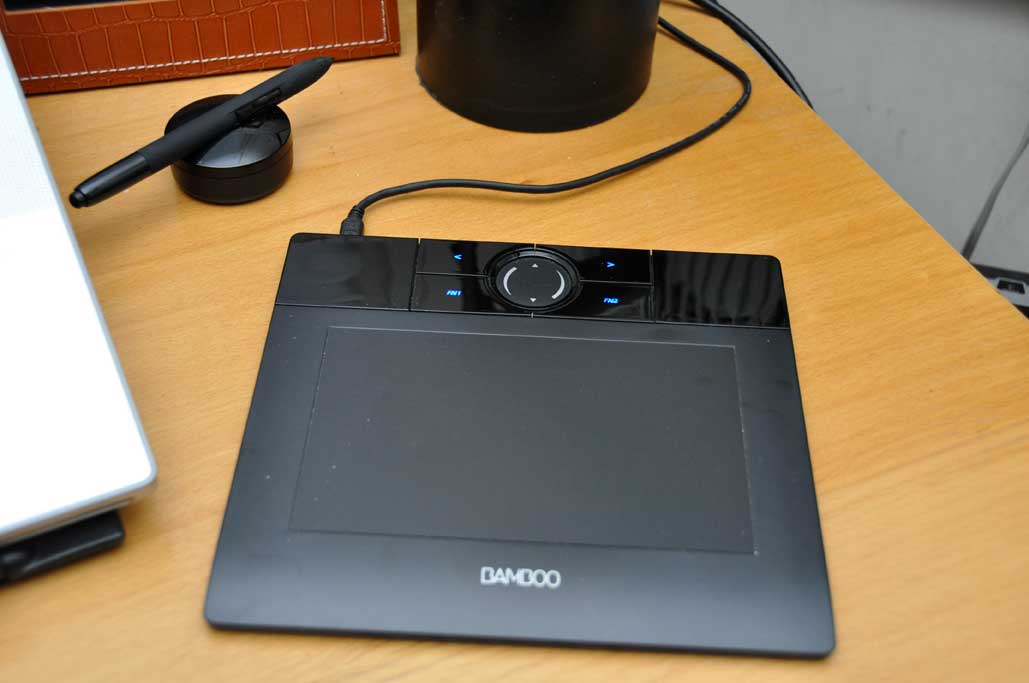
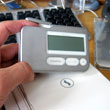
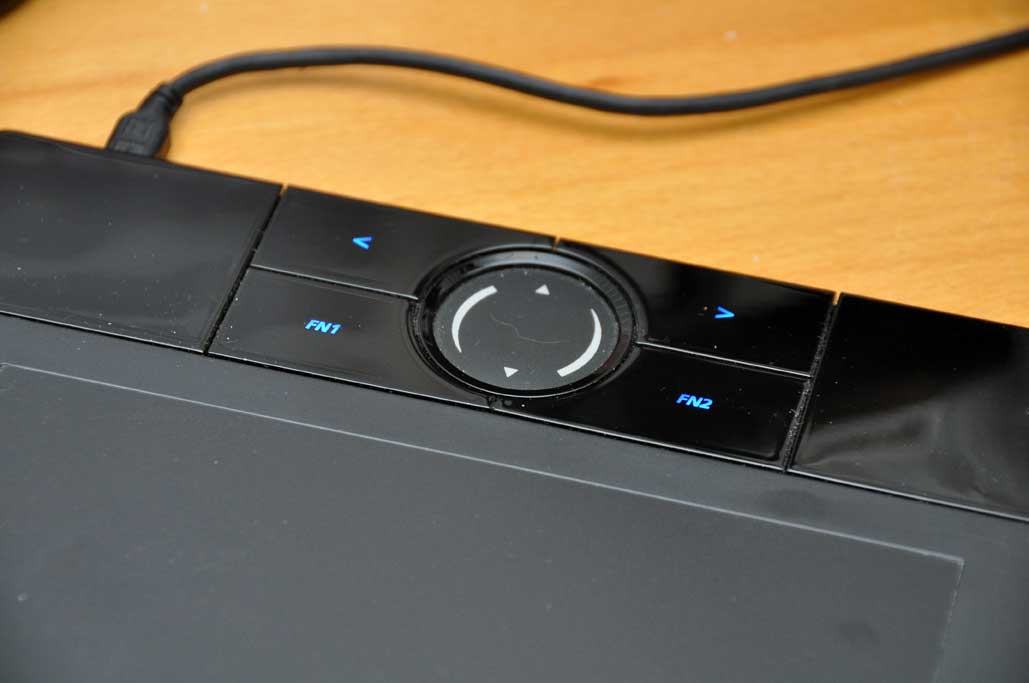
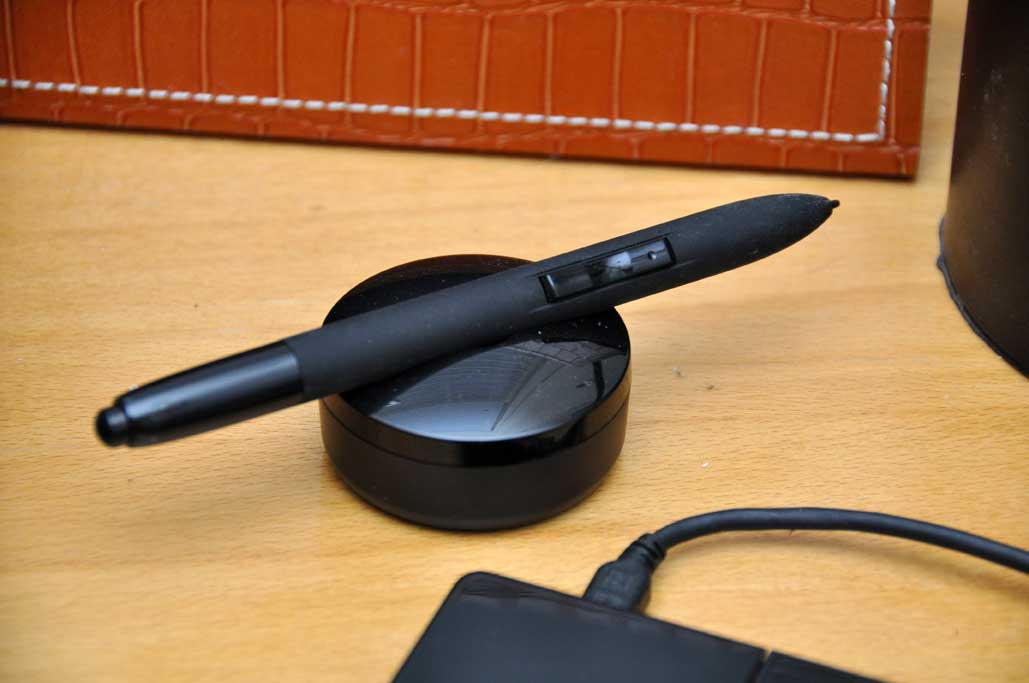
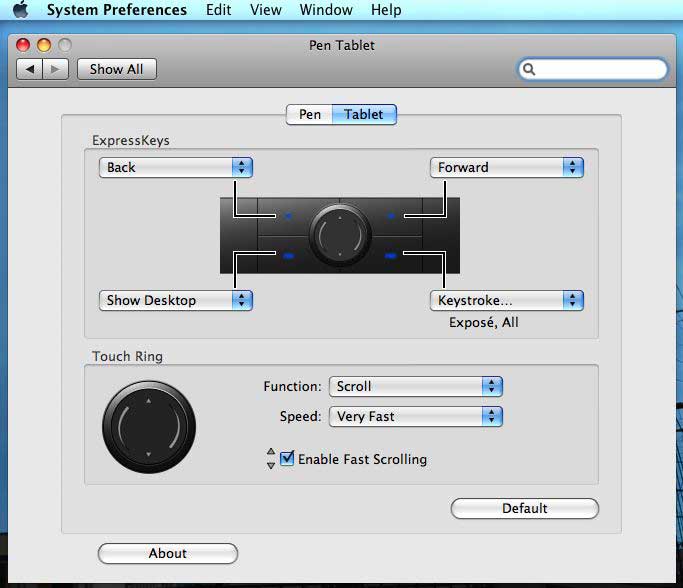
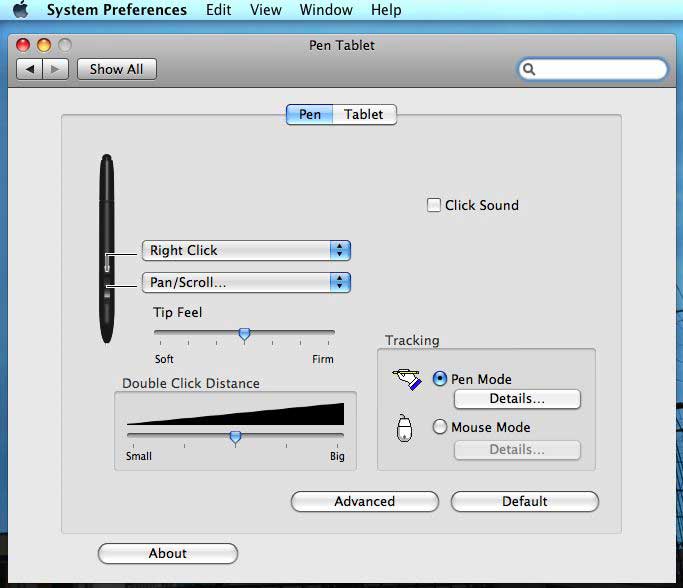
Graphics tablets are an important tool for anyone who deals with images. We have reviewed a few of them (Intuos, Genius) in the past. The usual rule of thumb for graphics tablets is the bigger the better. That was true until we got a look at the Wacom Bamboo.
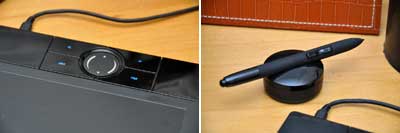
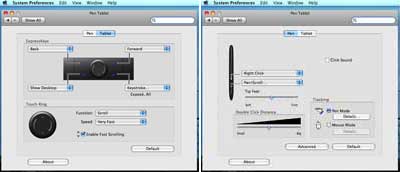
The Wacom Bamboo is a high-resolution tablet (active area: 6x4, 2540 lpi) with 512 level of pressure sensitivity. Integrated into the tablet are four programmable buttons and a touch-sensitive circular area. The pen has two customizable buttons. As with all Wacom pens, no batteries are required. This is actually a very significant feature, so much so that we only use Wacom tablets in-house because of it.
All of the buttons are software programmable. Once installed, users cna adjust the settings via the Wacom control panel in the System Preferences. Some applications support them directly and the controls on the tablet and the pen will behave in a context-sensitive fashion as appropriate.
The Wacom Bamboo is perfect for sketching, diagramming, and general cursor control. It is USB-powered, light-weight, and small enough to travel with the laptop. An additional "nice touch" is the cable detaches from the tablet, making it less likely to be damaged during transport.
Of course, what would REALLY be amazing is if Apple would incorporate the Wacom technology into their laptops, allowing users to write directly on the screen. Until then, we will make do with this perfect accessory for our Macbook Pro, whether it is in the office or on the road. [Permalink] - Wacom Bamboo Tablet |
||||
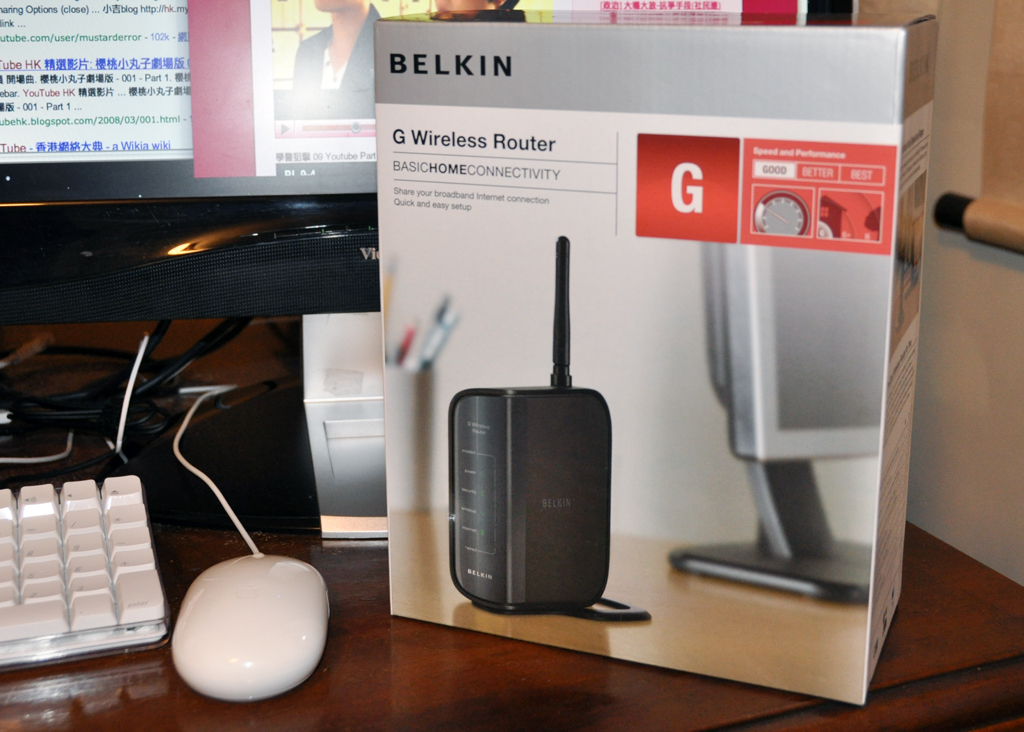
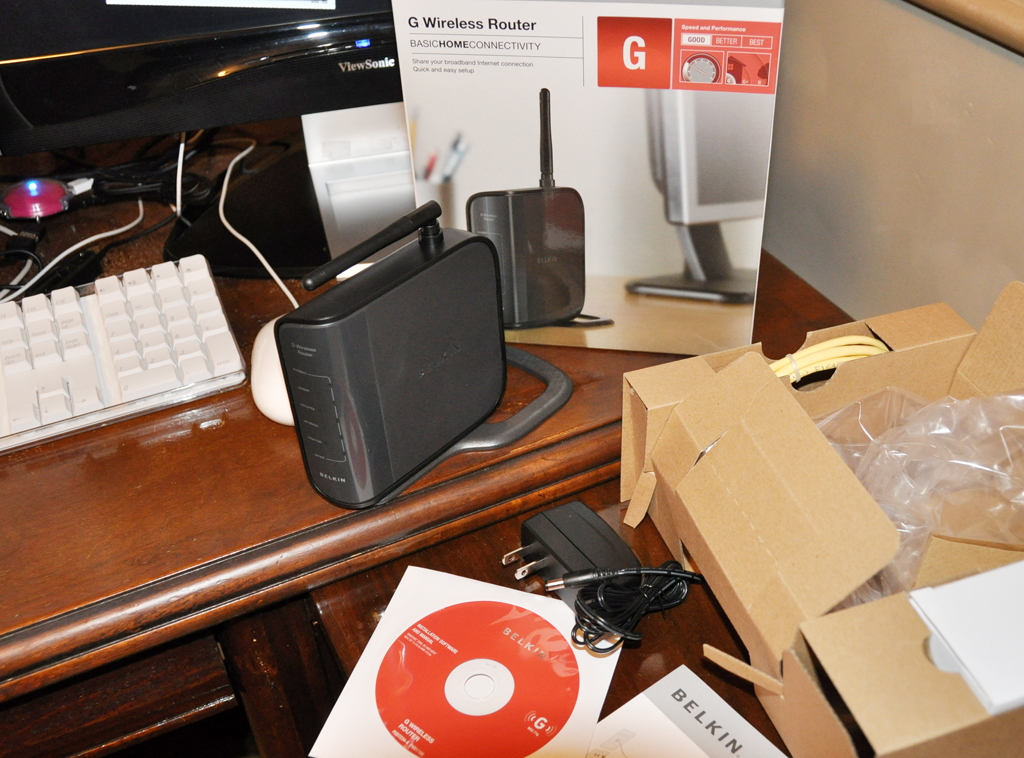
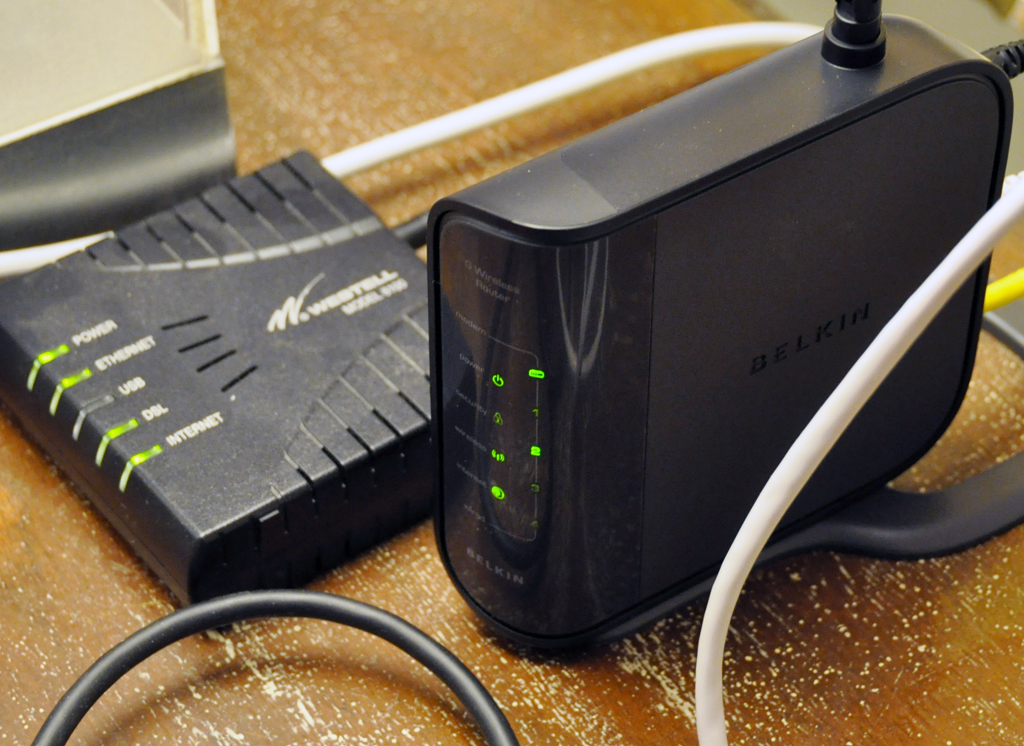
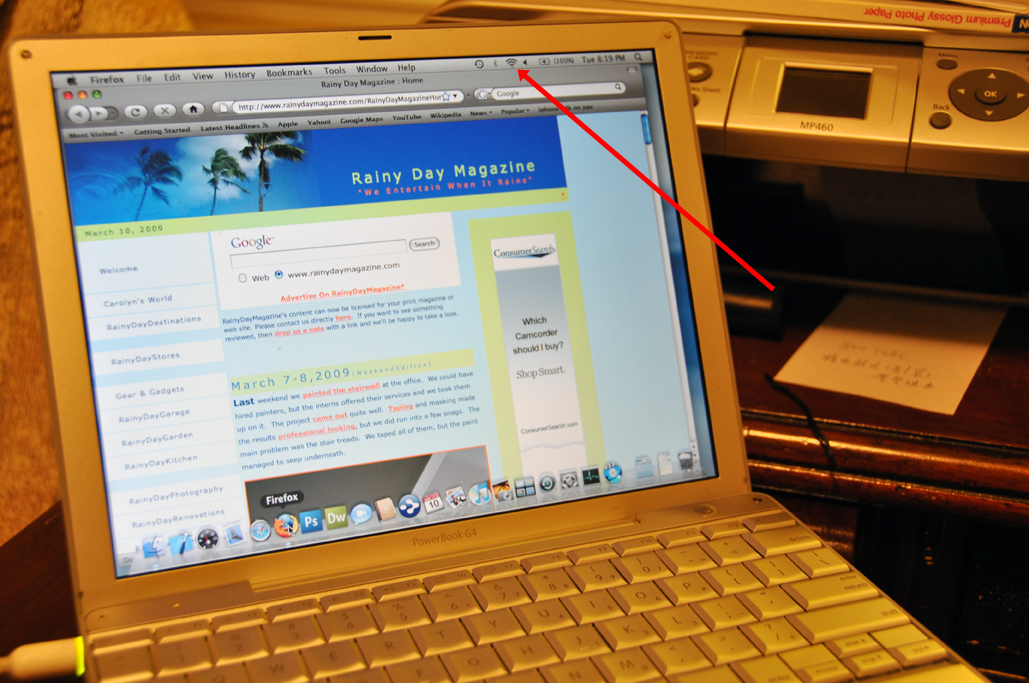
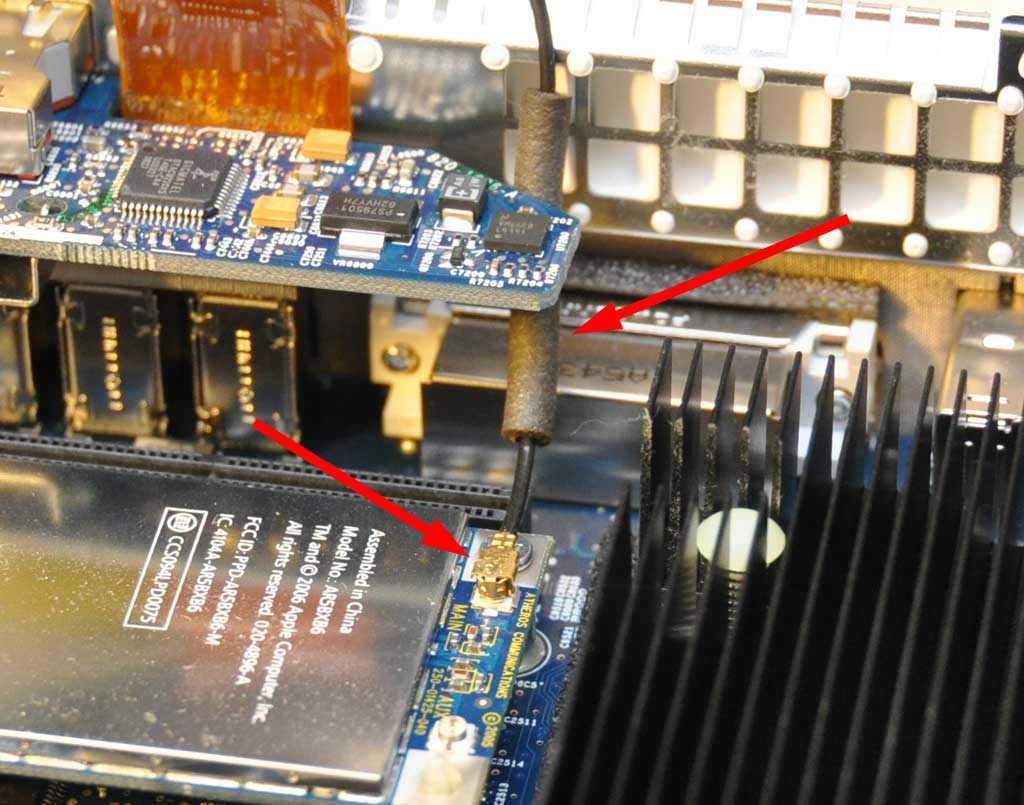
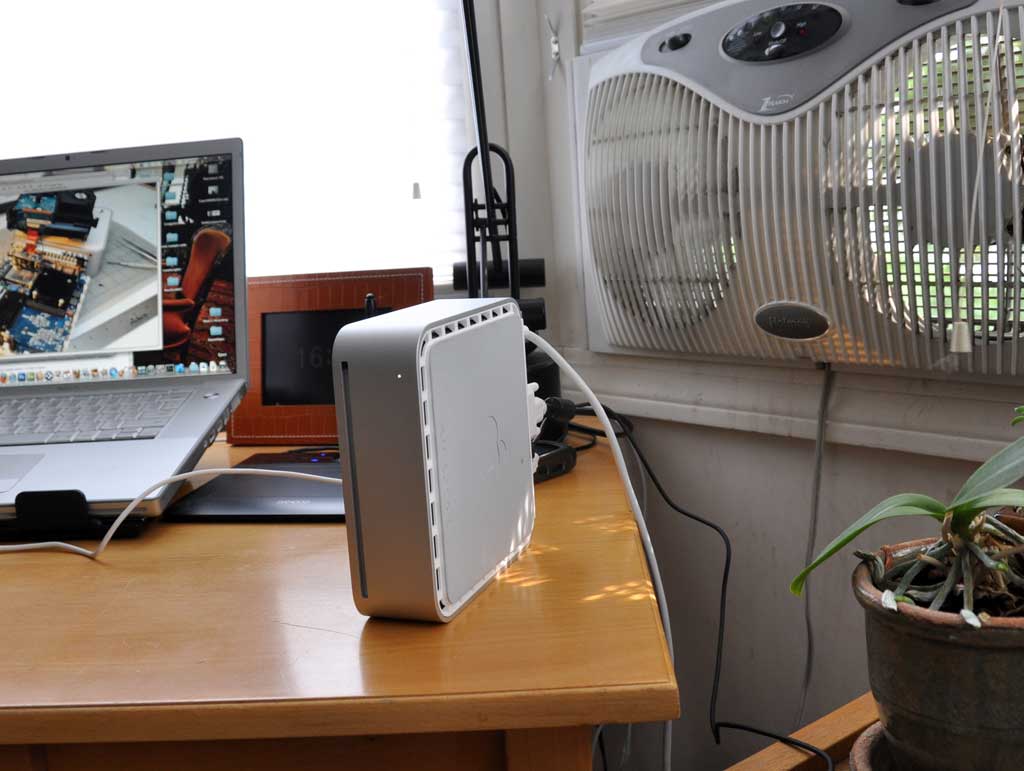
Our Intel-based Mac mini has always been a great computer. About a year ago, the WiFi on it started acting up. The signal was fine when the machine was first booted up, but would gradually degrade until it could not see any WiFi networks no matter what we did. We tried all kinds of things (software upgrade, reinstallation, relocation, etc...), but nothing helped. We eventually accepted the fact that the Mac mini would be a stand-alone machine...until today.
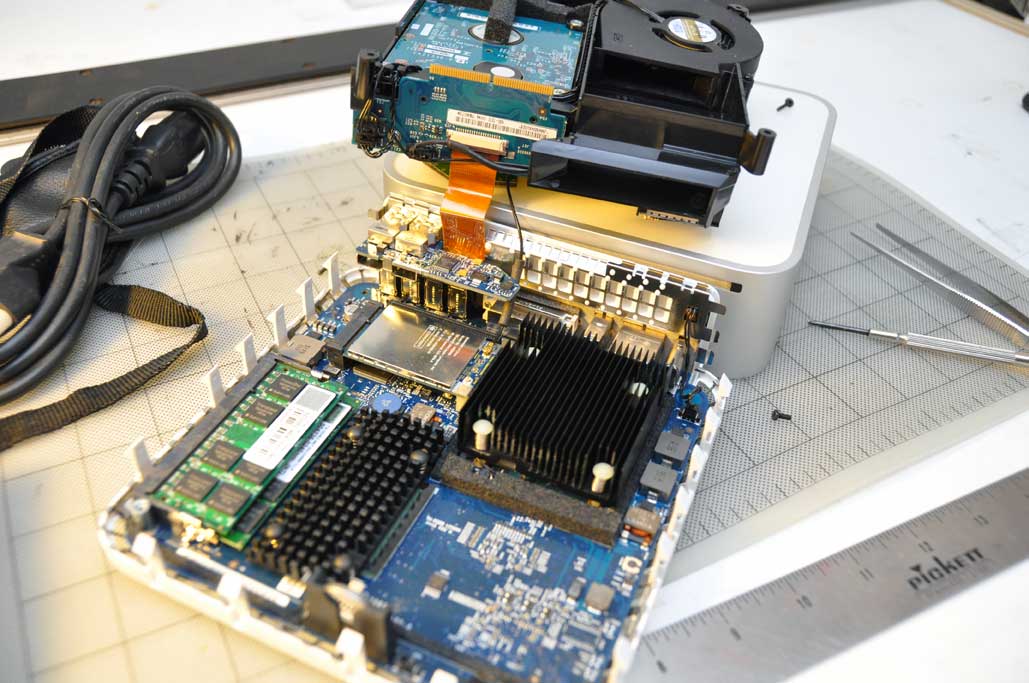
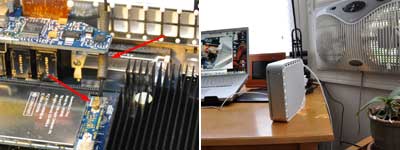
We thought the WiFi problem might be temperature related. It would explain why the connection worked when the machine first booted up, then petered out. It would also explain why it had been more of a problem recently. The office can get a bit warm in the Summer. To get more support for our theory, we opened up the Mac mini to get a better understanding of where the WiFi antenna was situated relative to other things. The process of opening the Mac mini has been previously documented in a series of articles we did back in 2008.
The wire of the WiFi antenna to the main Airport card runs right past a giant heat sink. The internals of the machine get pretty hot during use. Perhaps when we last opened the Mac mini, we left the wire too close to the heat sink? With that as a working theory, we moved the wire away from the heat sink the best we could and closed everything back up. The WiFi worked a bit longer with the wire rearrangement, but the problem came back after about 30 minutes. Would providing more cooling to the Mac mini make a difference? We repositioned the Mac mini in front of the window fan and the result was immediate. Fan on, we were WiFi-connected after about 20 seconds. Fan off, the WiFi connection disappeared in about 30 seconds. Seems pretty conclusive to us. The increased airflow has kept the machine cool and connected for several hours now. We will look for a more permanent solution to the heat problem, but it is nice to know that other machines in the office will once again be able to "talk" to the Mac mini. [Permalink] - Mac mini WiFi problem |
||||
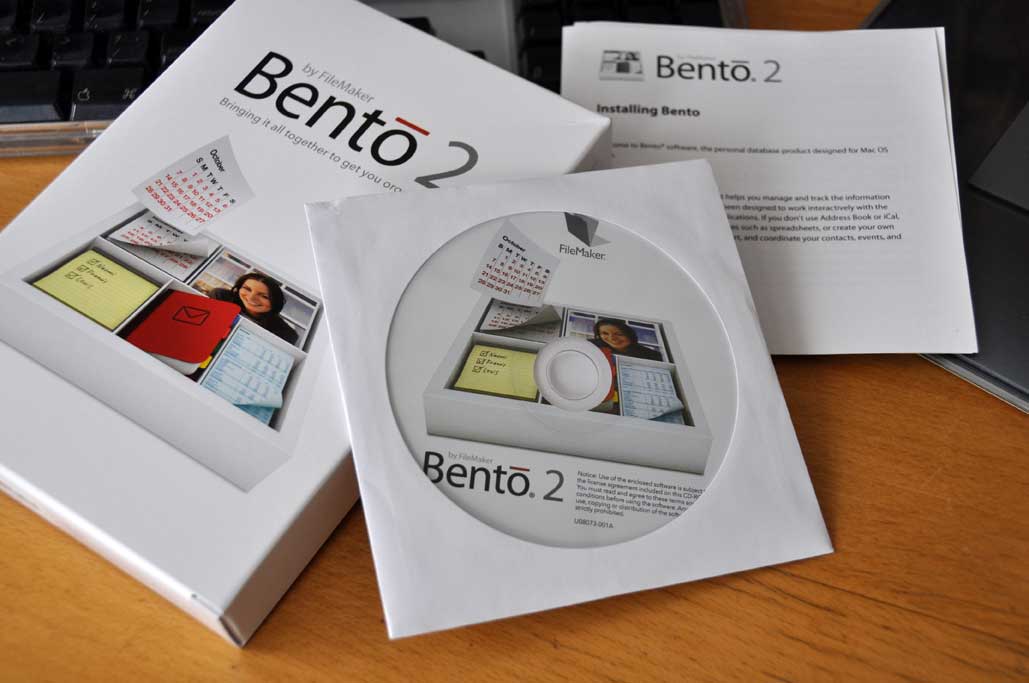
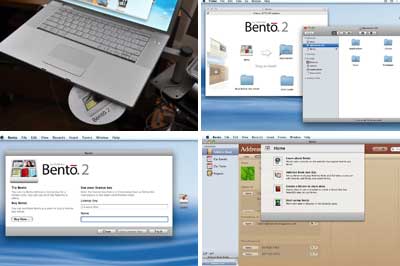
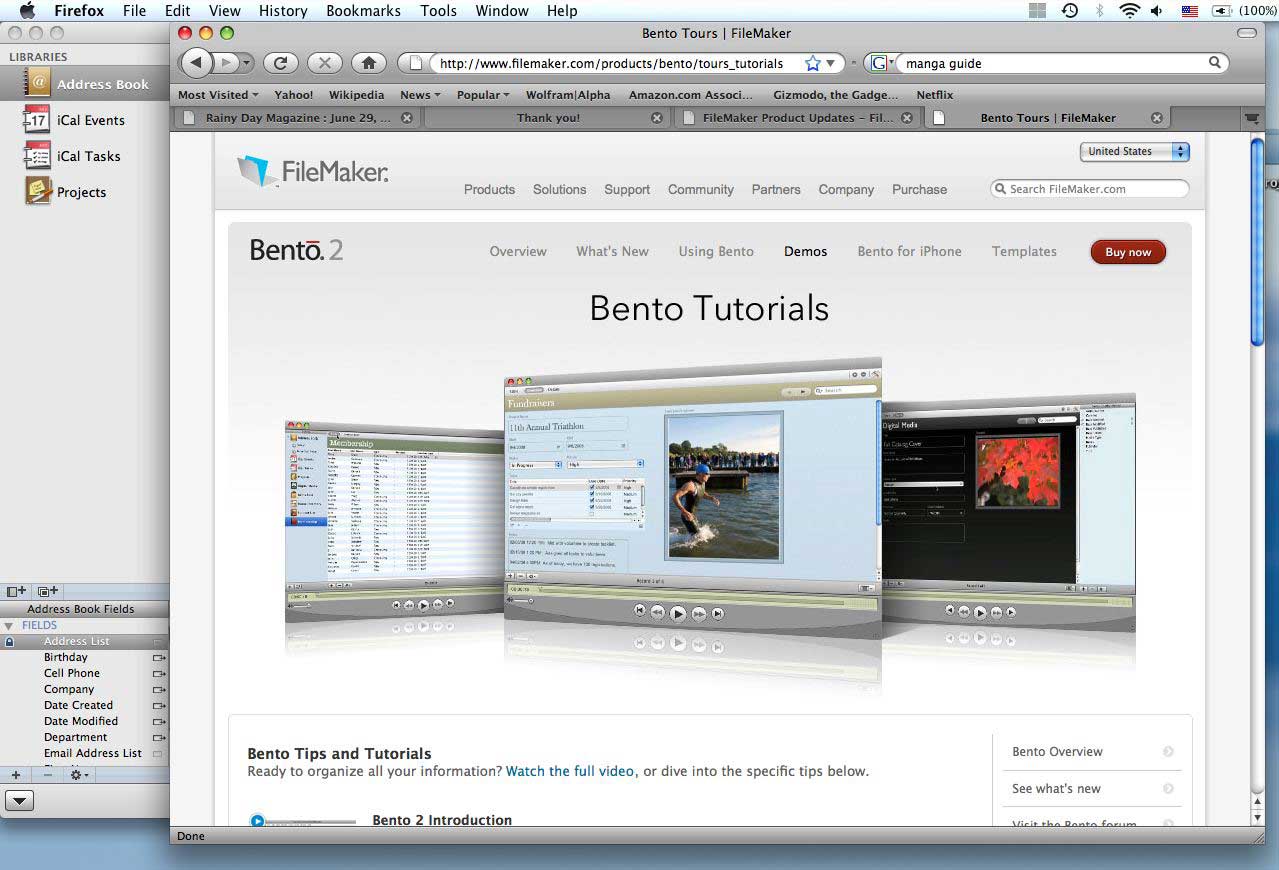
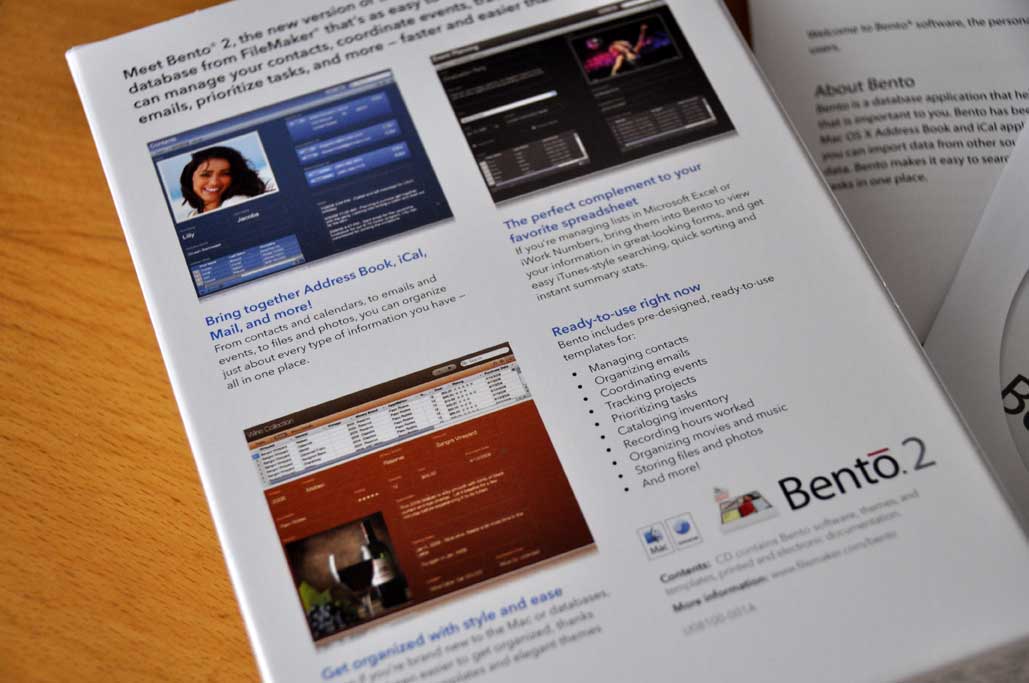
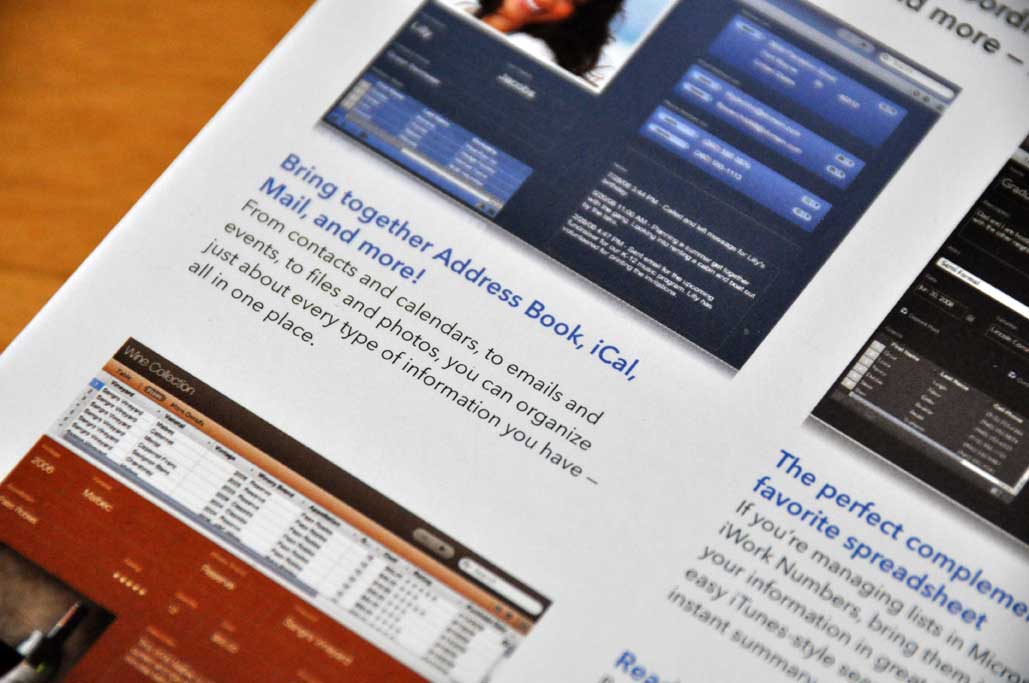
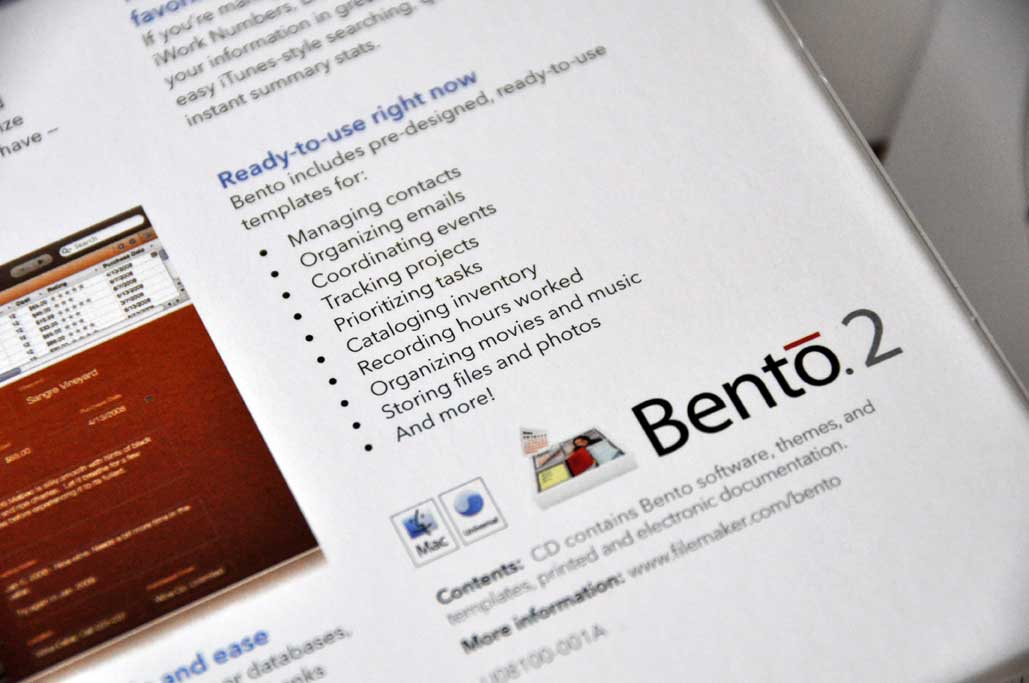
After we mentioned Bento 2 from FileMaker yesterday it generated quite a bit of email traffic so we decided to do a quick follow-up of it today. Just what exactly is Bento 2? What makes it unique? How is it useful? We'll give you some FirstLook answers to these questions today. We'll have a more detail analysis at the end of the Summer.
FileMaker is a company which started on the Mac platform, so one would expect that any software they publish would be very Mac-centric. Indeed this is exactly what we get with Bento 2. Bento 2 is a personal database creation and management system written just for the Mac.
It has all of the tight OSX integration one would expect of from a native Mac application. It also has seemless integration with many of the OSX apps such as Mail, Address Book, and iCal. Filemaker has a library of custom templates that make it easy for Bento users to get started. Users may also share their templates via Filemaker's online repository.
Installation of the software is a simple drag-n-drop of the main application into the Apps folder. A full working version may be downloaded from the FileMaker site, but to use the software past the trial period. a license key is required. Once installed, the software will walk the user through all they need to know to create a database. The FileMaker site has all kinds of tutorials and videos to help users get going on Bento.
One thing to remember about Bento 2 is that it is a personal database system. It is not one designed to be accessed by multiple users over a network. Bento 2 databases' main purpose is to help you organize your life. We'll let you know in a few months if it has made a difference in ours.
BTW, over time, the envelope with the license key and the installation disc can get separated. Without the key, the software is pretty useless. Keep the two together. We like to be sure way by writing the key on the CD itself. [Permalink] - Bento 2 FirstLook |
||||
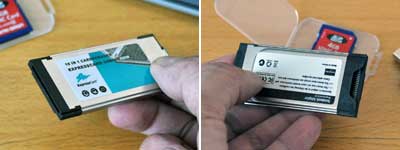
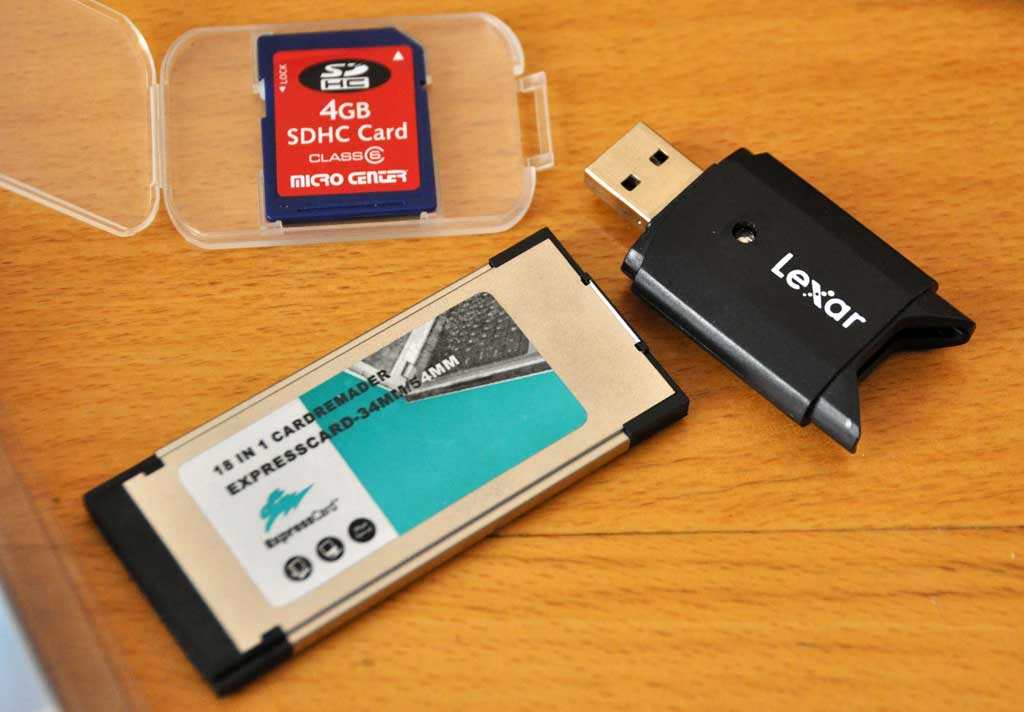
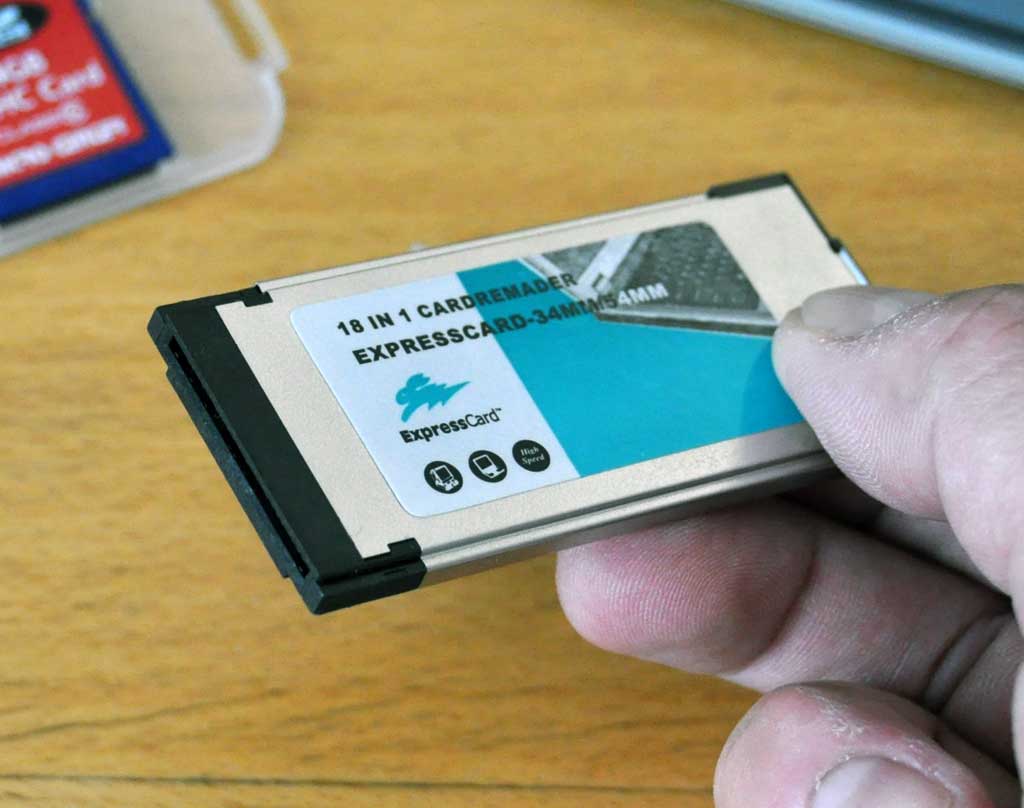
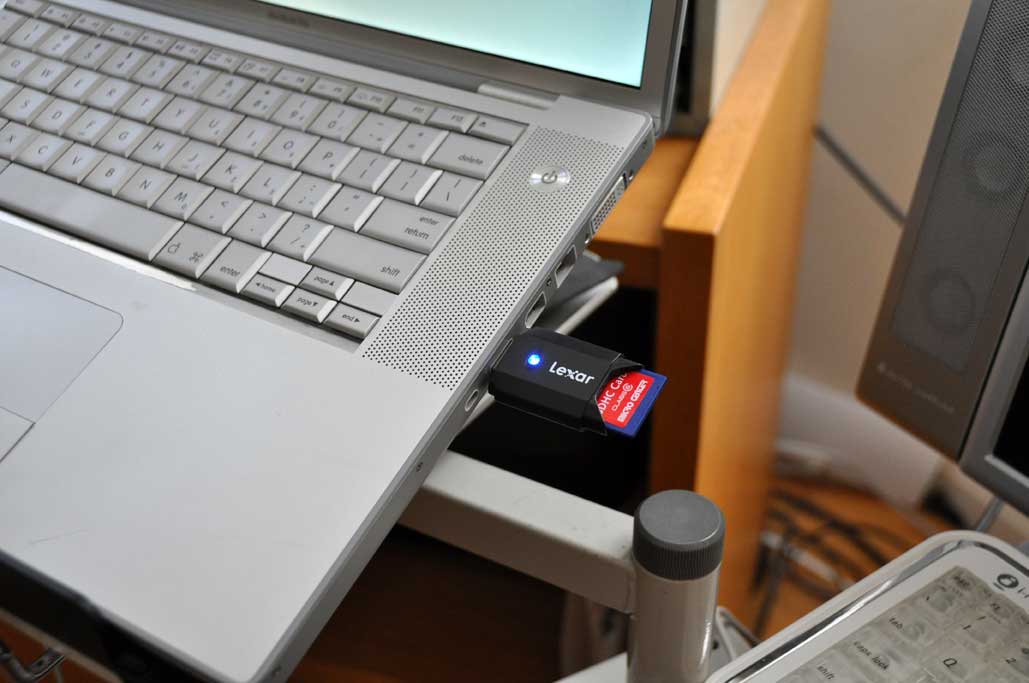
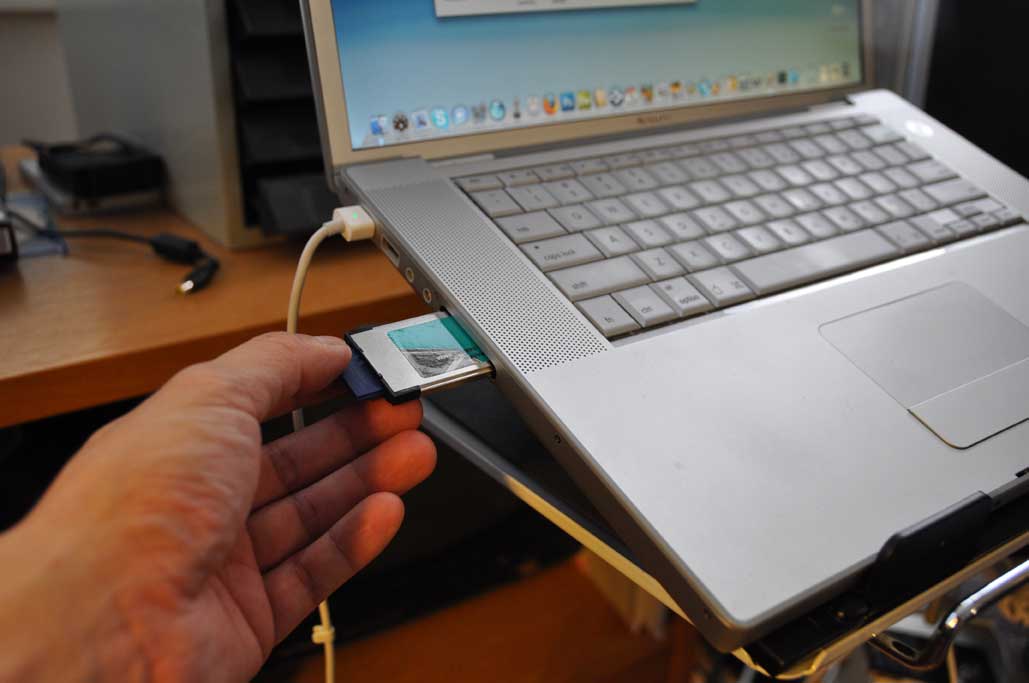
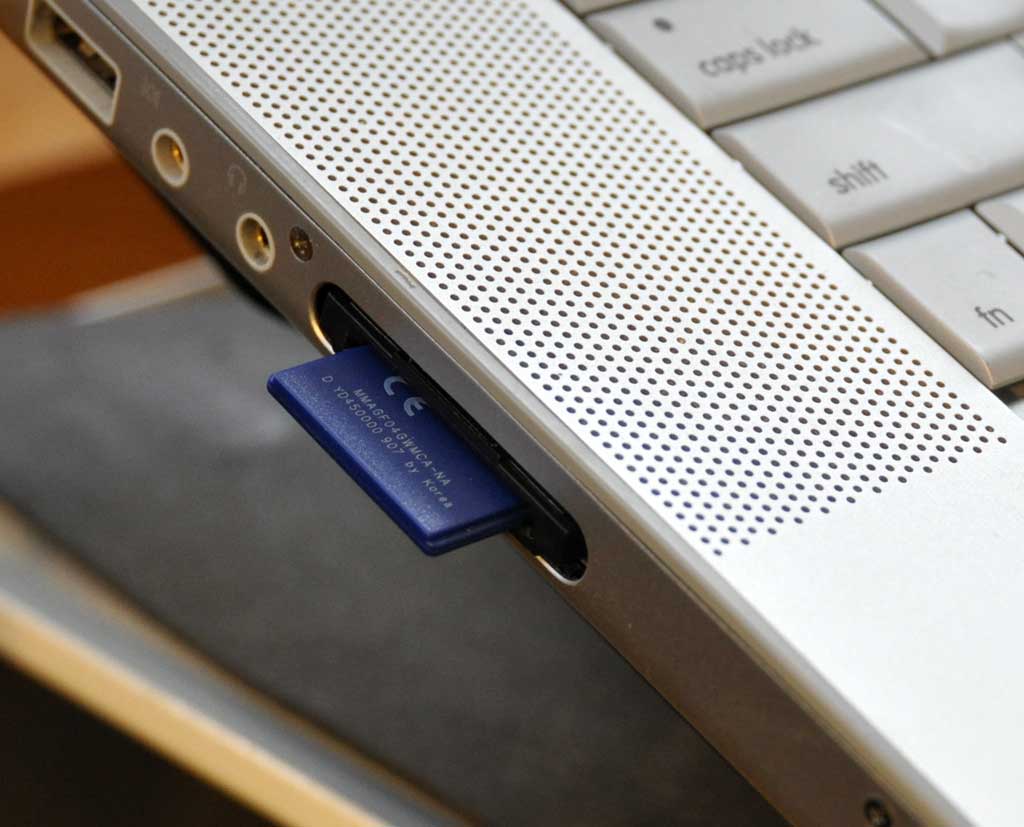
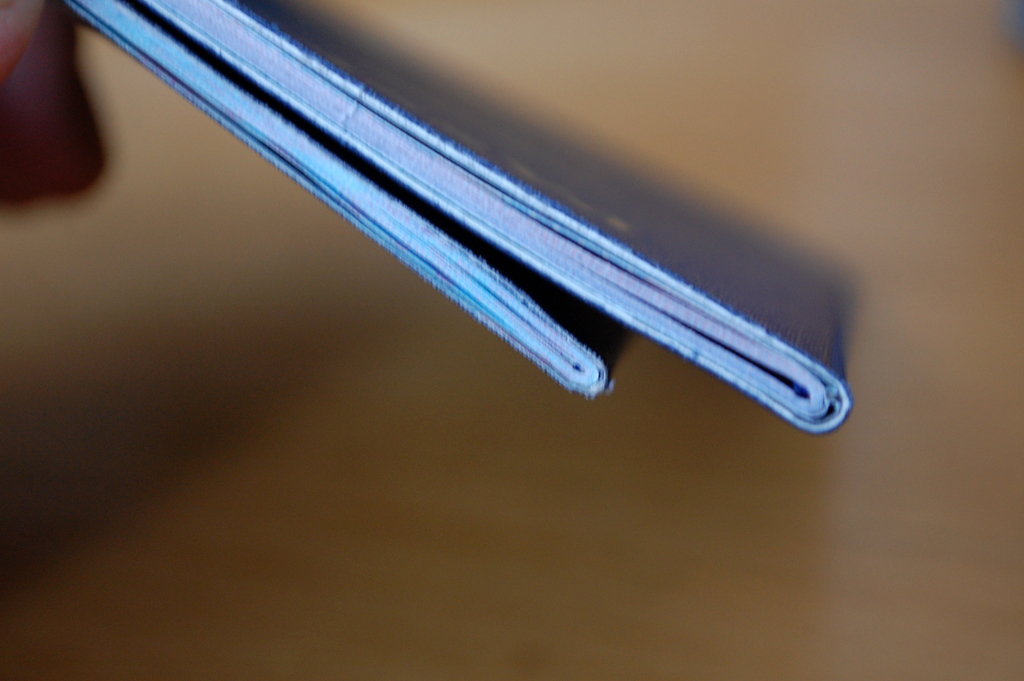
When we purchased our used MacBook Pro we learned it had a slot for something called an ExpressCard. We were not sure what type of cards were available for the slot, but thought it would be great if we could turn it into a flash card reader. A quick search on EBay resulted in this 18-in-1 card reader. We don't have that many types of cards, but it is suppose to work with an SDHC card.
The ExpressCard is a bit bigger than a typical flash card reader that plugs into the USB port. The nice thing about the ExpressCard is that it will completely disappear into the machine.
The ExpressCard slot is on the left of the laptop. The opening is covered by a flip-down lid. The lid will move out of the way when the reader is inserted. When the reader is inserted properly, it will disappear into the body of the case. The ejection mechanism is a spring-loaded release. Push the ExpressCard in a little more and the card will just pop out.
We normlly attach our USB card reader on the right and it sticks out about an inch and a half or so. While this particular ExpressCard reader sits flush with the laptop case, the flash memory card does not insert all the way in. This means it will be best not to leave the card in the reader as it may snag on something.
The flash memory was recognized and appeared on the desktop...no driver installations needed. Plug and Play at its finest. We now have a non-protruding flash card reader in our MacBook Pro. As we constantly use the card reader to shuttle images into the computer, adding the ExpressCard reader is definitely a worthwhile addition. Highly recommended. [Permalink] - ExpressCard Reader |
||||
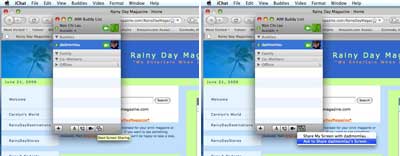
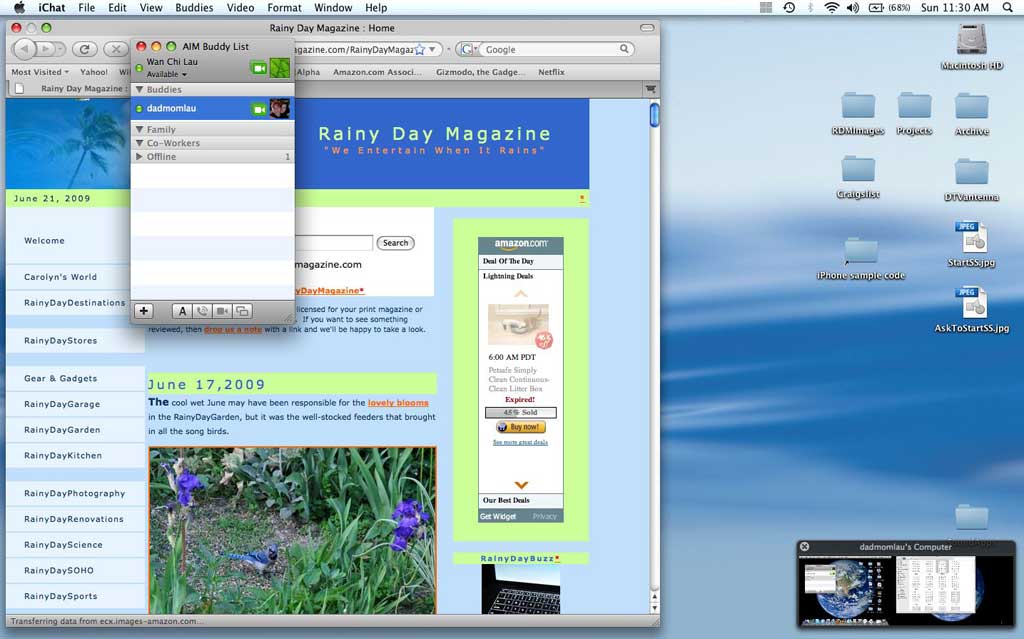
To readers who have parents with computers, getting "tech support" calls is nothing new. However, the difficulty comes when the parents are older, speak a different language, and may not actually understand what you are saying :-) This is when being able to see what is on their computer screen can be a HUGE help. "Screen sharing" is now a technology that is available on all OSX 10.5 equiped Macintoshes.
Apple has had a feature call Remote Access for many years, but it cost extra and was designed for system administrators rather than the average users. However, with the recent release of OS X 10.5, screen sharing using iChat has been made so easy that "normal" people can now share screens from anywhere across the Internet without having to take a course in systems administration.
All that is required is a relatively fast internet connection, that both parties be connected via the Apple iChat software, and have agreed to "share the screen" when invited to do so. The iChat software then does all of the "work" of making it happen.
When connected, the "shared" screen is visible and controllable by both parties. This is a very easy way to remotely administer a machine. This is also an excellent way to show someone how to do something without actually having to be on site.
This weekend is Father's Day weekend. Some in the office will go home to visit with their dads. Others will go and visit, but will end up spending most of the time "fixing" their dad's computer. If he has a Mac, set up "screen sharing" and fix things before you go. This way, when you get there you can spend more time "visiting" instead of "fixing." [Permalink] - OSX Screen Sharing |
||||
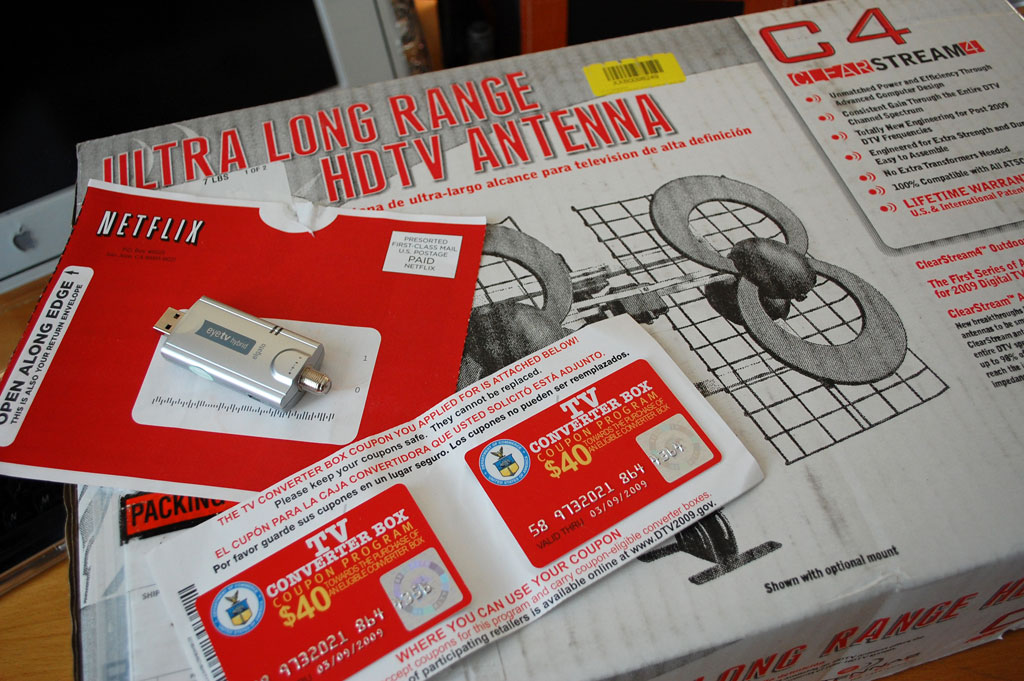
Today is the last day (REALLY) that stations in the US will be broadcasting TV signals in analog form. While we are pretty certain that frequent RainyDayMagazine viewers are aware of this fact, new readers from other planets may not be so aware. The switch to "digital" doesn't really have to affect you all that much. It is likely that many of you get your TV signals via cable or satellite dish, some may watch TV only via their computer, and a small percentage may not even watch any TV at all!
If you want to keep your analog set a little bit longer, a converter box is needed to change the digital signals being broadcast back to analog form for the "old-school" TV tuners. The government has been giving out $40 coupons for about a year now. We never did use ours and they have since expired. We kept them because we thought they would be a good collectors items :-)
For those who want to watch TV, but don't want invest in a separate LCD TV, a digital tuner such as the eyeTV from Elgato may be the way to go. This little gadget will turn your computer into a digital TV. Attach a good TV antenna to it and you can pull in signals from who knows where.
For readers who don't care about watching "live" TV, Netflix is a great option to stay current on TV shows on their own time. Only the "good" shows make it onto DVDs anyway, so when a TV series is available on Netflix, one can be pretty sure it doesn't suck. So there you go...analog TV is going away, digital TV is here. There are plenty of options to getting a "new" TV. By doing nothing, it is also an opportunity to break from the "boob-tube's" grasp and reclaim some "you-time". The choice is yours. [Permalink] - Analog's Last Day |
||||
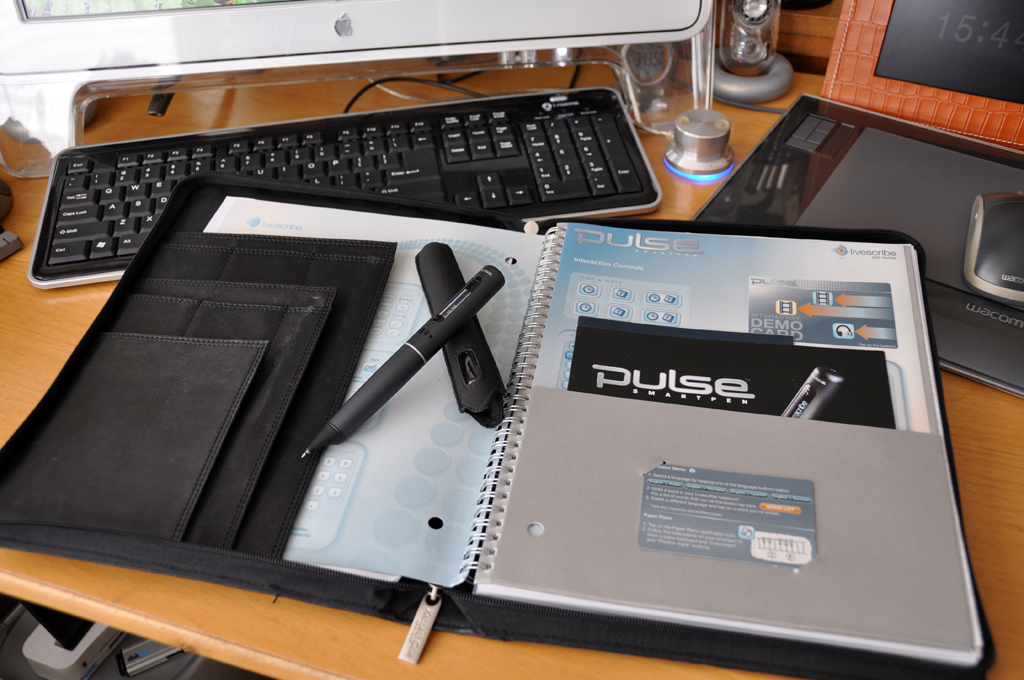
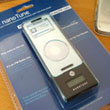
The Livescribe SmartPen is one of our favorite gadgets of 2009. We got it in-house at the end of 2008. Our FirstLook convinced us of the usefulness of this pen for our way of taking notes. We immediately purchased more for others in the office. Anyone using the SmartPen will see there are lots of potential for this device. We have been working on a SmartPen based ideas of our own :-) We posted one such idea in May.
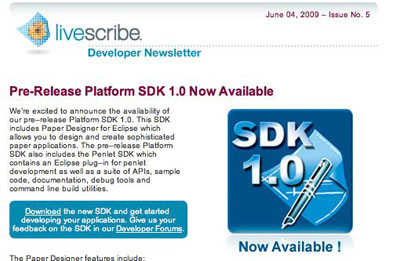
Many of you have sent in some pretty good suggestions after reading that article. Some of those ideas required features not currently available. Today, Livescribe announced that a pre-release version of the software development kit (SDK) for the SmartPen is now available for Windows platform. Mac developers (like us) will have to wait a little longer. The SDK has lots of new capabilities not currently available in the released product. Many of these are to support developers in the creation of new SmartPen features.
A big part of the SKD is the Paper Designer. The Paper Designer features include:
If you have been wondering what to do on the next "rainy day," go get the SDK, fire up the development environment and make something fun and useful for the SmartPen! [Permalink] - Livescribe SDK |
||||
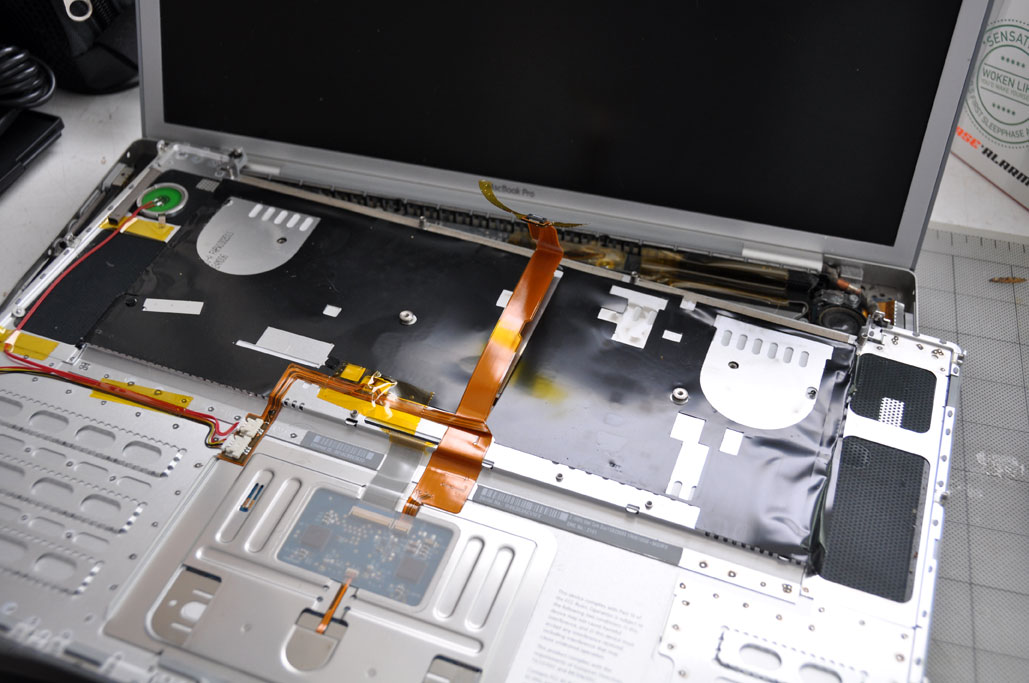
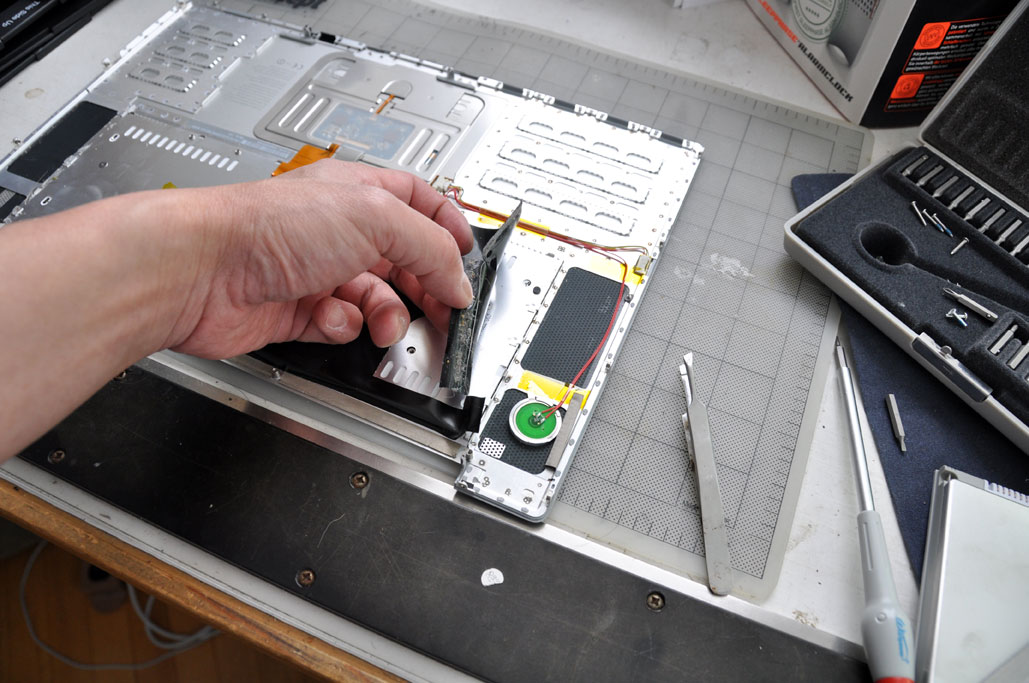
Yesterday we showed how to remove the top cover to gain access to the keyboard. Again, instructions from the folks at PowerbookMedic are excellent. We encourage readers to check them out first. We took photos of things which we thought warrant a closer look. Click on any of the photos for a larger version.
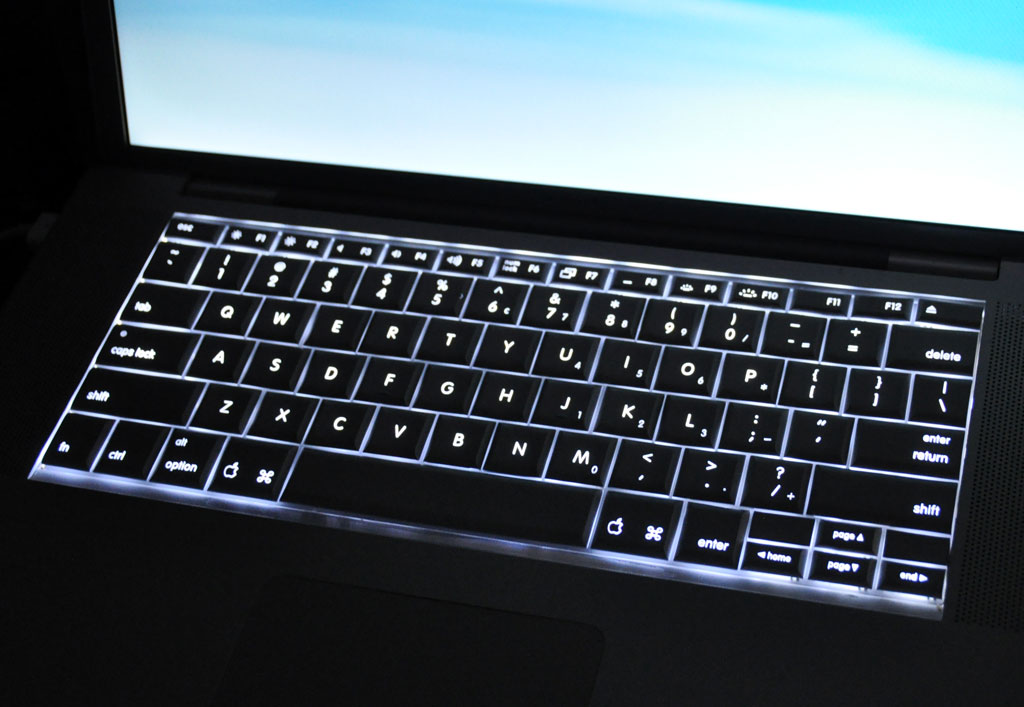
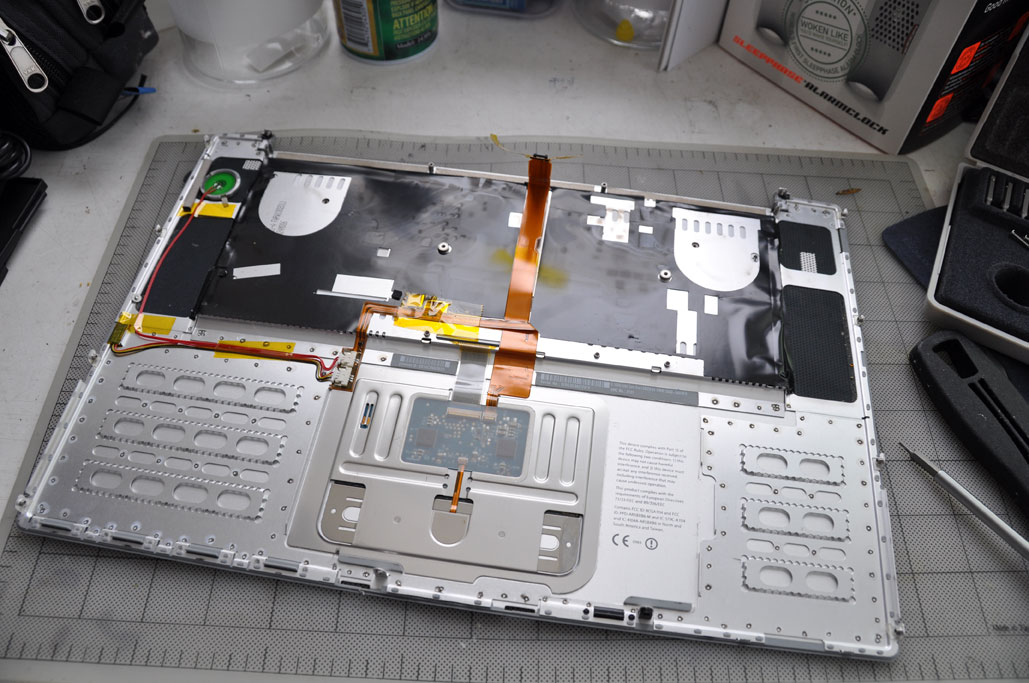
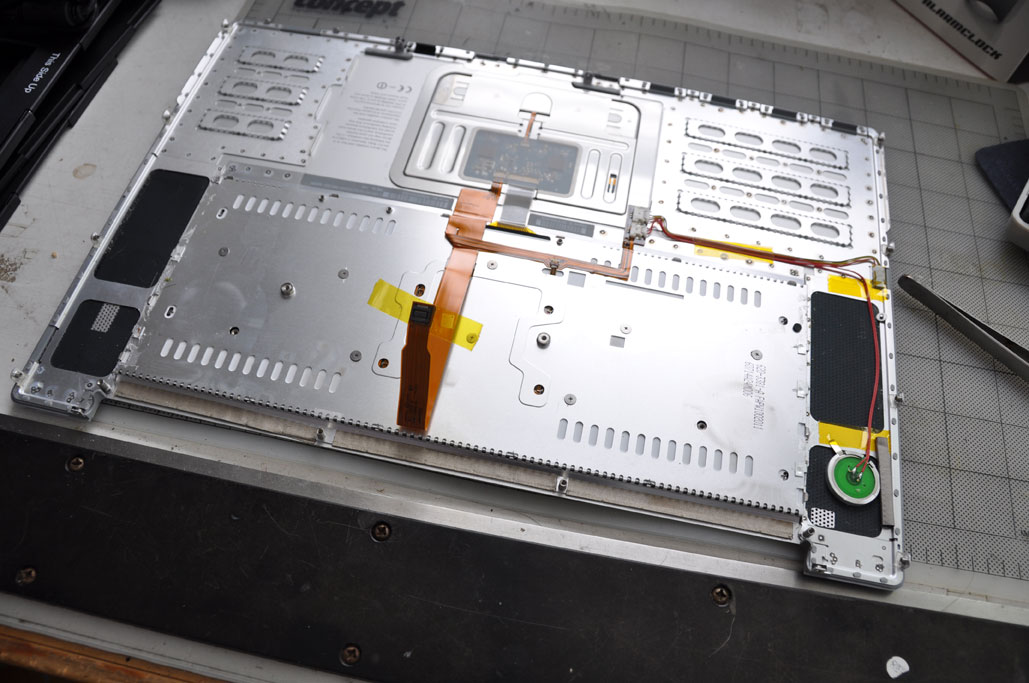
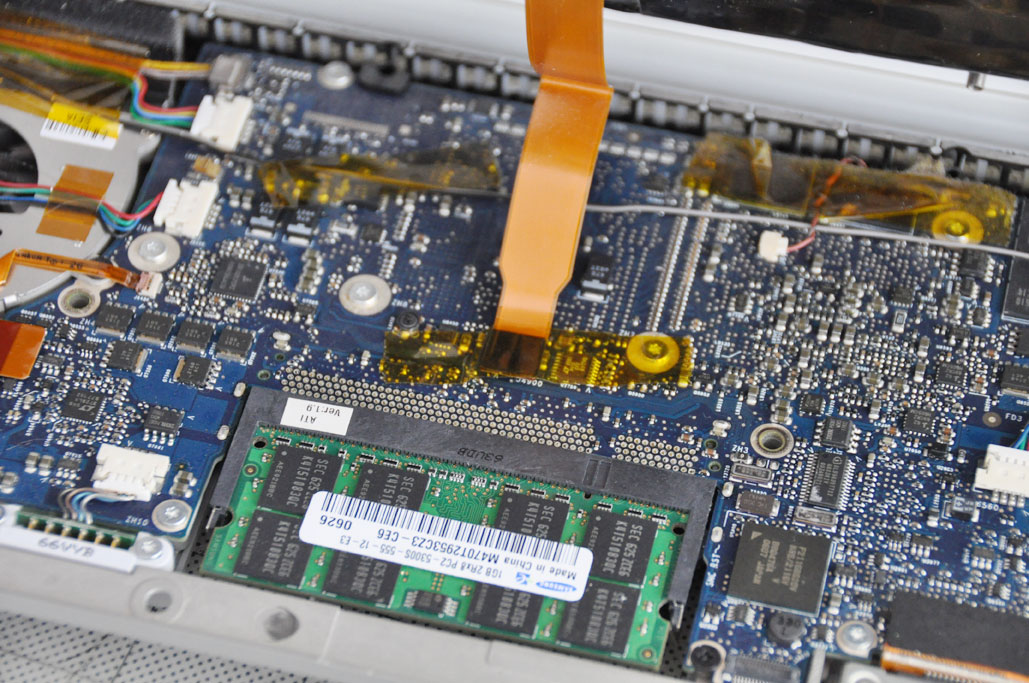
Today we will walk you through the steps for replacing the keyboard. When we examined the top, we noticed a layer of black tape sitting between the keyboard tray and the main circuit board. As readers may be aware, this MBP keyboard has backlighting. We are guessing the tape was there to minimize the light-leak around the edges and to protect the circuits on the main board from coming in direct contact with the metal tray.
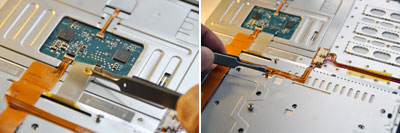
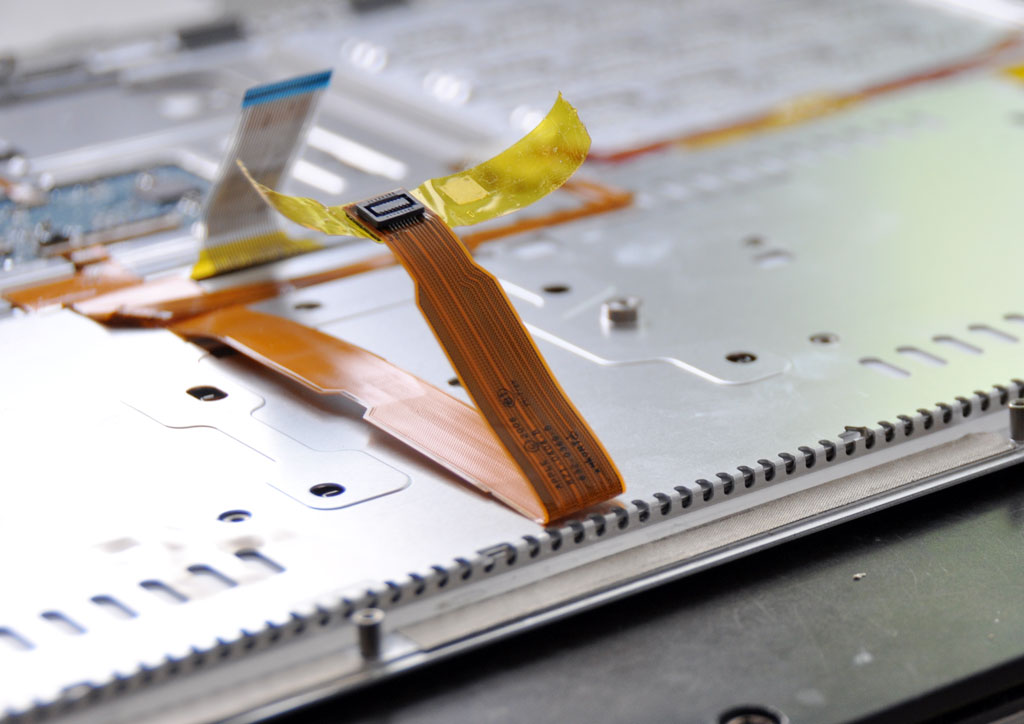
To get at the screws anchoring the keyboard to the tray, the black tape must be peeled away. We did this carefully so we could reuse the tape. You may not care if you have a replacement set. Besides the tape, there is also a clear film which covered the ribbon cable sockets. We used a razor blade to lift the edge of the cover and did this carefully for all of the obvious reasons.
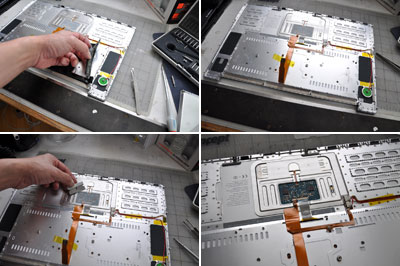
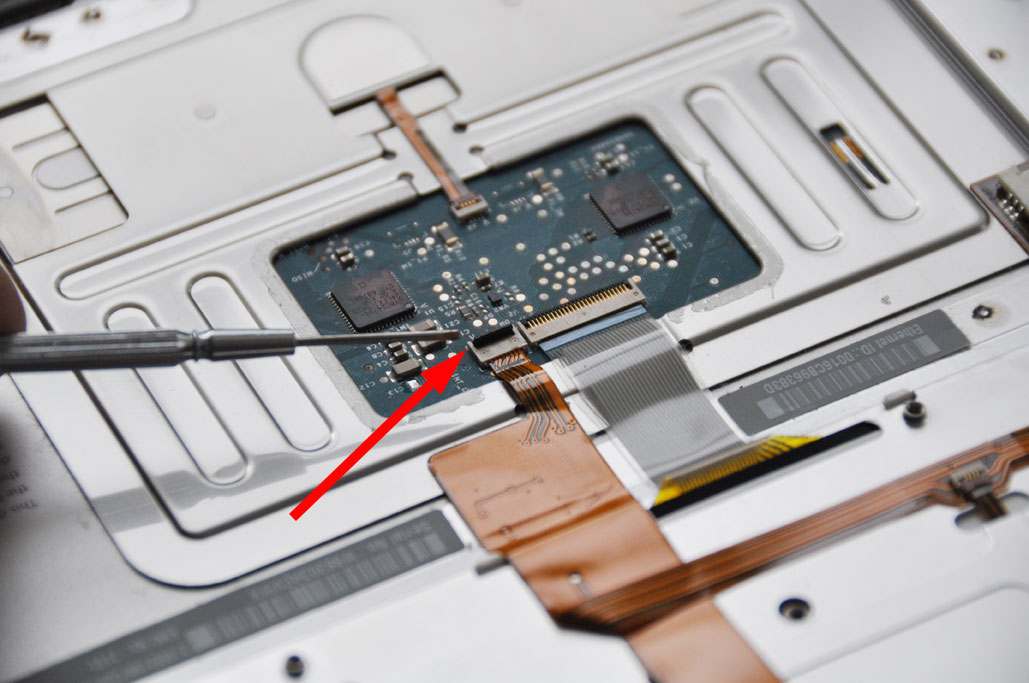
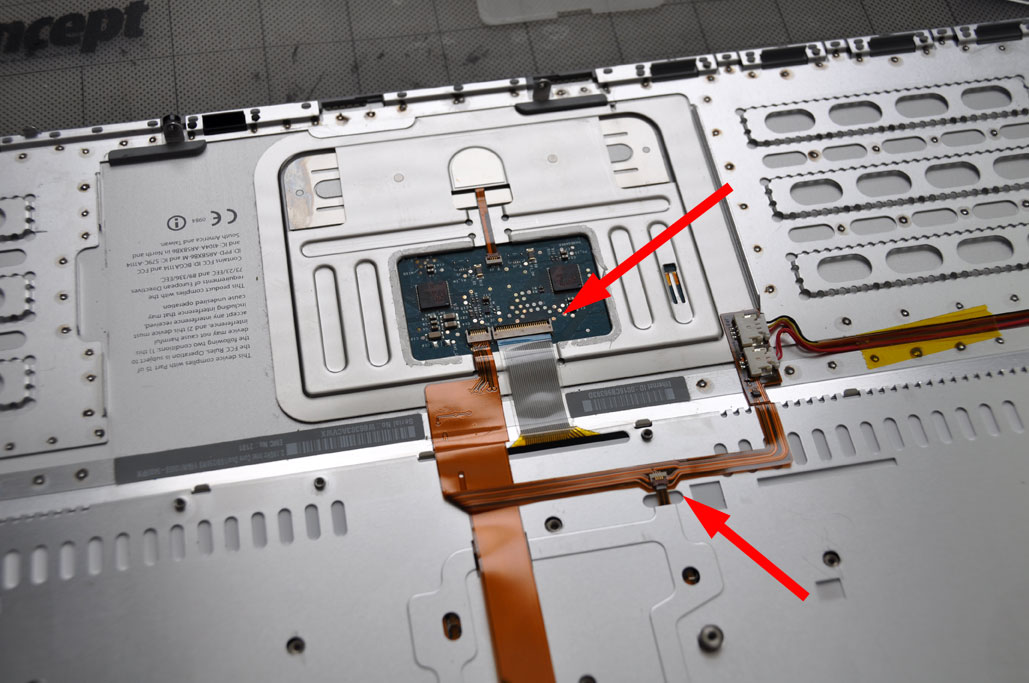
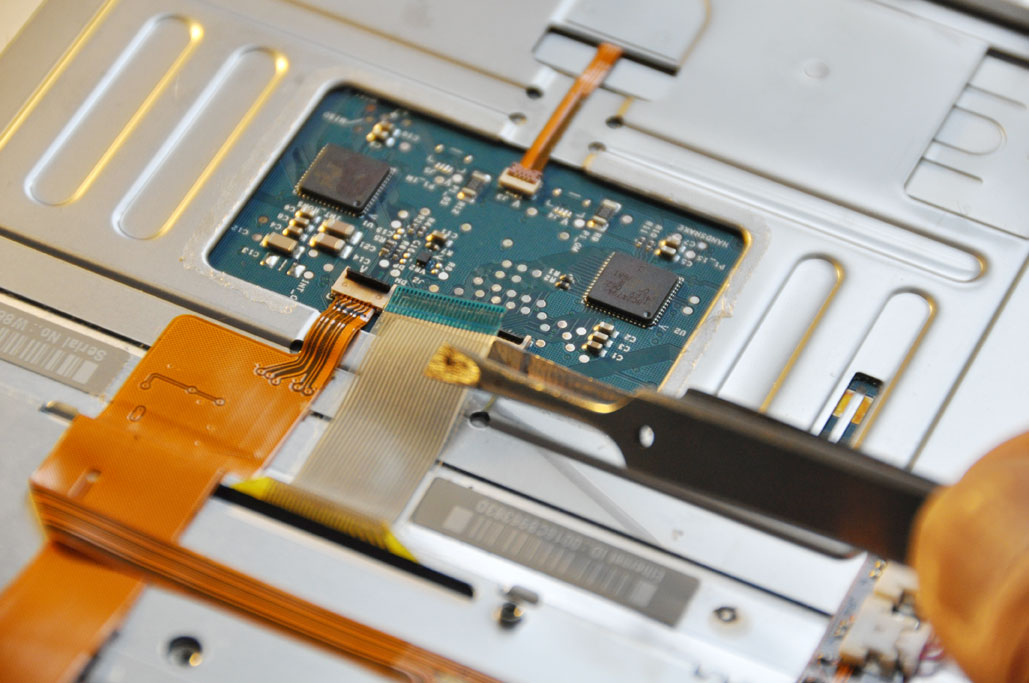
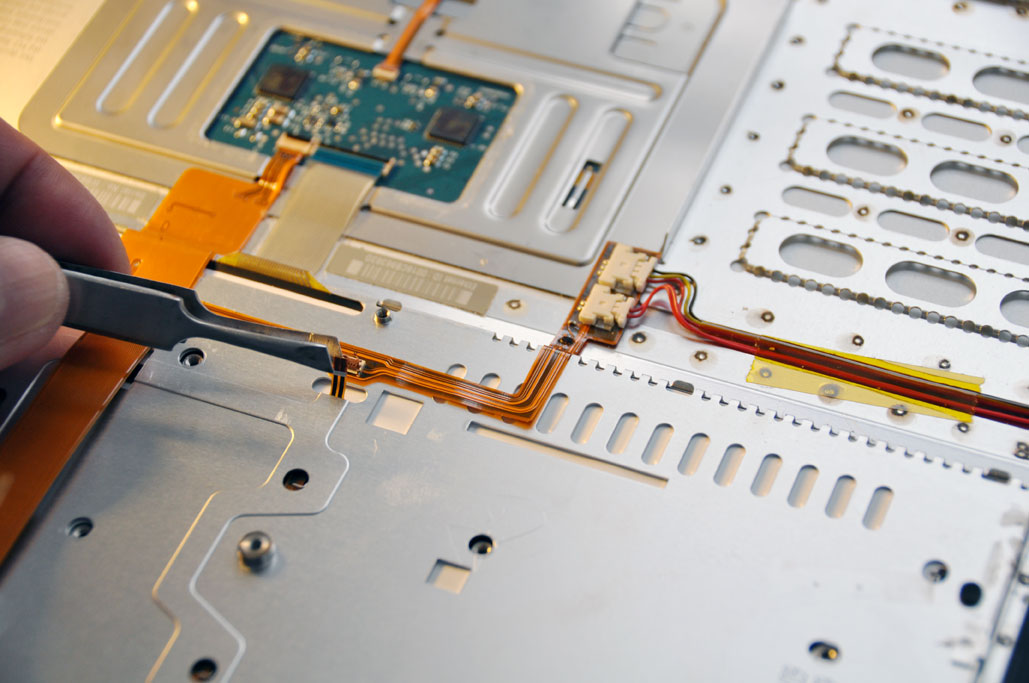
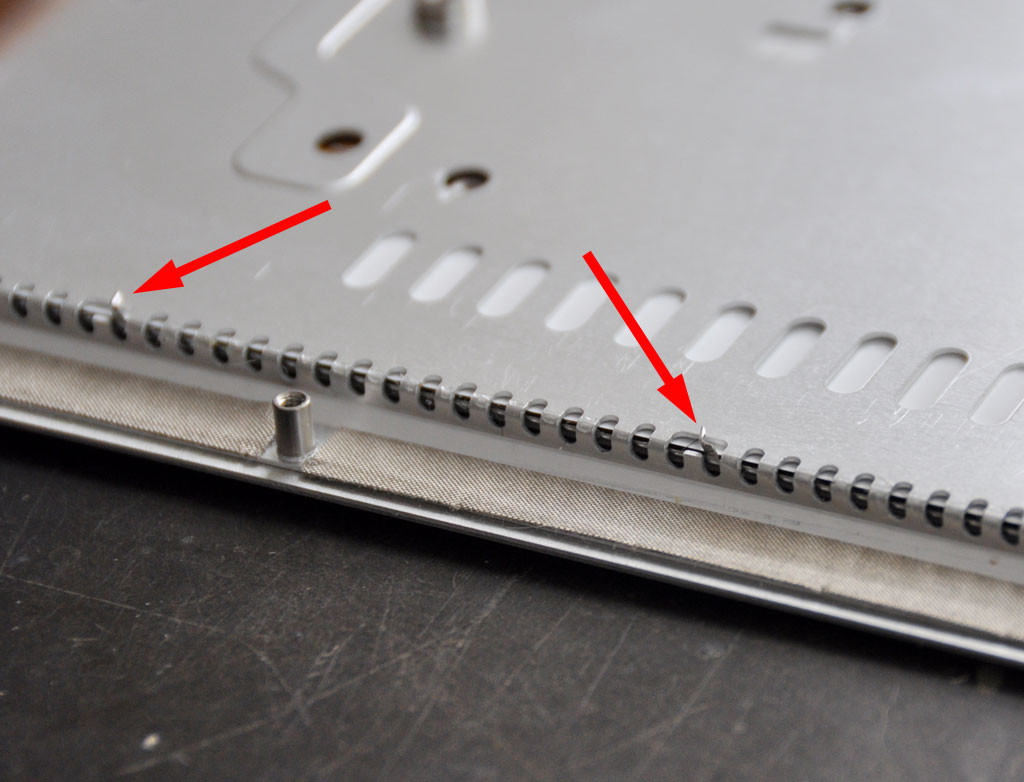
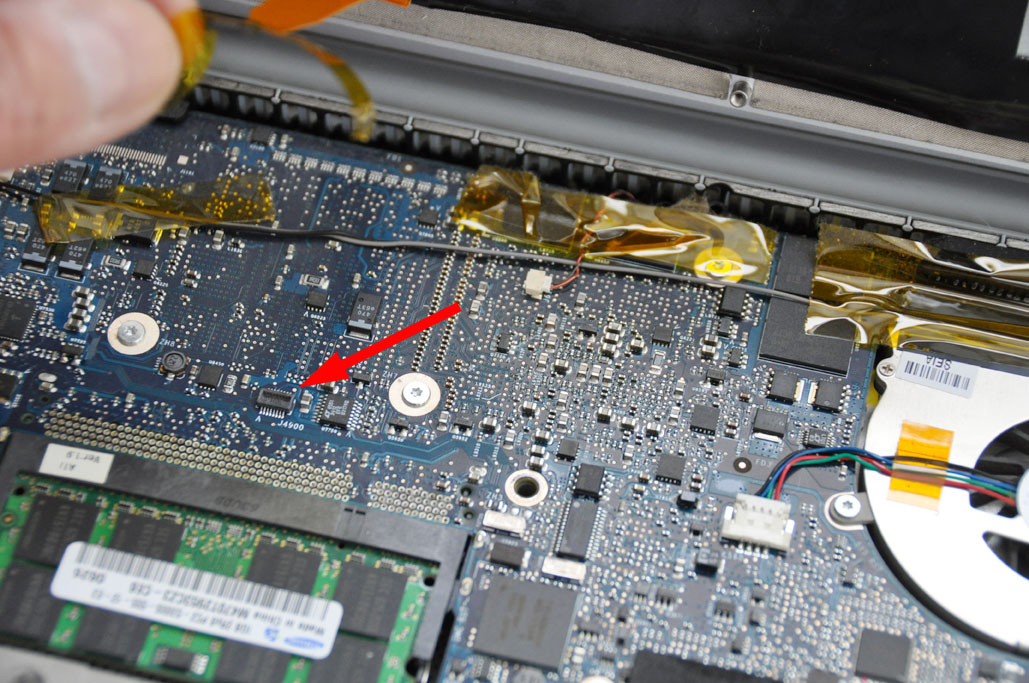
The black locking tabs (RED ARROW) must be flipped up in order to free the ribbon cables. This is a VERY delicate step. If you break the tab, you will need to replace the entire top as the tabs cannot be fixed.
We realized that we DID NOT need to free the small cable, just the larger one next to it. The small cable that must be freed is the one protruding out from a little opening. This is the power leads for the backlighting.
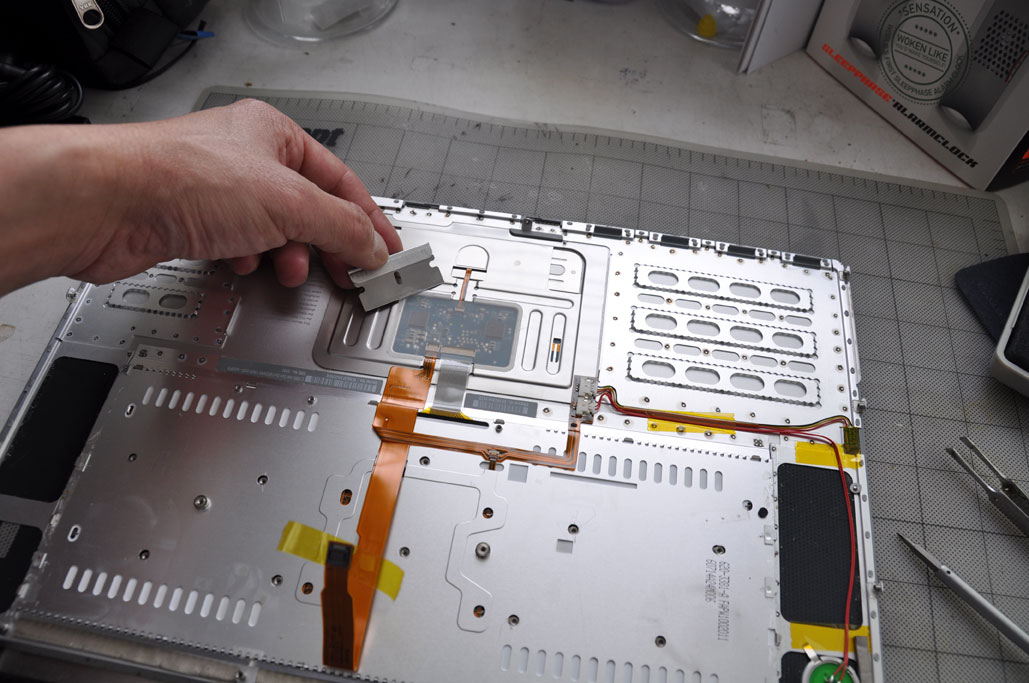
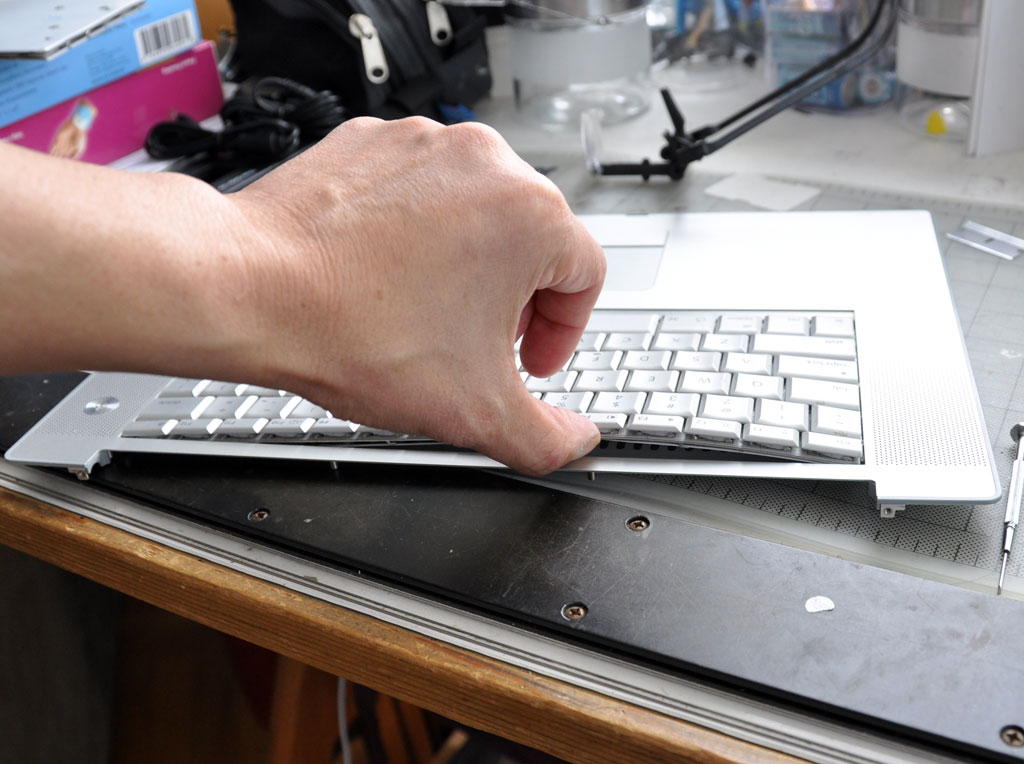
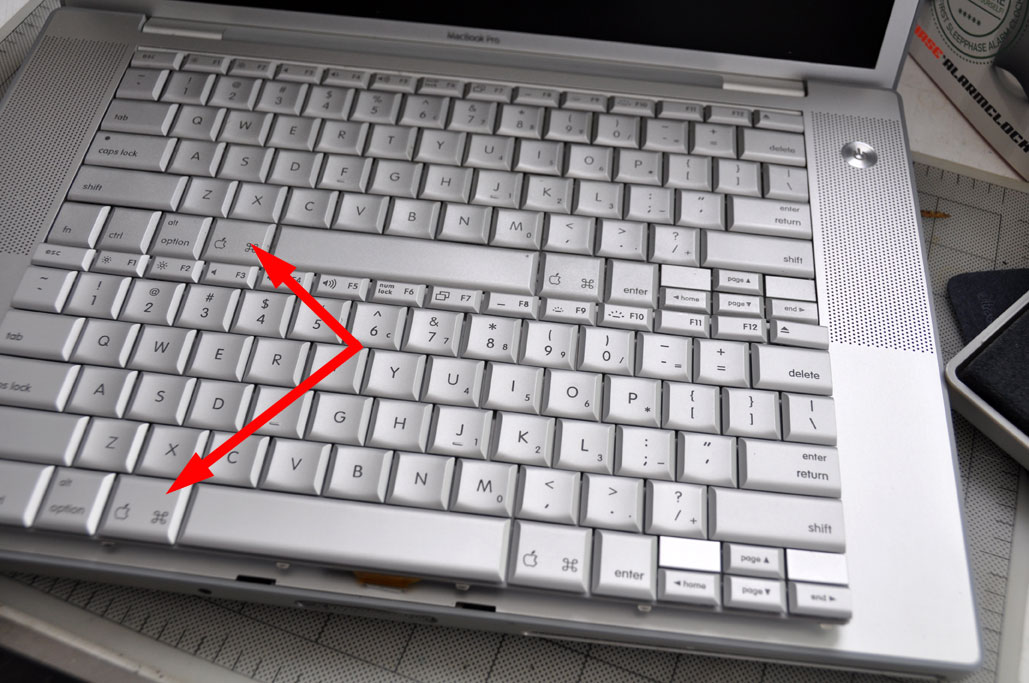
At the edge are four little locking tabs which have been twisted to anchor the edge of the keyboard against the tray. They must be straightened so the keyboard can be lifted out.
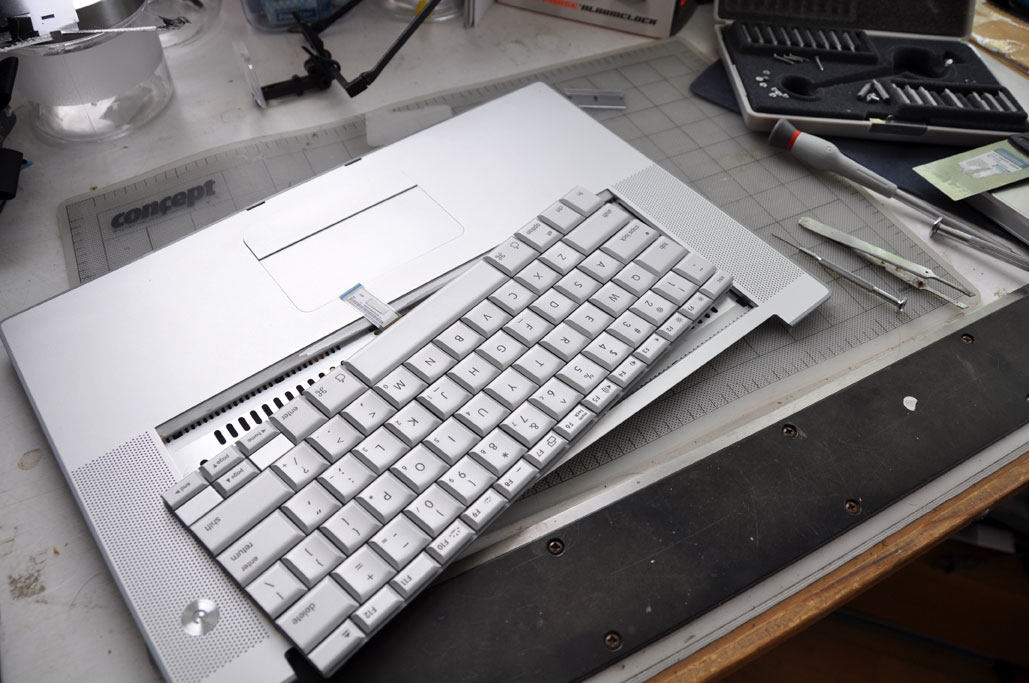
Once the keyboard has been freed, the hard part was over. Replacing it with a new one was just the reverse of the steps (insert, twist the locking tabs, reconnect the 2 cables, re-attach all the screws, reconnect the top cable to the main circuit board).
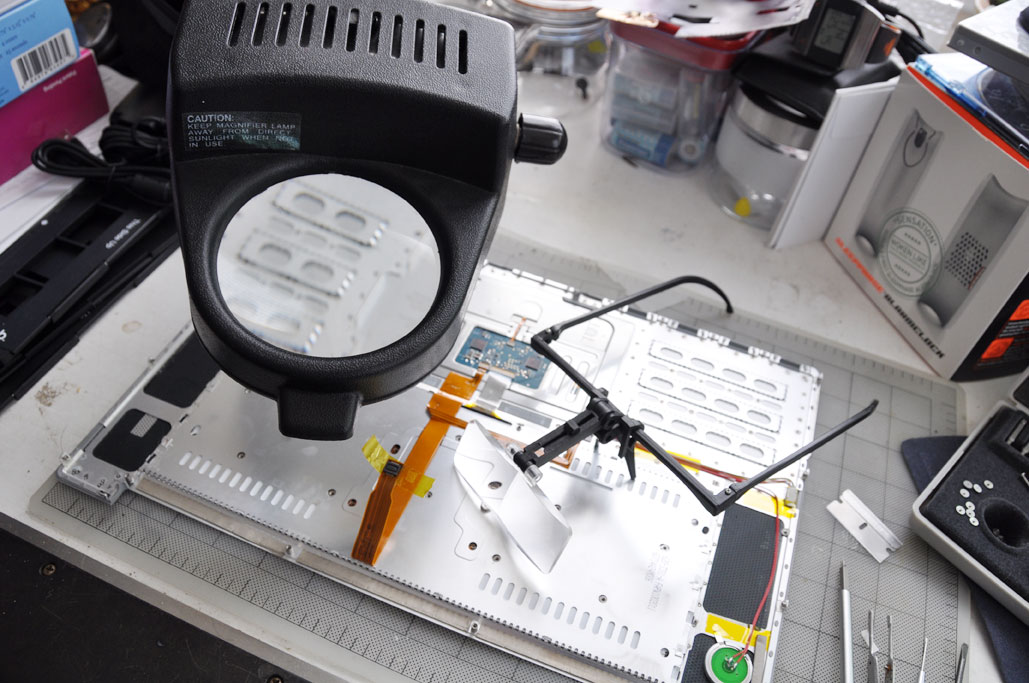
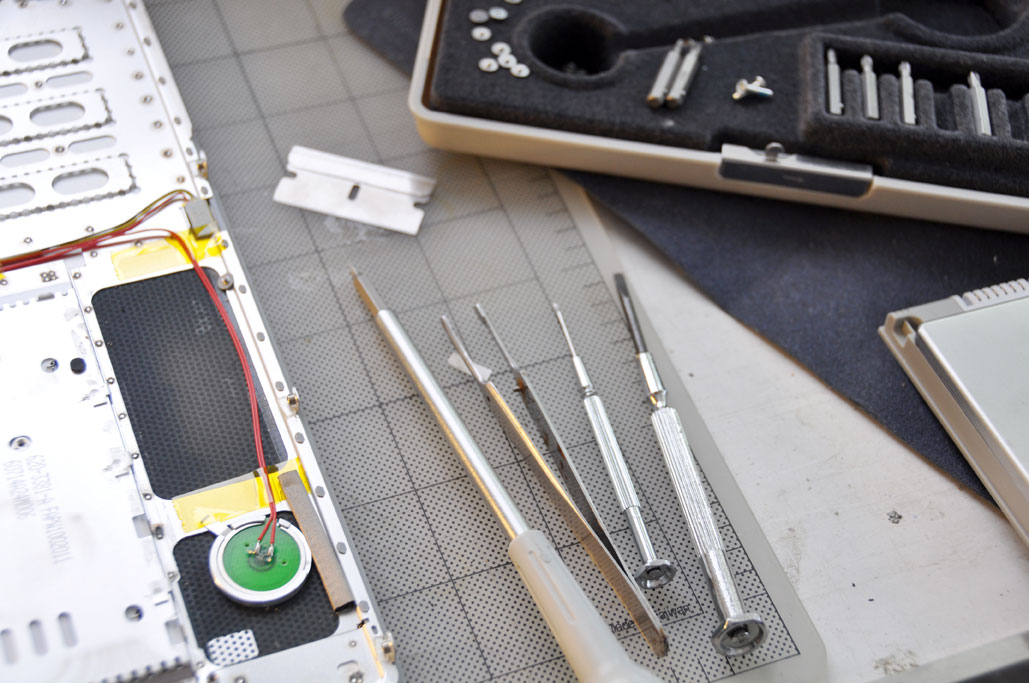
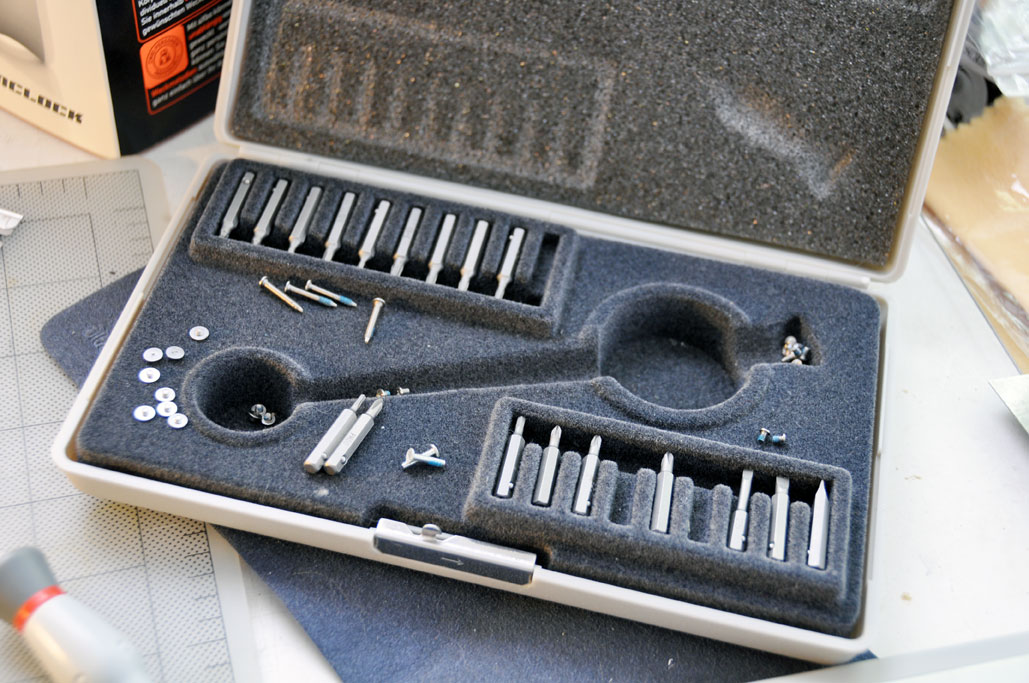
Perhaps we should have put this last bit at the beginning, but having good tools really made this project a lot easier. Some of the key tools were magnifying lamp and glasses, good jeweler screwdrivers / bit set, and a place to put all the screws without mixing them all into a single pile. The screws were not all the same, so keeping them grouped separately made it much easier come reassembly time...just saying.
Of course, the true measure of the success of any RainyDayProject is whether we were successful in getting everything working again. In this case, we could provide visual proof that the machine successfully booted and the backlighting is now functional. You will just have to take our word for it that all the keys are working as expected...well, with the exception of the Caps Lock key. We are not sure why it is not working, but it is a good thing we don't really ue that key that often as we are not keen on doing this again :-) [Permalink] -Replacing the Macbook Pro keyboard |
||||
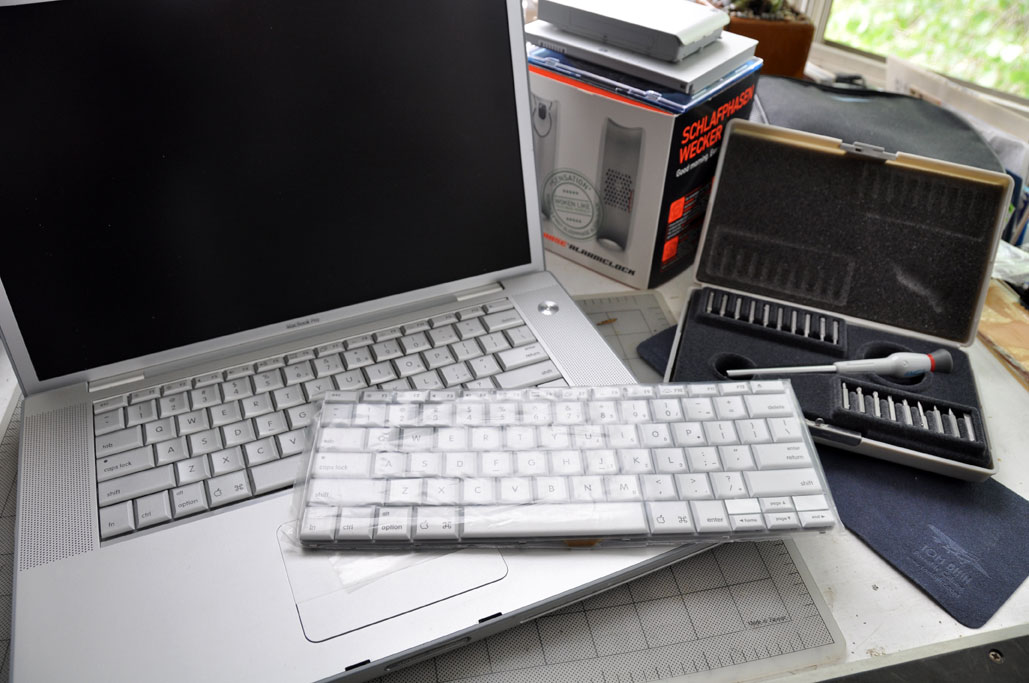
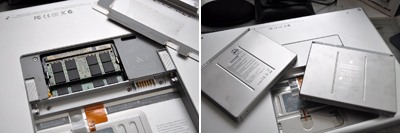
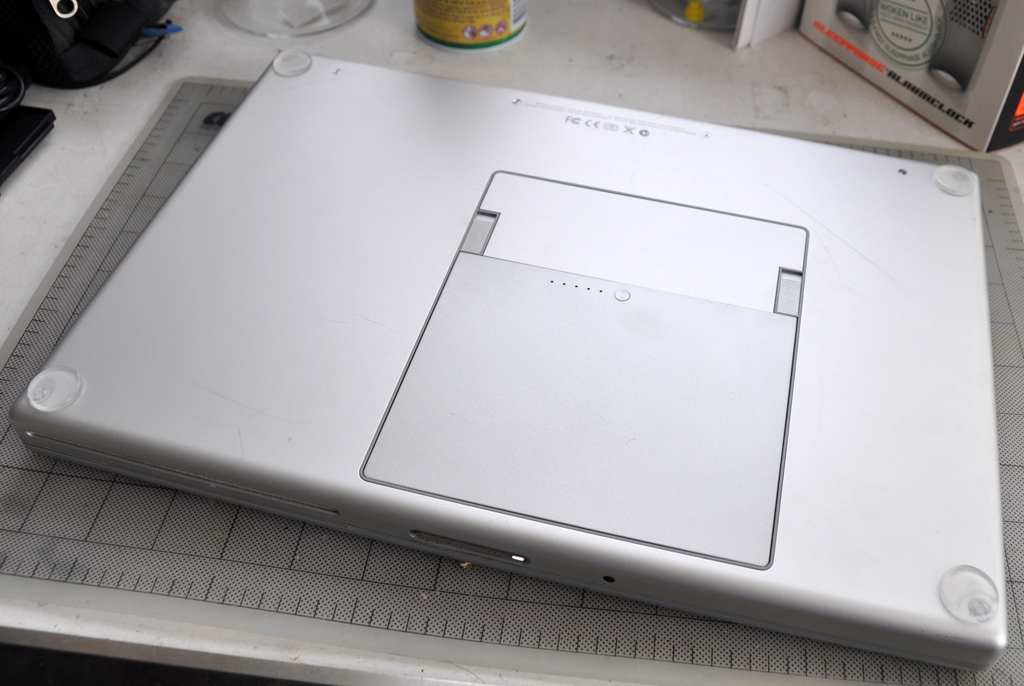
One of the parts (besides the battery) which seems to always need replacing on used Mac laptop is the keyboard. The 12" Powerbook we bought had some non-functioning keys. The same was also true of the 15" Macbook Pro we got a few weeks ago.
We found a good deal ($32, free shipping) on a new keyboard on EBay. It took a while getting here as the seller was in China. There are few different versions so be sure to get the keyboard which matches exactly... check for a "Command" key for pre-Core Duo MBP, an "Apple" key for post-Core Duo MBP.
Replacing the keyboard on the 12" Powerbook was simple because it was designed to be user removable. Not so with the one for the Macbook Pro. In order to get at the keyboard, the entire top of the machine had to be removed. We'll walk readers through the process. The project is definitely within reach of those with good dexterity, but it is not a DIY for everybody...especially if you don't have good tools. The folks at PowerbookMedics have a huge collection of DIY instructions. They are very well done. We used the one for the 15"MBP as a starting point. However, we did notice a few discrepencies with what we have encountered. We will not repeat their instructions, but will point out places where we found differences.
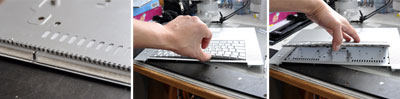
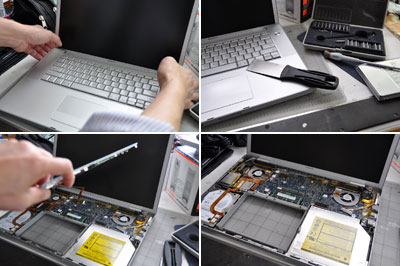
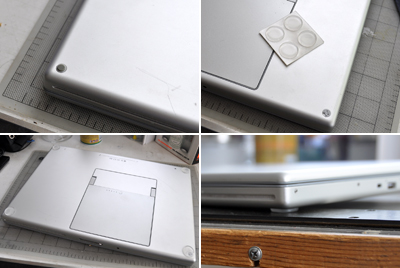
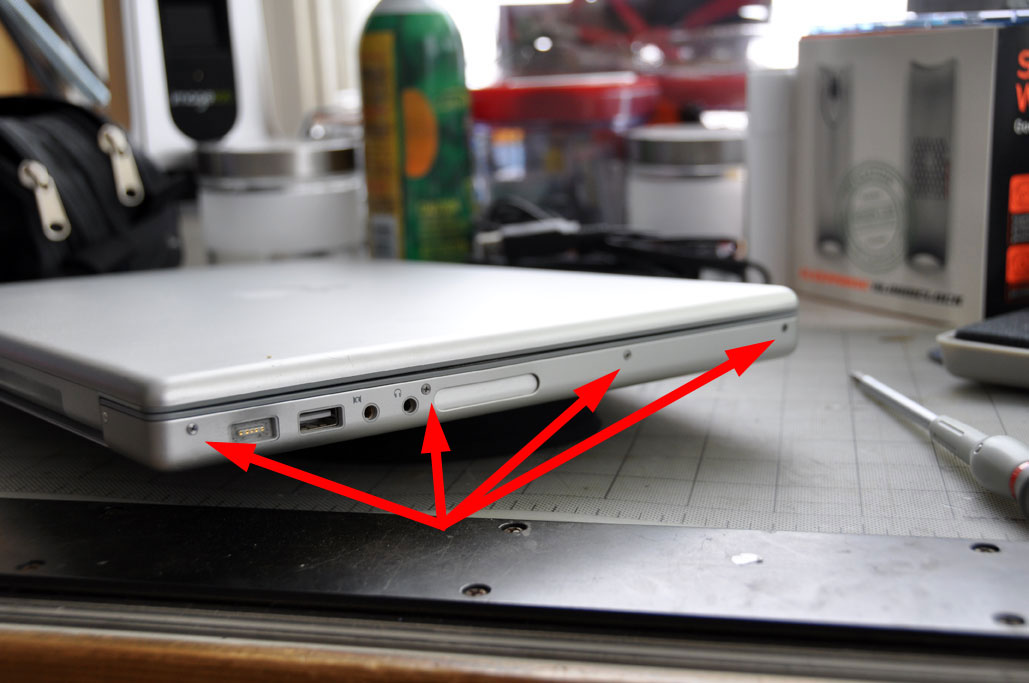
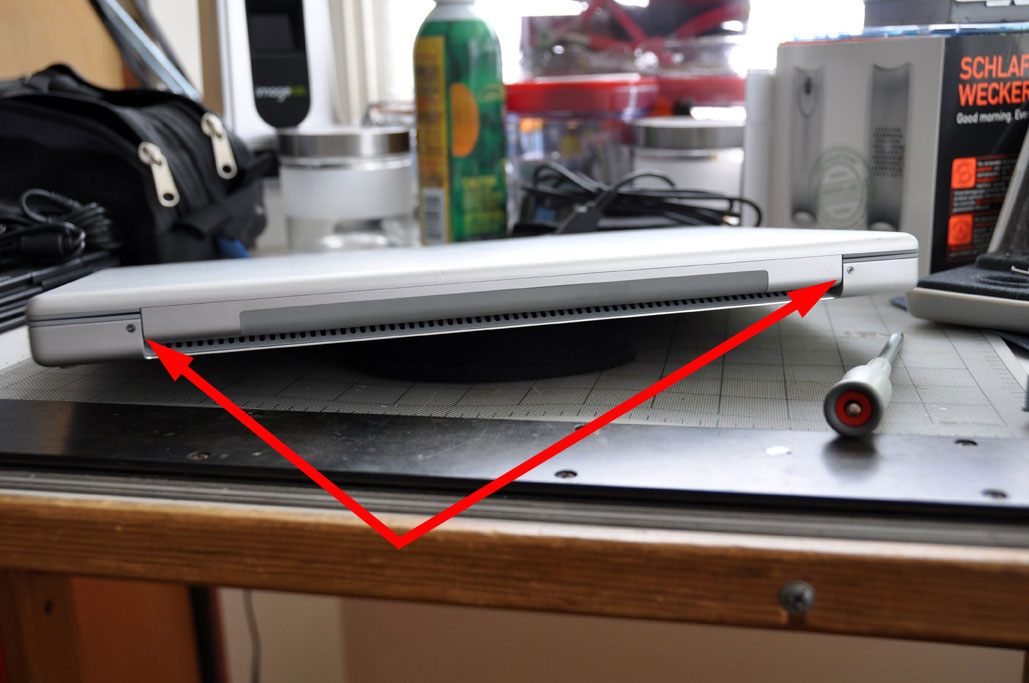
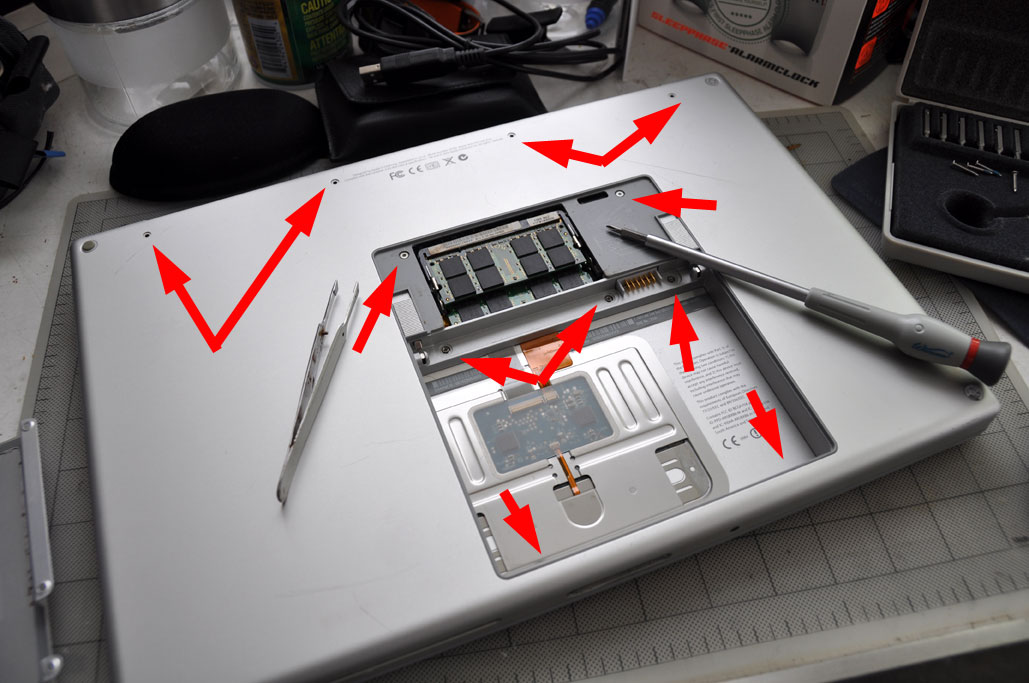
In order to remove the top cover, stainless steel screws on the sides, back, and bottom must be removed. Click on any of the images above to see the location of all the screws. Contrary to PBMedic's directions, the two torx screws in the memory bay MUST be removed.
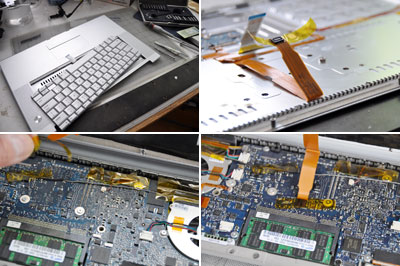
Once all of the screws (4 on each side, 11 from the bottom, 2 from the back) have been removed, the top should lift off. Start from the edge closest to the screen and work your way forward. We used a putty knife to help lift the sides, but you may be able to get by without it. There is one cable connecting the top to the main circuit board. Ours popped off (no damage) when we lifted the top too high, so take care when you are at this step.
With the top cover off, we were ready for the removal/replacement portion of this DIY repair project. There were a few delicate steps to freeing the old keyboard from the top cover. Our general rules are: go slow, don't use force, and track where all the screws came from. In the next segment, we will show you some tricks to make the process a little easier. [Permalink] -Removing the Macbook Pro keyboard |
||||
The iPhone SDK had always required a Mac with an Intel processor. While we have been able to successfully hack the iPhone SDK installer to make it work on the 12" Powerbook G4 we purchased last year, we knew that at some point it would be more trouble than it was worth. Now that the new unibody Macbooks have hit the streets, there are plenty of older Macbook Pros available on Craigslist. We managed to score a 2.12GHz unit a few weeks ago for just $500 cash. Anyone want to buy a used 12" Powerbook? We'll give you a good deal :-)
For $500, the unit was about 50% off the going rate. The main reasons for the discount price was because it only had 1GB of RAM, the battery was dead, and not all the keys on the keyboard worked. Ebay to the rescue. We got another gig of RAM for $10 and a new battery from BTI for $25. Getting a new keyboard took a little bit of work, but more on that some other time.
The first thing we usually do with a new laptop is to wipe the drive and reinstall the OS. With this newly acquired used Macbook Pro, we wanted to avoid having to manually transfer all of the personalized settings, apps, and files on the Powerbook. Fortunately, the Mac OS installation process has a feature to automatically transfer all of that directly to the newly installed OS via a Firewire connection. The process worked flawlessly and saved us a lot of work in having to set things up from scratch. One thing that did not transfer was the activation code for Photoshop. We had to contact Adobe to reactivate our copy of PS3.
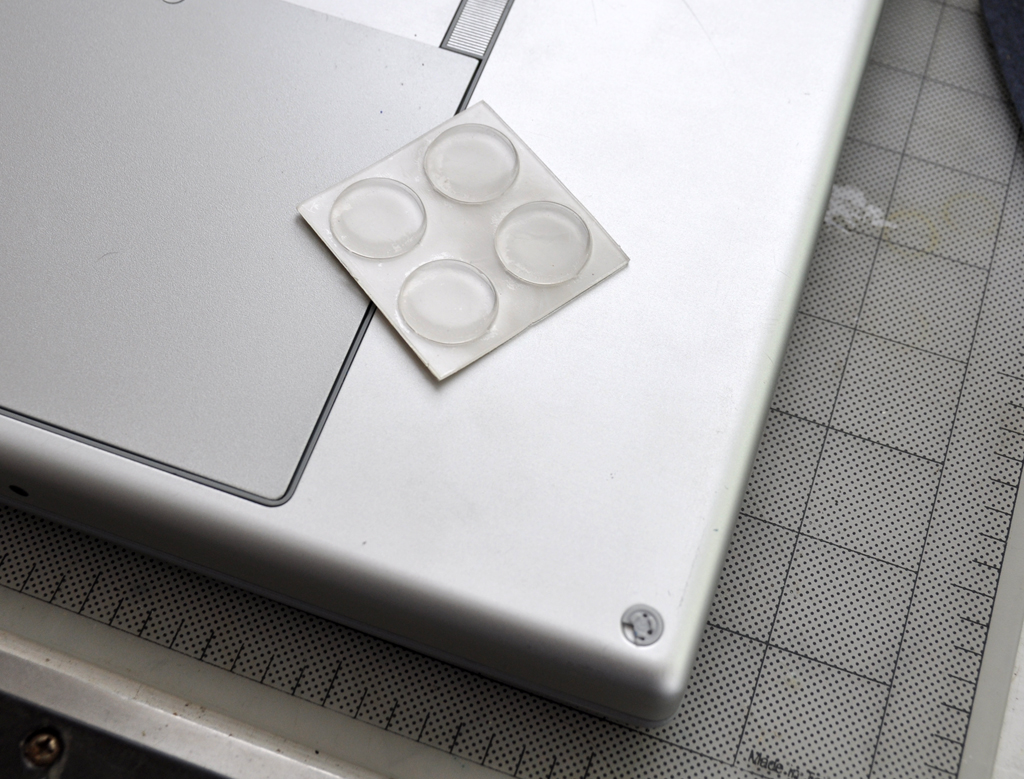
Another thing we noticed was that most of the pads at the bottom of the laptop were missing. Replacing them with OEM pads didn't seem worthwhile as they would just go AWOL again. We thought some silicone ones from Home Depot would be easier and at less than a dollar, a lot more cost effective. They raise the laptop a bit higher, but that is actually good as the unit tends to get quite hot during extended use.
This keyboard replacement project will not be as simple as the 12" powerbook one. Preliminary research indicates that the entire top of the Macbook Pro will need to be disassembled before the keyboard can be removed. We will tackle the project tomorrow. Full write-up to follow. [Permalink] -Upgrading a Macbook Pro |
||||
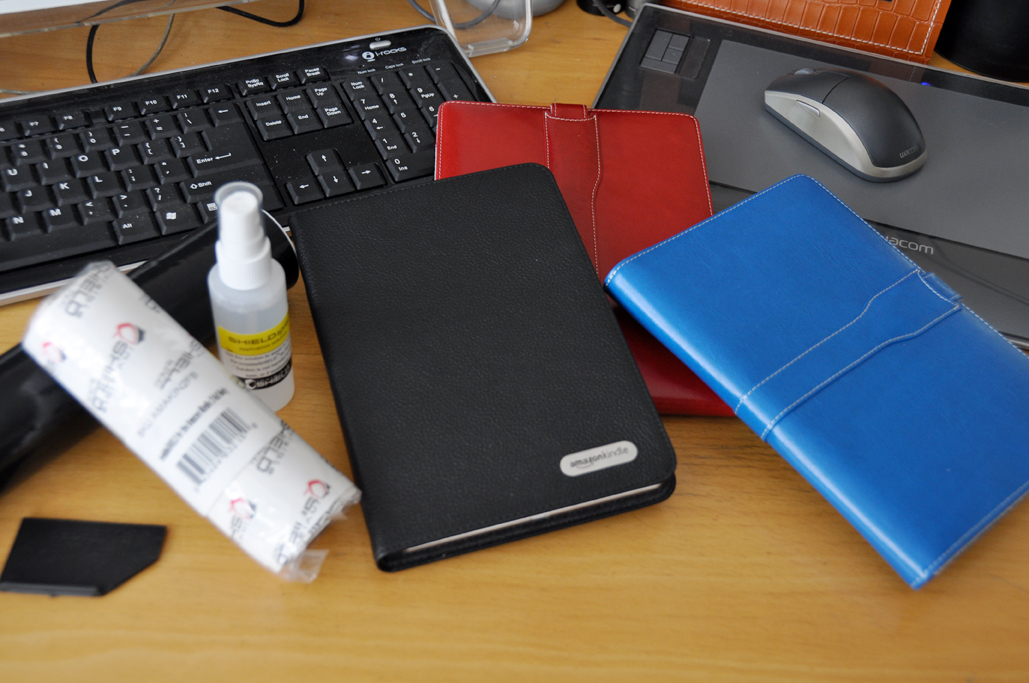
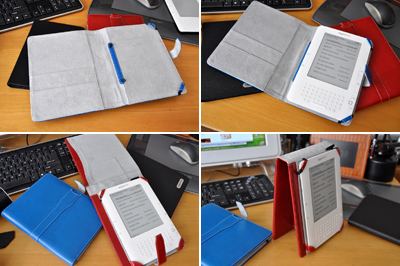
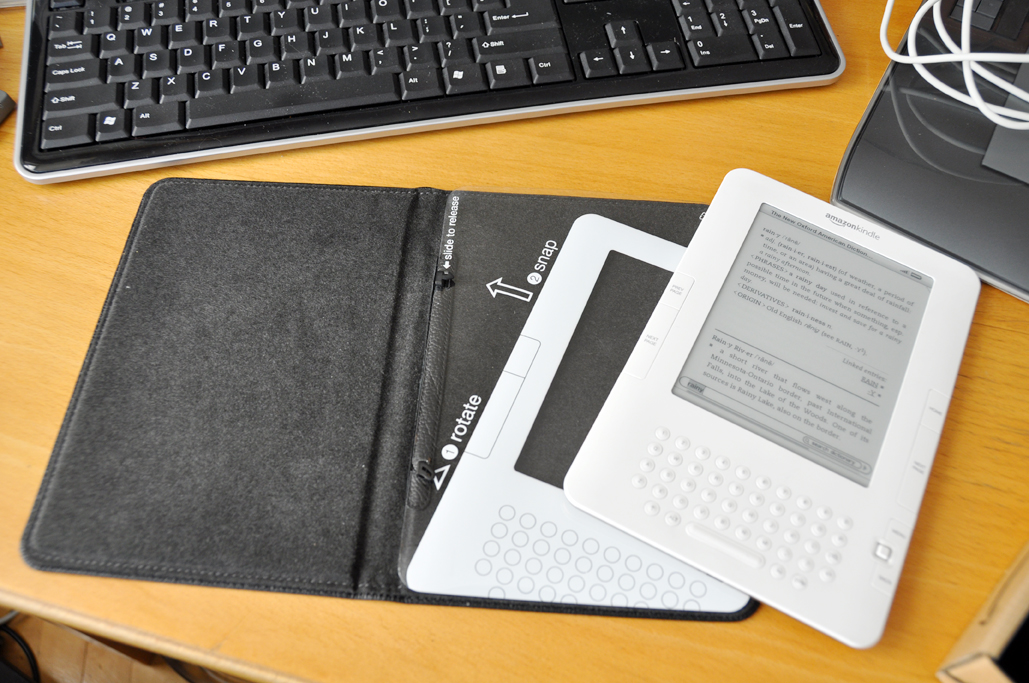
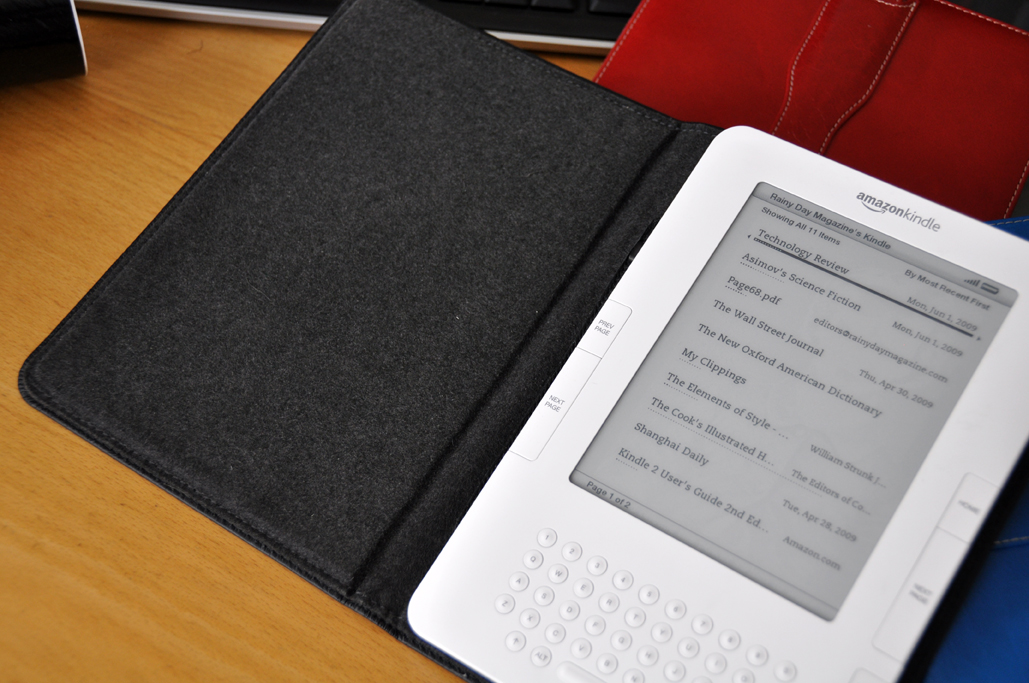
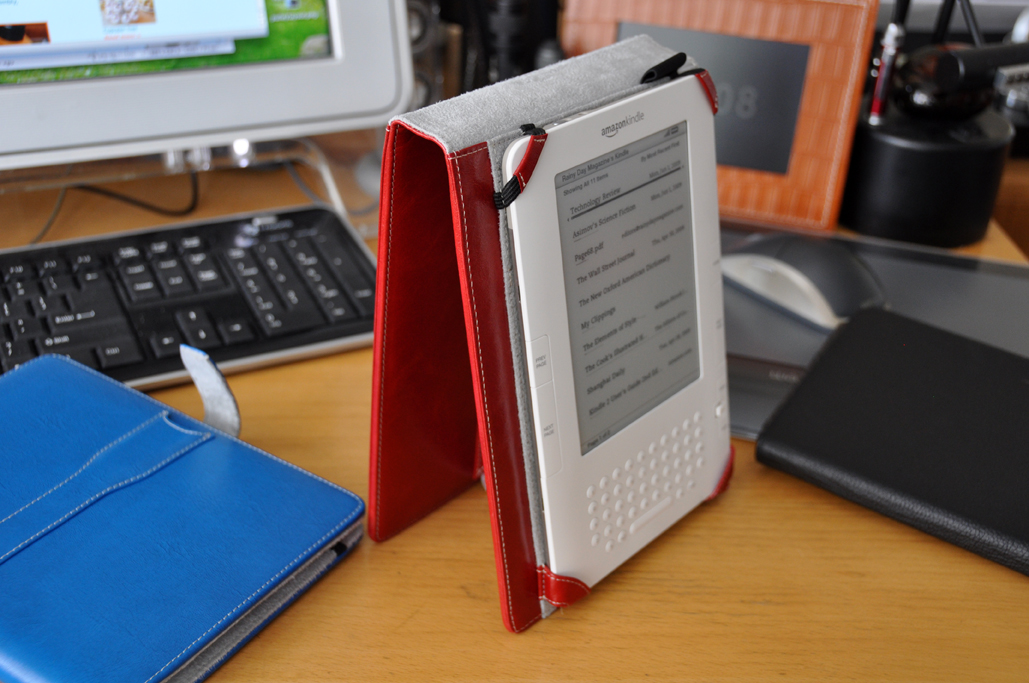
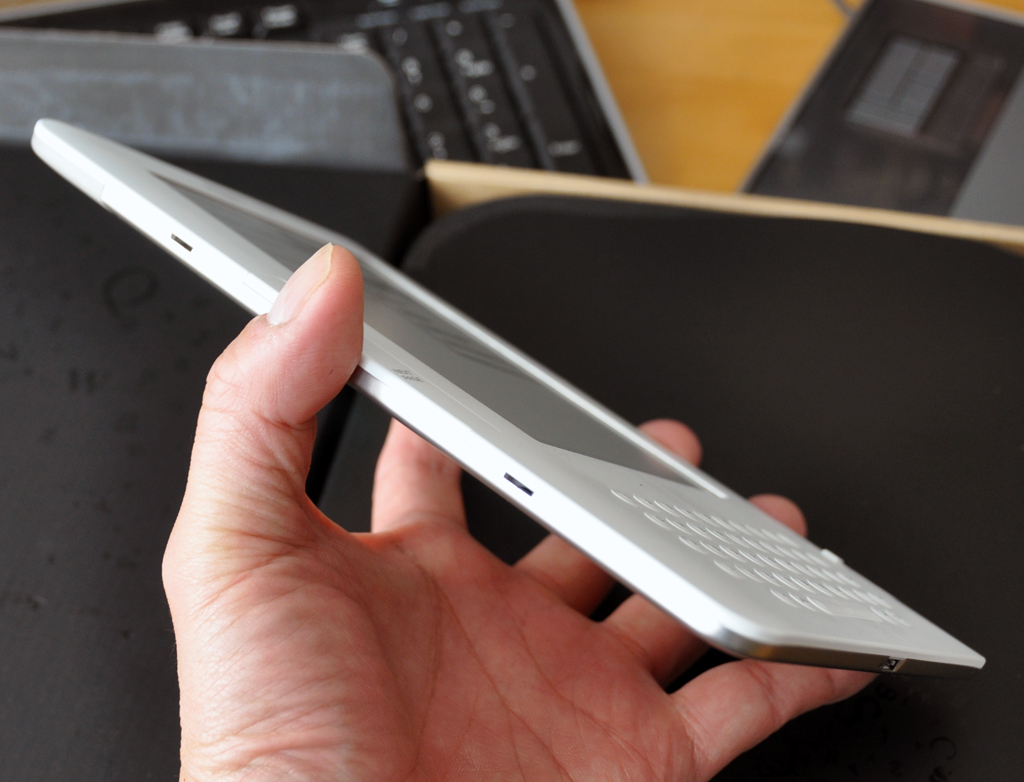
We all know that one cannot judge a book by its cover, but if you paid $350 for the book, you would want it to have a pretty good cover. For Kindle owners, protective covers were available from Amazon since the device was announced. Now alternatives to Amazon's basic black offering have started to make their way to the marketplace.
Amazon designed the Kindle2 to easily accommodate an add-on cover. On the left side of the device are two slits. They allow a set of hooks to grab and hold a cover in place without the usual straps or velcro contraptions. The result is a sleek, polished appearance with no additional bulk.
When we asked Kindle2 owners which cover they would like us to review, the one mentioned most often was the offering from M-Edge. Readers liked them because of the color options, but what they really wanted to know was our view on the quality of the cover.
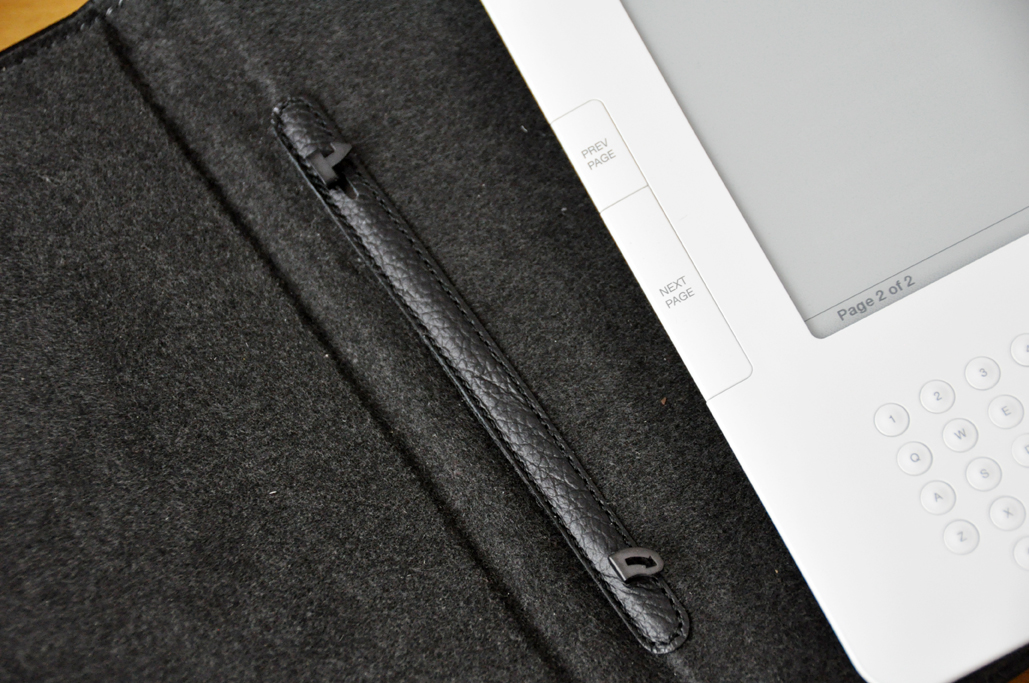
We are happy to report that the M-Edge covers are very well made, have a great feel, and look fantastic. They are a little bit thicker than the Amazon cover, but not so much so that it would actually make a difference day-to-day. The M-Edge cover also has a bit more space at the spine for carrying a pen or a small book light. One interesting option available with the M-Edge covers is the "platform" feature. This allows the Kindle to stand upright for hands-free use.
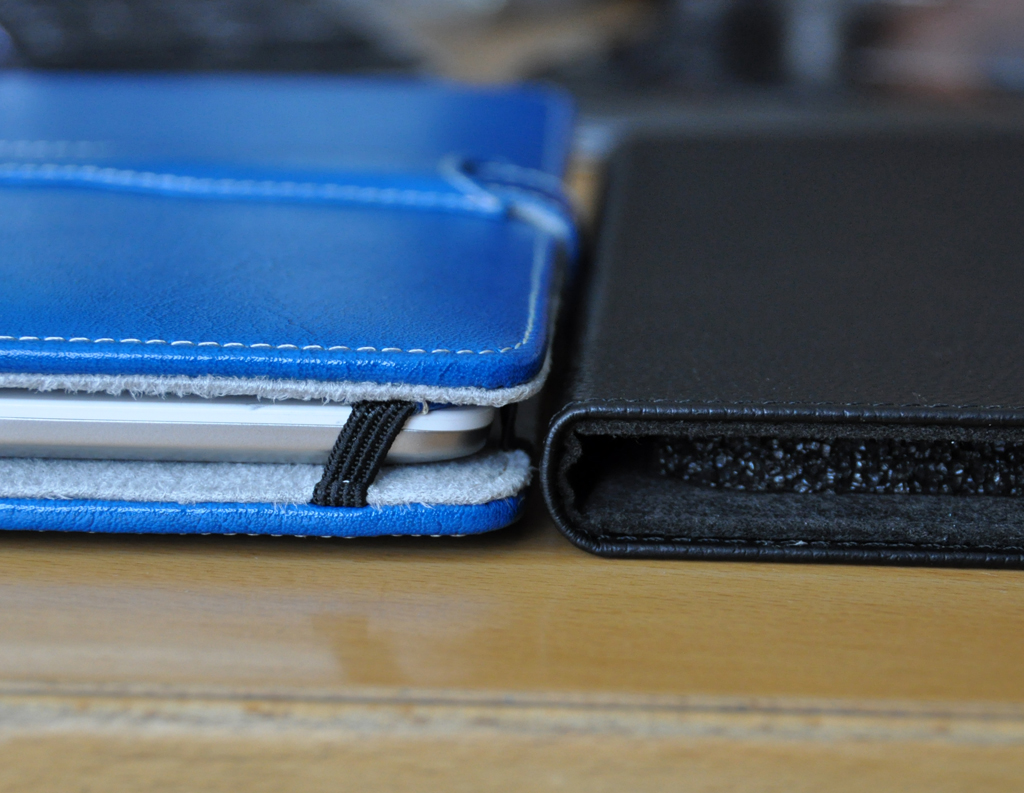
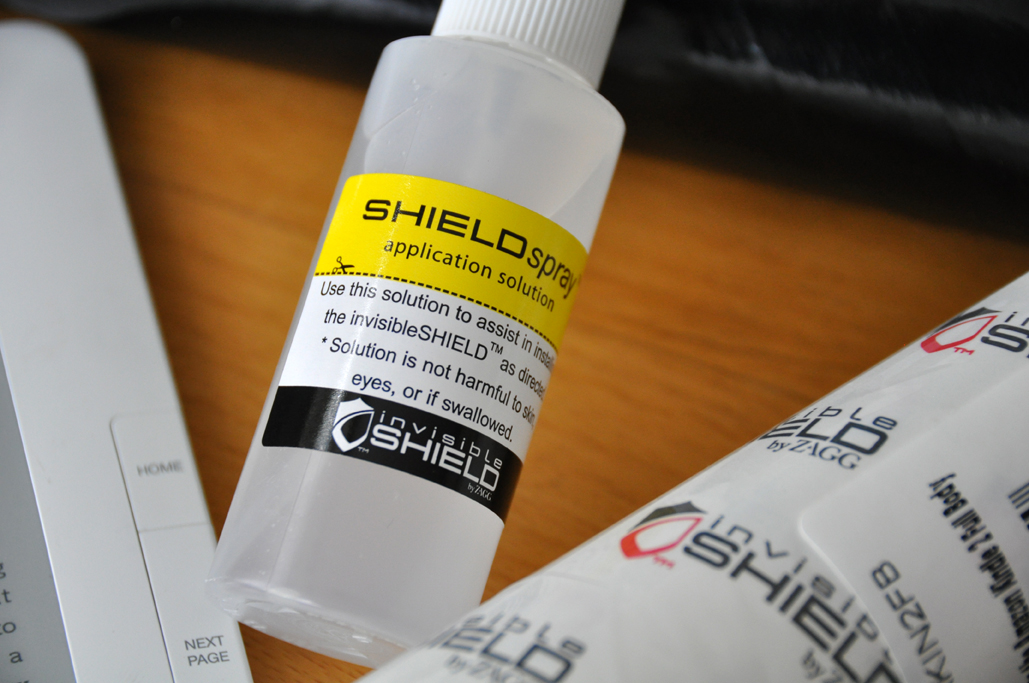
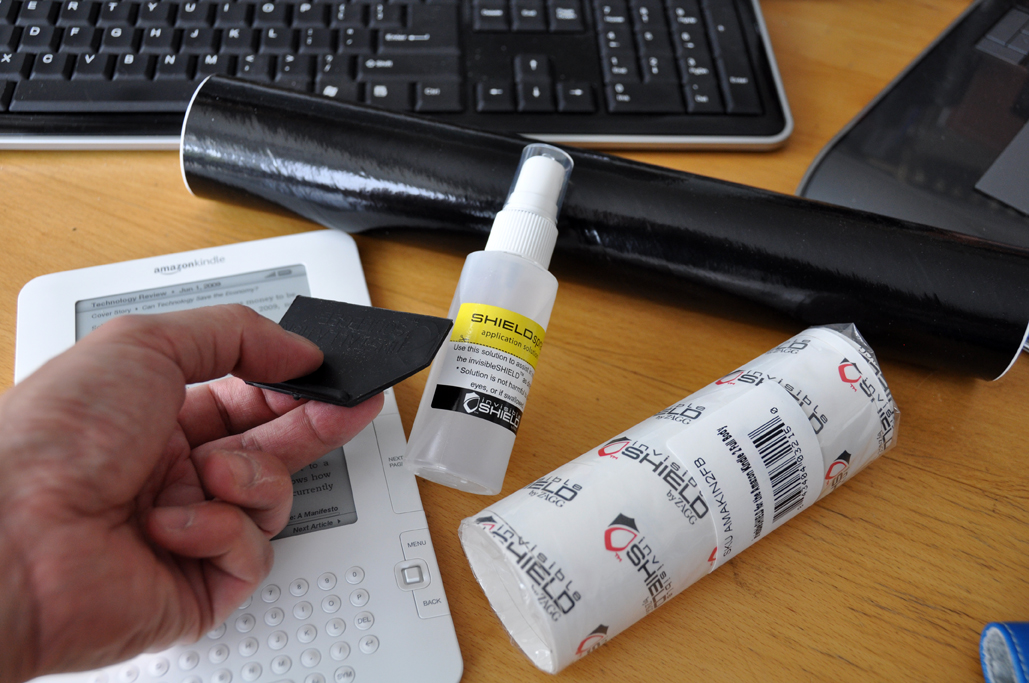
The "cover" with the least bulk is the InvisibleShield. We have used these super-tough covers on our iPods for years. They are just amazingly durable. Ease of application of the InvisibleShield has also improved over the years. The installation kit now comes with the application solution and a tool for squeezing out the air bubbles. For readers who want maximum scratch protection with almost zero bulk, this is the only product they need to consider. Of course, the thin cover will not give the Kindle any "drop" protection. So if you are clumsy with your gear, you may want to take that into consideration.
Regardless of the type of cover you choose for you Kindle2, it is probably a good idea to protect it with something. Personally, we would use the InvisibleShield in addition to a hard cover, but that's just us :-) [Permalink]-Kindle protection |
||||
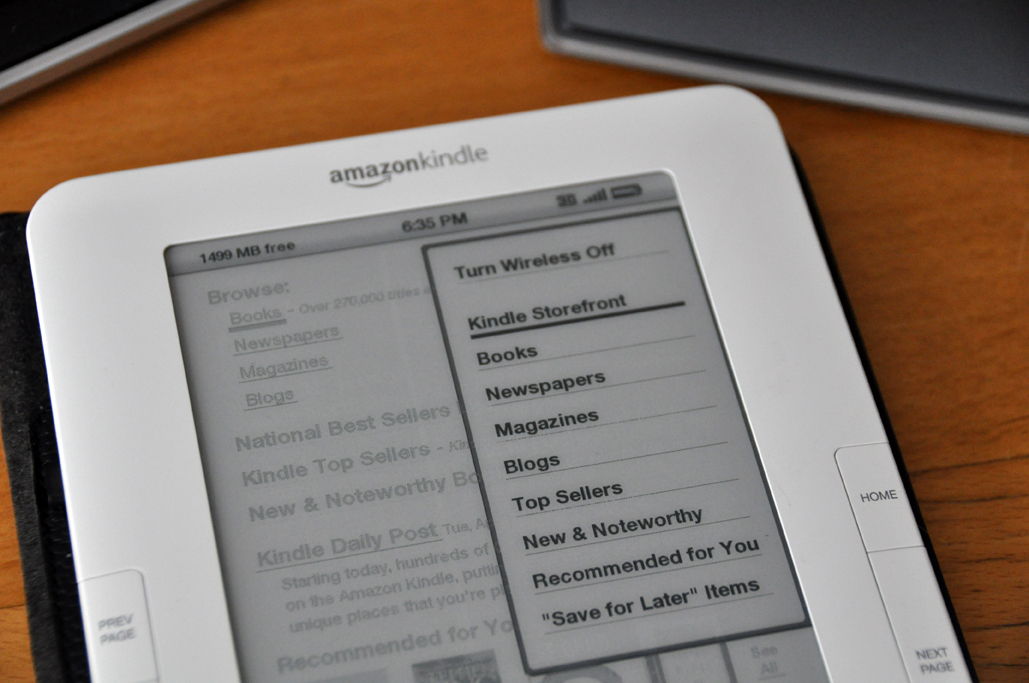
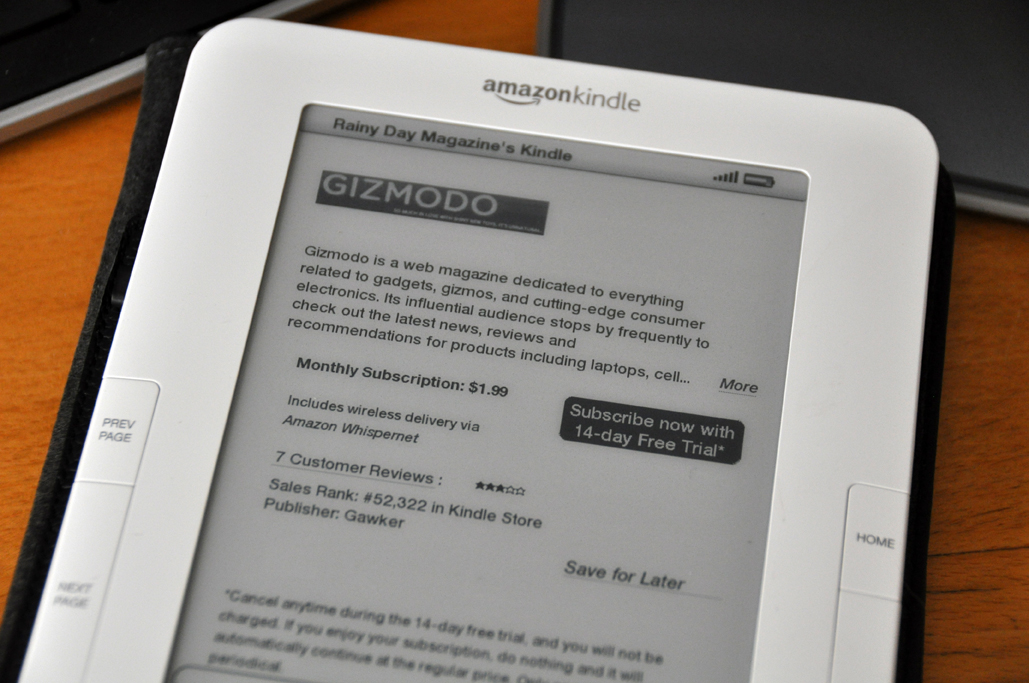
The Kindle2 came into the office at the end of April. Folks have been taking their turn checking it out. We wanted to see if having access to things we wanted to read at any time changes the way we interact with the reading material. First, though, we had to get some content into the Kindle2. Thanks to Amazon, the process is both fast and easy.
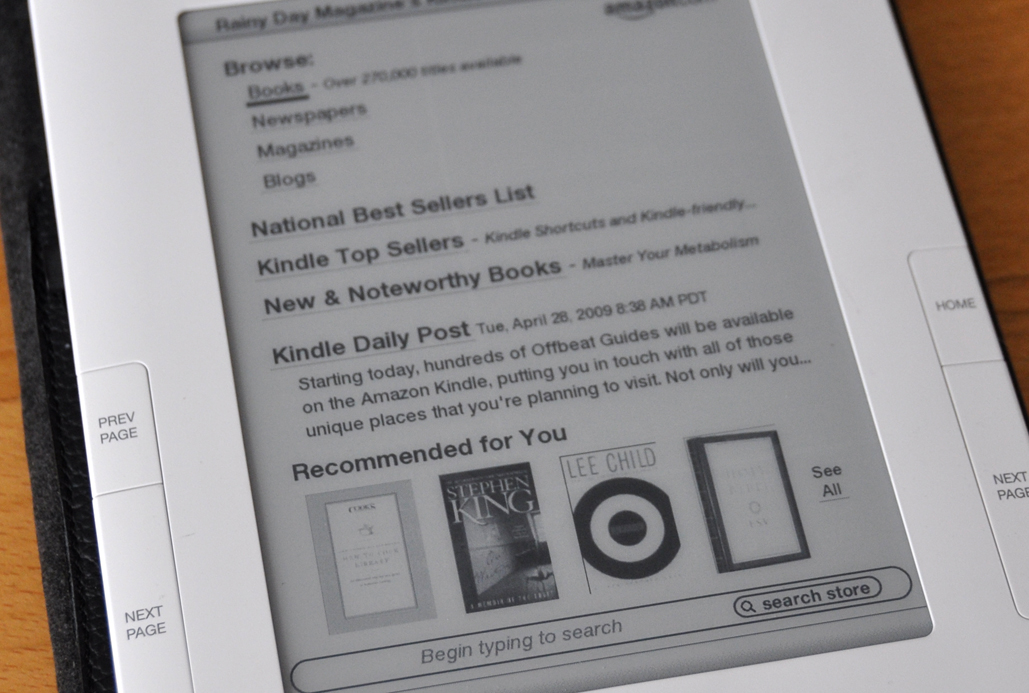
The Kindle is connected to the Amazon store all the time, giving us access to magazines, newspapers, books, and even blogs. Browsing is a little awkward with the Kindle2, but its search feature is a much faster way if you know what you want.
The electronic versions of the books are quite a bit cheaper than the physical versions. All purchases were billed to our Amazon account. The books were delivered directly/wirelessly to the Kindle. The transfer can take a few minutes, but we were able to continue reading our current material while the purchase was being downloaded in the background.
What we liked about the whole process was how seamless it was. We were able to poke around, read reviews, get recommendations, and make purchases all without any problems.
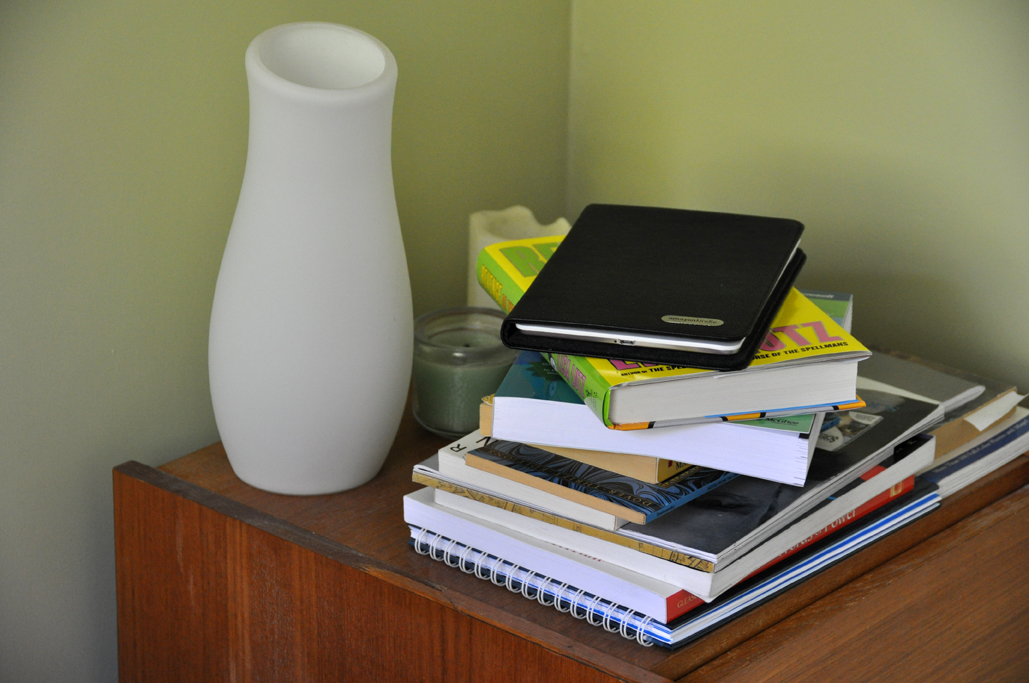
One of the places we'll be testing how the Kindle2 compares to books is reading in bed. There is a lot of different types of reading material on our nightstand. It will be interesting to see how much of it can be replaced by the Kindle.
After two weeks, the Kindle2 is proving to be a lot more useful than we had first anticipated. We are using it both for work- and pleasure-reading. We will tell you more about that in an upcoming article. If you are interested in getting one, but want to know if it will be a good fit for you, drop us a line with your questions. We'll continue to share more of our Kindle experiences as we "live" with the device. [Permalink]- Kindle Online |
||||
Anyone who has attempted to learn Chinese knows that it is challenging. With an alphabet-based language such as English, it is possible to figure out how to pronounce a word by looking at its spelling. This is not so with a character-based language like Chinese...either you know how to pronounce the character or you don't. The only way is to learn character-based languages is to memorize how to pronouce them a character at a time. There are no short cuts, no magic methods, or simple solutions...just hard work. However, the SmartPen may be able to help. While the SmartPen is more of a personal device today, we think it has the potential to be a great learning tool.
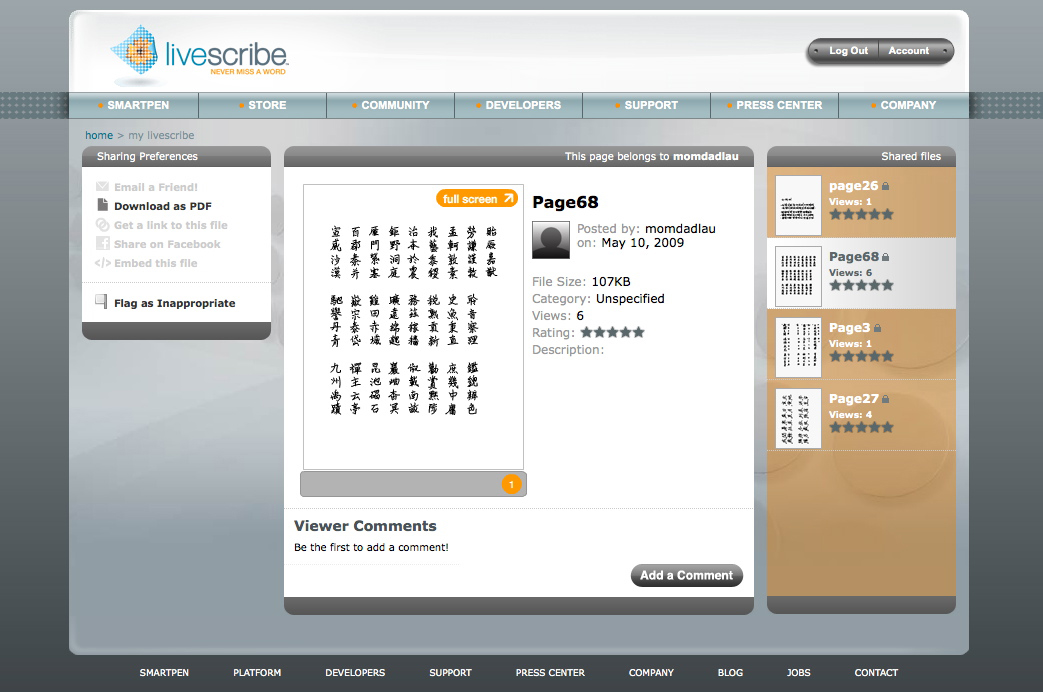
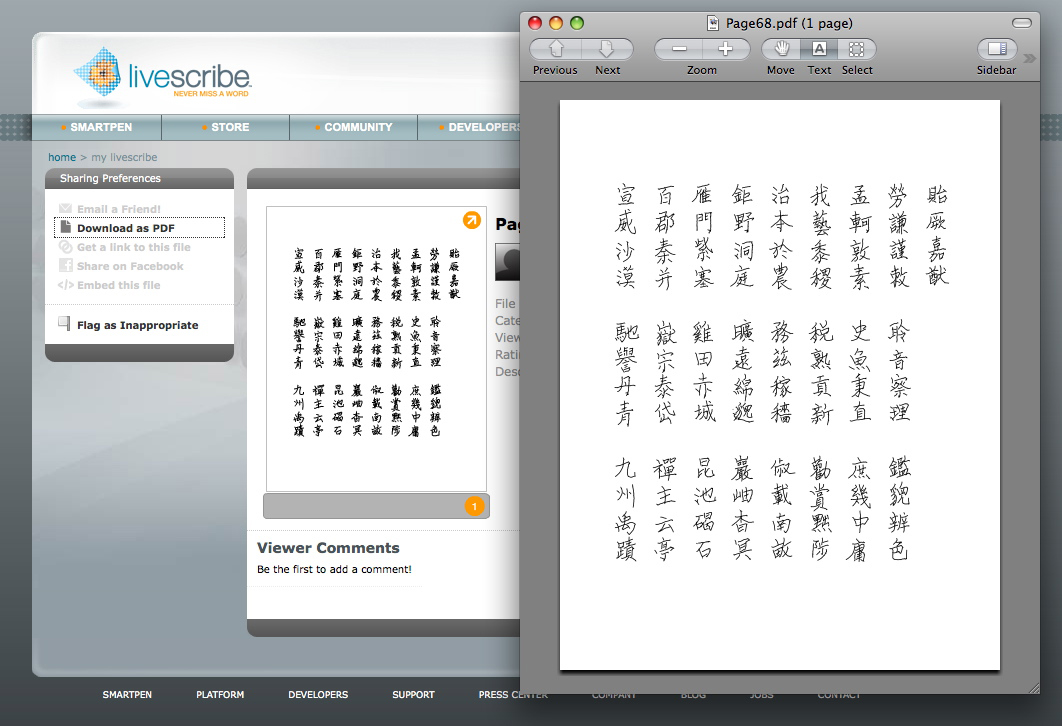
When Mr. and Mrs. Lau, parents of one of the editors, saw the SmartPen they thought it would be "fun" to use it to reproduce the famous book 1000 Character Text often used to teach Chinese characters. Their idea was to annotate the text so a student could then tap on a word to hear its pronuciation and its meaning. Clever! We checked in with them this weekend to see how they were coming along with the project. So far, Mr. and Mrs. Lau have done a few different versions and are now experimenting with different layouts and formats. The project is so cool that we wanted to see if we could find a way to keep up with their progress between trips down to NYC. We remembered reading about Livescribe's Online feature and decided to check it out. After some fussing around, we managed to figure out how to upload files, activate access privileges, and create .PDF versions of the pages.
There are a lot of things LiveScribe did right, but there is still a lot that LiveScribe can to do to truely make the site a useful tool for sharing data and collaborative work. The limitations and problems--one audio file per page, slow updates, occassional freezes--were not show-stoppers for LiveScribe Online, but made the experience more awkward. However, the SmartPen is such a revolutionary product that we are willing to give LiveScribe time to continue improving its online service.
What would we really love to be able to do? It would be great is if we could download the data from the site into our pen and print out a hardcopy of the page so we could just click on the word to hear the audio. It would be a bonus if we could also download it to the Kindle. We look forward to the day when LiveScribe has this capability. [Permalink]- LiveScribe Online |
||||
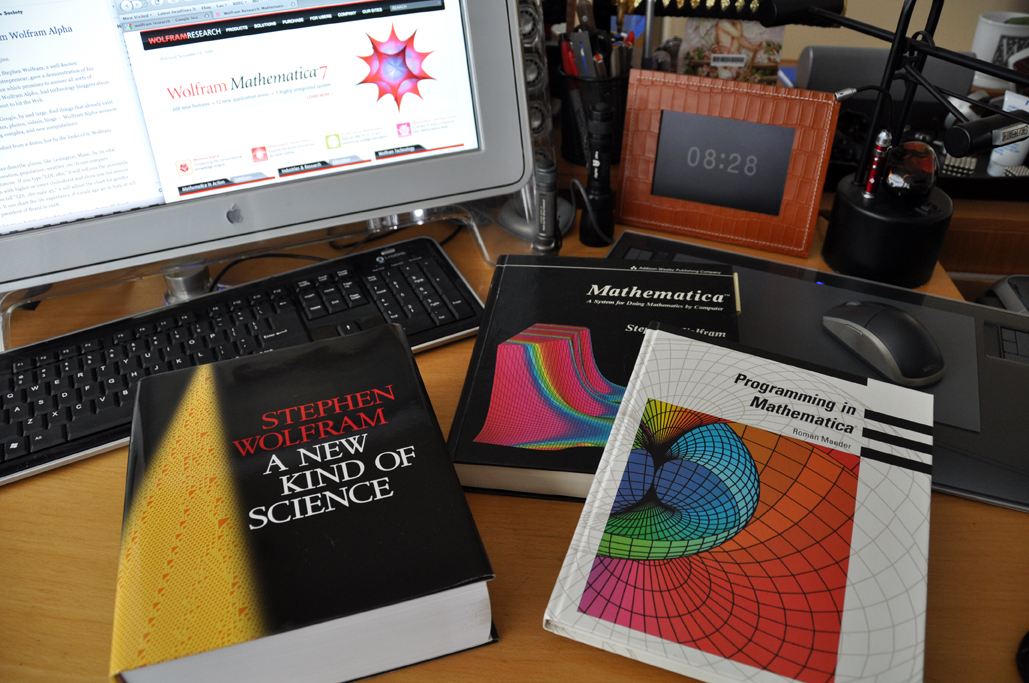
Stephan Wolfram of Wolfram Research has always been using mathematics to extend the boundaries of human understanding. He made his first commercial mark with Mathematica, a software tool that did for science and research what spreadsheets did for business. He then went quiet for about a decade and came back on the scene with a book called A New Kind of Science. NKS caused all kinds of passionate comments and discussion when it was first published.
Some compared it to Newton's Principia. Others thought it a compilation of loosely strung together ramblings. A lot of it was about how Wolfram went about publishing his theories, research, and conclusions. Good scientific works can always stand the test of time. It will be interesting to see how NKS is viewed a few hundred years from now.
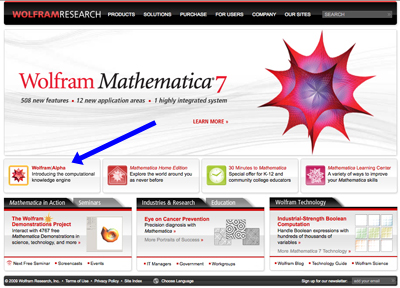
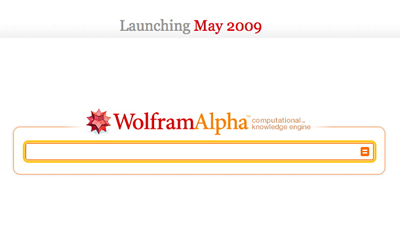
For readers interested in something a bit more immediate, Wolfram Research has been getting a lot of press recently about a new application called "Alpha." Like other of Wolfram's projects, its goals are to change the way we work and see the world. Ambitious to say the least...
Some have seen bits and pieces of it. Others have actually touched and played with it. Sometime this month, we will all get to experience it first hand. This could be a very interesting month. [Permalink]- Wolfram Alpha |
||||
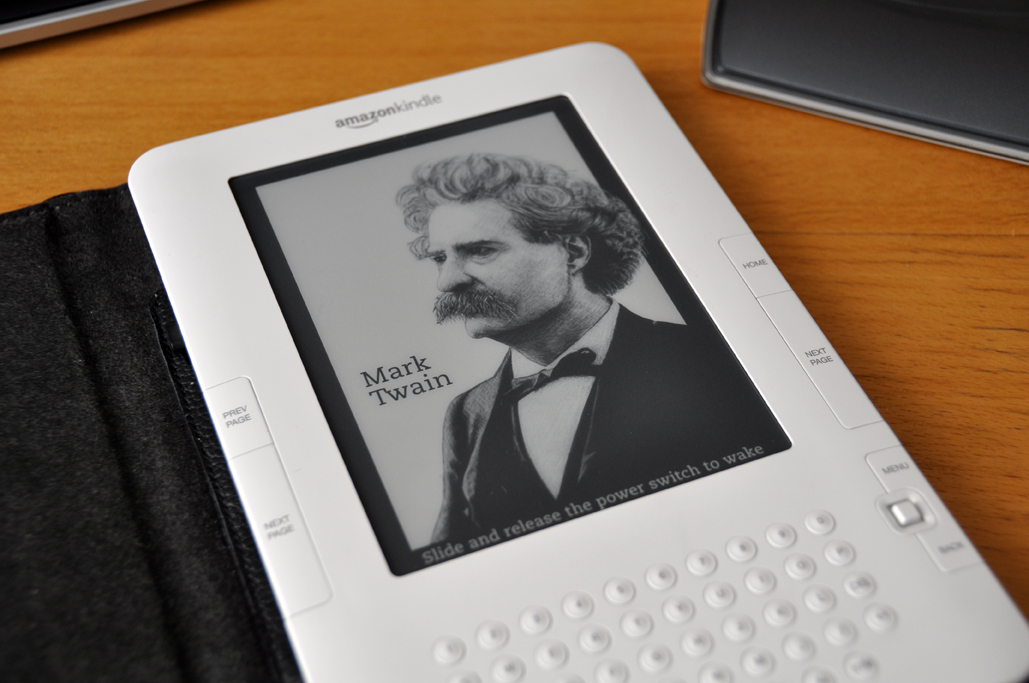
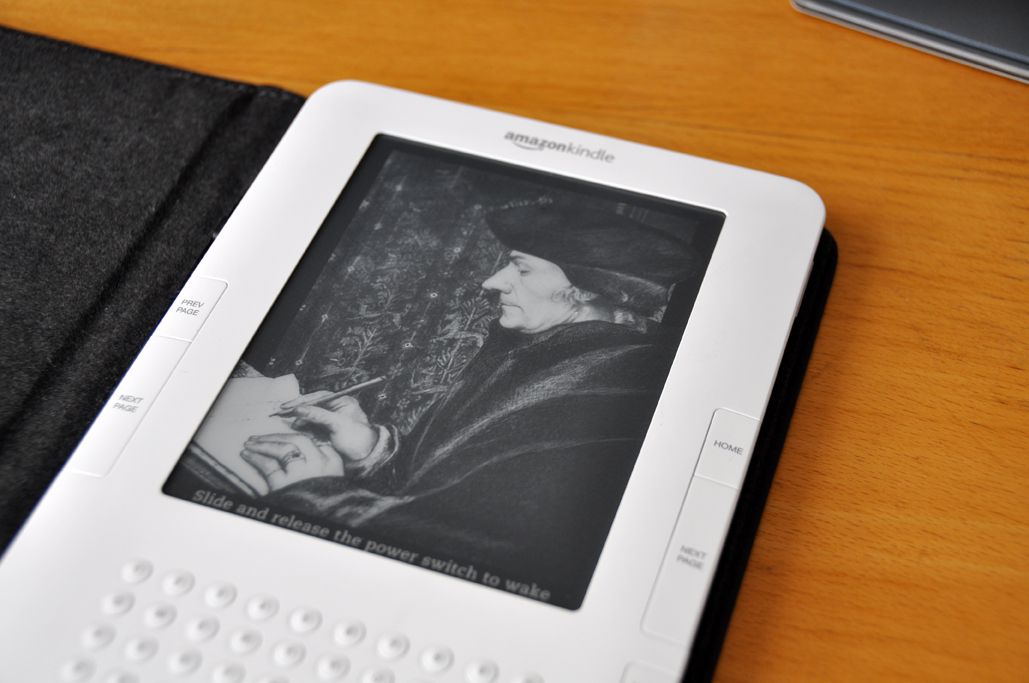
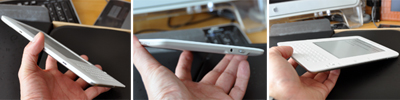
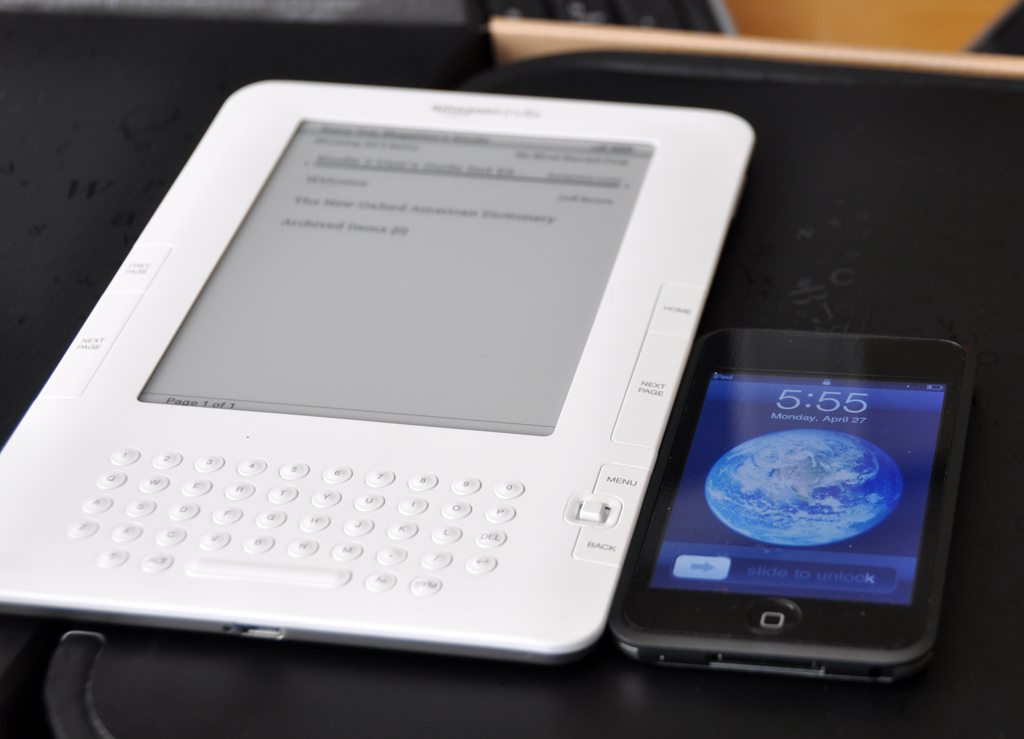
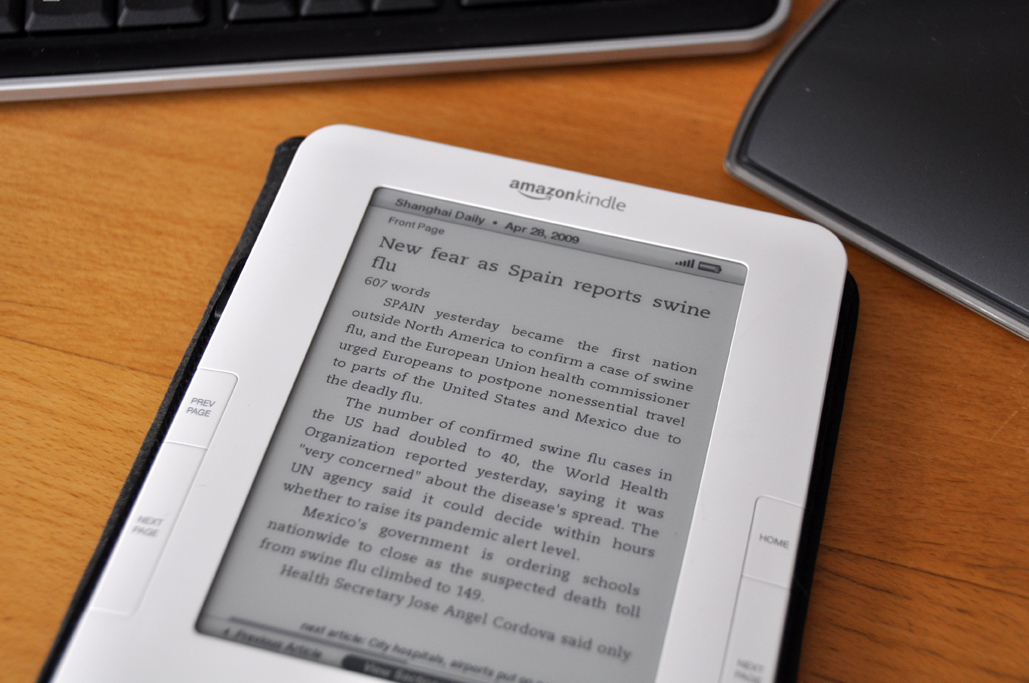
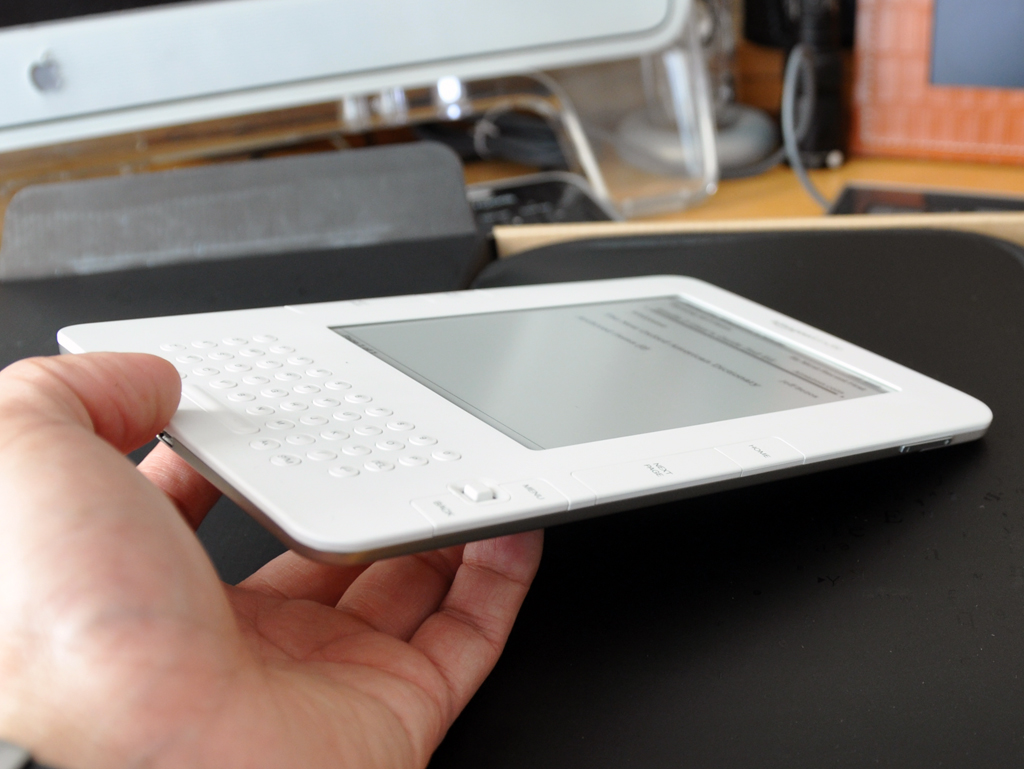
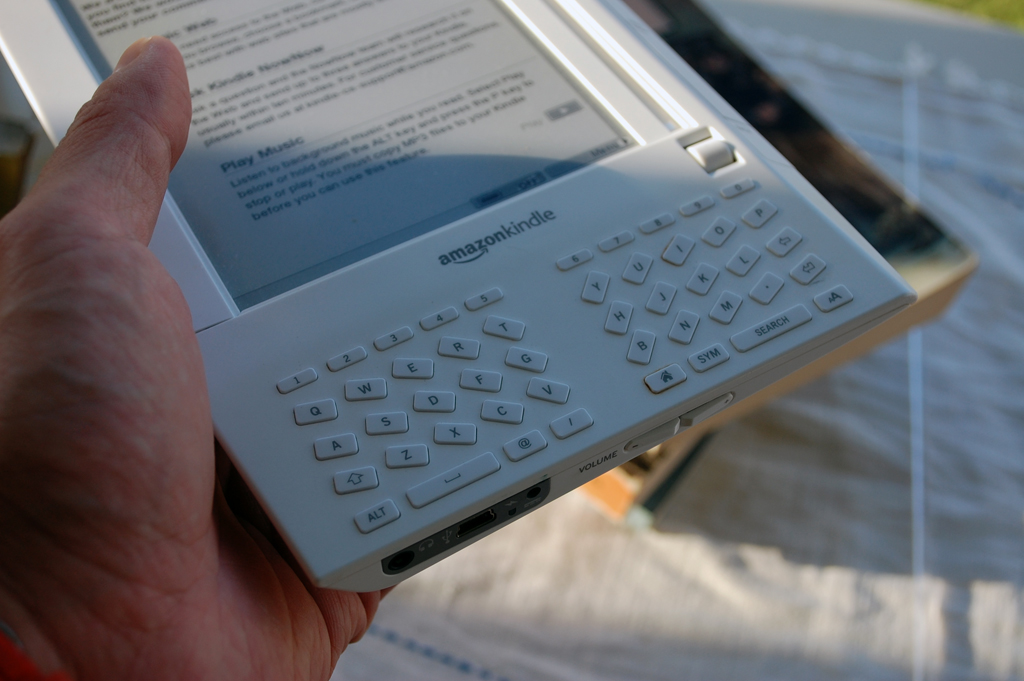
Amazon's Kindle2 arrived at the office earlier in the week. Folks here have been taking their turn at it non-stop. The general impressions of v2.0 of the Kindle have been overwhelmingly positive. The Kindle2 is neither a laptop nor tablet computer. It is not an MP3 player, a PDA, or a netbook. Although the Kindle2 can do many of those things, its was designed to be electronic version of a physical book. Better yet, it is the next major evolution in the path of a physical book. Today, we'll take a FirstLook at the basics (size, controls, etc...) of the Kindle2.
The Kindle2 has a lot of cool new physical upgrades (better display, more memory, longer battery life, etc...). but one of the more controversial addition to the Kindle2 is its new Text-to-Speech capability. We listen to a lot of audio books and are pretty sure that this feature, as it is currently implemented, is not a threat to that market. Of course, advances in technology are often unpredictable.
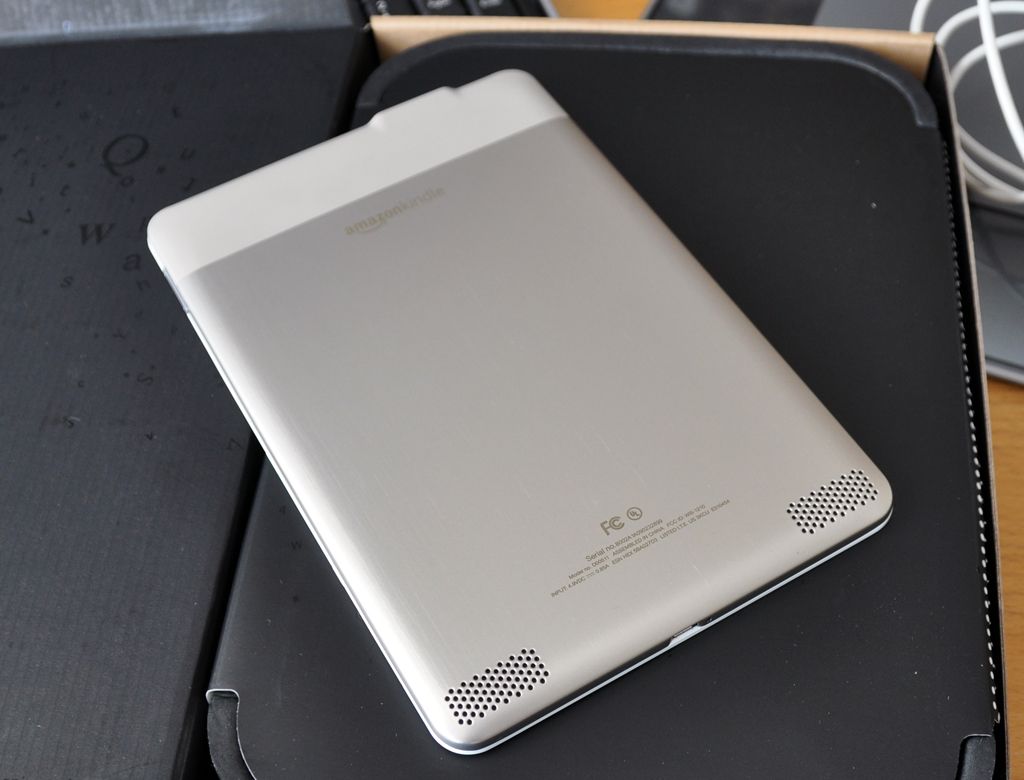
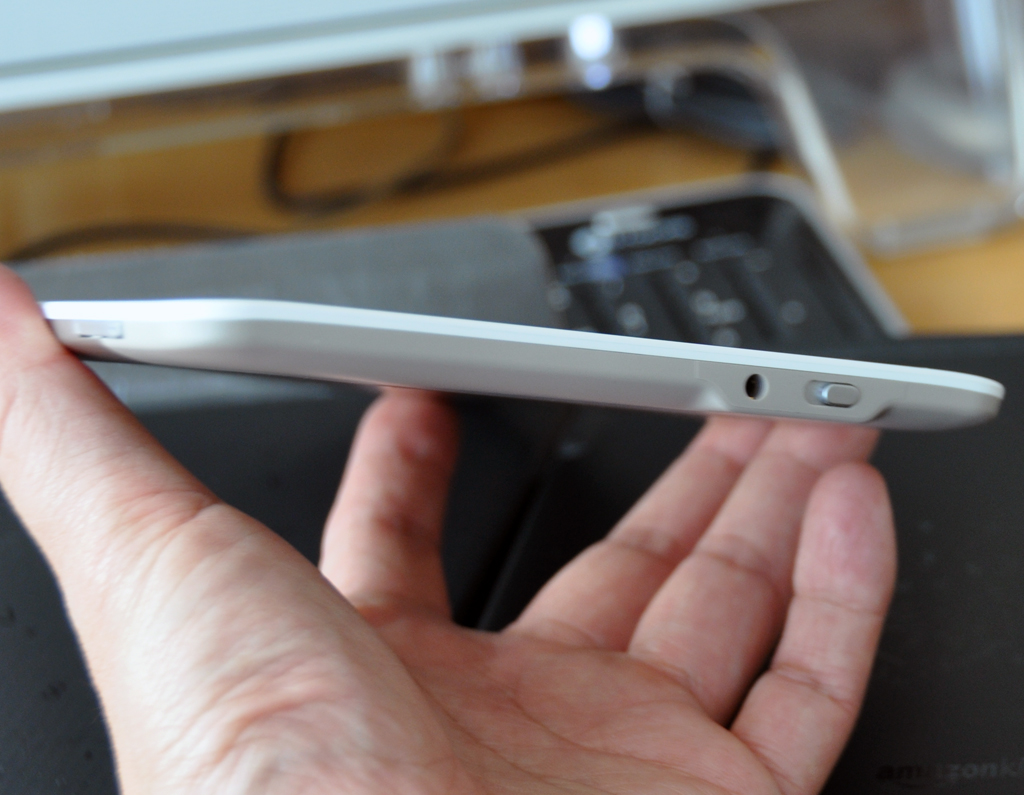
This updated Kindle is slimmer, better looking, and generally more polished than v1.0. The corners and keys are now rounded, the back is metal, and it is as thin as the iPod Touch. There are slits designed into the side for anchoring to a cover (not included). The USB/power port is at the base, the power button and headphone jack are at the top, and the volume controls are on the right.
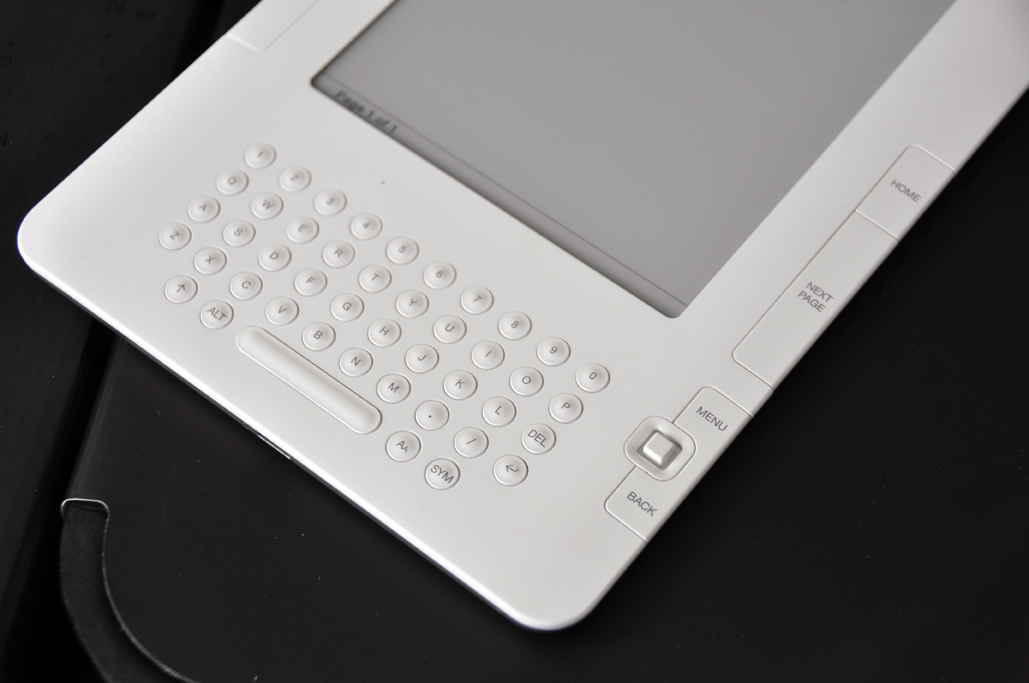
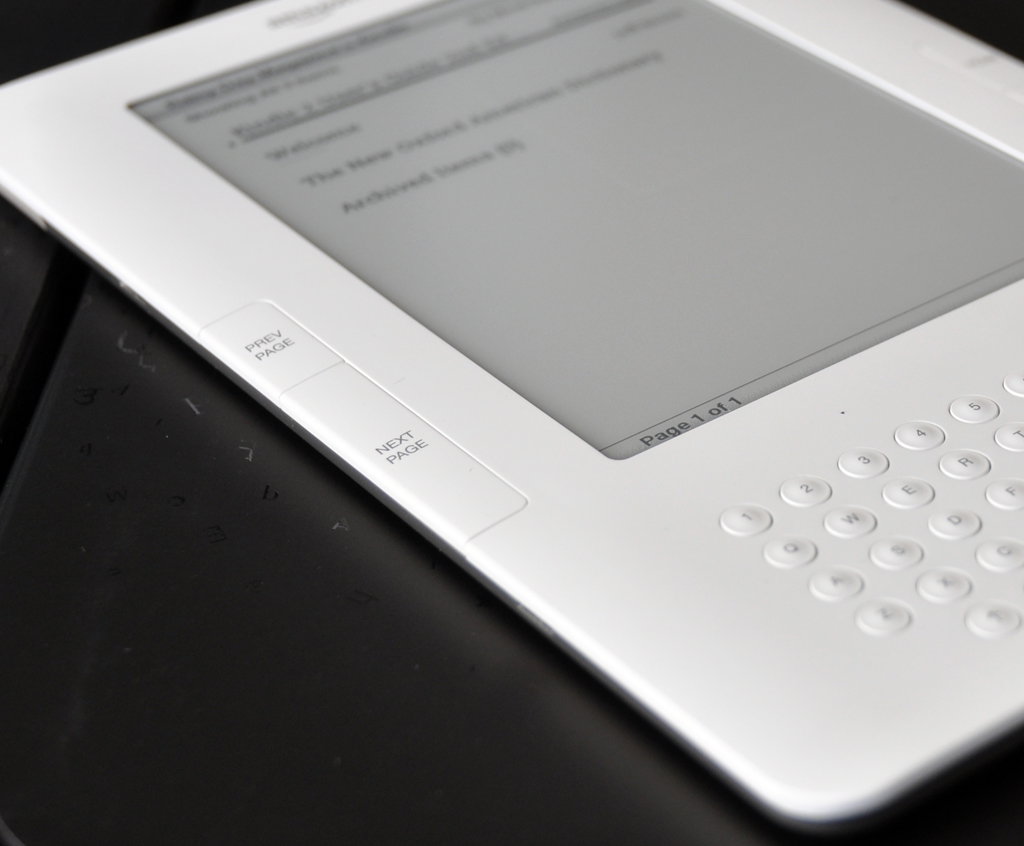
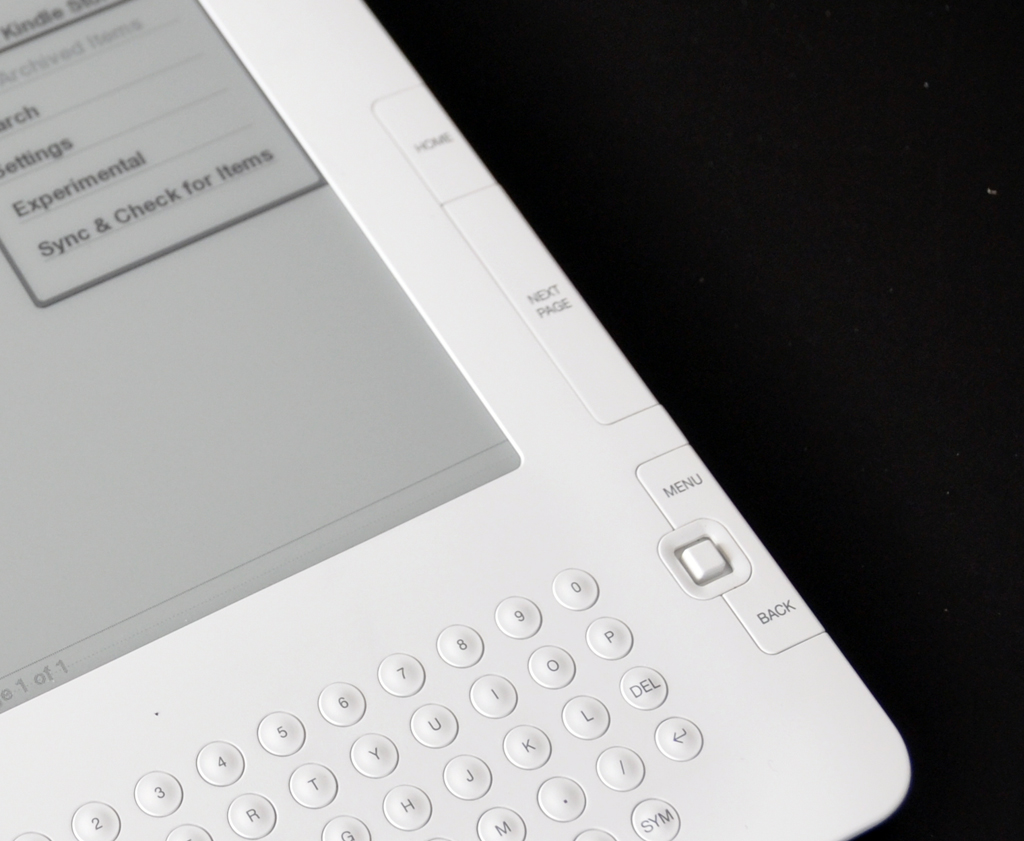
Like the first Kindle, paging controls are on both the left and right sides of the device. On the left side are the Prev/Next buttons for turning the pages. This configuration works well if you hold the "book" with your left hand and use your left thumb to navigate. On the right side are the controls for navigating within a page (menu, cursor movements, etc...). In this version, Amazon has added a 5-way (up, down, left, right, click) controller for manipulating the on-screen cursor. The designers have also reworked the keyboard. The first keyboard was just a means for occassional text input, not extensive typing. This new keyboard's purpose is the same. Someday, the Kindle may get a touch screen and they will be able to get rid of the physical keyboard altogether.
Amazon has recently released a version of the eBook reader on the iPhone and iPod Touch. We did a quick mention of this at the beginning of April. Obviously, the iPhone version is not intended as a Kindle replacement. It is another way for Kindle owners to have access to their digital content regardless of devices. We'll show how well the two work together in a future write-up.
As with any category-defining devices, there is always the desire for additional features and improvements. We'll have our list of suggestions for Amazon soon enough. In the meantime, we will just have to satisfy ourselves with exploring the future of reading on the Kindle2 now. [Permalink]- Kindle 2.0 FirstLook |
||||
When we took a look at Kindle v1.0 back in October, we realized we were witnessing the start of something amazing. It reminded us of when we were introduced to the first 128K Mac in 1984 and the first-gen iPod in 2001. Like the 128K Mac and the first-gen iPod, the v1.0 Kindle was well designed, thought out, and fully functional. Like the 128K Mac and the first-gen iPod, we believe the v1.0 Kindle is a "game-changing" product.
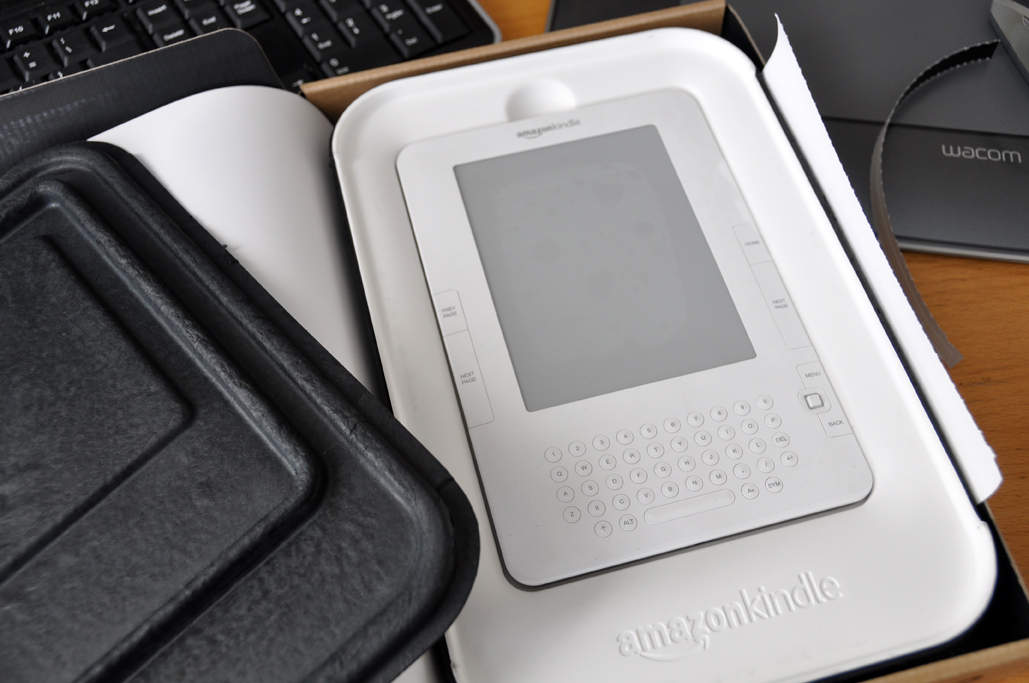
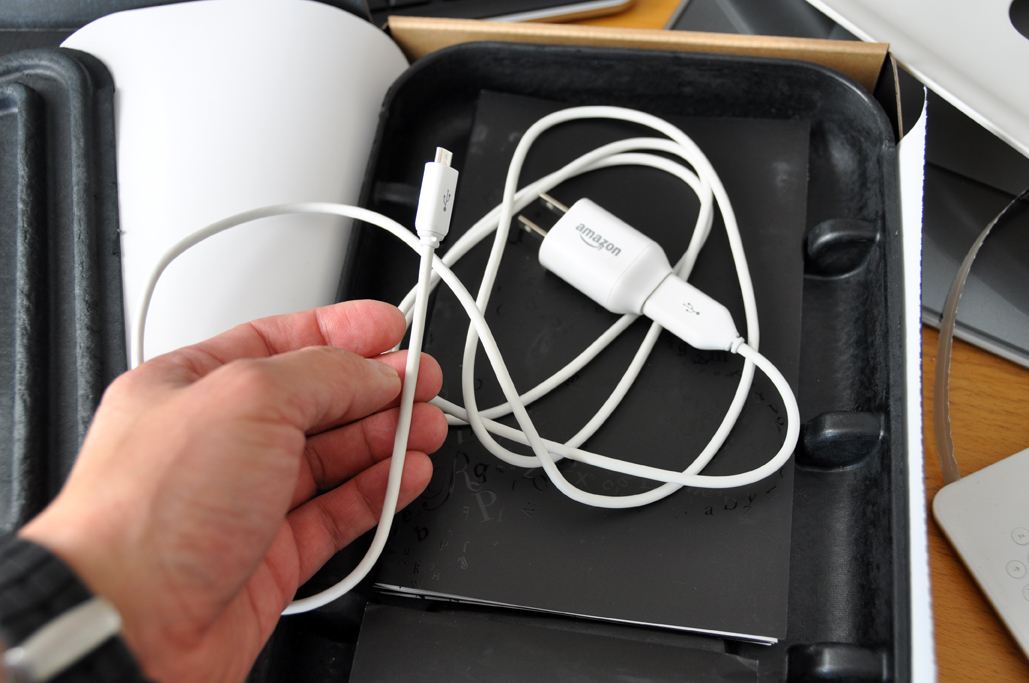
Amazon has listened to the feedback of v1.0 users and have rev'ed the Kindle to address some of the issues the v1.0 users had. Yesterday, the UPS guy dropped off v2.0 of the Amazon Kindle at the RainyDayMagazine office. The Kindle came packaged in a style similar to products from Apple. There is not much to the Kindle package (reader, cord/adapter, quick start guide). This is a good thing. This kind of device needs to be as simple to use as a book. It was. There wasn't any assembly, configuration, or initialization required. It just worked.
We are going to try to stay out of the path of this Swine Flu thing by staying home, curling up with the Kindle, and catching up on some reading. We will have a full FirstLook/FirstUse report by this weekend. A look at some of the accessories available for the Kindle2 will follow later in May. There are already more than 250,000 books available in the Kindle Store |
||||
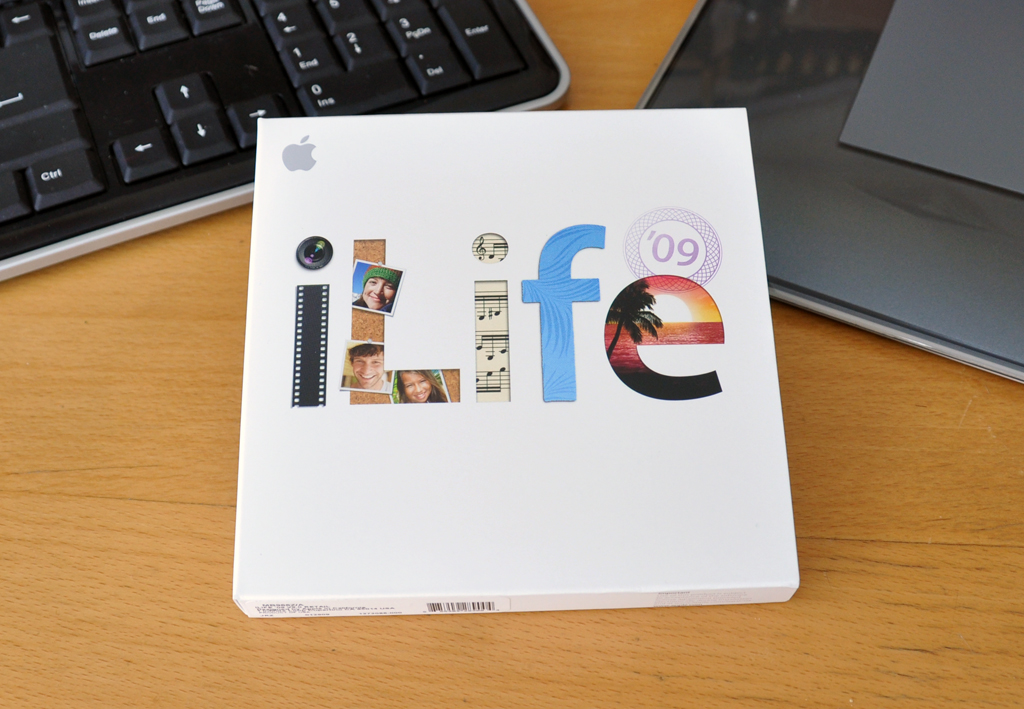
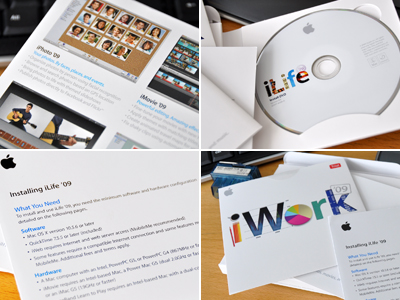
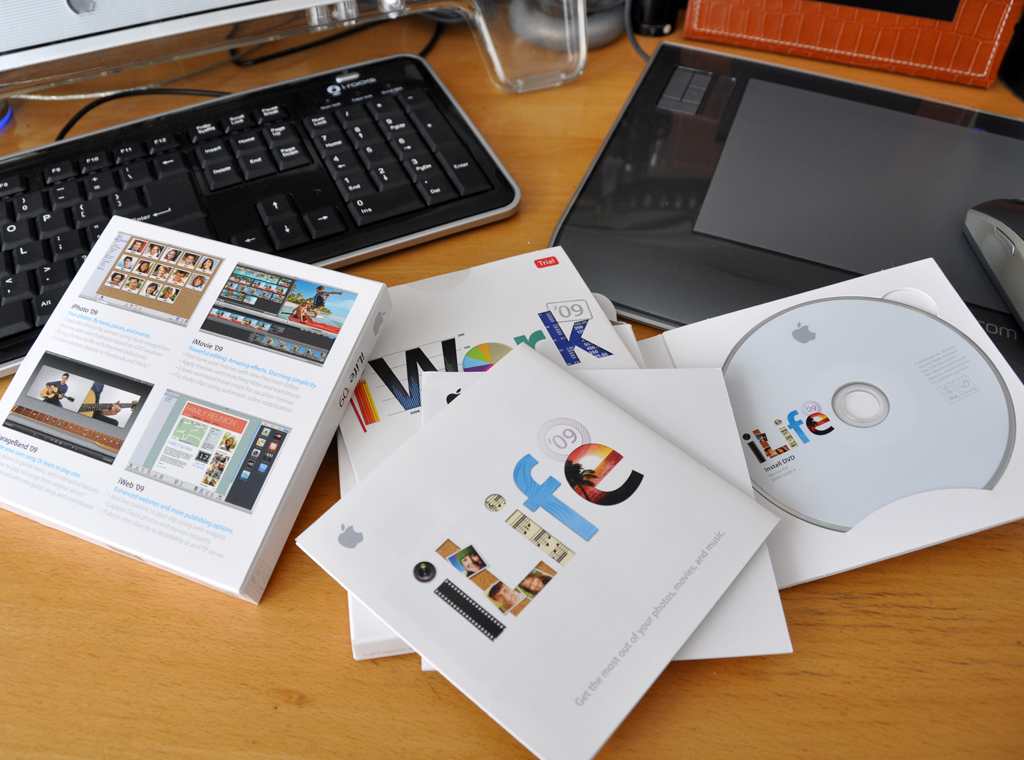
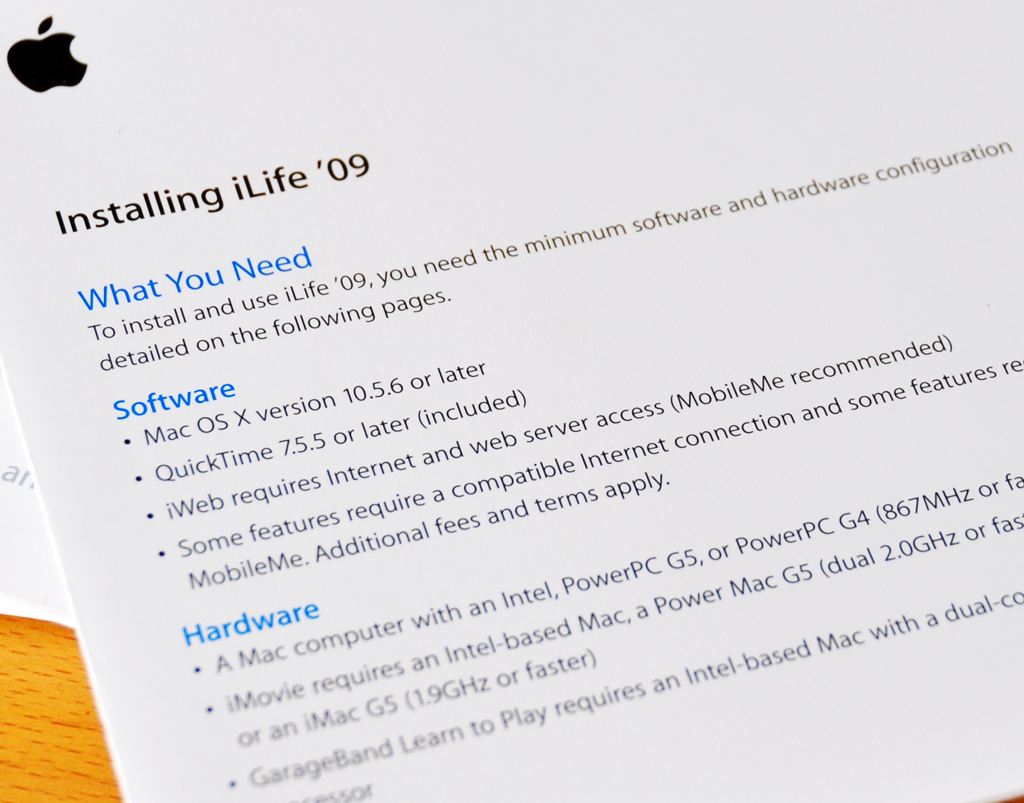
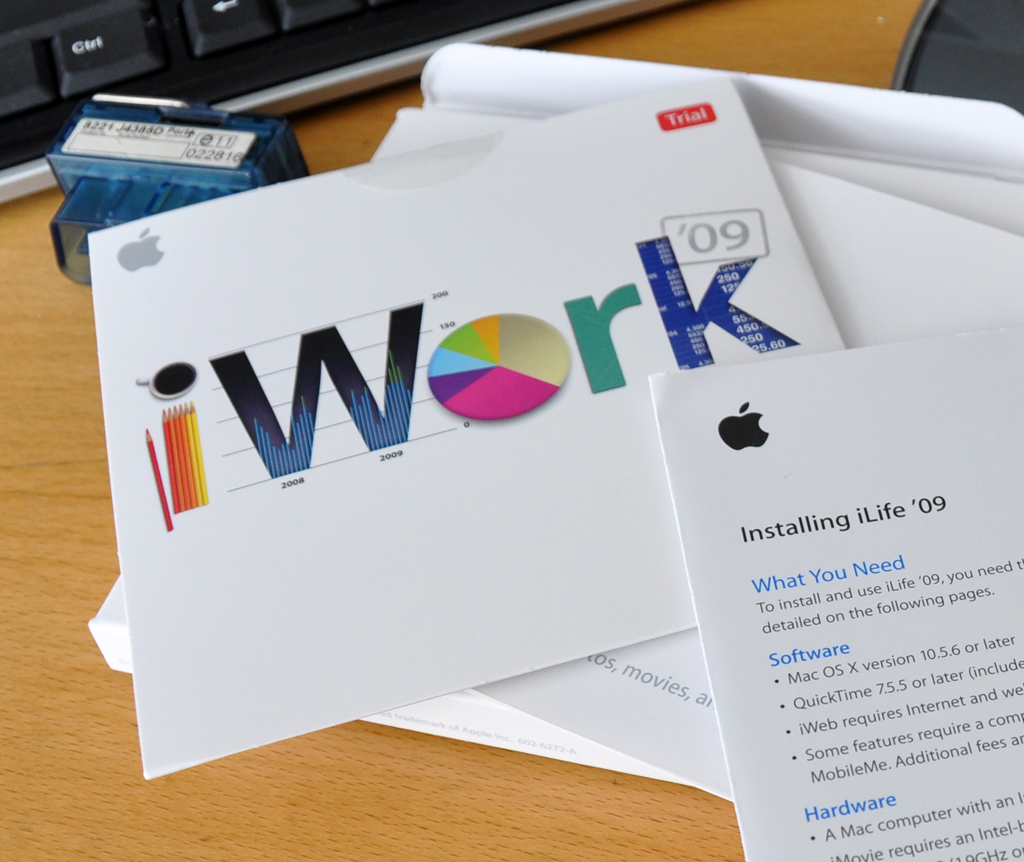
A copy of Apple's iLife comes with every Mac computer. This collection of applications (iPhoto, iMovie, GarageBand, iWeb, iDVD) are without equal in the PC world. We upgrade whenever there is a new version not because we need or use all of the new features, but because there is always that one really cool feature that we really wanted to try.
While each of the iLife 09 apps has something new, the one feature we were most intrigued with was iPhoto's facial recognition capabilities.
The new version of iMovie now requires an Intel based Mac to work. The other apps will work with the older G4-based units. Included in the package is also a trial copy of iWork. We don't know much about it, but will give it a look-see.
We'll install this new version of iLife and report back on how well the facial recognition feature works. We will also try out the other apps to see if there are any surprises to those upgrades as well. [Permalink]- iLife 09 |
||||
|
||||
|
||||
|
||||
|
||||
|
||||
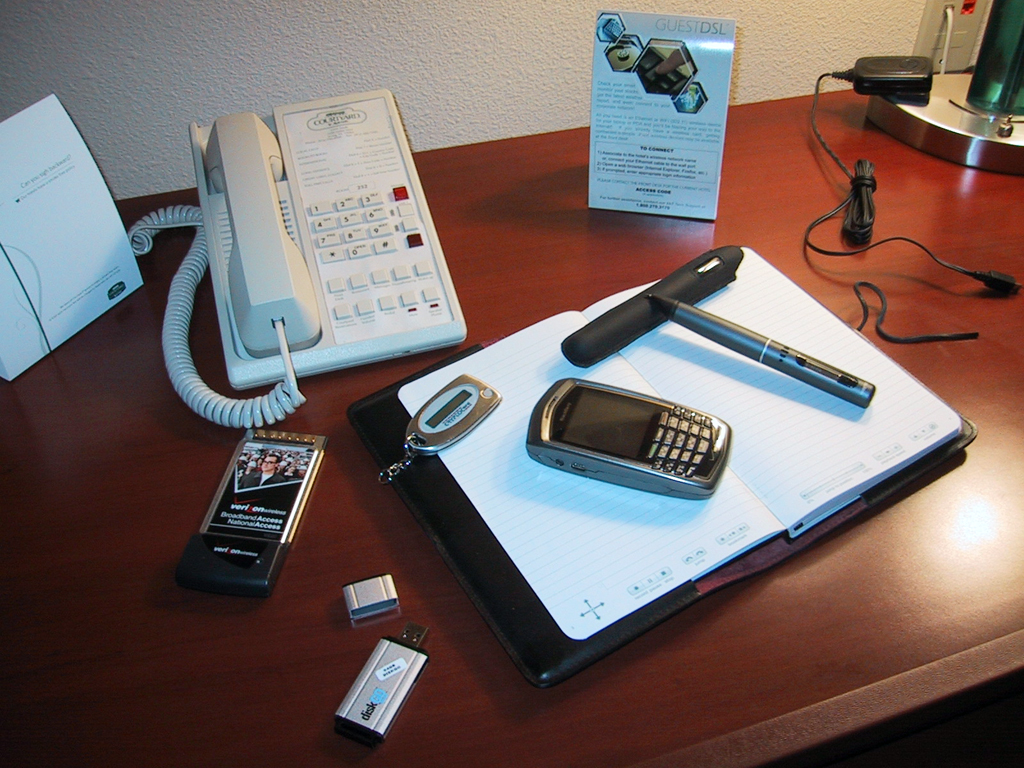
Those who travel for business pack differently than those who travel for pleasure. Waiting in security lines, fighting for overhead space, and checking out in time for an 8:30AM meeting gets old really quick when you have to do it more than once a week.
One way to make business travel easier is to pack as light as possible. Another is to "maximizing function while minimizing size"... especially when it comes to devices. We have been road-testing some new gadgets to see if they would lighten our load.
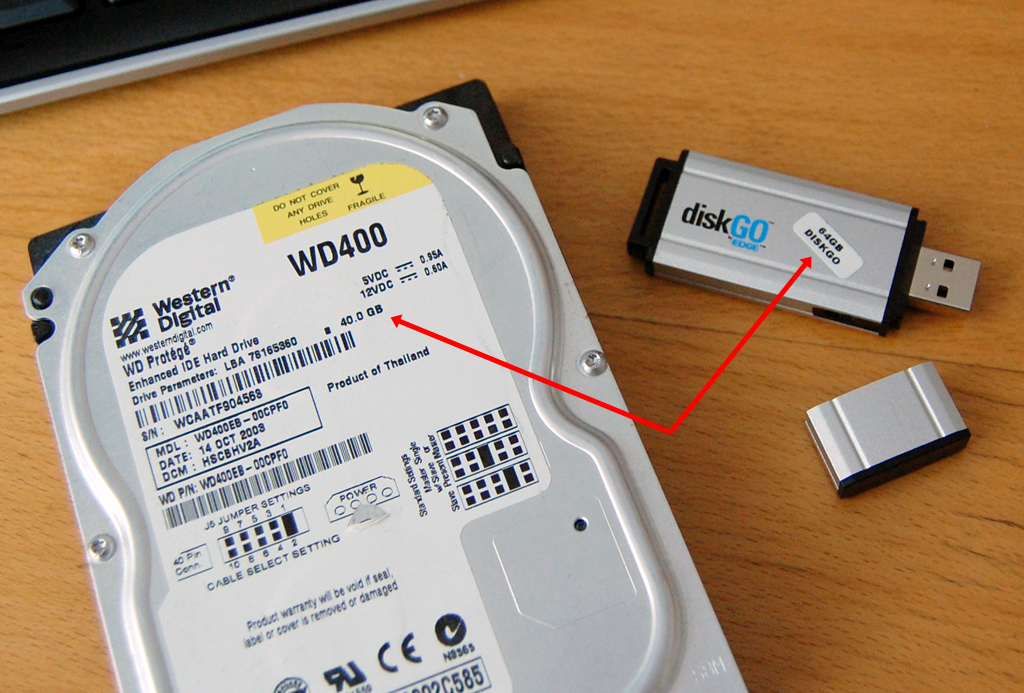
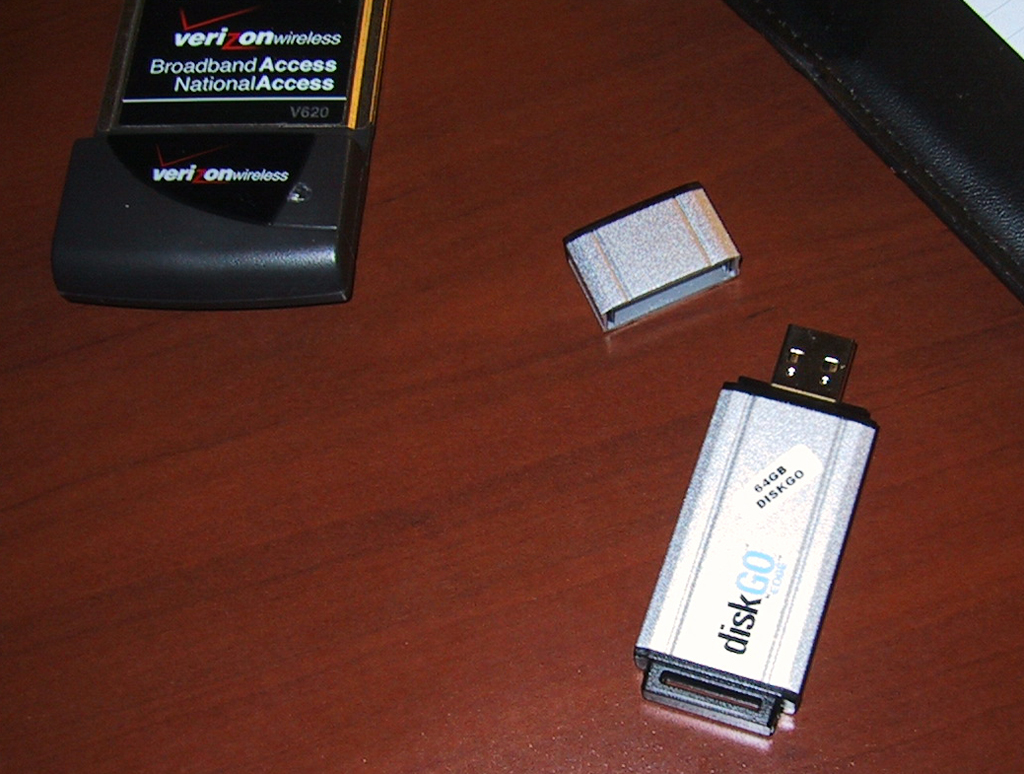
One item we took with us on this trip was the Edge's diskGO 64GB flash drive. Just a few years ago, 40GB of data had to be stored on a spinning hard drive which was about 20x heavier, had to be inside a computer, and cost about 3x as much.
Today, 64GB of data can be stored on a flash drive just 2" big. The drive is USB powered, entirely solid state, and about 100x more shock resistant than a drive with moving parts. 64GB is a LOT of storage space. It is enough for all of our business documents, presentations, and proposals. At some point, all drives will be solid state. This means everything requiring storage will be lighter, smaller, and more portable. Folks who have to travel for business are eagerly looking forward to that day. [Permalink] - diskGO 64GB Flash
|
||||


| ||
| RainyDayBuzz* | ||
|
|
||
| GET MUSIC* | ||
 |
||
| GET GEAR* | ||
|
||
| RECENT TRIPS* | ||
|
|
||


| GO PLAY* | ||
|
||


