
| TODAY |
| Reviews |
| 2009 |
| 2008 |
| 2007 |
| 2006 |
| Projects |
| Contact Us |
RainyDayMagazine's content can now be licensed for your print magazine or web site. Please contact us directly here. If you want to see something reviewed, then drop us a note with a link and we'll be happy to take a look. NOTE: Click here to read more about our approach to product reviews. |
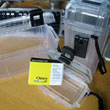
| Dec 15, 2010- Rainy Day Gift Guide: SOHO... | |
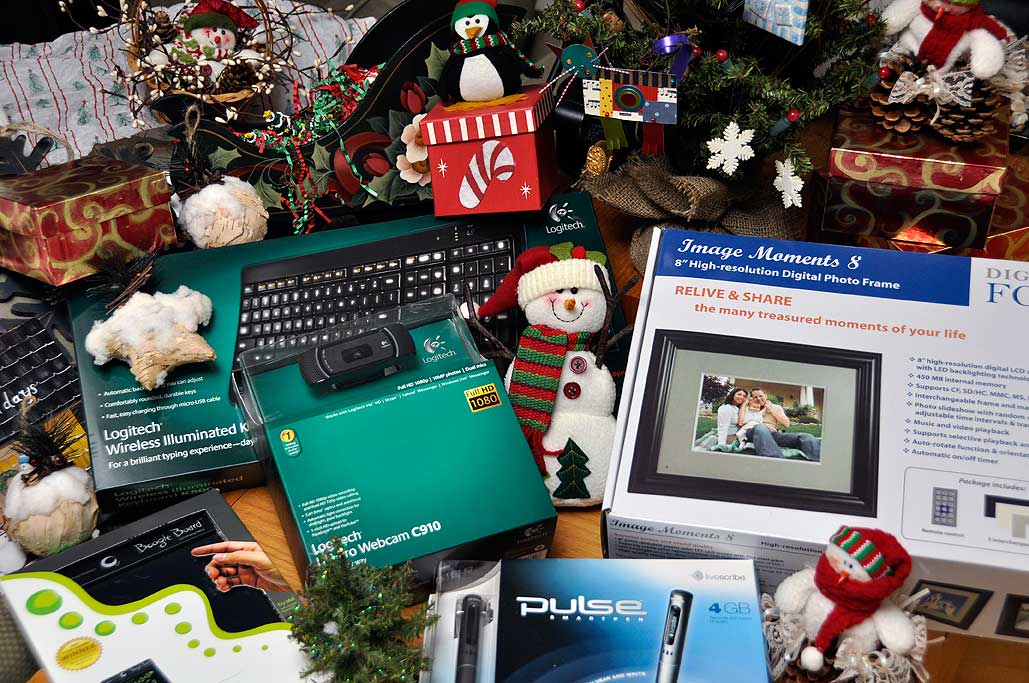
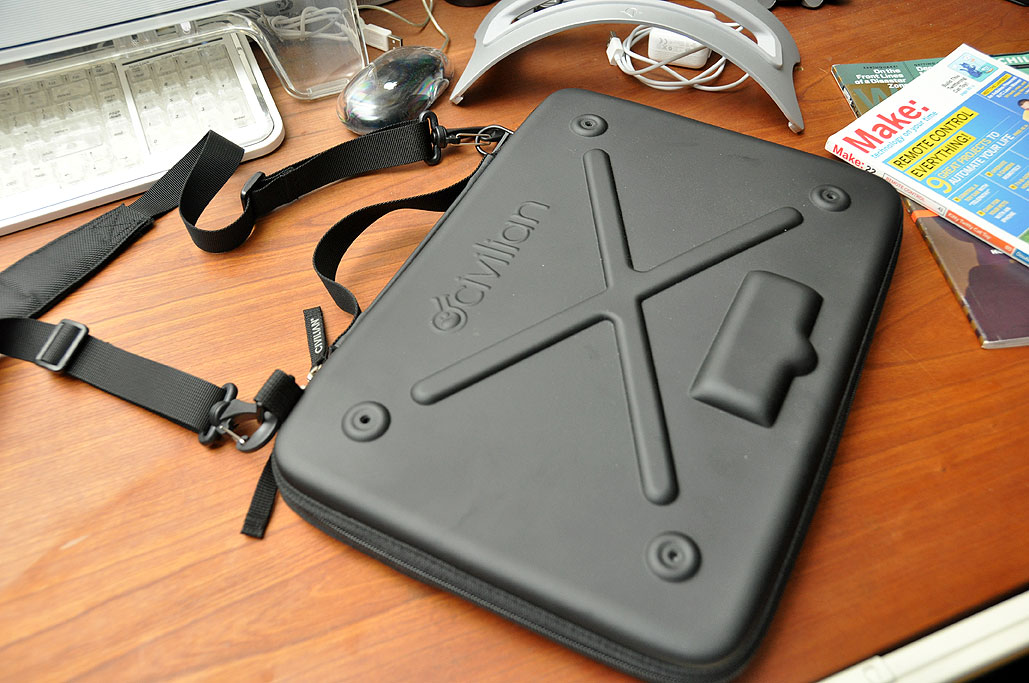
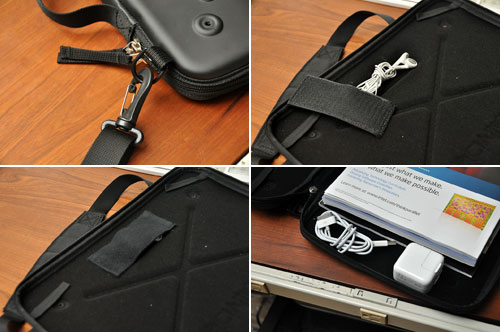
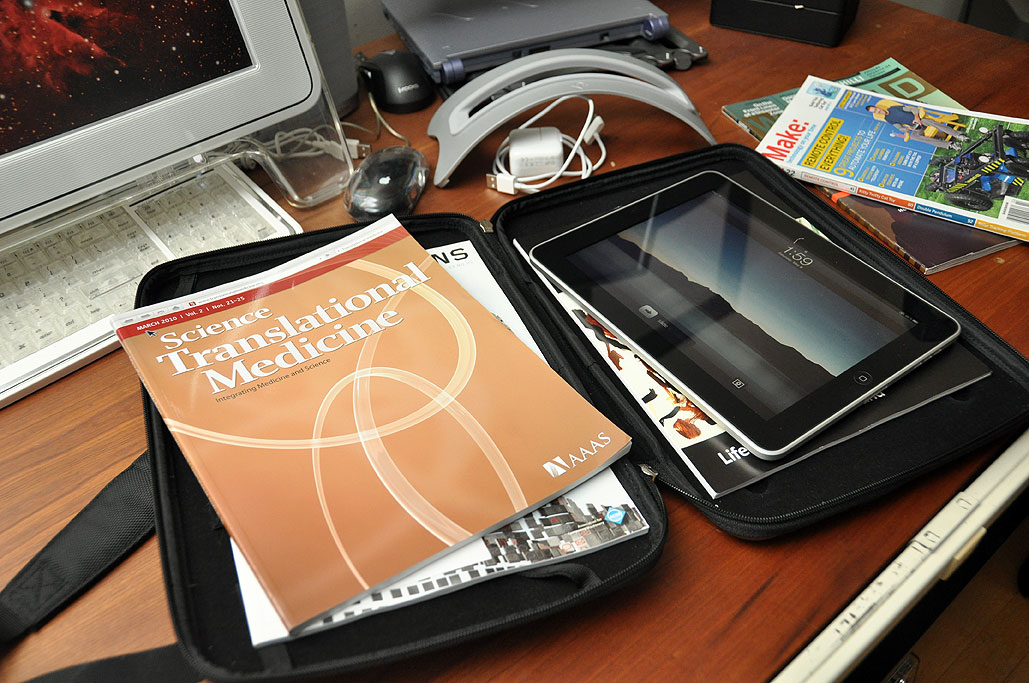
With more and more folks starting their own businesses, we thought we would put together a guide for those who may have a few SOHO (Small Office Home Office) friends on their gift list. When considering what to recommend, we went with suggestions which would make the SOHO work experience both more productive and more enjoyable.
With all the attention focused on killer devices such as the iPad, other innovative gear gets less mentions than they deserve. We did a review of a gadget called the Boogie Board back in September. We think this LCD drawing tablet is the sleeper gift of this holiday season. Sources tell us that... [more]-Holiday Gift Guide: SOHO
|
|
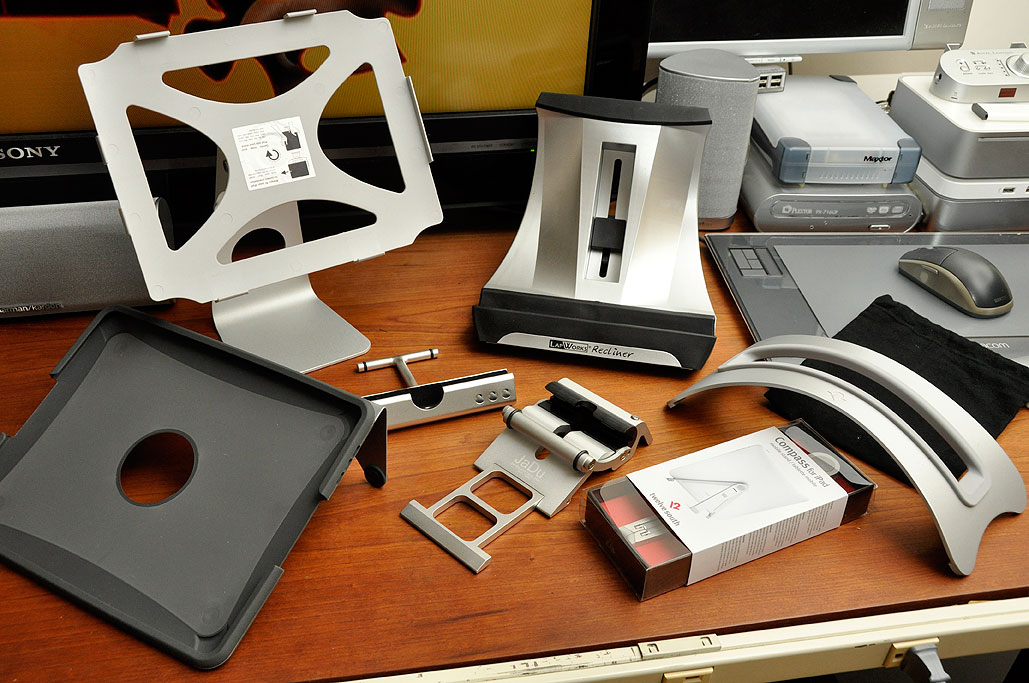
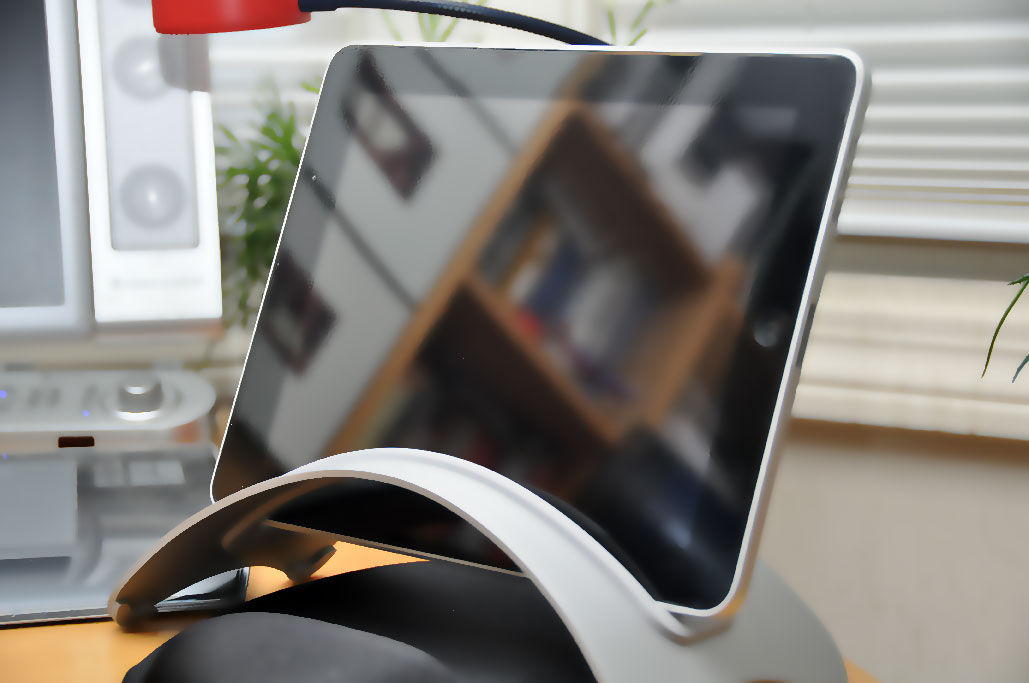
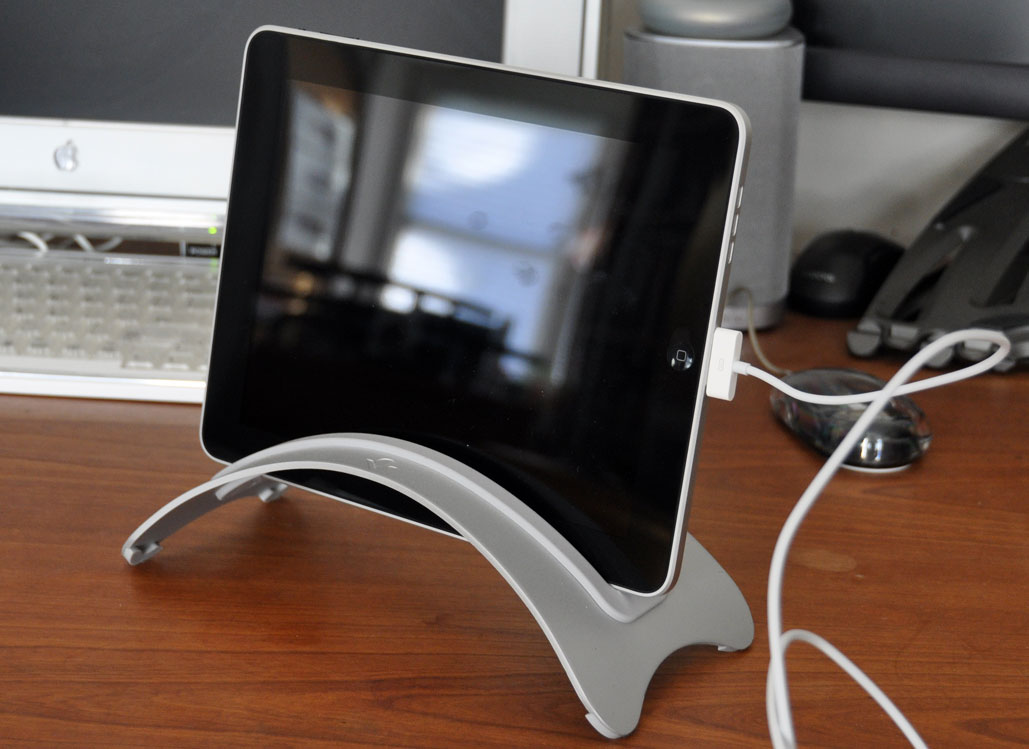
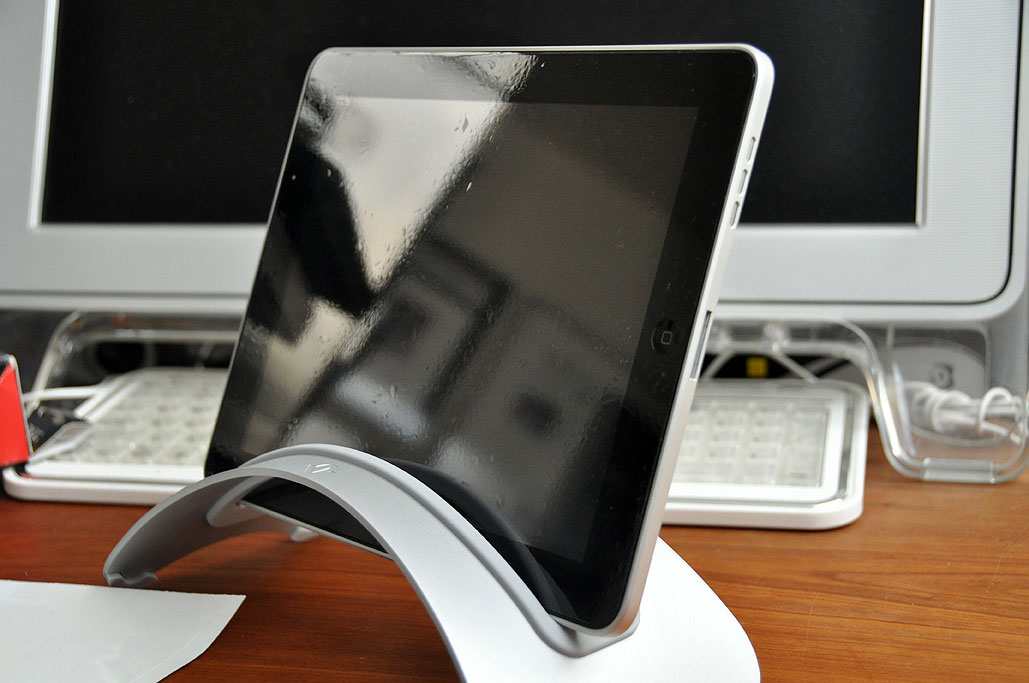
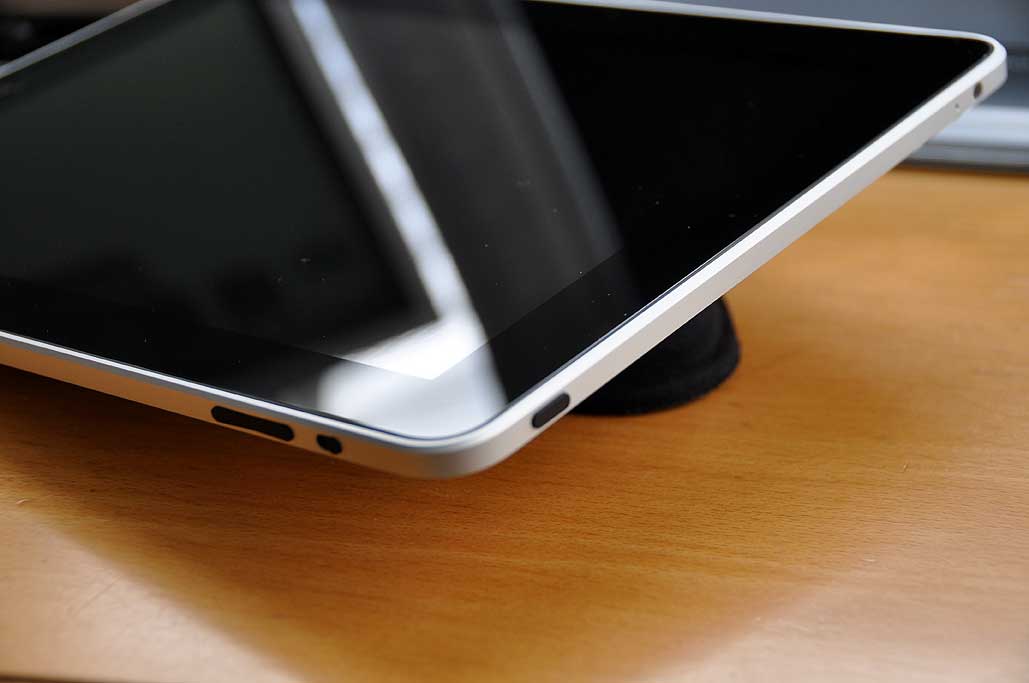
| Nov 24, 2010- iPad Stands: Desktop... | |
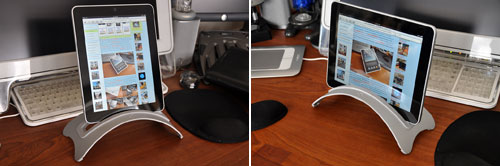
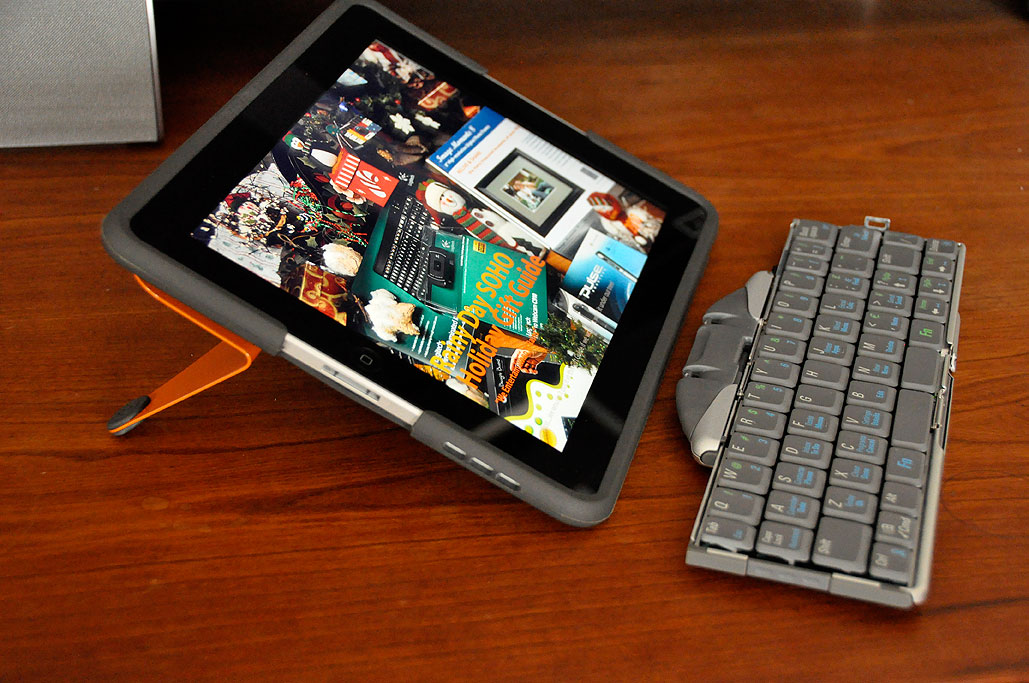
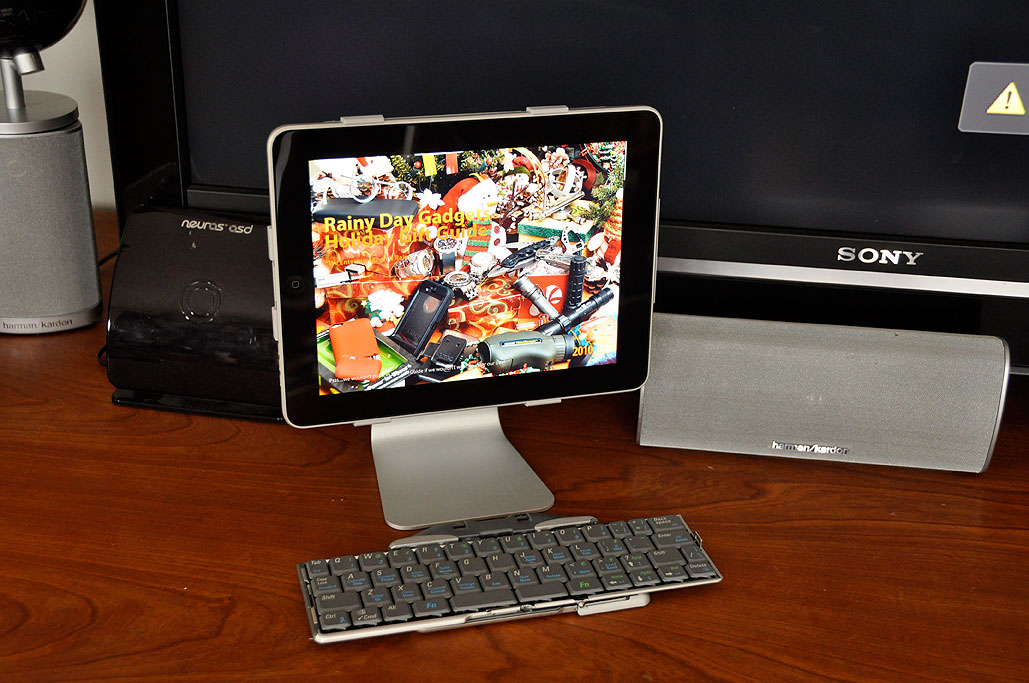
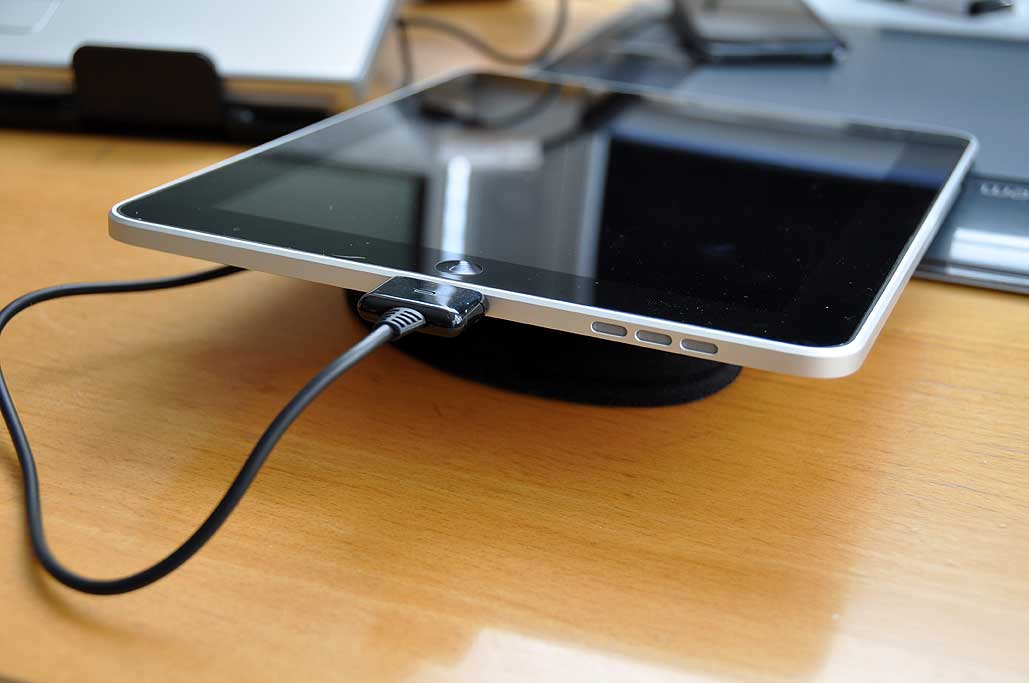
iPad stands come in two flavors: portable and desktop. Yesterday, we started the two-part series with a look at a few of the portable ones. Today, we will finish up with a look at the ones designed for more stationary use. Once we looked into what was available we realized the different desktop stands pretty quickly sorted themselves into four varieties: slot, easel, brace, and holder.
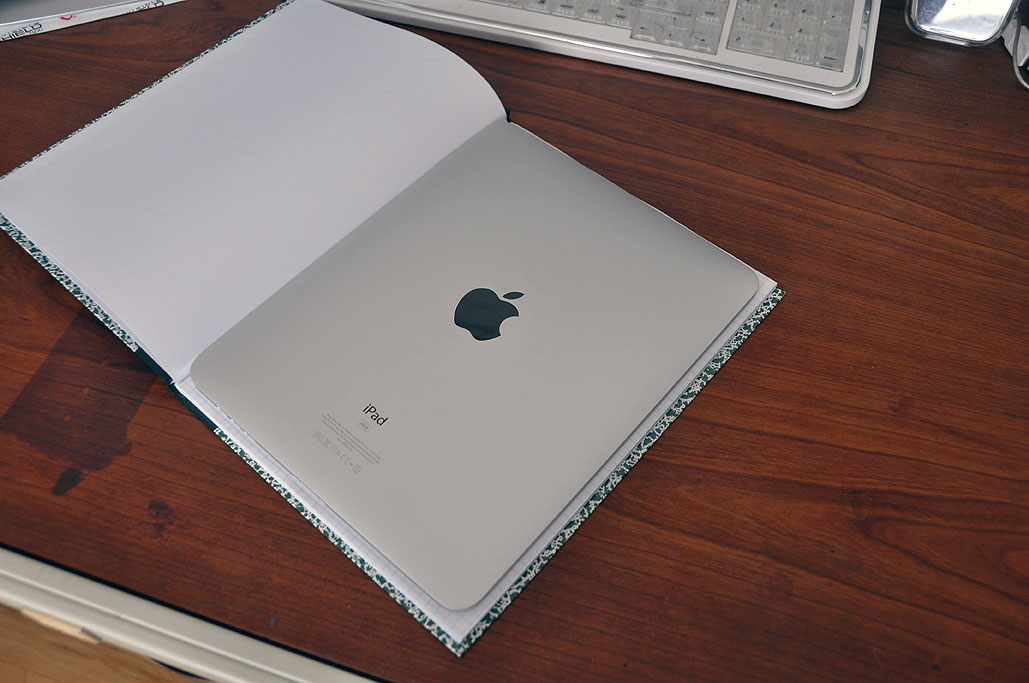
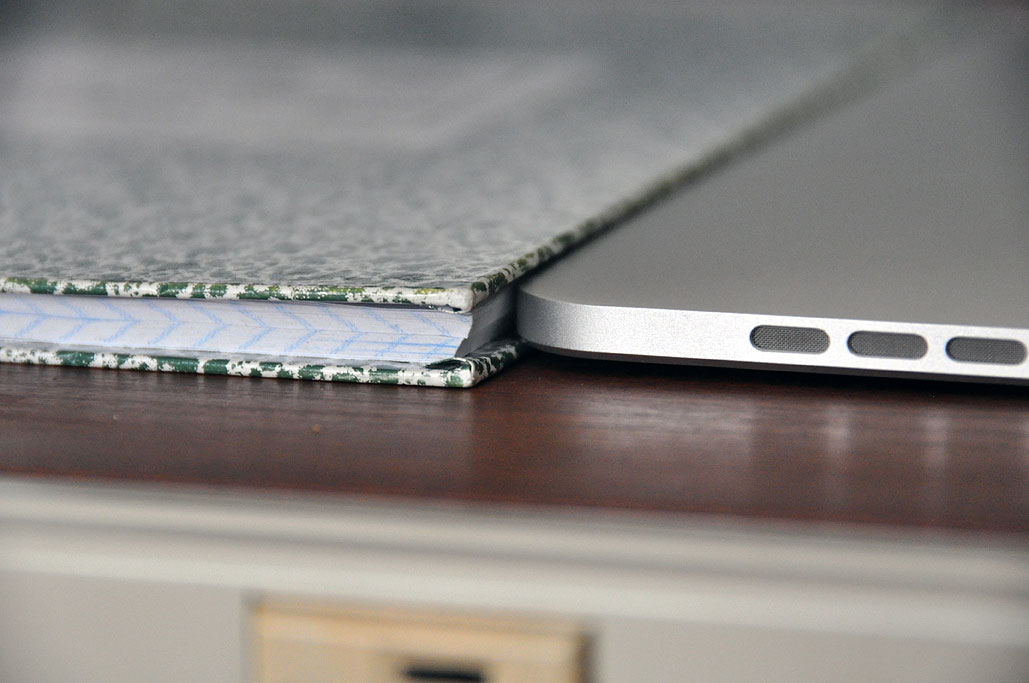
The slot unit we have here is actually for the MacBook, but it works just fine for the iPad. It is called the BookArc and is from TwelveSouth. The design allows the iPad to be dropped into and pulled out of stand with the minimum of fuss. The drawback is that it allows only one view angle. The easel design, however, is even simpler to use in that all one has to do is lean the iPad on the holder. Some easels, like this Recliner from LapWorks, can even adjust its display angle. The advantage of the easel approach is that it will work when the iPad is in a case. Very convenient for those who like to carry their iPads in a folio. The tradeoff is... [more]-iPad Stands: Desktop
|
|
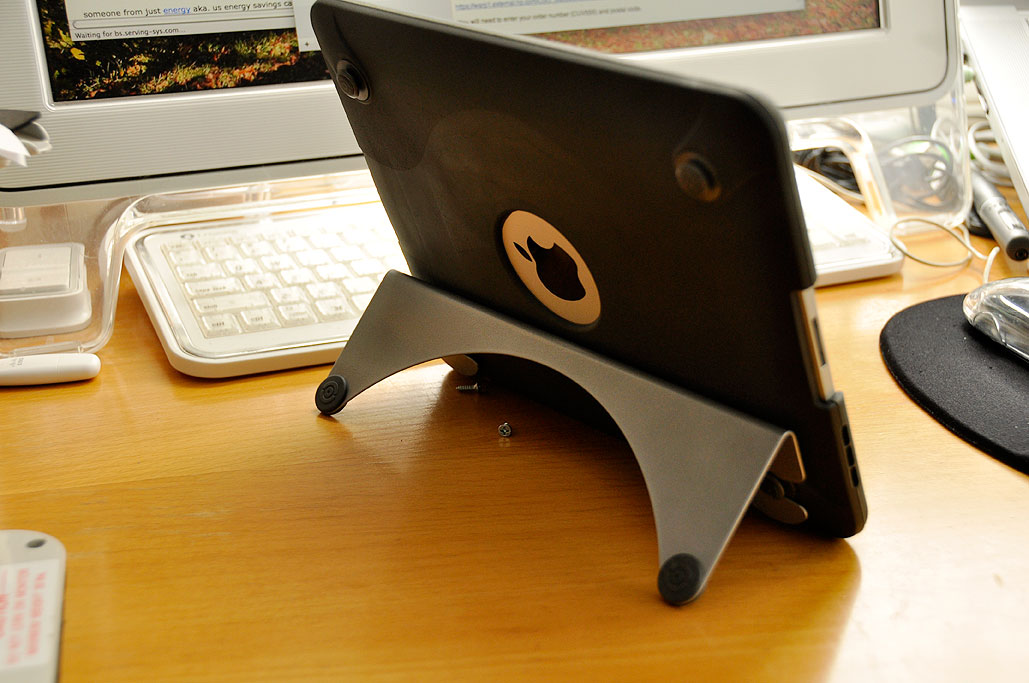
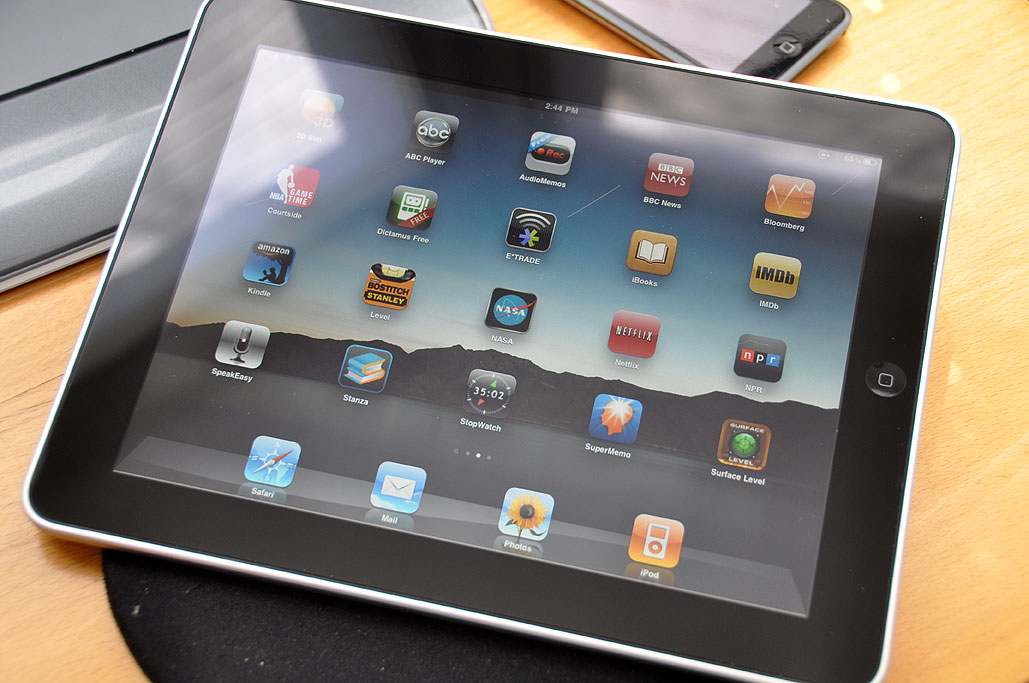
| Nov 23, 2010- iPad Stands: Portable... | |
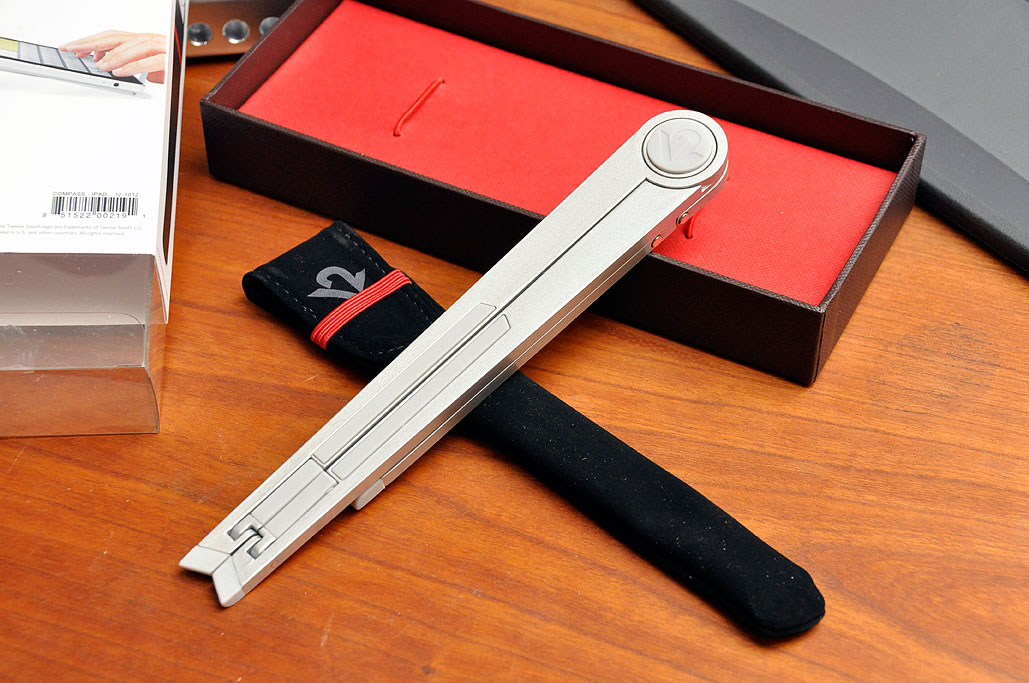
The ecosystem of 3rd-party accessories surrounding Apple gadgets have always been a healthy one. Laptops, iPods, and iPhones have stimulated the developement of cases, docks, and peripherals to protect and extend the capabilities of those devices. The iPad is no different. The iPad is great for "consuming" media and has inspired the creation of all kinds of contraptions to help it stand up so users can lay back. There are instructions of how to make an iPad stand from a coat hanger, pencils & rubber bands, or just a simple block of wood. While all of those are great home-made solutions, we wanted to find some options more in keeping with the esthetics and build quality as that of the iPad. After a bit of research, we settled on units which we feel follow the design spirit of the iPad: functional and great looking. Three of the units are portable. The others, not so much. We will take a closer look at portable ones today and save the not-so-portable (but still exceptionally cool) units for tomorrow.
First up is the Compass from Twelve South. As a Mac-centric accessories company, Twelve South have made a name for themselves in the short time they have been in business. Their gear are not only highly functional, but are created using the same design language as that of Apple. The result is... [more]-iPad Stands: Portable
|
|
| Nov 22, 2010- A Perfect Gift ... | |
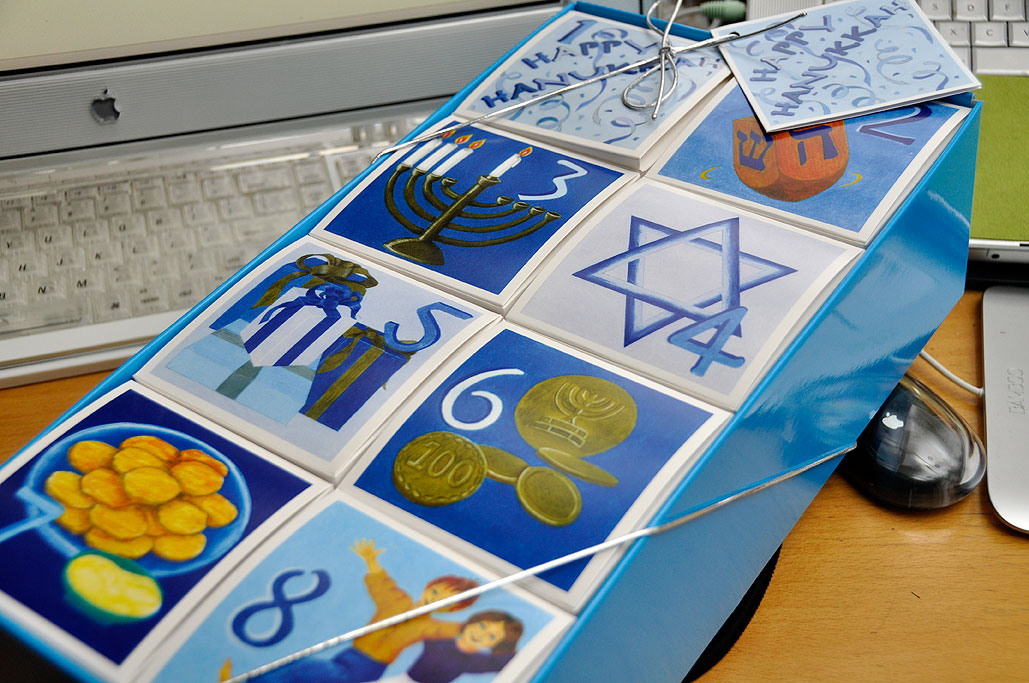
F.E. Young and Gena Schmidt have formed a new business. They have what they believe to be the perfect product to start with. The government has been creating a myriad of incentives to encourage the start up of small businesses, which made it perfect timing. And F.E., who had recently acquired a house, coincidentally across the street from Gena, had the perfect place. And so, on February 1st of this year, "A Perfect Gift Company, LLC" was born. When F.E.'s daughter Zoe was little, F.E. wanted to make Hanukkah special for her. As an artist, teacher and single mother, a little had to go a long way, so she created the "Hanukkah boxes." They were eight small cardboard boxes, each with an illustration of a Hanukkah tradition and a number…one for each night. She stacked them together in two rows, side by side, and bound them with a colorful piece of blue paper. She put Zoe's name on the side and filled them with... [more]-A Perfect Gift
|
|
| Nov 10,2010- BlueTrek Duo... | |
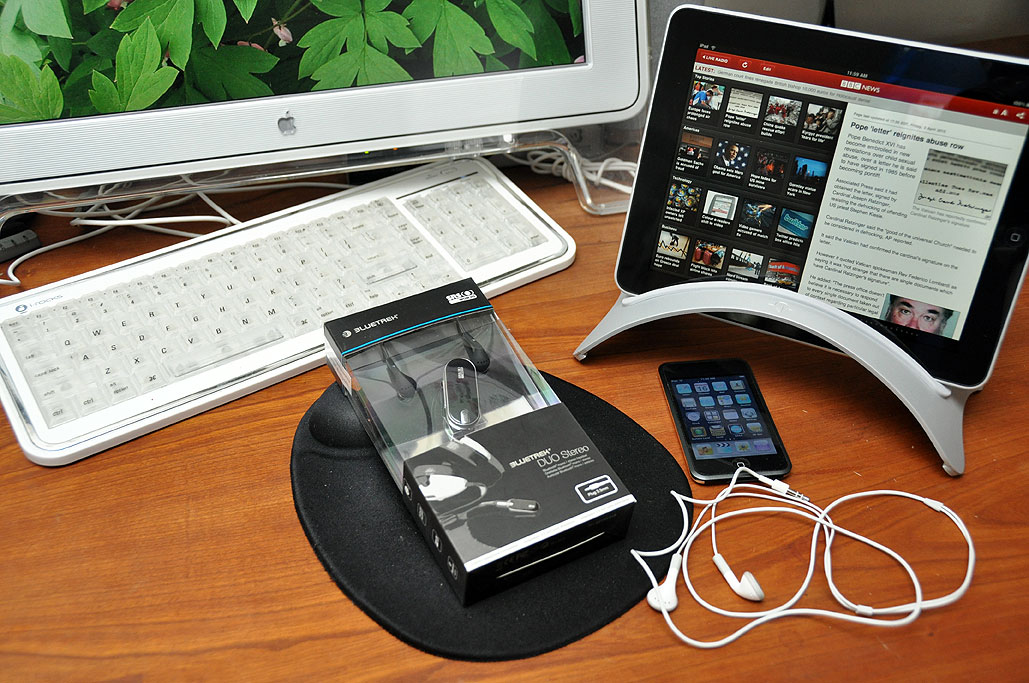
Our headsets have been silently proliferating behind our back. One set was for our iPod. Another set was for our cell phone when we drive with the top down. A third set was for...well, we don't actually know why we have it, but it seems to be in our bag. Anyway, the point is many of our devices have audio capabilities and they all seem to require a set of headphones.
We decided to look around to see if we could find a set of Bluetooth headphones which would work with all of our devices and free us from being tethered to them. After a bit of searching, BlueTrek's Duo bubbled to the top of the list. The Duo is a set of Bluetooth-enabled... [more]-BlueTrek Duo
|
|
| Oct 29,2010- Interactive Test Issue... | |
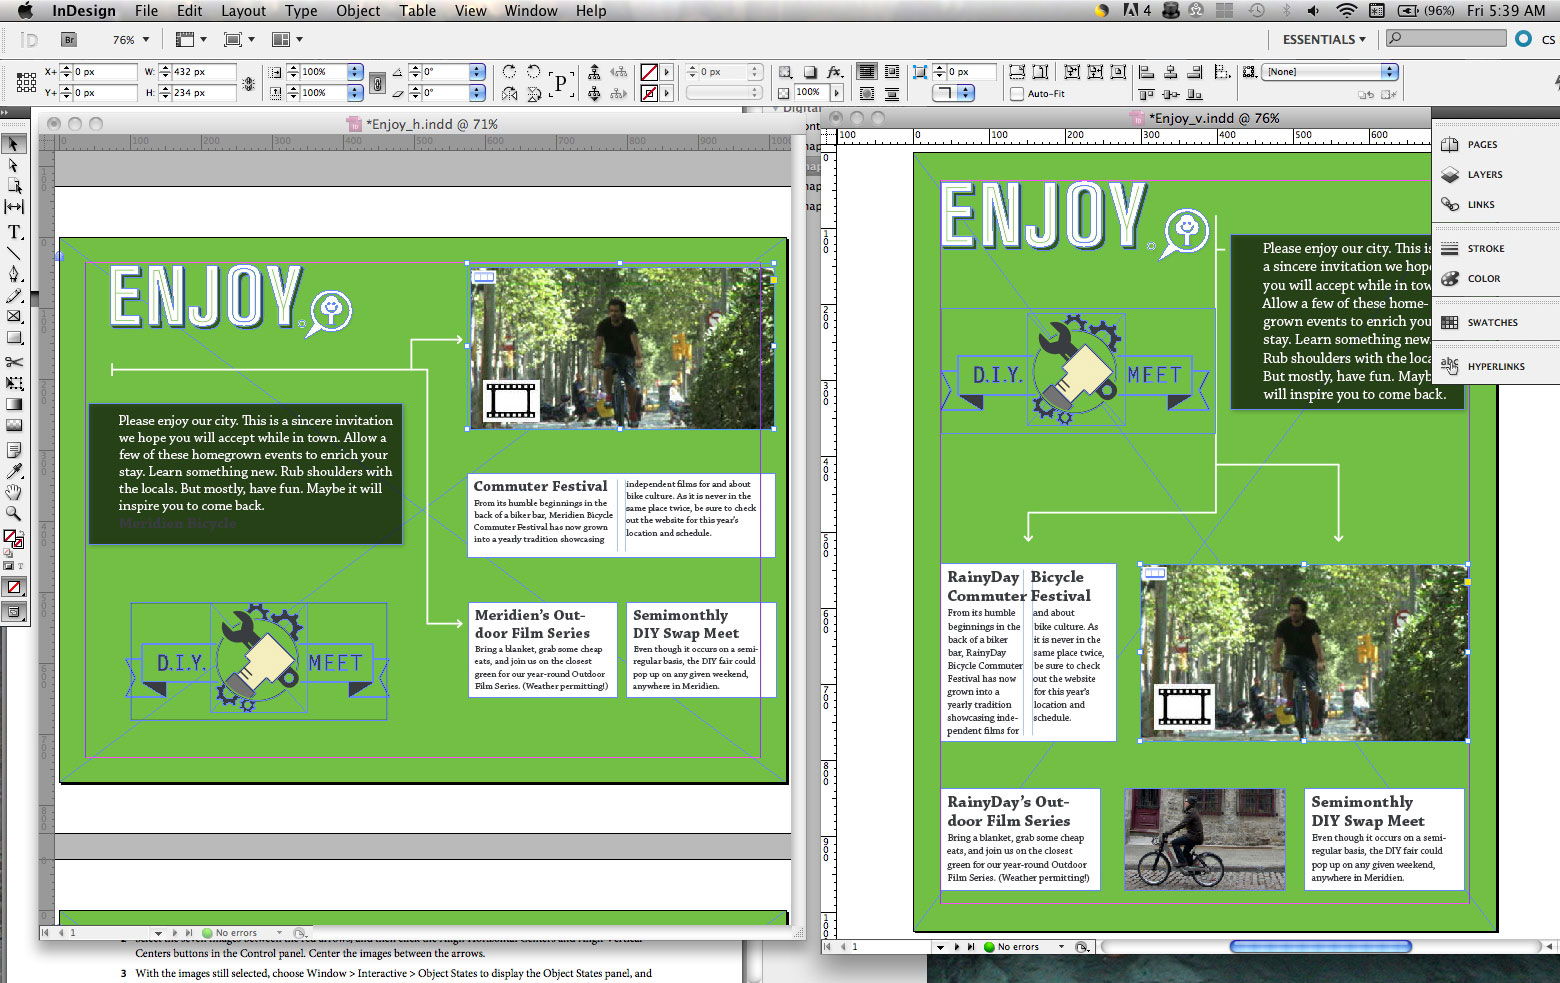
This is the last installment of our brief tour of the Adobe Digital Publishing Solution. Yesterday, we worked through Adobe's tutorial on putting together a single page using their DPS tools. Now that we are confident that all of the pieces of the process are functioning properly, we are ready to tackle a second and more challenging tutorial.
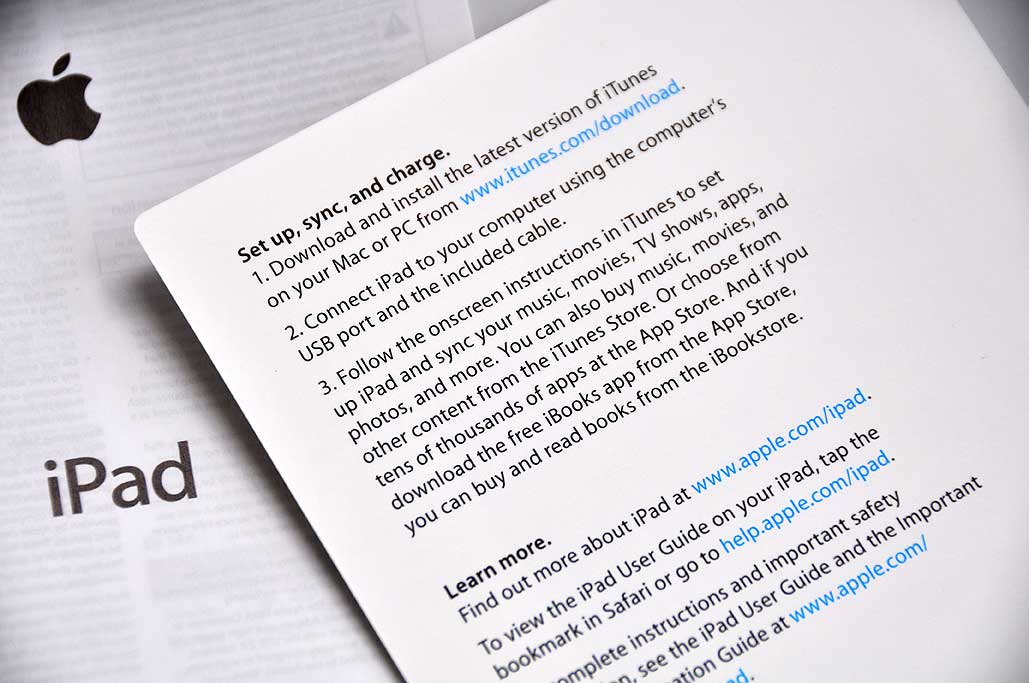
Today, we will show the workflow involved in assembling an issue with more interactive (slideshows, video, etc...) elements. Also, instead of just transferring the issue directly to the iPad, we'll upload it to Adobe's magazine server and download it wirelessly using the iPad. As with the single page issue, the layout of the various component were done using... [more]-Adobe DPS: Interactive Test Issue |
|
| Oct 28,2010-Digital Publishing Solution... | |
We've spent the last few days getting the pieces of Adobe's Digital Publishing Solution (DPS) downloaded, installed, and running. The DPS is Adobe's set of tools for publishing interactive magazines for the iPad. It is currently in beta testing and is scheduled to be available in Q2 of 2011. The following are the main components of the DPS workflow:
This set of tools was developed by Adobe to enable magazine publishers to leverage their print material for the digital tablet market. The basic idea is, with a little extra work, publishers can add value (interactivity, links, etc...), repackage their print material, and deploy to a host of current and future digital devices...all without having to do any programming. It is an attractive proposition. We want to see if Adobe's solution will only work for the big publishing houses or will it also work for the slightly smaller operations like RainyDayMagazine.
The DPS workflow is based around the latest Creative Suite InDesign application. While InDesign CS5 is the main component of the workflow, there are a few other pieces which help connect everything together. One of the "glue" components is... [more]-Adobe DPS: Test Issue
|
|
| Oct 27,2010- Adobe CS5 QuickStart.. | |
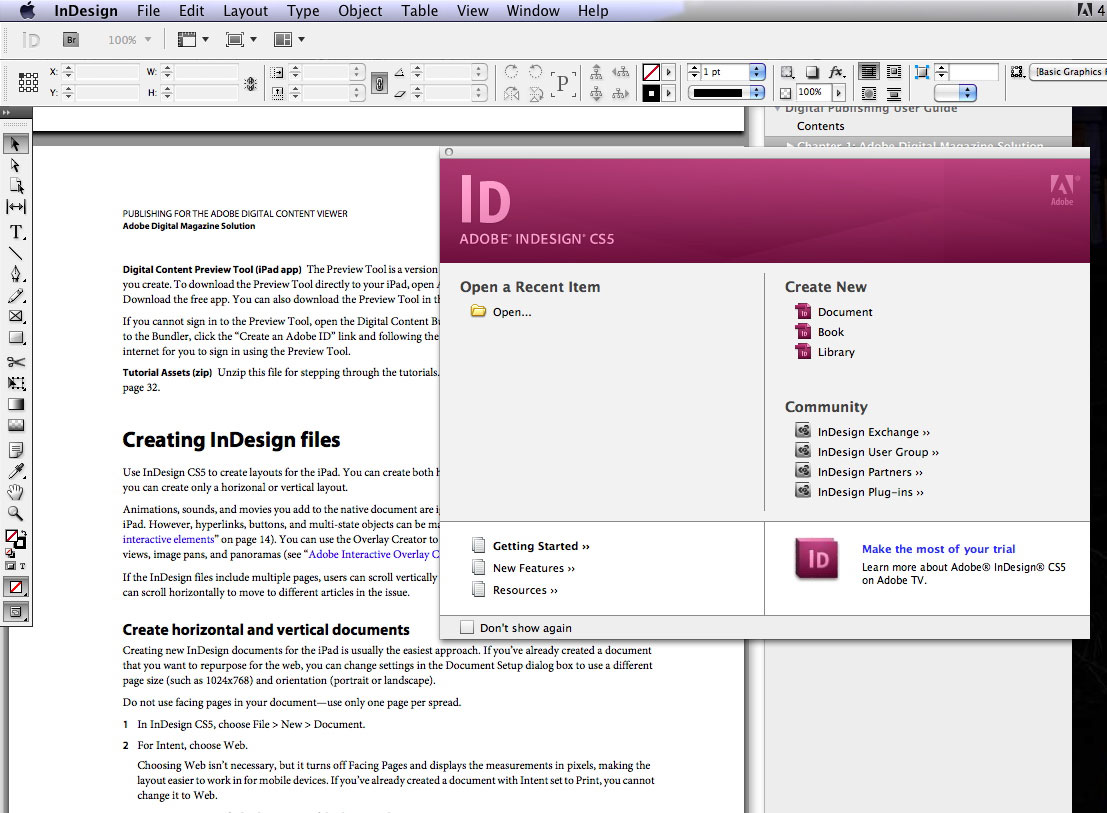
The tools for digital publishing have evolved quite a bit over the past thirty years. At the beginning, PageMaker, Quark Xpress, and Word were the tools of the trade. It was possible for one person to be an expert on all of these applications. Granted, the digital portion of the entire publishing workflow was was limited, but still it was possible to learn it all. The suite of applications used to create, layout, and manage the digital publishing process keeps growing. Today, just familiar with a few of them is difficult enough, being an expert in every application necessary to produce a digital magazine is next to impossible.
Keeping current with the updates to the applications we currently use (Dreamweaver, Photoshop) is challenging enough. With our venture into publishing for the iPad, we will now need to get up to speed on a component of the Adobe CS suite called InDesign. It came as a part of our Adobe CS4 package. As the application is for laying out pages for printing, we never even bothered to install it. However, now that Adobe has extended InDesign CS5 for... [more]-Adobe CS5: QuickStart
|
|
| Oct 26,2010- iPad Magazine Publishing.. | |
The iPad has changed a lot of things in the six months since its introduction. A whole cottage industry of game and utility apps has sprung up for the device. Companies are jockeying for position around which technologies will be/should be/never will be supported on it. Publishing houses are scrambling to understand what the iPad will mean for books, magazine, and the web.
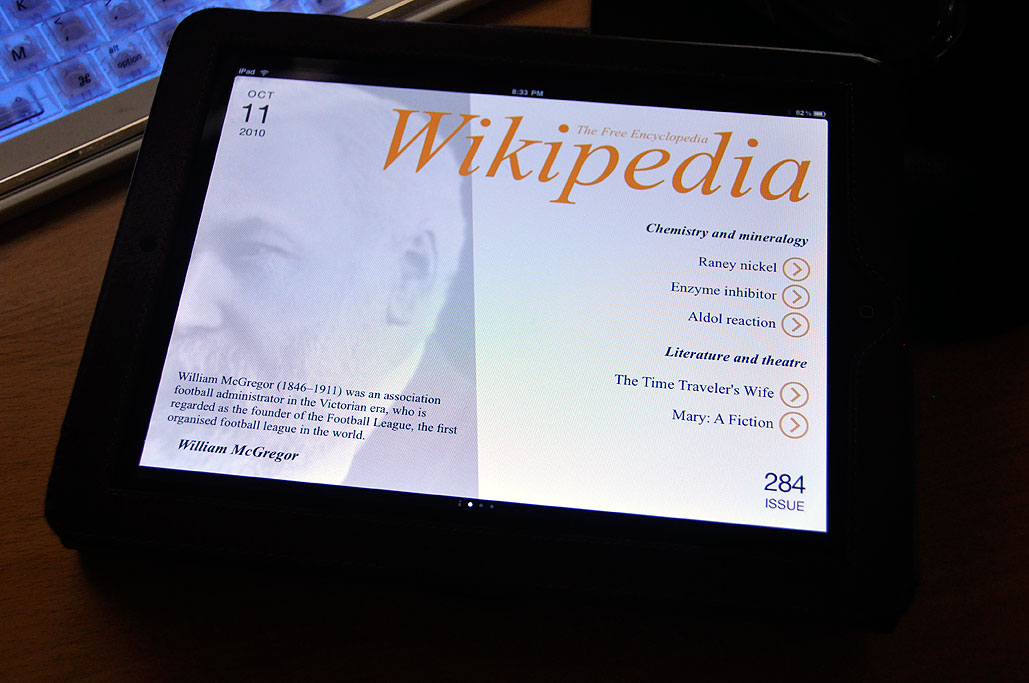
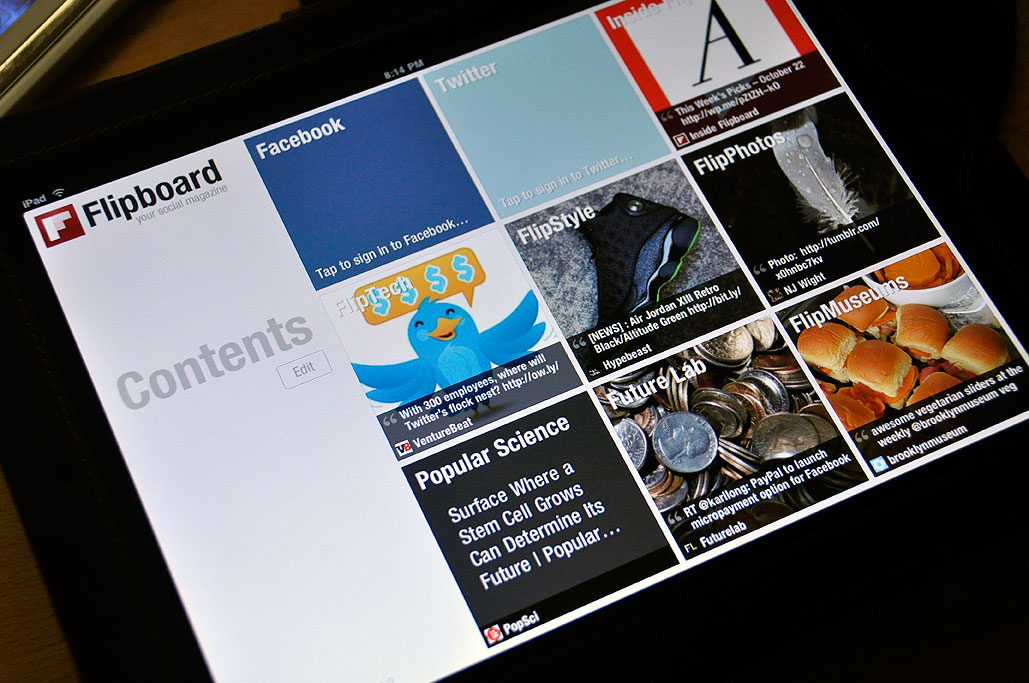
Magazine publishers are especially interested in the iPad as a platform. The tablet form factor is a natural fit for reading magazines. The iPad/AppStore combo is especially suited as it can allow subscribers to connect to the web, purchase, and download new issues. Sites such as Wikipedia and TED have iPad apps which enable users to view their content in a magazine-ish format. Flipboard has even made it possible for iPad users to create their own personal magazines using content from Facebook, twitter updates, and other feeds. The biggest splash this week was... [more]-iPad Magazine Publishing
|
|
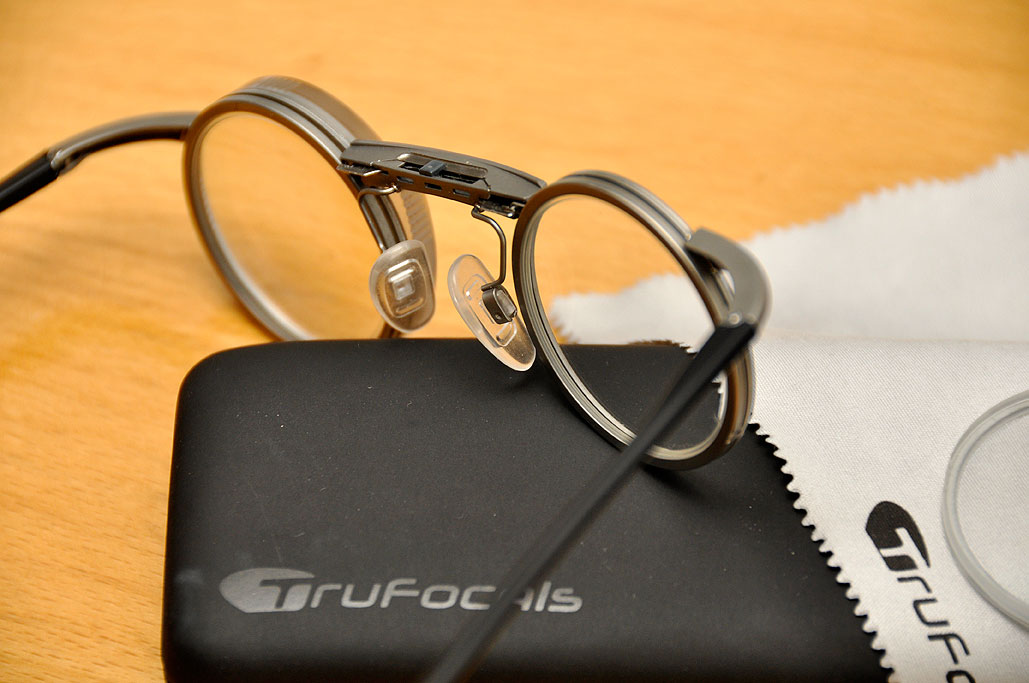
| Oct 14,2010 - SuperFocus FirstUse... | |
We posted comments of the TruFocals as sunglasses yesterday. After two months of use, we thought we would give our impressions of the variable-focus TruFocals as reading glasses today.
It took us about two days to get used to changing the focus on the TruFocals as the slider was a bit stiff. At first, it was a two-handed operation. Once the mechanism had loosen up some, we could do it with one hand. Now we don't even think about it when we work the slider from... [more]-SuperFocus: FirstUse
|
|
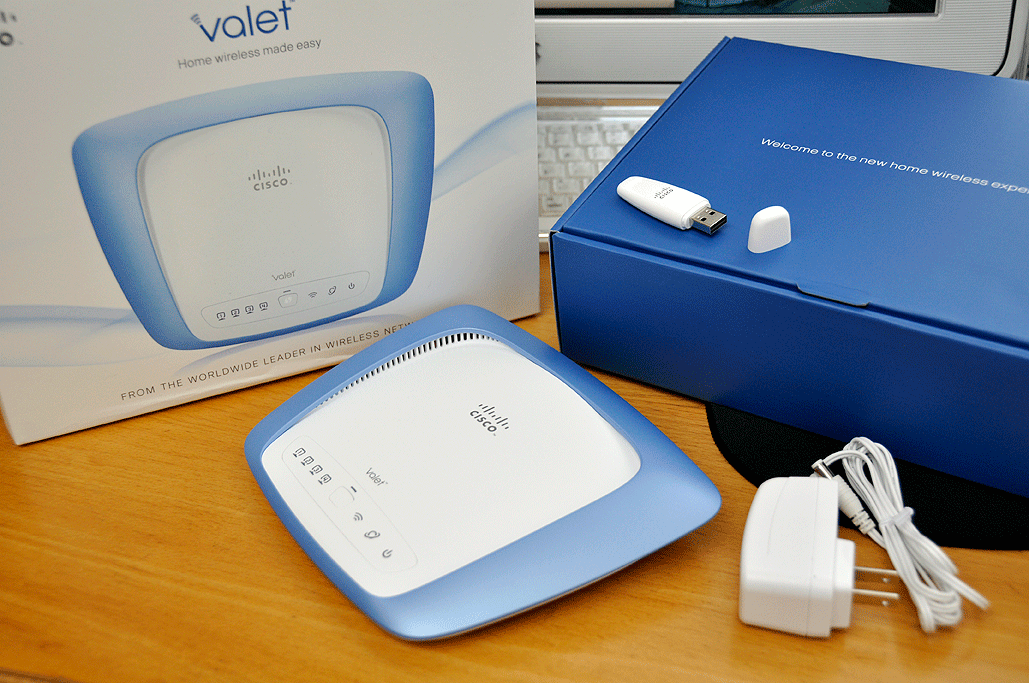
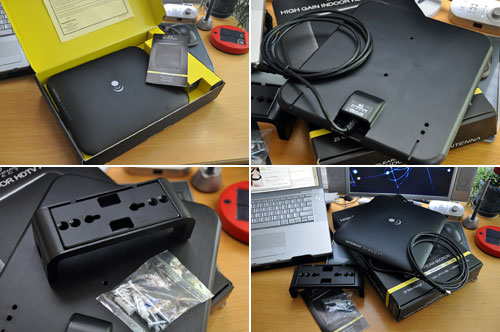
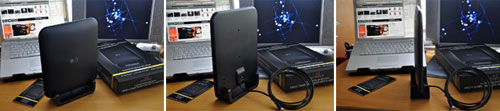
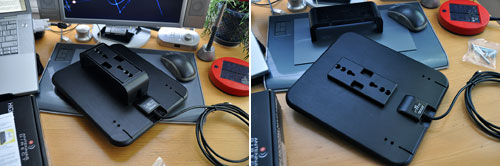
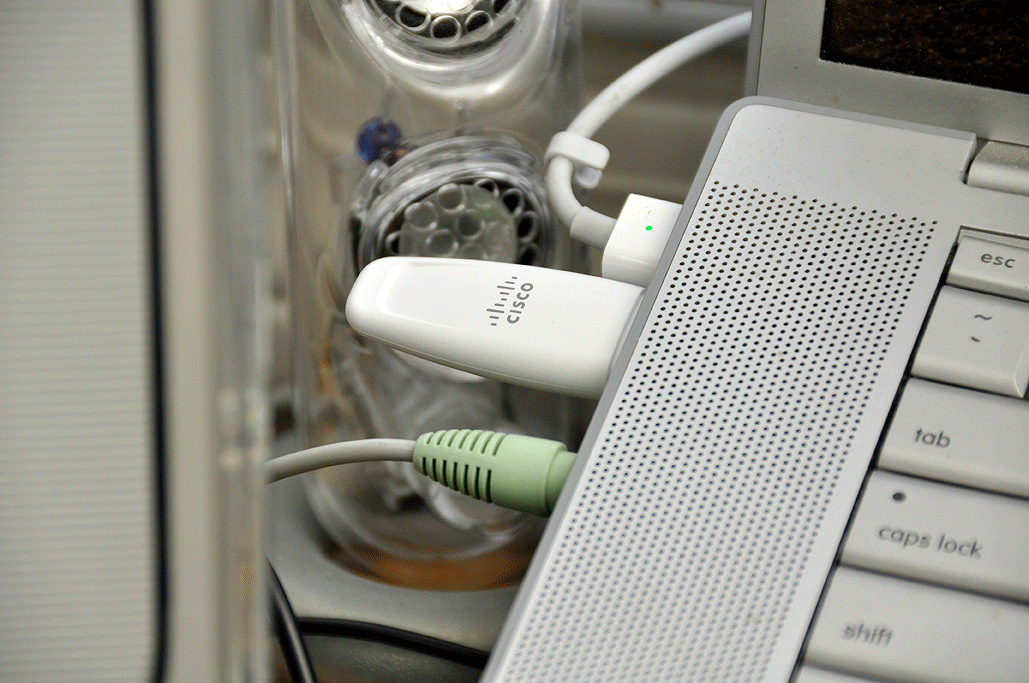
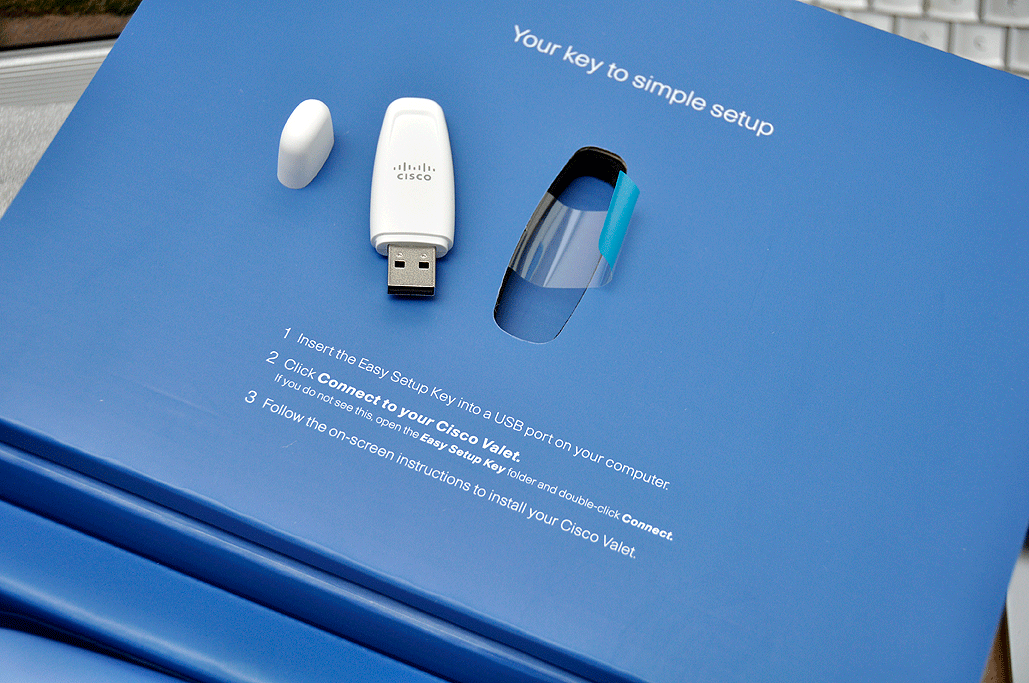
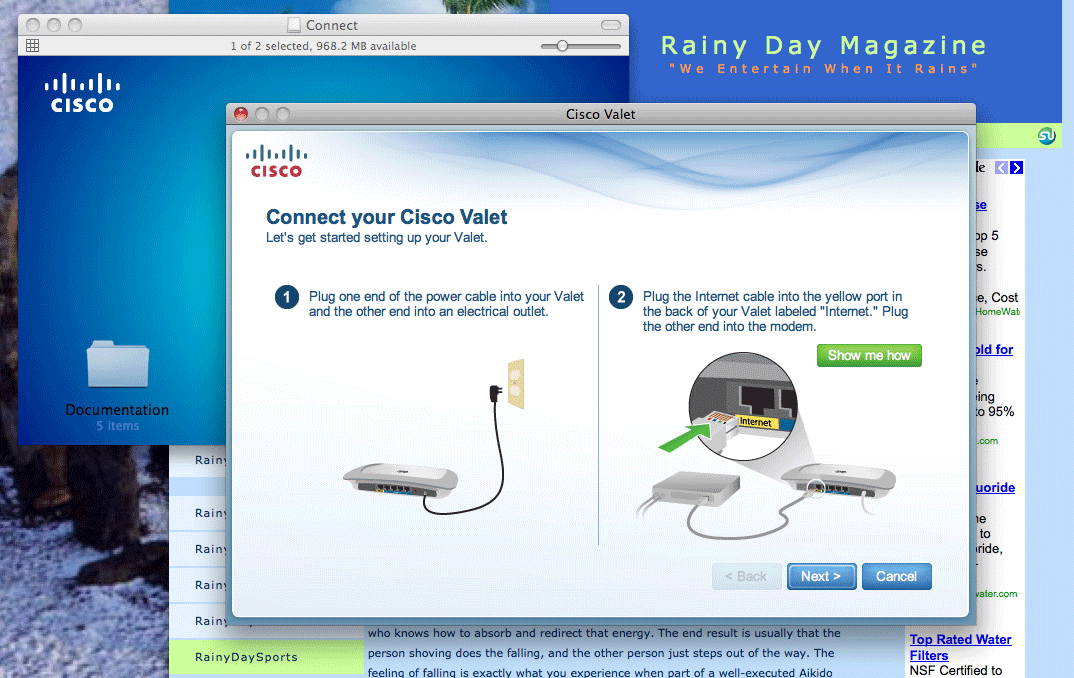
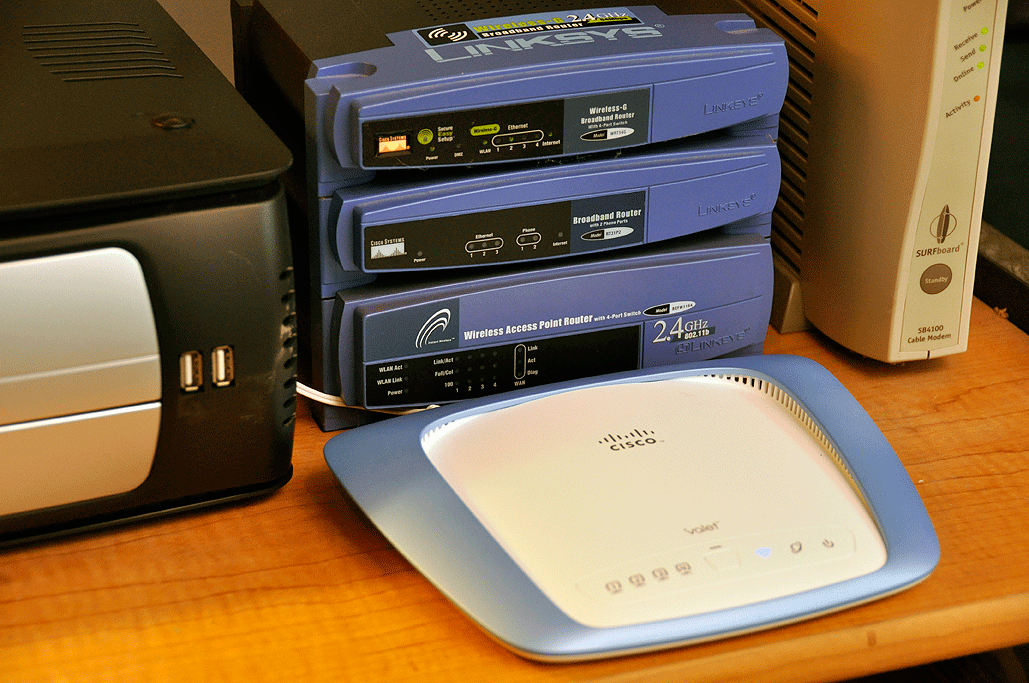
| Oct 8,2010 - Cisco: Valet Installation... | |
Setting up a home WiFi network should not require a computer engineering degree. What's more, it should not even require the user to know ANYTHING about networking. However, what it should be is easy to do. The network should also be fast, secure, and convenient to use...even for the occasional guest.
The Cisco created the Valet with the aim of enabling anyone to be able to setup a home wireless network with just a few clicks. To do that, Cisco has almost completely automated the process of setting one up. We were a little skeptical at first, but after having gone through it, we are now believers.
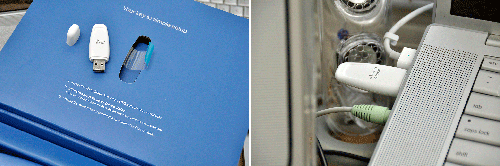
We inserted the USB key to initiate the setup and installation process. Our first instruction was to hook up the Valet router to the cable or DSL modem. We wanted to have both the old and the new WiFi network running at the same time. So instead of taking the signal from the cable modem, we looped it from the Linksys router. This point is... [more]-Cisco Valet: Installation |
|
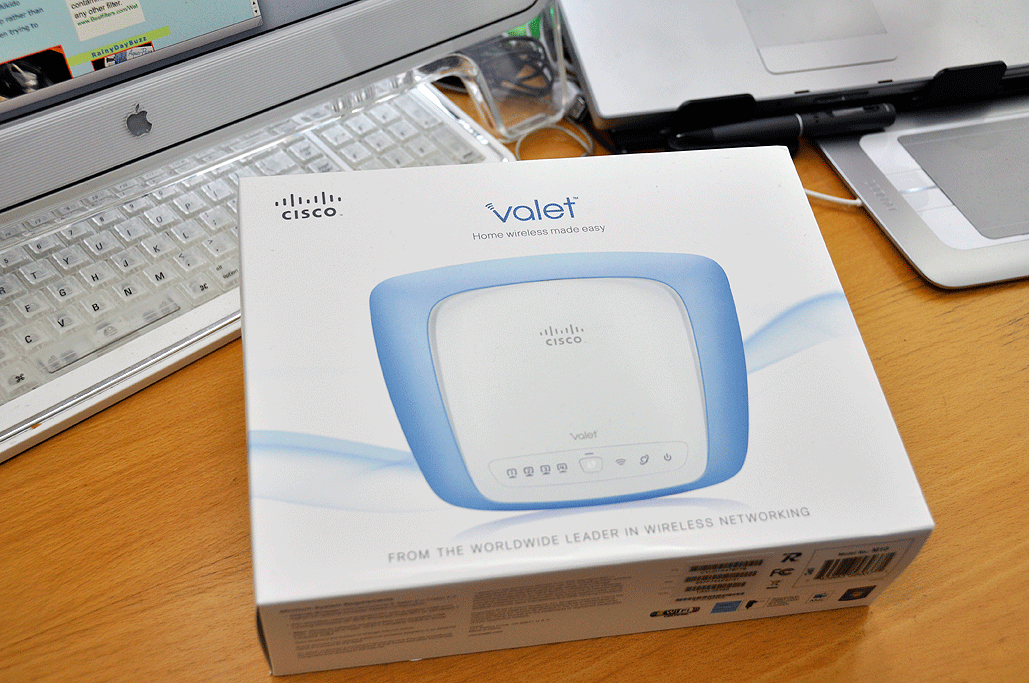
| Oct 7,2010 - Cisco: Valet FirstLook... | |
The value of having a WiFi network at home is pretty obvious: no unsightly wires, whole-house access, ability to surf the web out in the yard, etc. However, setting up and administering a wireless network can be more of a challenge than many non-techies may want to take on. Apple's Airport WiFi is a snap to get up and running, but their gear requires a Mac for setup. Even with Apple's typical elegant ease of use, one still has to know a little about IP addresses, security protocols, etc... Cisco, the giant in networking, now has a line of self-configuring WiFi routers which was design to do Apple's Airport one better. The claim of the Cisco Valet line of wireless routers is that they setting up a home network as simple as plugging them in and turning them on.
We have setup many WiFi networks and have, along with many others, struggled with getting all of the parameters setup right. When we heard about the Valet, we were intrigued. Could Cisco really have designed the Valet to let anyone without technical knowledge of networking to... [more]-Cisco Valet: FirstLook
|
|
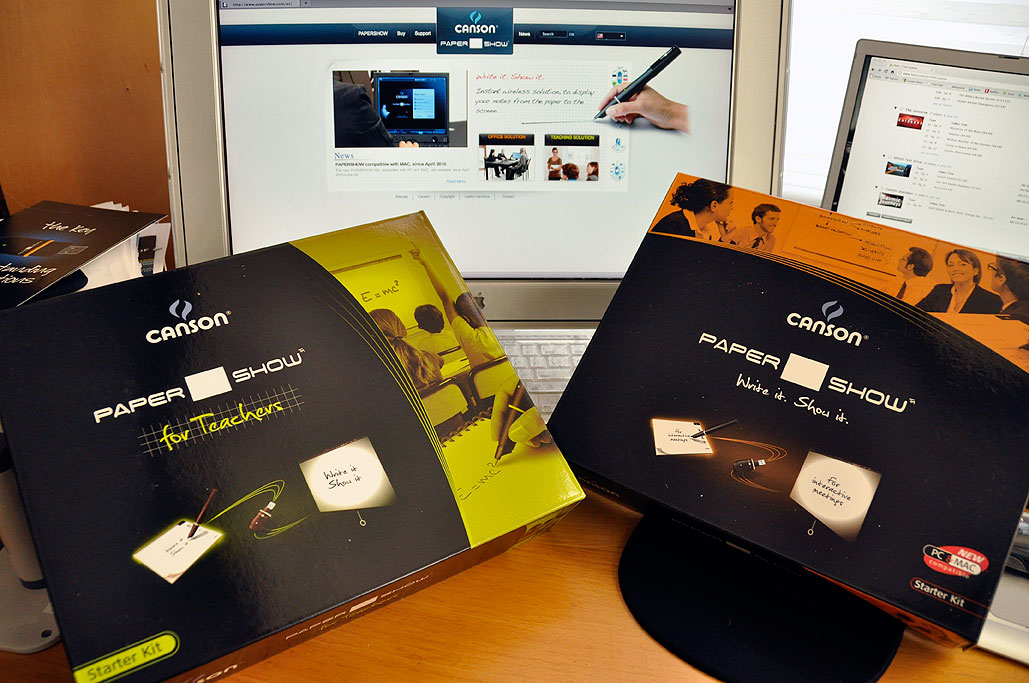
| Oct 6,2010 - Canson: PaperShow FirstLook... | |
The Digital Pen was invented and developed by a Swedish company called Anoto. A digital pen looks, feels and writes like a normal ballpoint pen. However, it contains an integrated digital camera, an advanced image microprocessor and a mobile communications device for wireless connection. The pen is able to determine its exact position when used with special encoded paper. The non-repeating dot pattern printed on the paper is a set of coordinates trackable by the camera at the tip of the pen. This information, combined with the image of the ink, enables the pen to record exactly when, what, and where something was written. Anoto licenses this technology to a variety of companies who then use it to make products which target different markets. Many of the uses are purpose-built for vertical sectors such as healthcare, finance, etc. However, some companies have created products aimed at general business and consumer market.
Most know Canson as a French company with a large line of fine art paper and related products. Today, we are going to take a FirstLook at a product from Canson called PaperShow. RainyDayMagazine readers will... [more]-Canson: PaperShow FirstLook
|
|
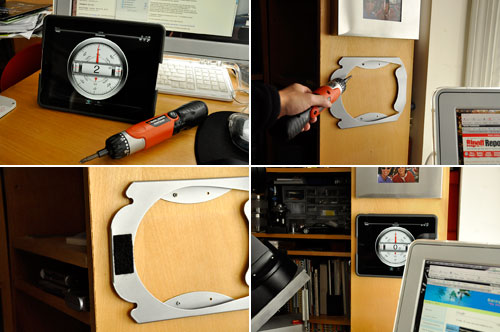
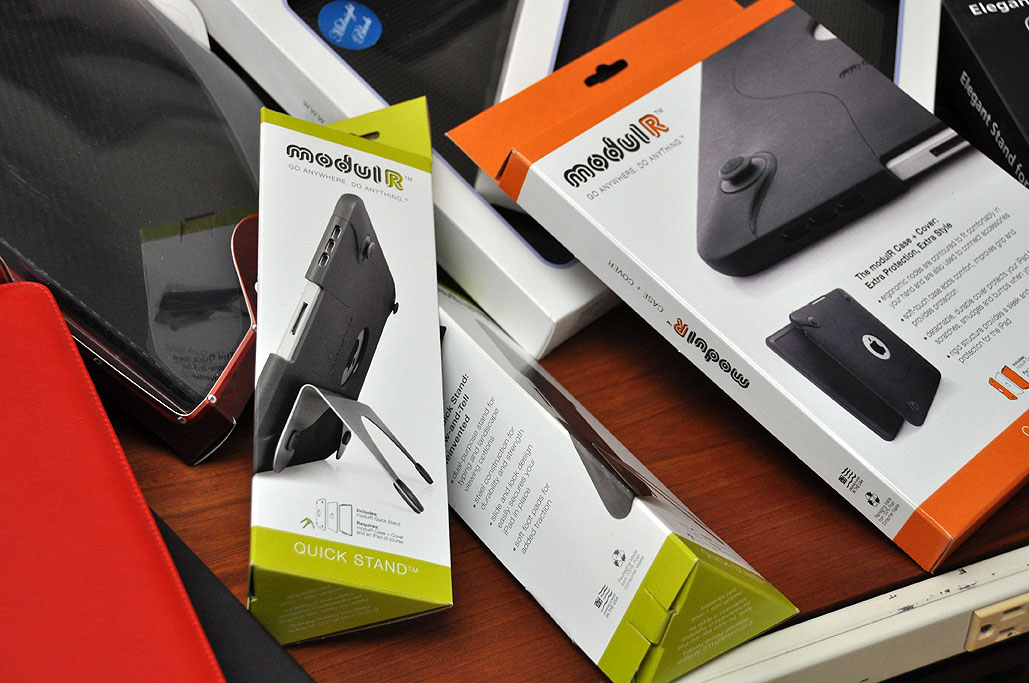
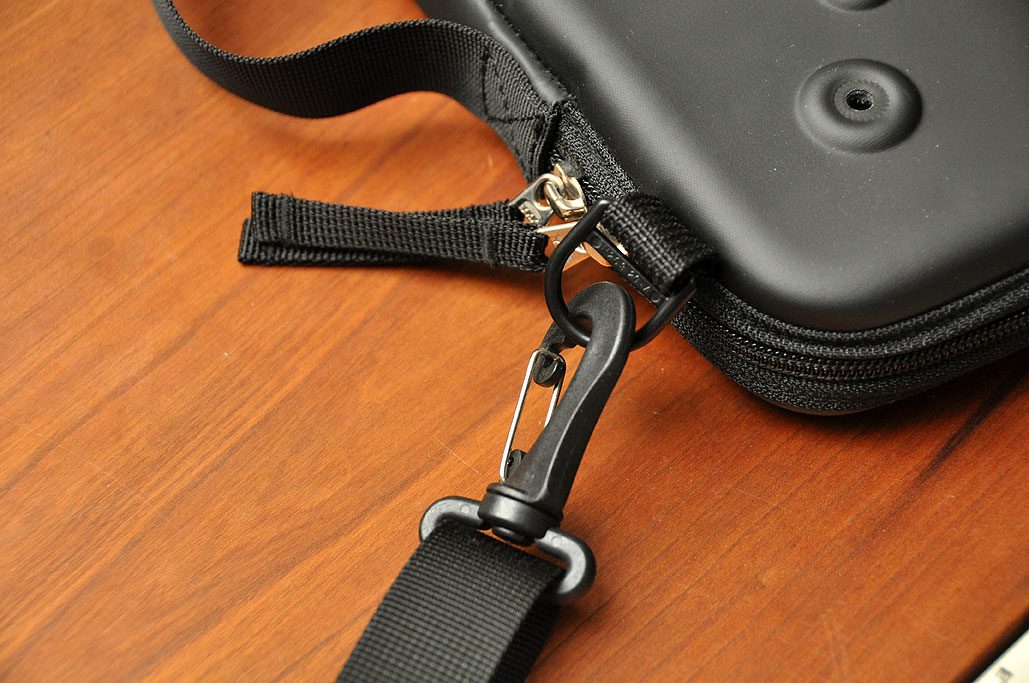
| Oct 5,2010 - modulR: Wall Mount Installation... | |
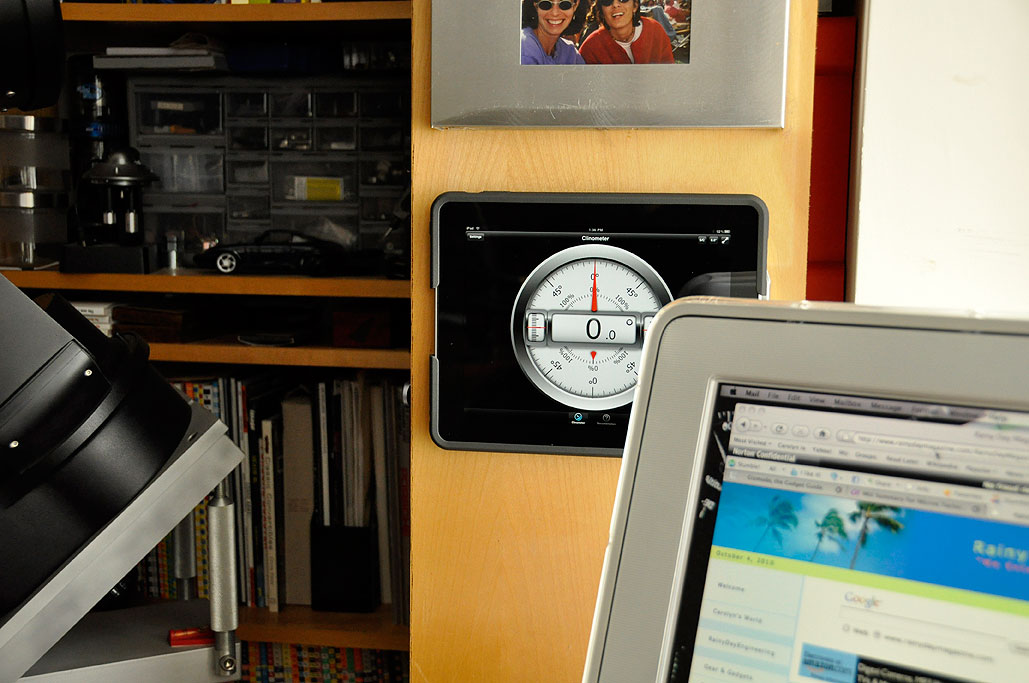
Most cases, folios, and stands for the Apple iPad are designed for protecting and using the iPad while on the move. What about the times when the iPad is just laying around? If you are like us, your desk space is precious. Wall-mounting the iPad will get it off the desk yet still have it visible and accessible.
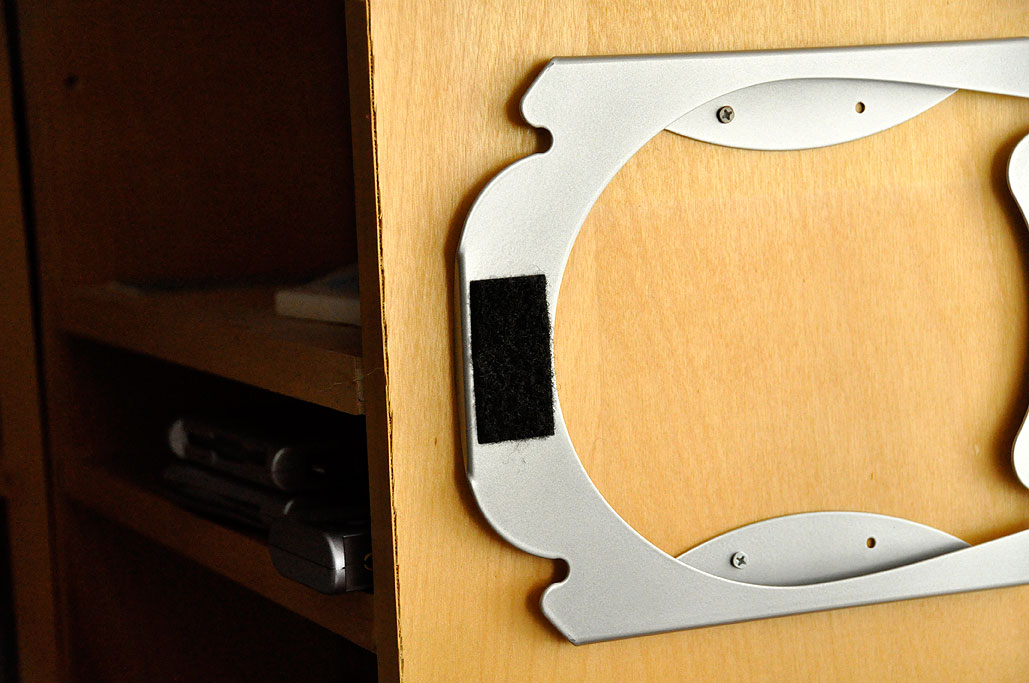
modulR offers a system of a case and bracket which makes it easy to put the iPad on a vertical surface. We had taken a FirstLook at the two-piece modulR case back in August. Today, we show how easy it is to mount the bracket and our impression of using an iPad on the wall. Most of us have lots of apps on our iPhone and/or iPad which we rarely use. We have the apps around "just in case." Well, we FINALLY had a use for our bubble-level app when we had to mount the modulR bracket!!! The app made it very to easy mount the bracket level. The tricky part was to keep it from moving when taking the iPad off to lock down the bracket. Our suggestion would be to mount one screw, level it, then lock it down with another one on the other side.
We added a velcro pad because the iPad slid out just a little too easily for our comfort. We are not sure if it was because we got one of the earlier pre-production cases. Personally, we would like to see a... [more]-modulR: Wall Mount Installation
|
|
| Sep 21,2010 - Boogie Board... | |
Liquid Crystals (LC) used in LCD panels were first discovered in the late 1800s. They were interesting because the crystals will align themselves in the direction of a magnetic field. Display makers have used this property in combination with polarizing filters to make LC pixels "appear" or "disappear" to form an image on the screen. However, liquid crystals have many other interesting properties, one of which is cleverly used by Improv Electronics to make a product which may someday replace the paper pad.
When we first saw the price ($30) of the Boogie Board, we were intrigued. We knew this was not an LCD panel, an ePaper display, or something which could be made into a monitor. We were interested because... [more]-Boogie Board
|
|
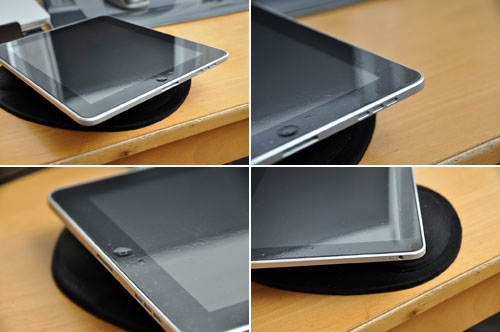
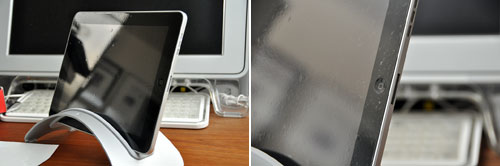
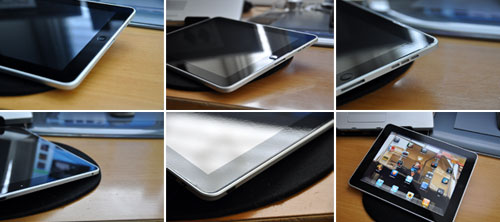
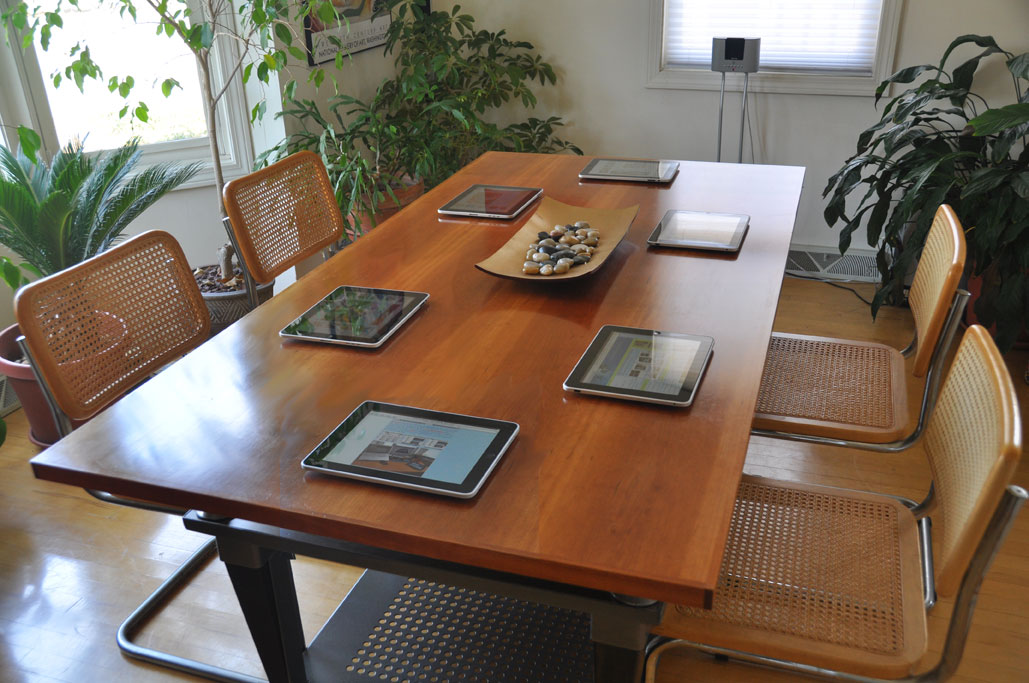
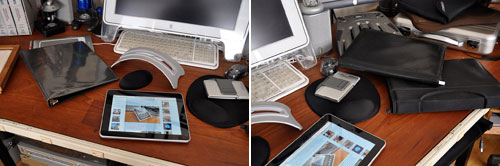
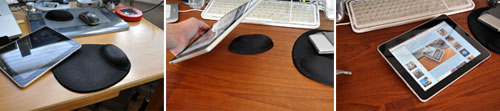
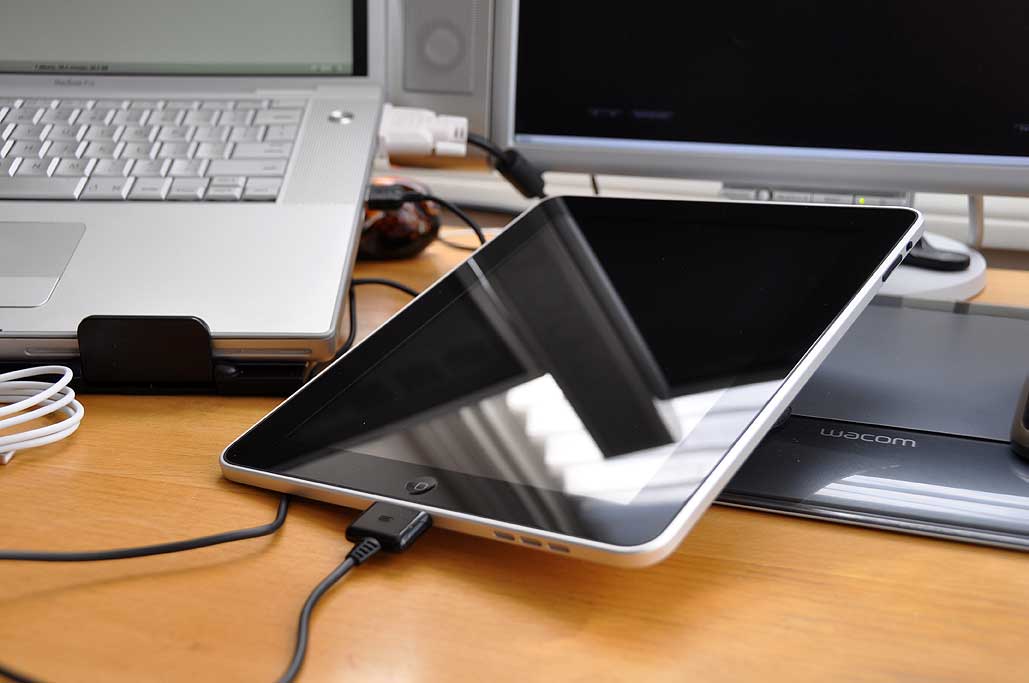
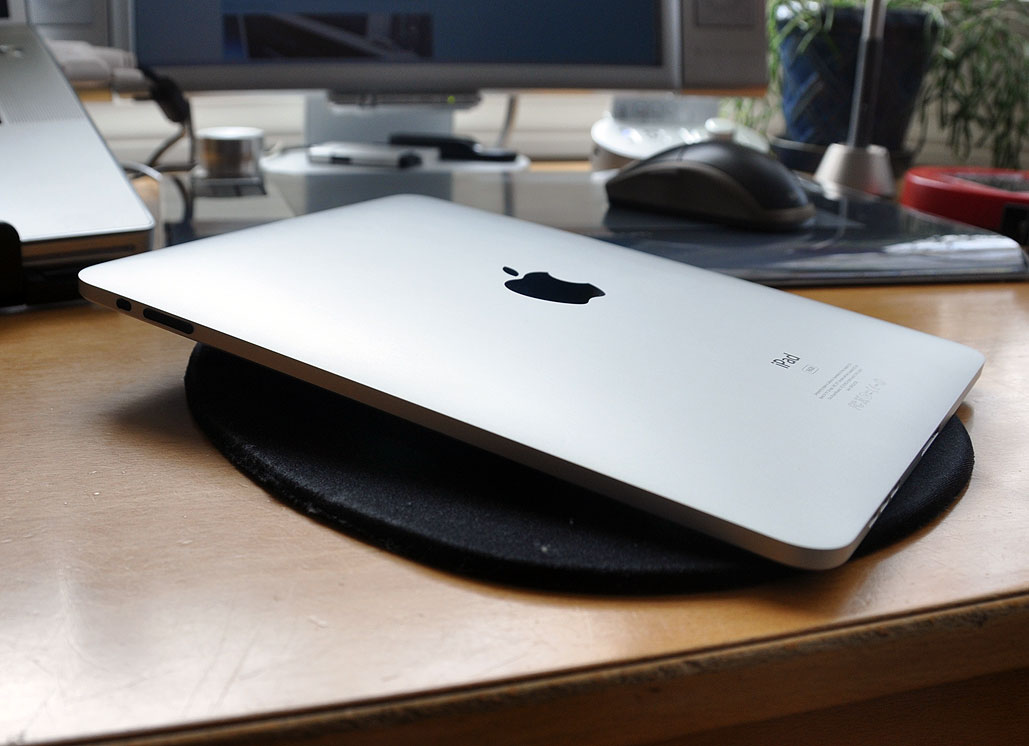
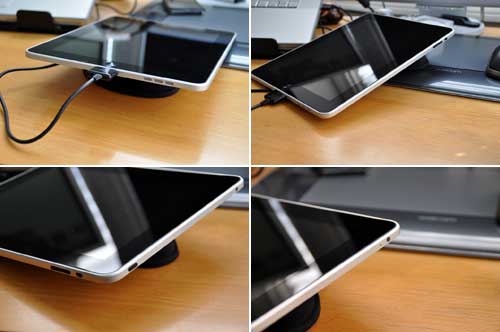
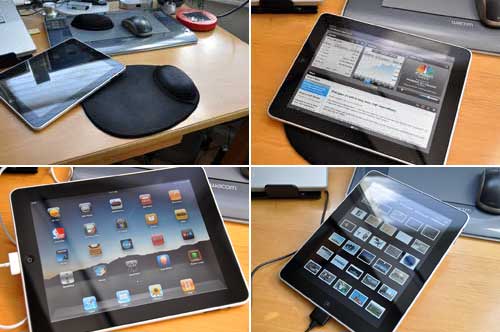
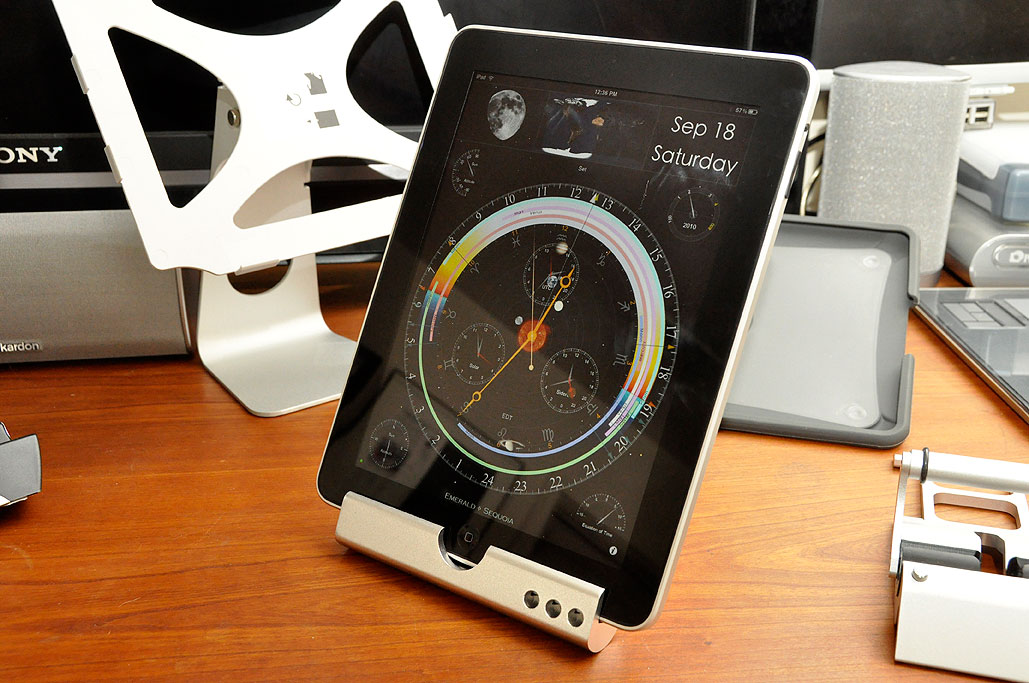
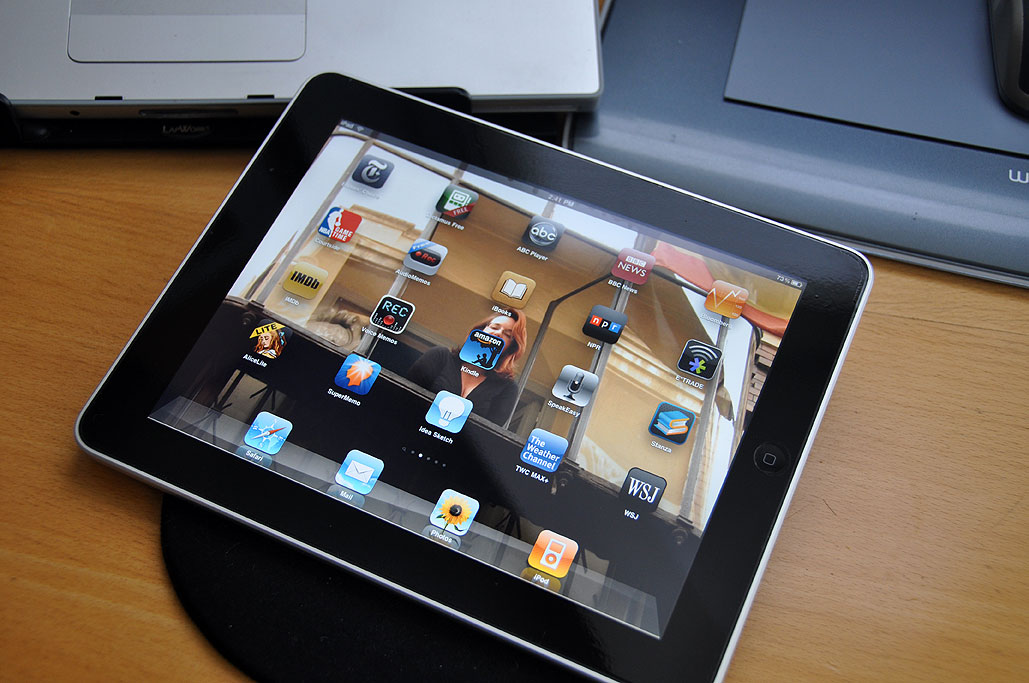
| Sep 20,2010 - iPad Stands : Best Of Breed... | |
We have been using our iPad extensively since April: emailing, googling, mapping, movie watching, and general web-surfing. We have taken it on trips in place of our laptop. We have used it as an eReader for books, magazines, graphic novels, and everything else we could think of. After five months of intense usage, we have learned a few things. It is clear that iPads will someday replace laptops, but not yet. The iPad is a good eReader now, but its potential has barely been scratched. The iPad is excellent for watching movies anywhere as long as you don't have to hold it the entire time ...which got us interested in looking at stands.
In our review of iPad cases, we had looked at a few with integrated stands. Many readers had commented that they would love to see a Best-Of-Breed series on separate stands specifically designed for the iPad. The response to our first Best-Of-Breed series was so positive that... [more]-iPad Stands: Best Of Breed
|
|
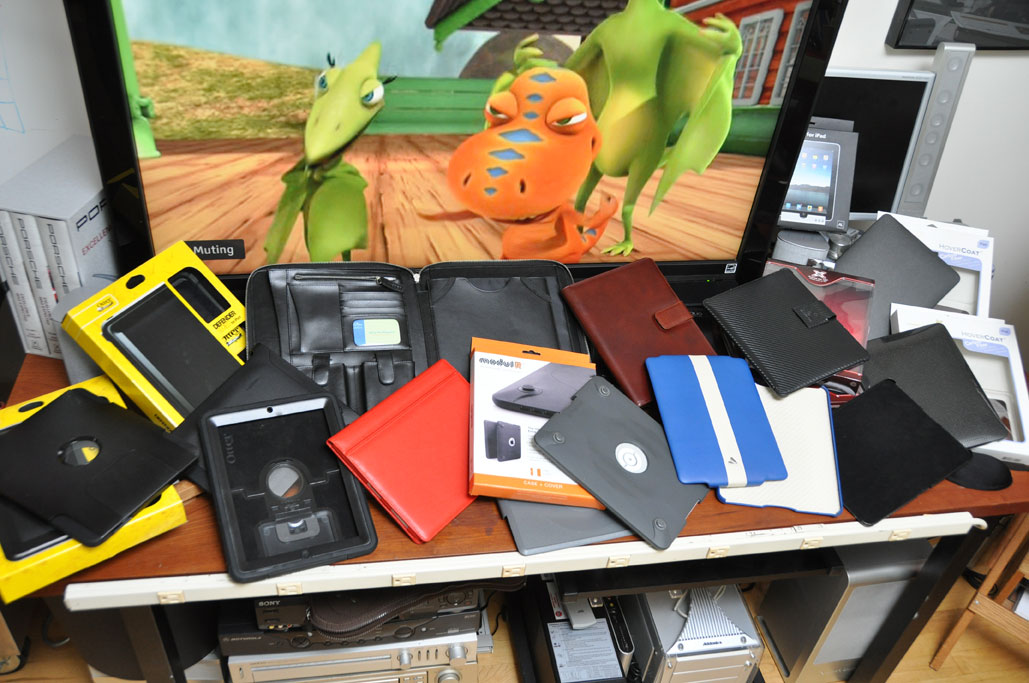
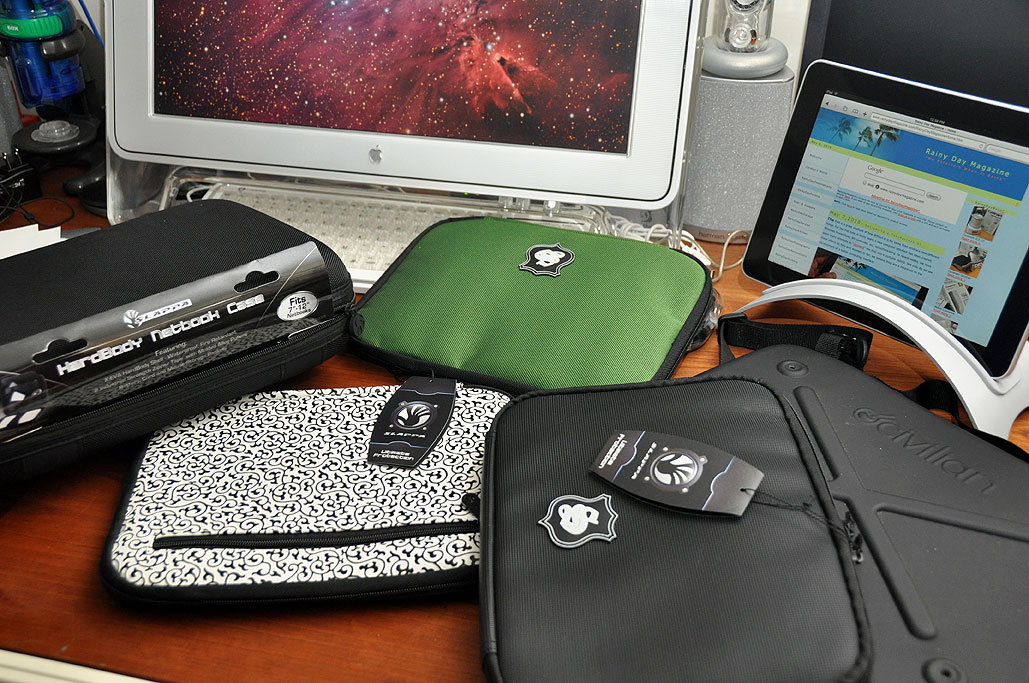
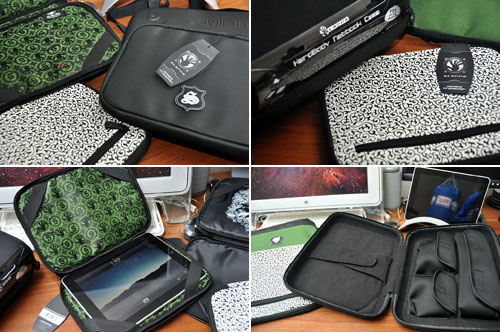
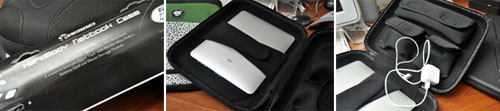
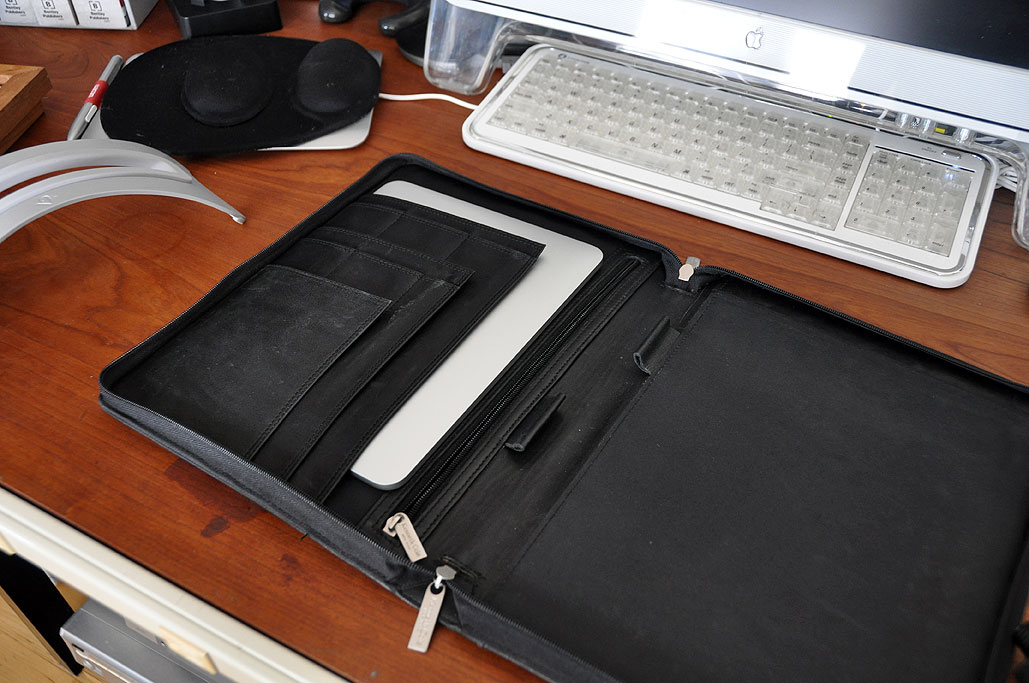
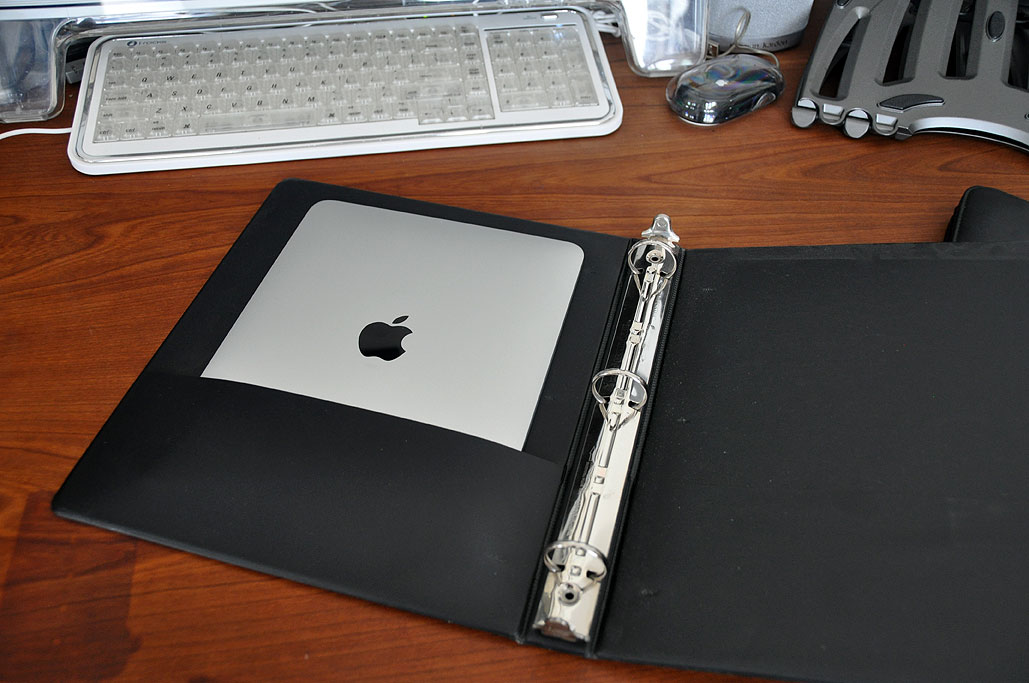
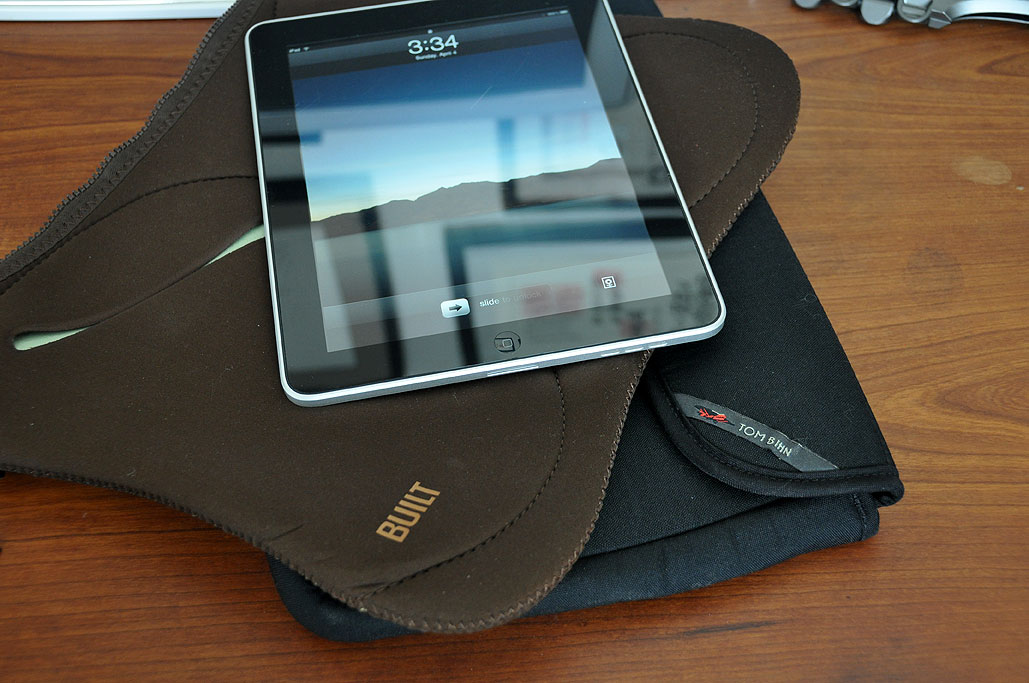
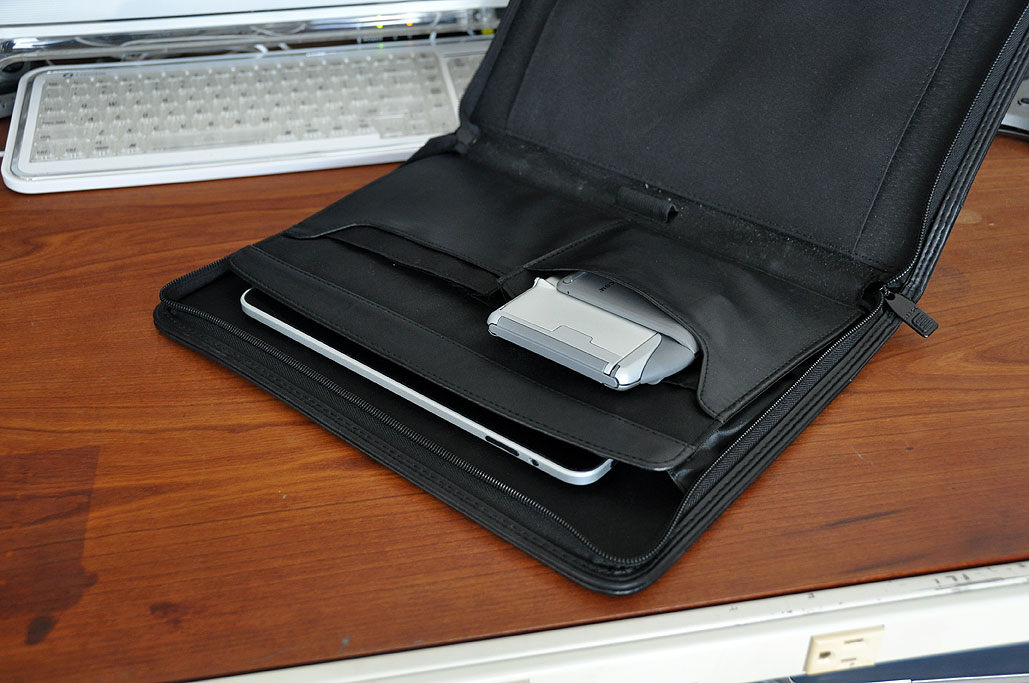
| Aug 27,2010 - iPad covers: Best Of Breed | |
We looked at ten great iPad covers this week. Whether it was a unique feature, the quality of materials used, or some other criteria, we had an excellent reason for putting it on our Best-Of-Breed list:
Click on any of the image squares below to jump directly to the related article. The question is what are we going to do with all these cases? As with past RDM items, once we are done with the reviews, we need to move them out of the office so we can make room for new gear. We used to... [more]-Best Of Breed: Summary
|
|
| Aug 26,2010 - iPad covers: Best Of Breed | |
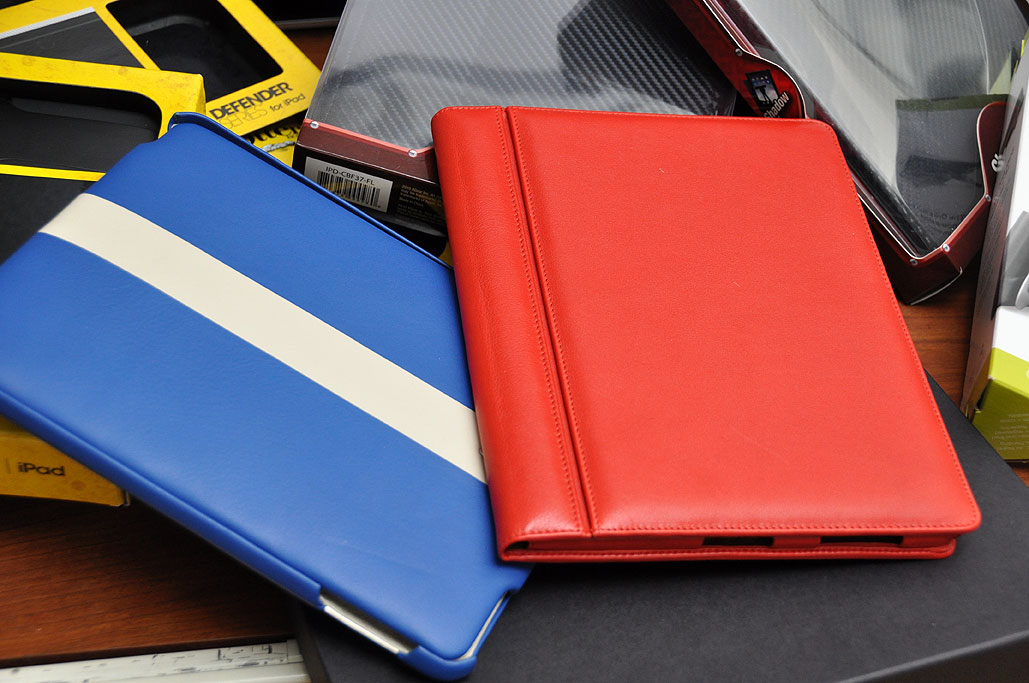
Companies such as Franklin Covey and FiloFax created the personal organizer market to help people give structure to their busy lives. The paper day planners, appointment calendars, and to-do lists helped people juggle, arrange, and cram more into their day then ever before. All of these different sections were neatly packaged in a handy paperback book size folio. When Personal digital assistants (PDA) hit the scene, their functionalities were modeled after the paper day planners, appointment books, and organizers. So it was not surprising to see them sporting leather folio covers like their analog counterparts.
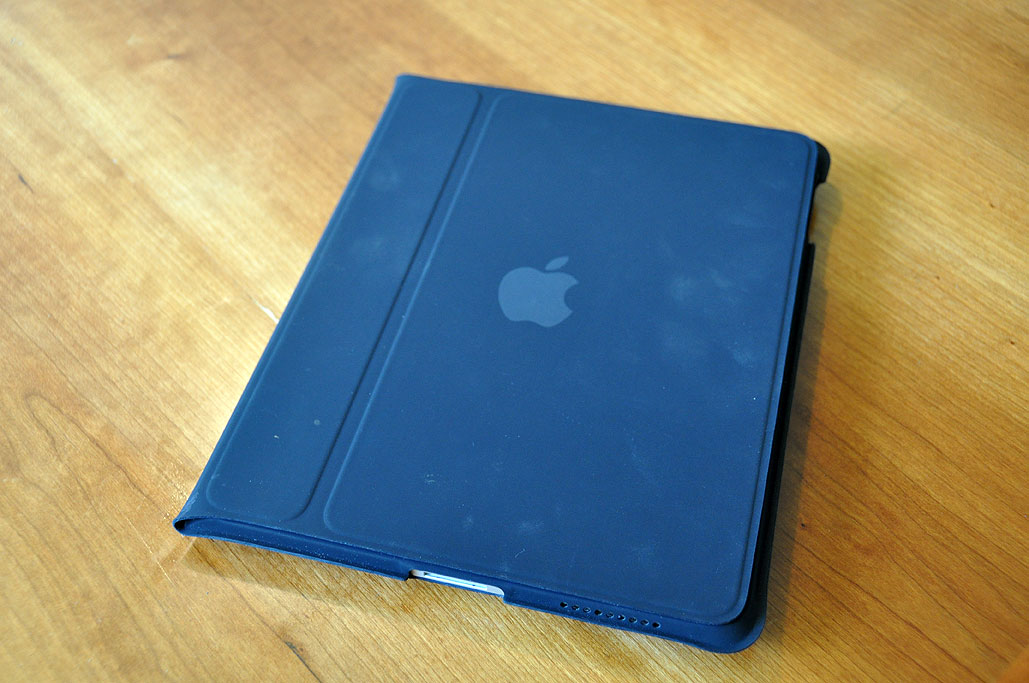
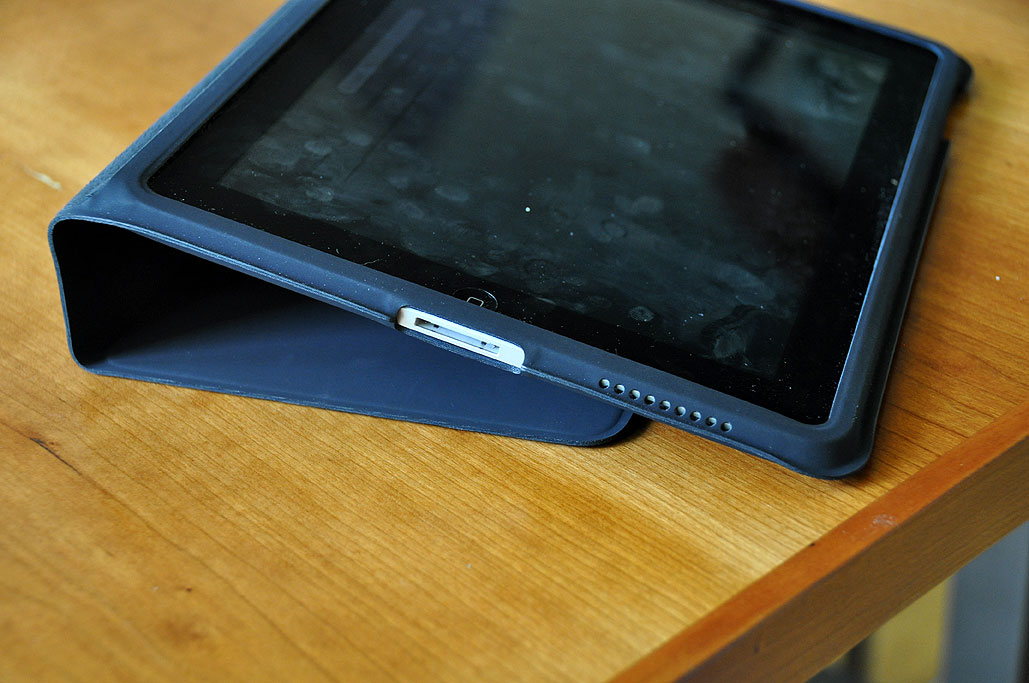
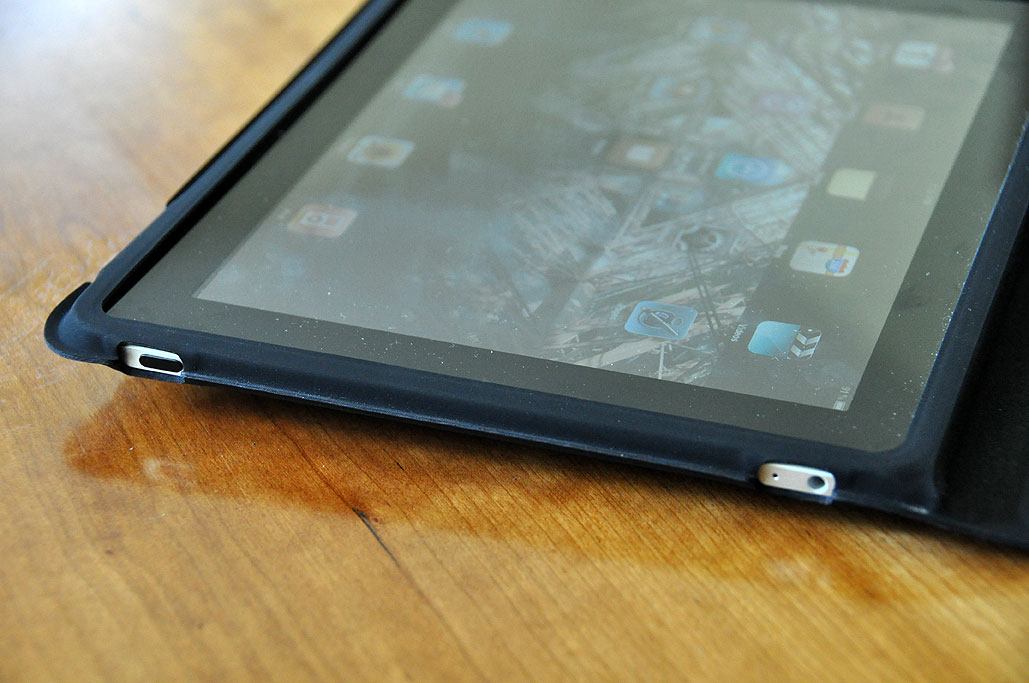
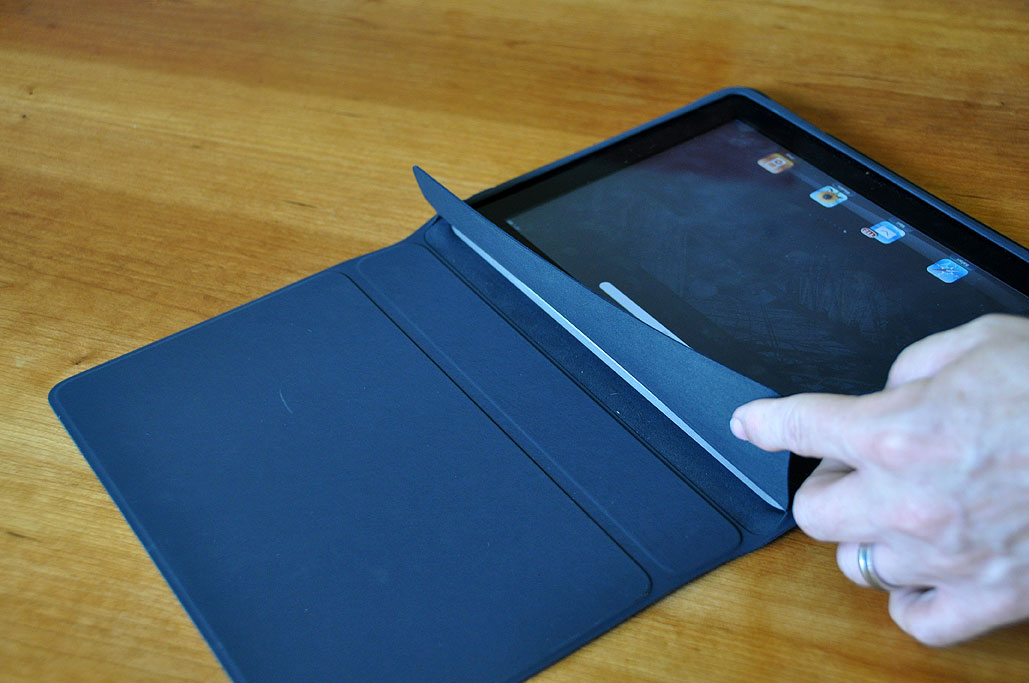
The iPad, with its notepad-like form factor, was a natural fit for the folio-style covers. Apple even sells a folio cover for the iPad when the iPad. The problem is it is rather bland and uninteresting, but it was the only one available when the iPad was released. Now that the iPad has been out for a while, the selection of folio covers is much richer. We spent the last few months combing through all of the different offerings and selected... [more]-Best Of Breed: folio
|
|
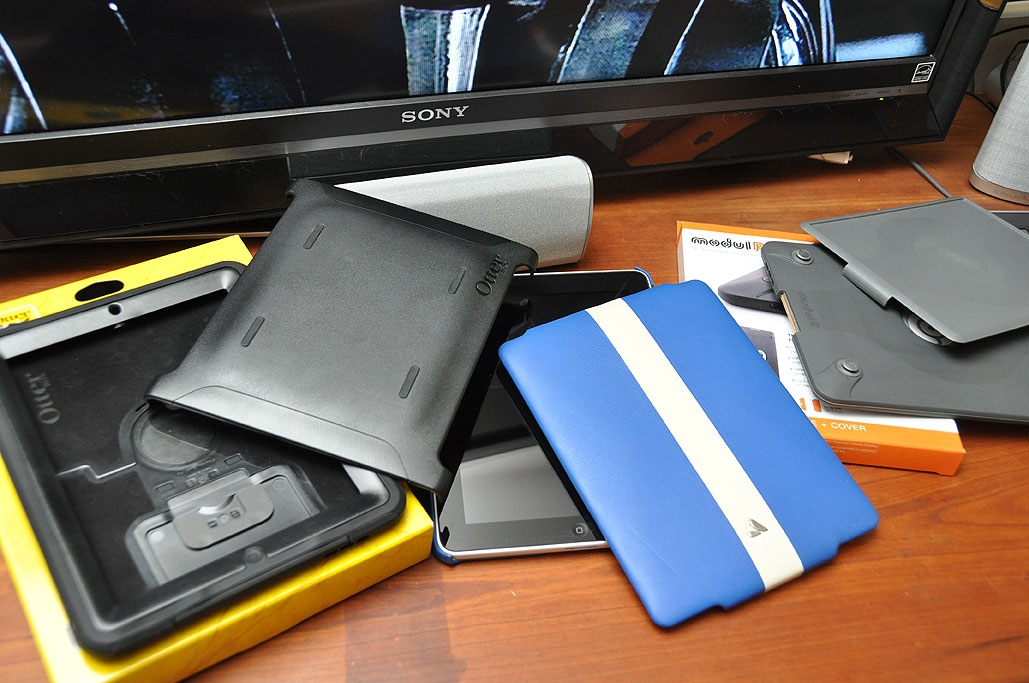
| Aug 25,2010 - iPad covers: Best Of Breed | |
Since the iPad is more transportable than a laptop, it will no doubt be taken to more places. It stands to reason that providing it with some protection when on the move is a good idea. Any iPad cover will offer some sort of protection. All of them cover the back, and some of them also cover the front. As the screen is the most fragile part of the iPad, if you like to just grab your iPad and go, it would be best to get a case that protects both front and back. Cases with front/back covers come in two basic styles: two-piece, folio. Today, we will concentrate on the two-piece covers from our Best-Of-Breed list: We have done FirstLooks of both the OtterBox Defender and Vaja iVolution so we will not repeat them here. The OtterBox Defender is first and last stop for those in search of the ultimate in iPad protection. Other then putting an iPad wrapped in a Defender inside one of these, there is nothing on the market that offers more 360º safety. The Vaja iVolution is a two-piece case for those who want something more luxurious, less techie-looking, but still every bit as functional. Vaja is on our Best-Of-Breed list because the leather used for their products are the best available and their workmanship is second to none.
modulR may be new to many, but we expect they will be making quite a name for themselves with their entrant. The case we got was hot off the production line. The modulR case is different from every other case we have reviewed to date. This case is the core of an extensive accessory system (stand, mount, strap, swing arm, etc...). The idea is extremely cool. With the right accessory, the modulR case can transform the iPad into a... [more]-Best Of Breed: two-piece iPad covers
|
|
| Aug 24,2010 - iPad covers: Best Of Breed | |
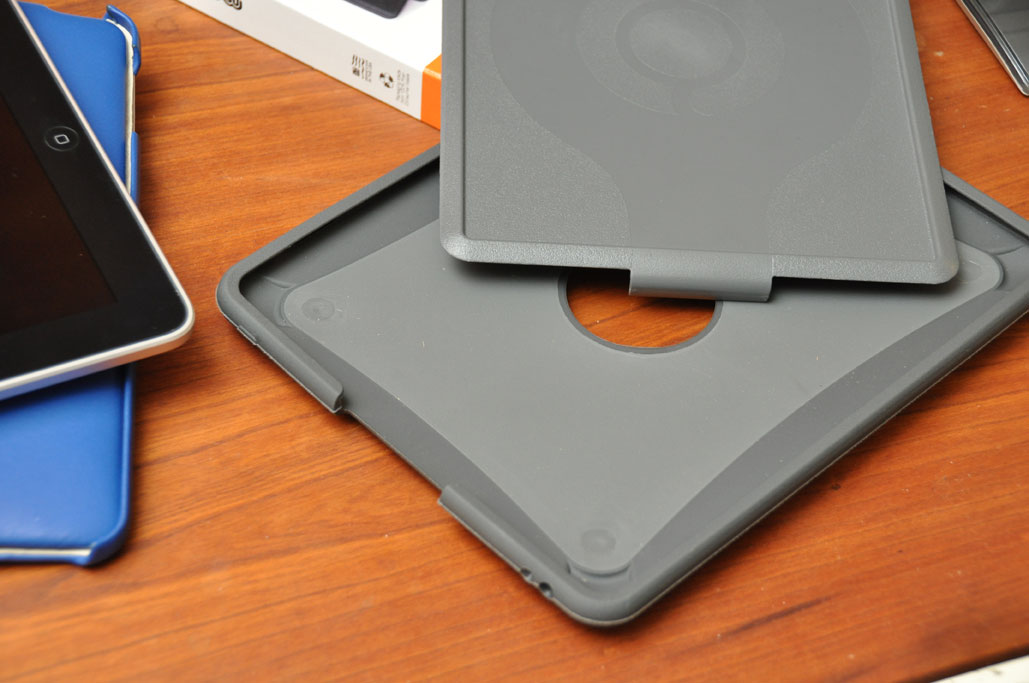
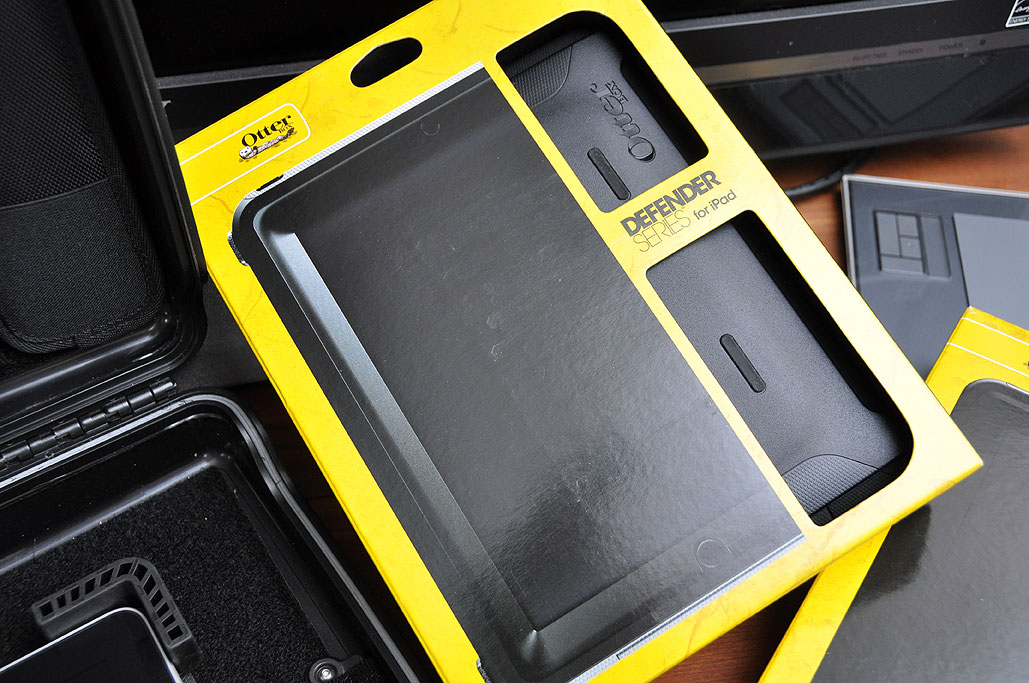
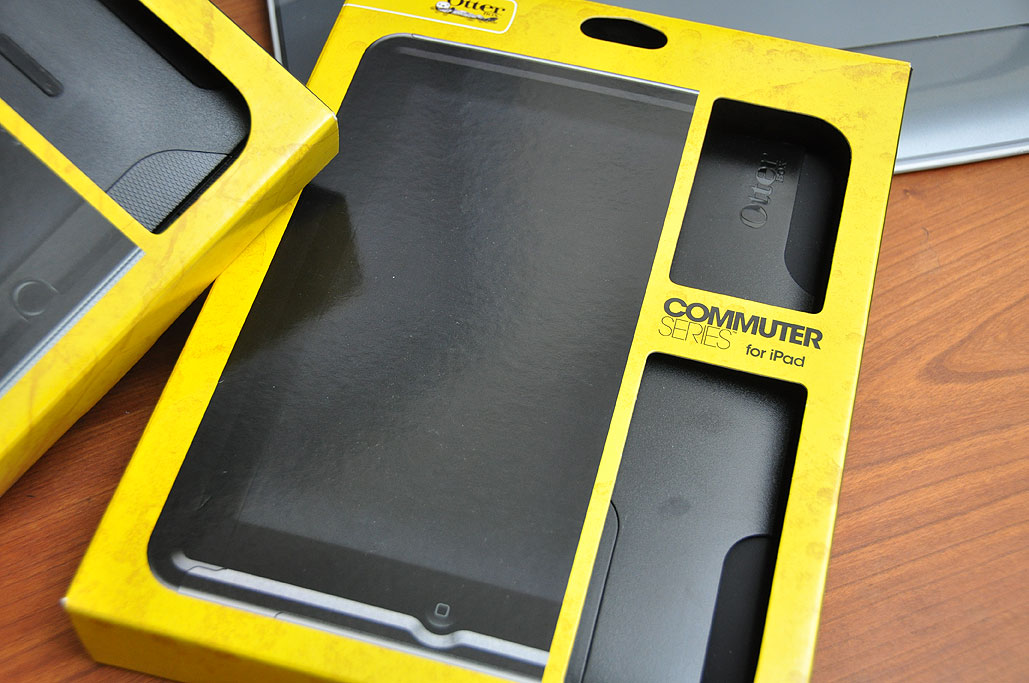
The frame of the iPad is milled from a solid piece of aluminum. As a result, it is about as tough as they come. Thus, adding a back cover to protect the electronic innards of the iPad is really not necessary. However, most of us like to keep our things nice and new-looking, so a cover to shield the back of the iPad from the inevitable nicks and scratches is something of interest to many. Here are three back-only covers from our Best-Of-Breed list which will keep the iPad as blemish-free as the day it was made:
The OtterBox Commuter offers more protection than any other back-only cover on the market. Like the OtterBox Defender we looked at in July, the Commuter's protection is made up of multiple layers. The hard plastic shell will deflect sharp objects while the thick rubber layer will... [more]-Best Of Breed: one-piece iPad covers
|
|
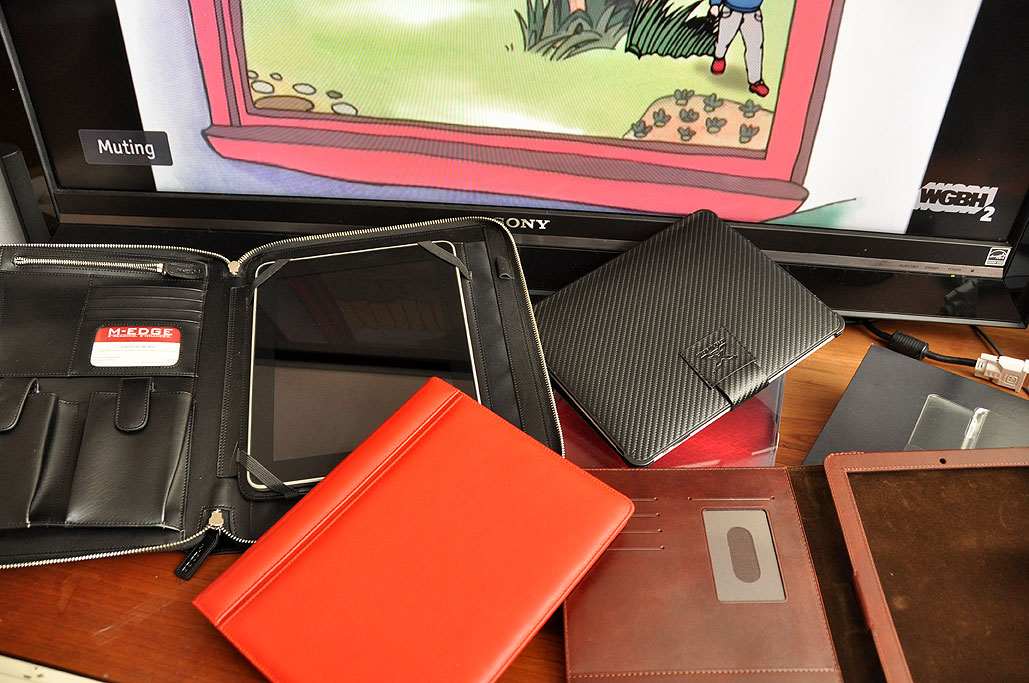
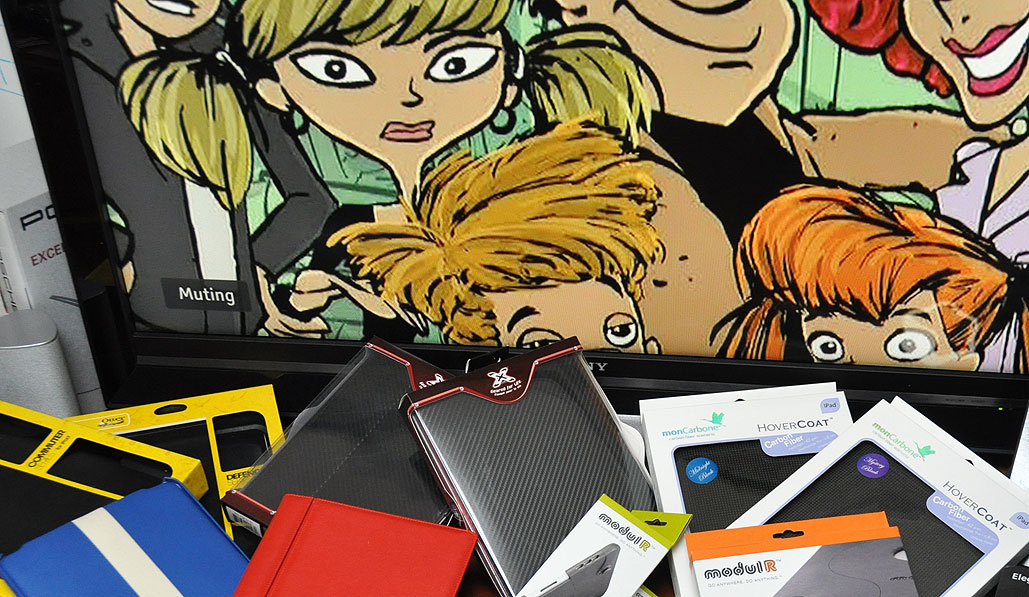
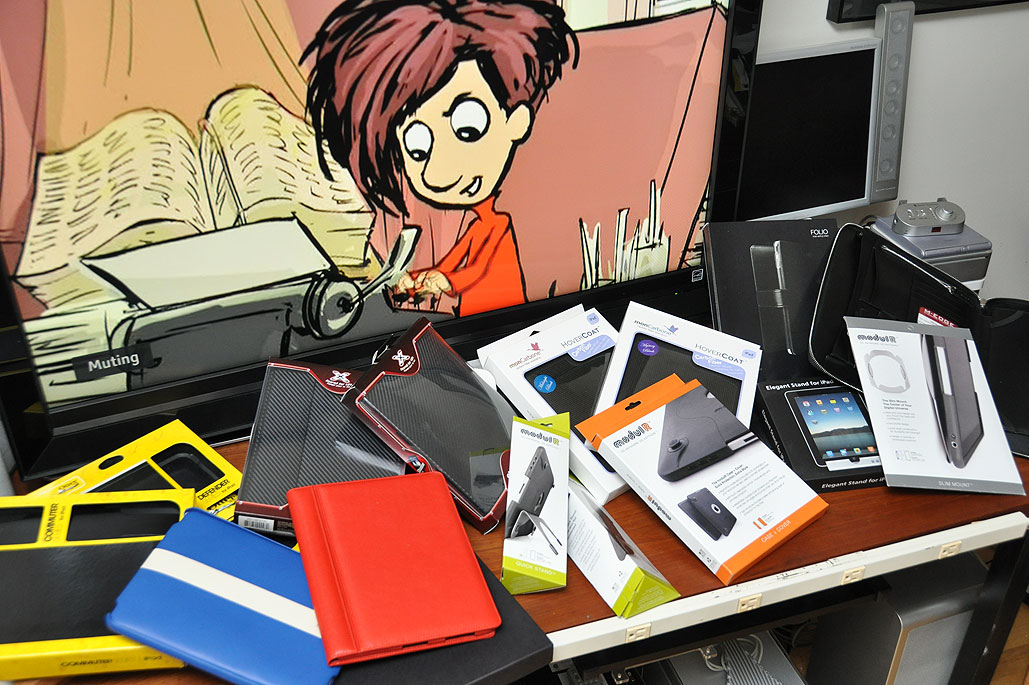
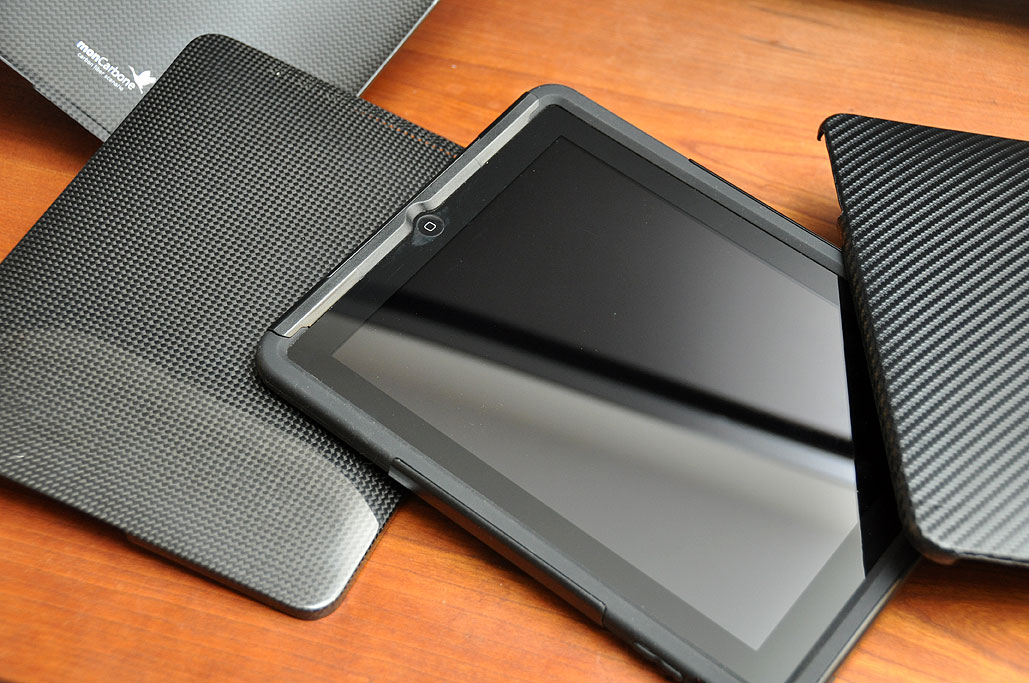
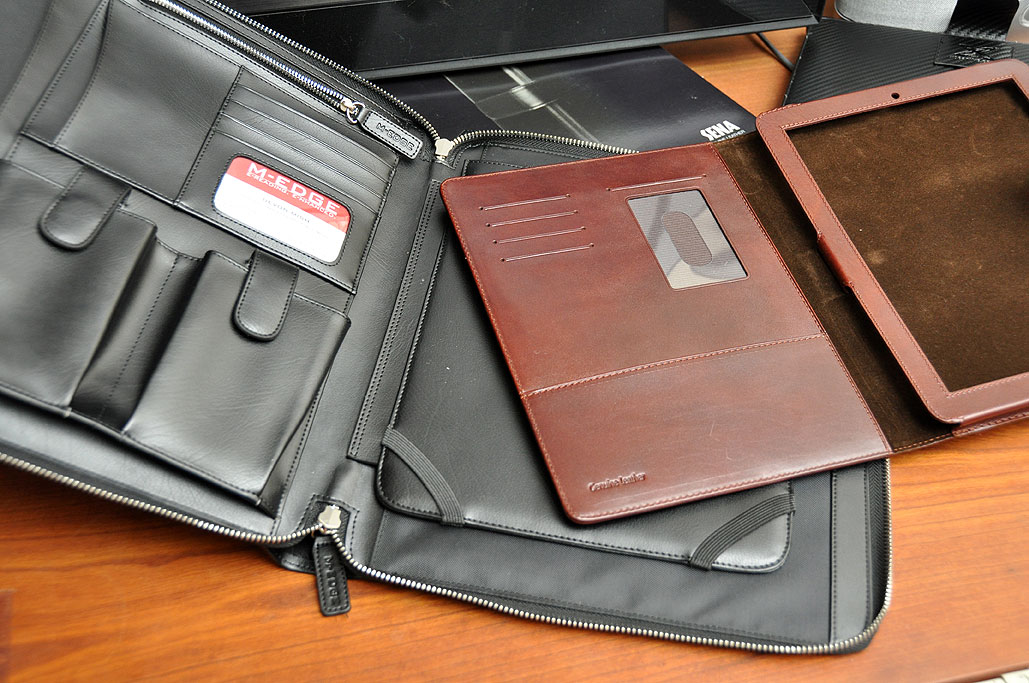
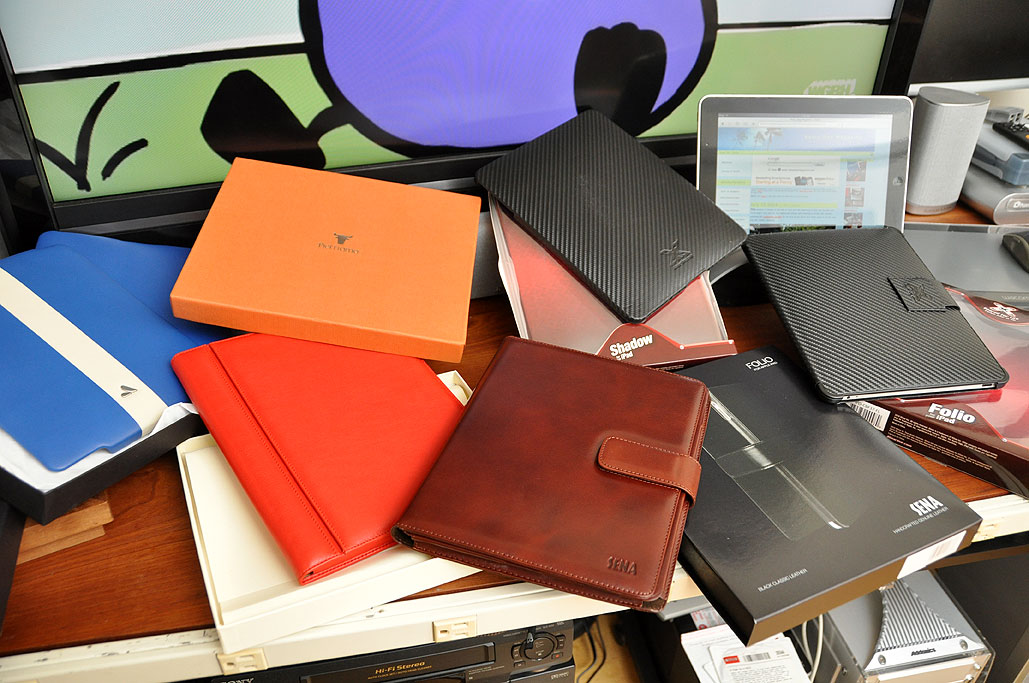
| Aug 23,2010 - iPad covers: Best Of Breed | |
In July, we mentioned that we were going to take a side-by-side look at a select list of iPad covers. We pushed out our editorial schedule on them because we got two (monCarbone, M-Edge) great last minute suggestions from readers. That worked out just fine as the modulR folks were running late because of some production issues.
All the covers and cases have now arrived. Here is the final list:
These covers were selected because we felt they were the "Best of Breed" in one way or another. Some were picked for their quality of workmanship or appearance. Others were choosen for their... [more]-Best Of Breed: iPad covers
|
|
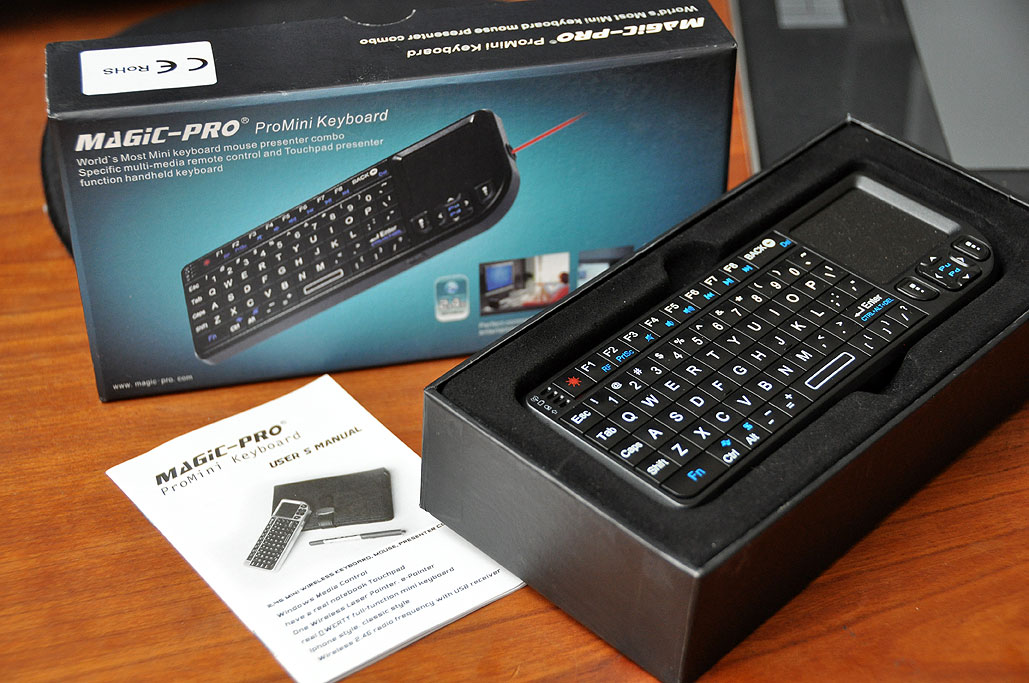
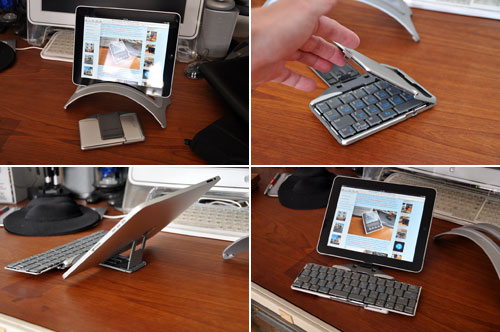
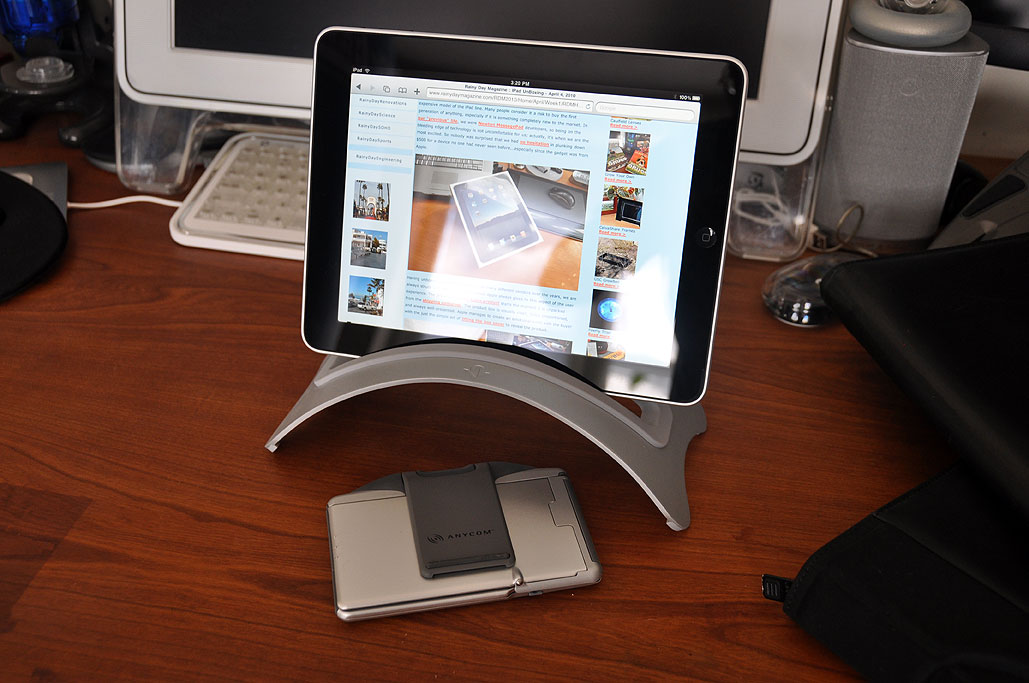
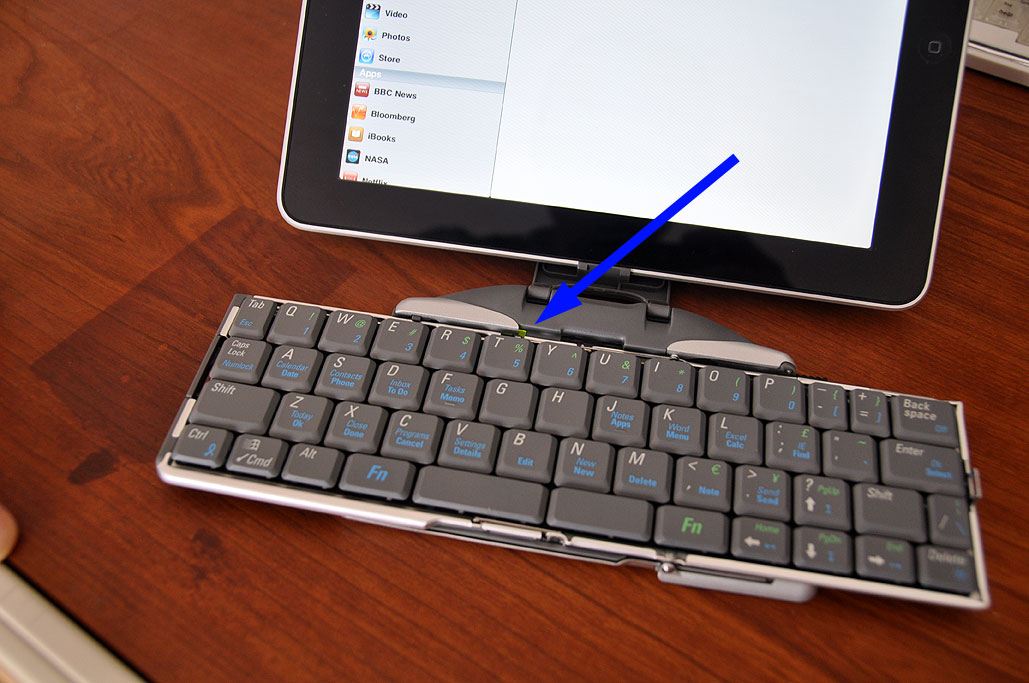
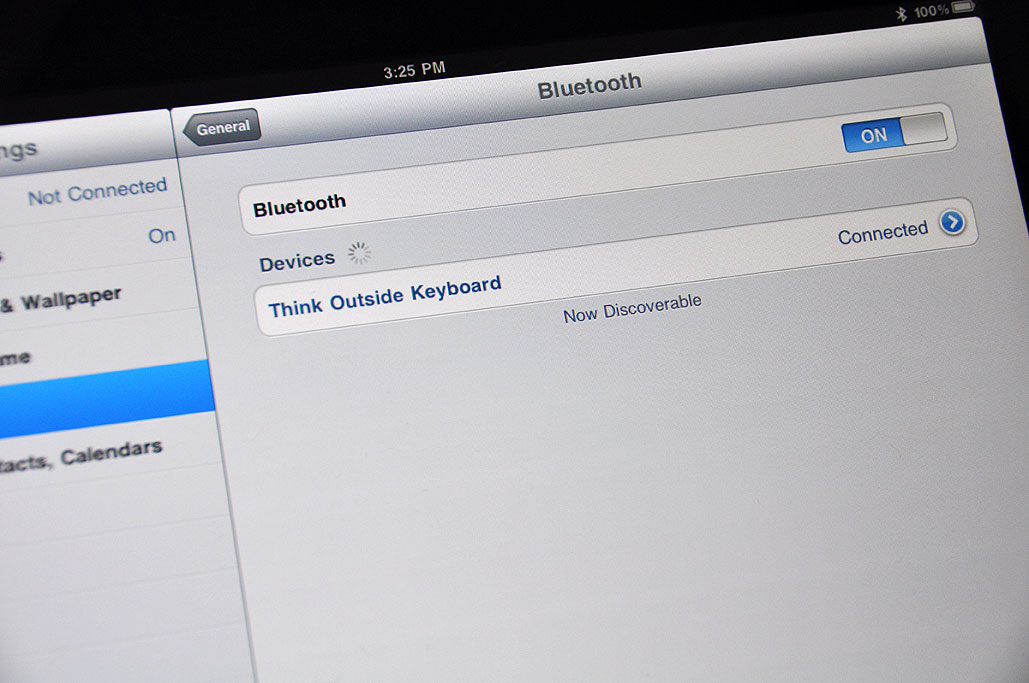
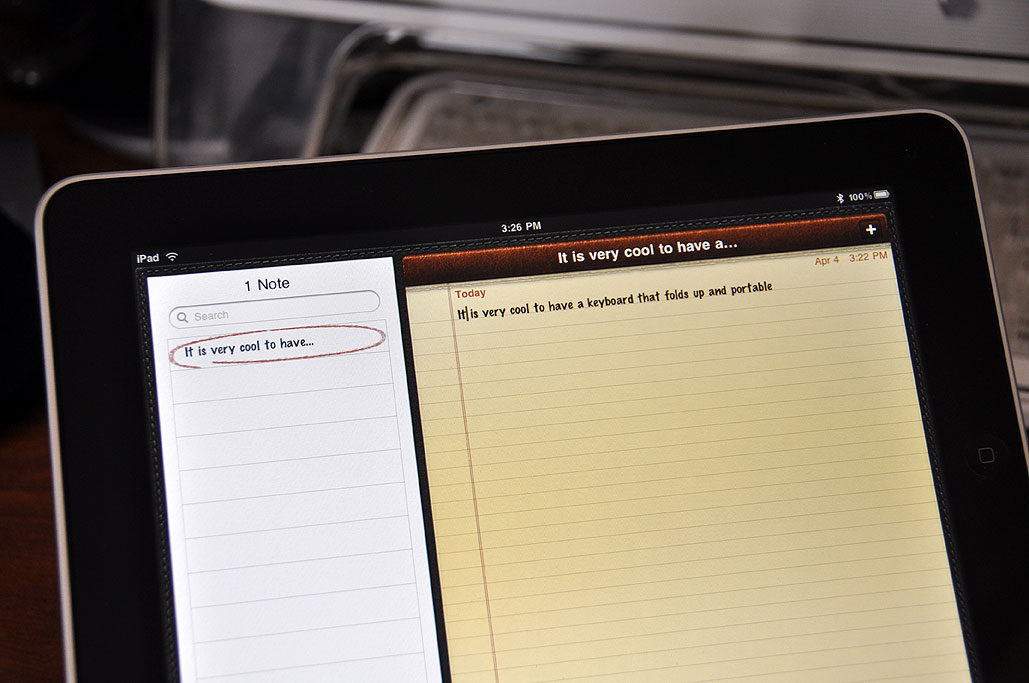
| July 29,2010 - Magic-Pro ProMini Keyboard | |
After we got our Sony LCD panel mounted, we got some questions about how we planned to control the cursor while lolling on the couch. We had not given the problem much thought as the answer seemed pretty obvious: a wireless keyboard and mouse, of course. Wasn't that the whole point of having a wireless keyboard?
That theory was fine until we realized that most of our interactions with the screen consisted of maneuvering the cursor for selecting a movie on NetFlix or choosing a TV episode on Hulu. Trying to manipulate the cursor with a wireless mouse and a large keyboard from across the room made it clear why readers were asking those questions. After a bit of research, the interns came up with several potential solutions. The first of which is this cool little keyboard from Magic-Pro. The keyboard is sold through their US reseller, Pyramid Distribution. We have... [more]-ProMini Keyboard: FirstLook
|
|
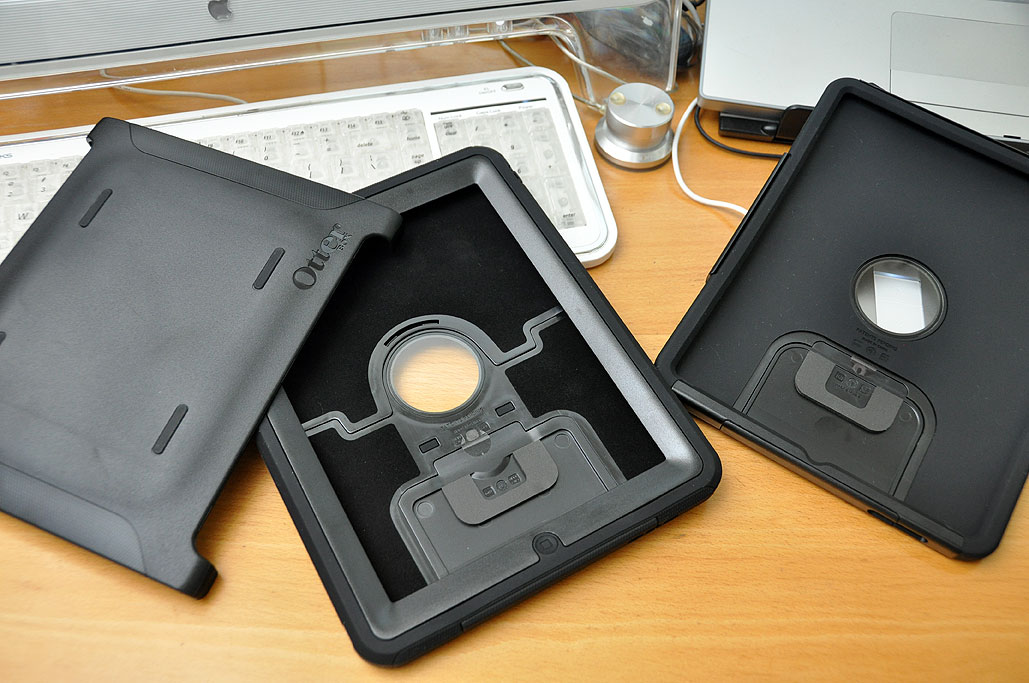
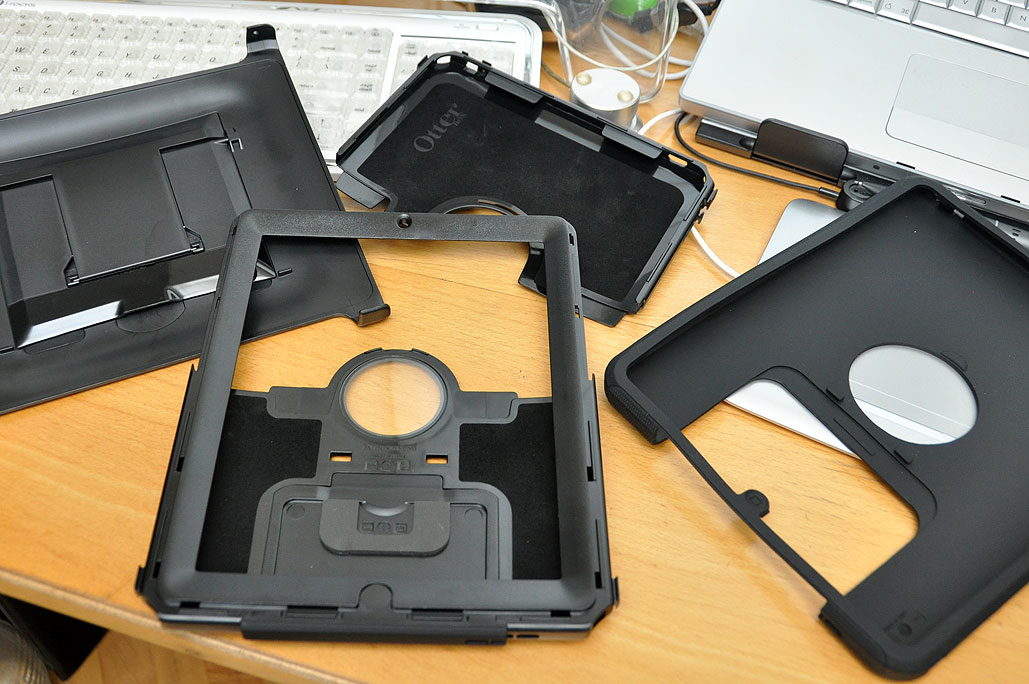
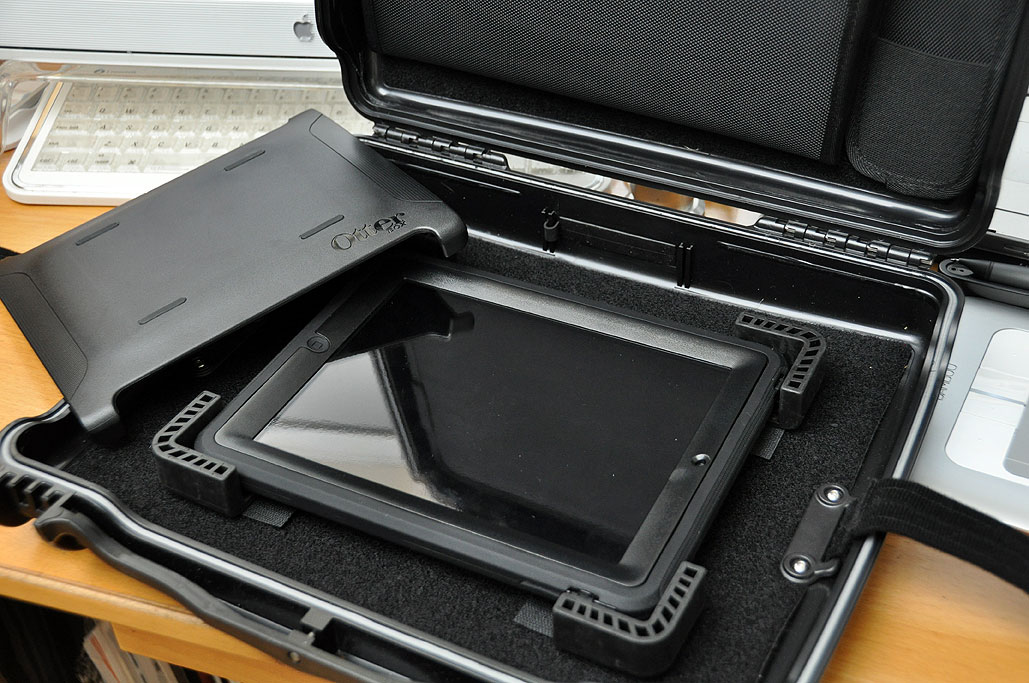
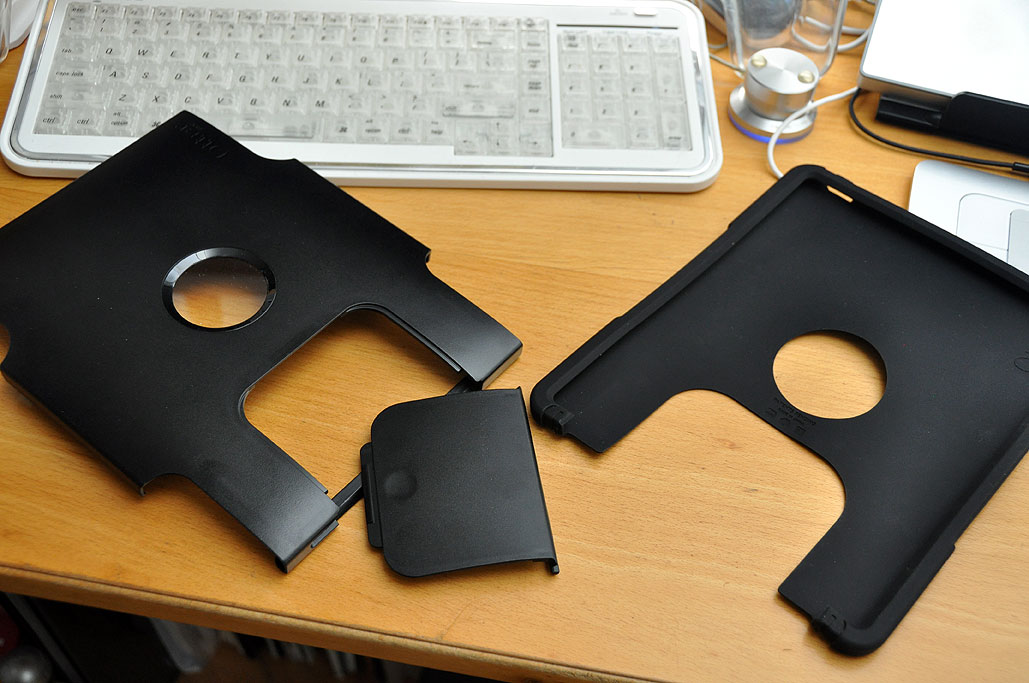
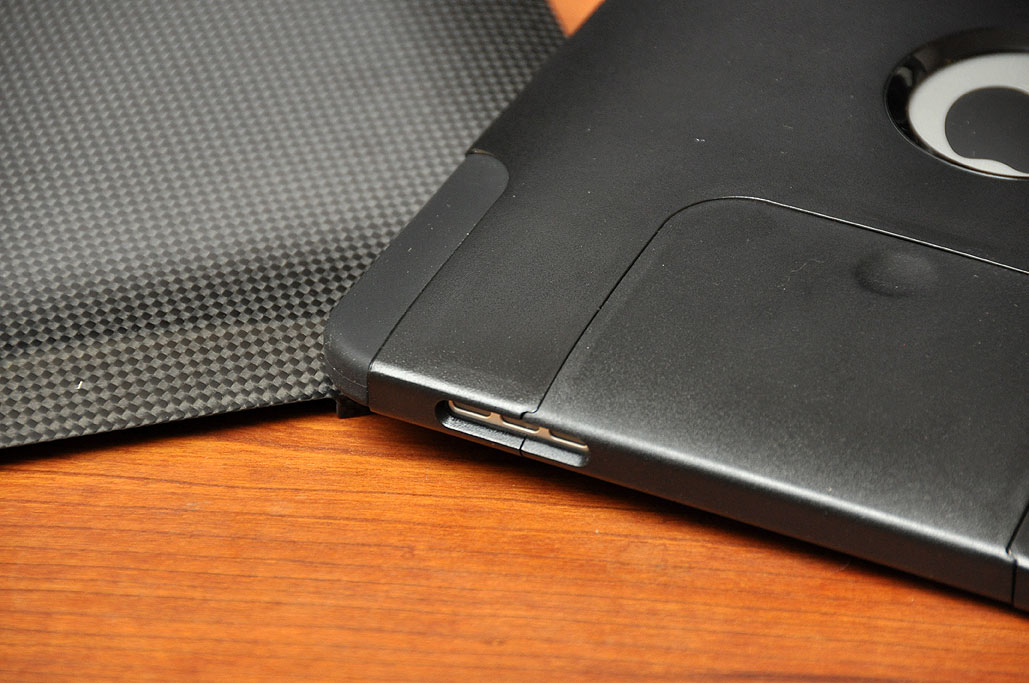
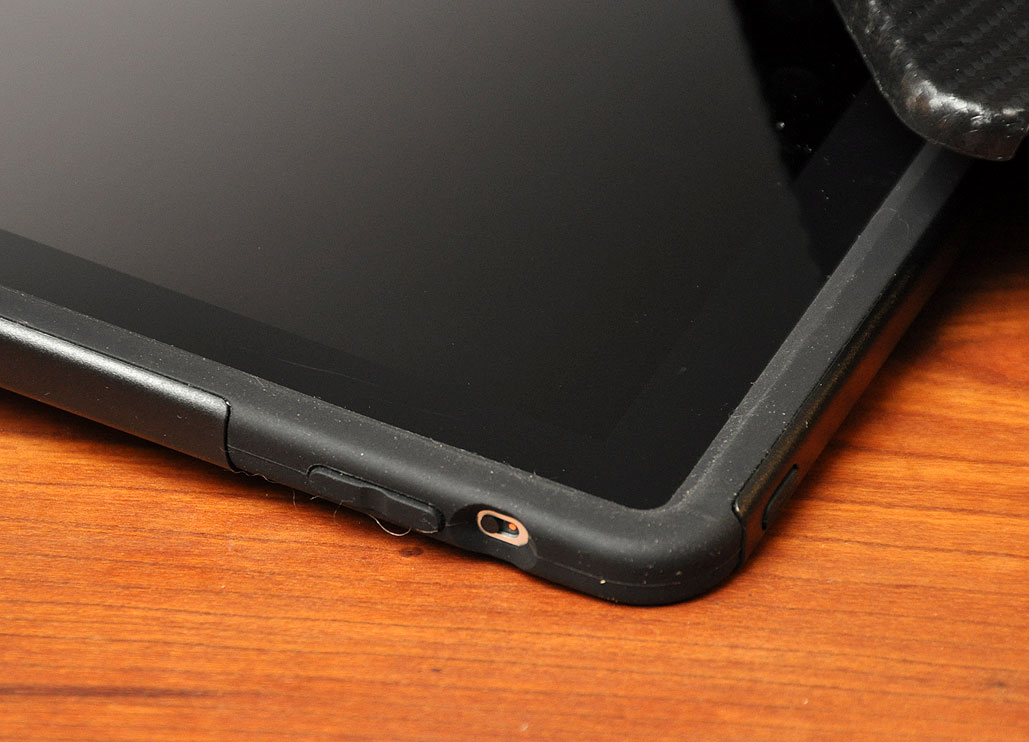
| July 28,2010 - OtterBox iPad Defender:Installation | |
Judging by the response to Monday's FirstLook of the OtterBox iPad cases, it appears that readers are really interested in the Defender and the Commuter. We can understand why. They look like something Batman would use to protect his iPad...and they could be right. "Suiting up" the iPad with the Commuter case is simple and we won't need to show it in this installation write-up. Instead, we will focus the remainder of this discussion on the Defender case.
When we tried to slide the iPad into the Defender case, we got halfway in and was met with quite a bit of resistance. If we really wanted to we probably could have jammed it in there (or, maybe not), but we would have had to break the case to get it back out. The reason? The tolerance of these Defender cases is very tight. Having the InvisibleShield on both sides of the iPad made it too thick to fit into the case. The only solution was to... [more]-OtterBox iPad Defender: Installation
|
|
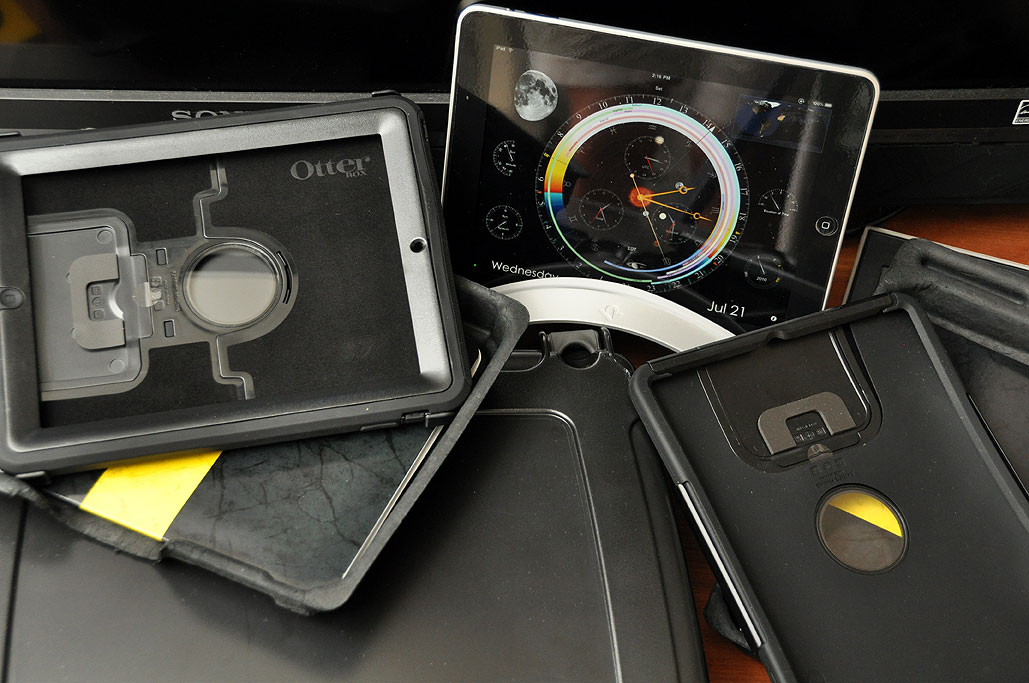
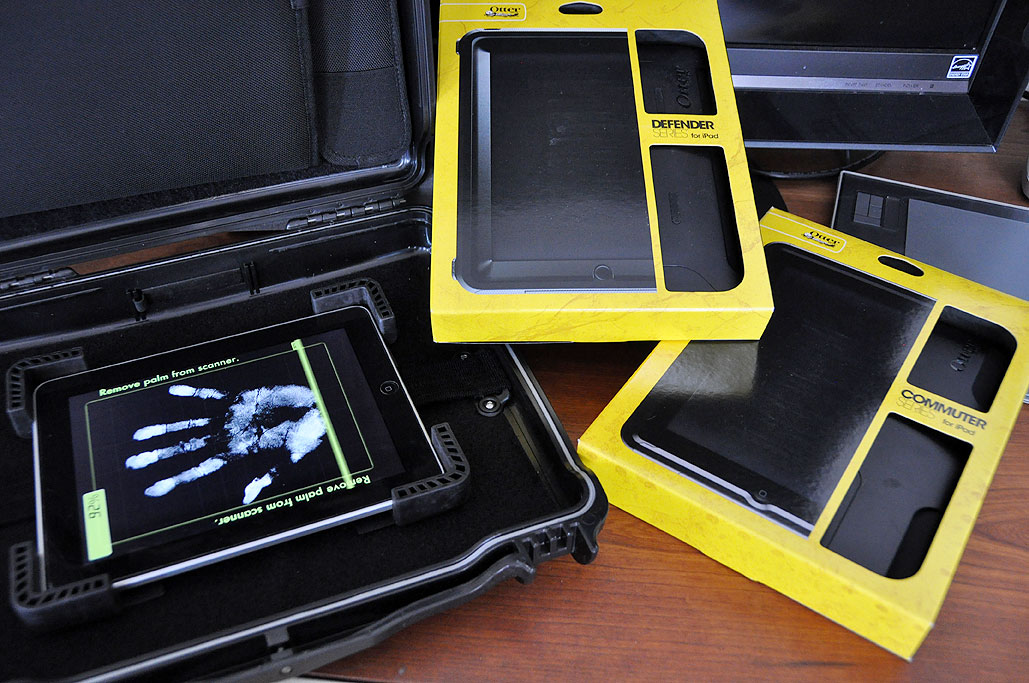
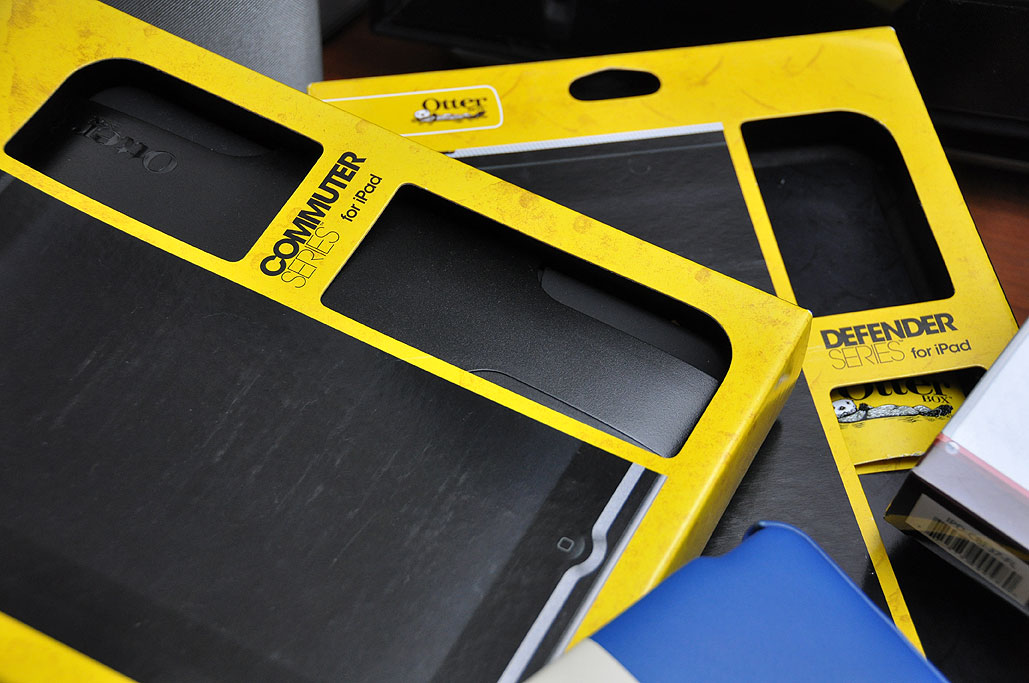
| July 26,2010 - OtterBox iPad cases... | |
The OtterBox iPad cases came in last Thursday. We posted a teaser with a few images of both the Defender and the Commuter. Many of you discovered that if you clicked on the "palm" in the palm scanner image, you were told how to gain access to a preview of today's FirstLook images.
Before we go any further, we want to answer the most asked question about these cases: Are the cases waterproof? Both cases offer some protection against moisture (rain, splashes, small spills) but are definitely not water-resistant in any substantial way. In fact, we have contacted all of the usual waterproof case makers and... [more]-OtterBox iPad cases: FirstLook |
|
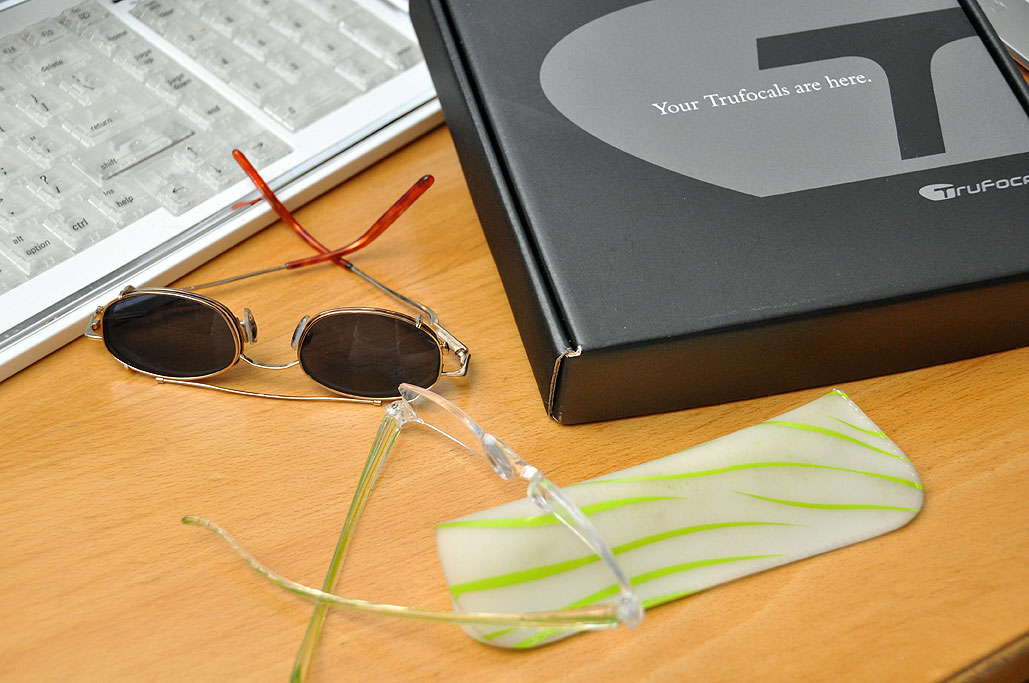
| July 23,2010 - TruFocal FirstLook... | |
It has been said that the day you turn 40, your eyes immediately require the aid of "reading glasses." We didn't believe in such things and have been blaming the restaurant's romantic lighting for not being able to read the menu, the low ppi on the monitor for the fuzzy screen, and having too much coffee for not being able to put the thread through the eye of the needle (we stitch up our own wounds here at RainyDayMagazine).
Those excuses worked for a while, but some of the editors had to face the fact that they either had to increase the font size on their screen or get a pair of decent reading glasses and get on with life. Having opted for the latter was a step in the right direction, but it spawned another problem...reading glasses of different prescriptions started multiplying around the office like bunnies. Reading glasses are only good for seeing clearly at... [more]-TruFocals FirstLook
|
|
| July 22,2010 - OtterBox iPad cases... | |
The OtterBox iPad cases came yesterday. As we said last Friday, we are going to do one big head-to-head case comparison in August. However, we thought readers would want to get a quick look at the long awaited OtterBox Defender and Commuter cases.
OtterBox did not deliver a case for the iPad until now because they wanted to take their time, leverage their strengths, and create the kind of case their customers have come to expect from them: a case that acts like a... [more]-OtterBox iPad cases |
|
| July 16,2010 - More iPad cases... | |
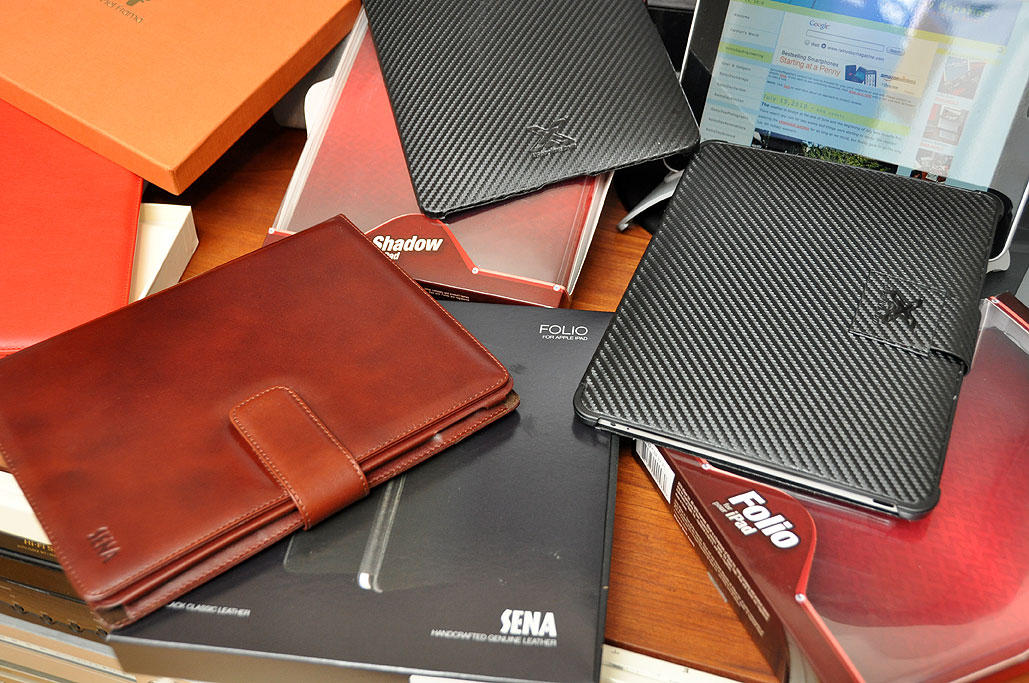
Since the launch of the Apple iPad in April, an avalanche of protective covers, cases, and folios for the iPad has hit the market. Sorting through them all has kept us quite busy. We wanted to find great-looking cases which were functional and well-made. We also kept and eye out for ones with an innovative design or unique features. After three months of research, we narrowed our list to six different makers. Each of these manufacturers have covers/cases/folios with unique features which we thought were worthy of further consideration:
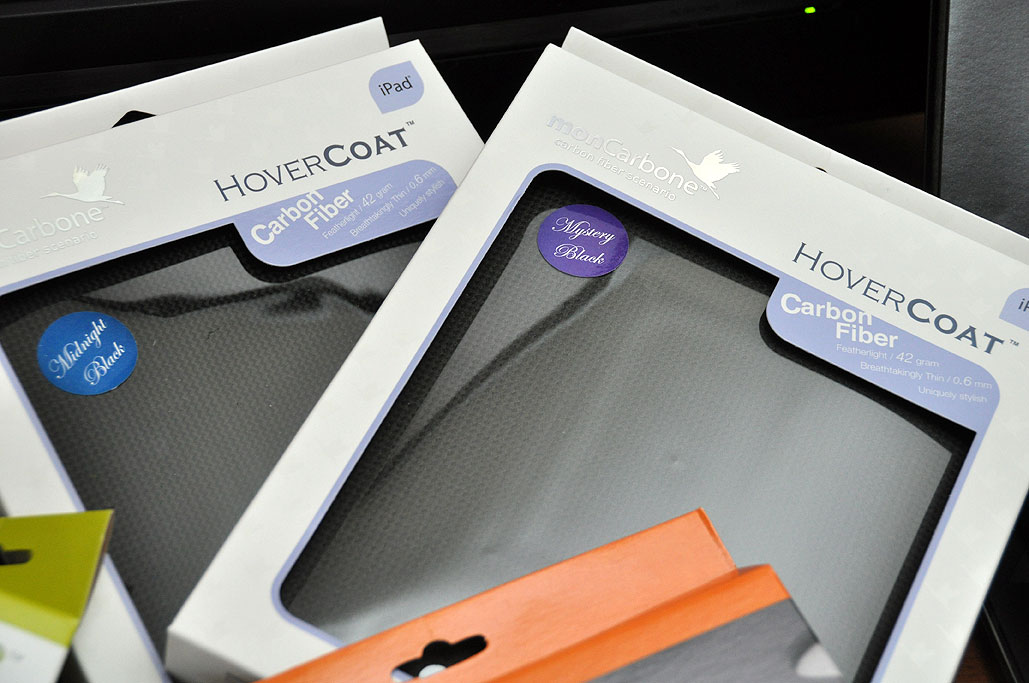
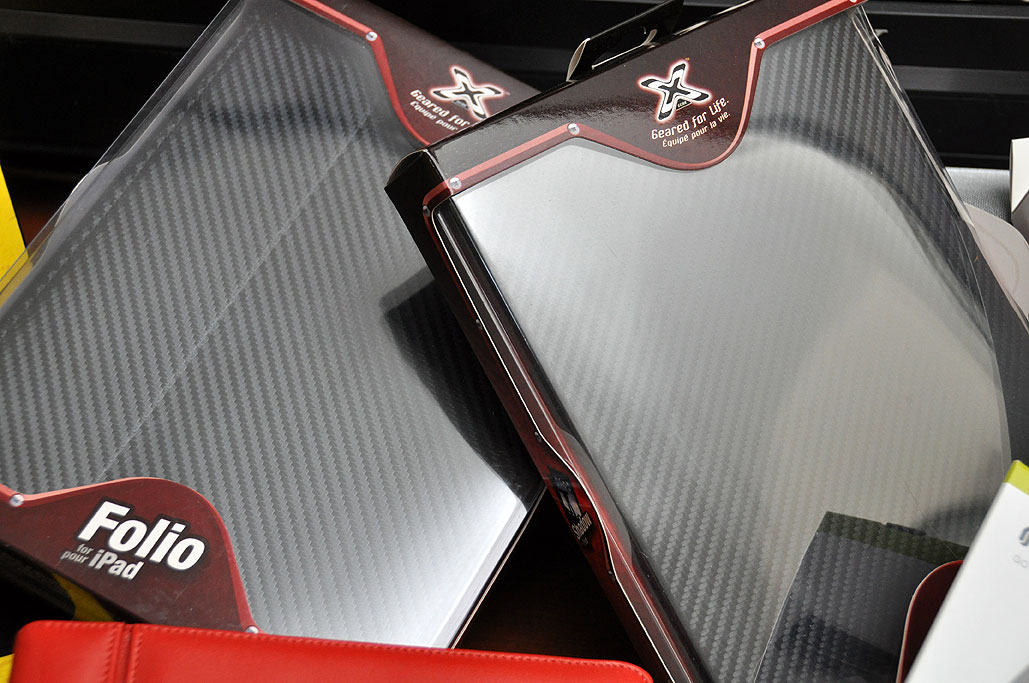
We picked the Vaja and Piel Frama covers because of their reputation for high quality leather iPod cases. We were not disappointed. We chose the Sena folio because of the interesting design of their integrated stand. XGear is on our list because they use carbon fiber for their covers. OtterBox made the cut because their cases typically offer the best physical protection possible. The unknown in the group is... [more]- More iPad cases
|
|
| July 12,2010 - Watching the World Cup ... | |
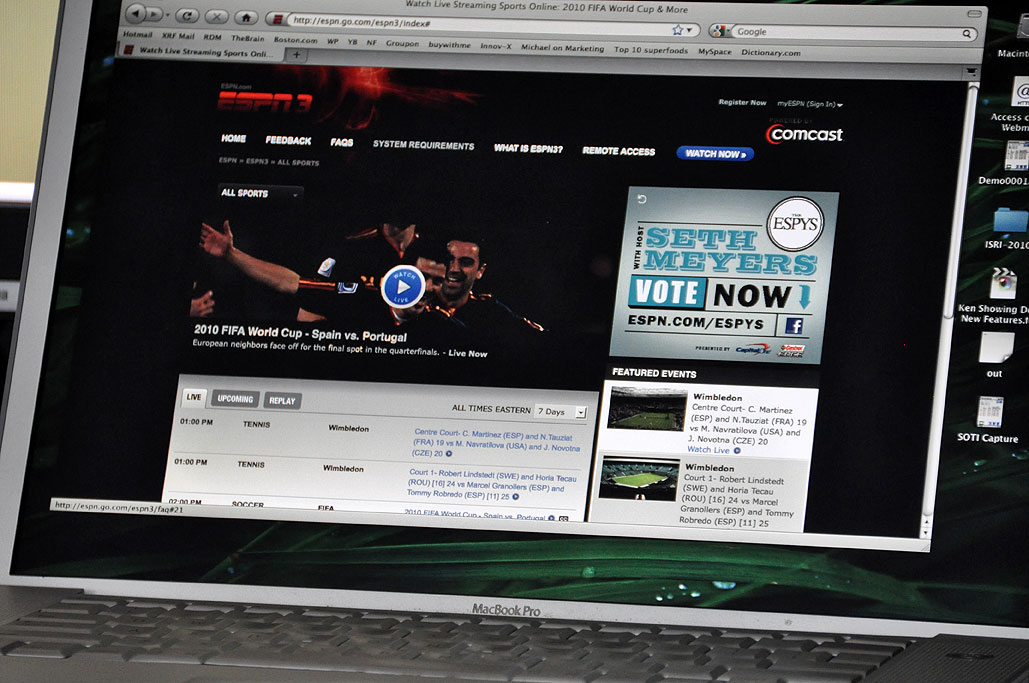
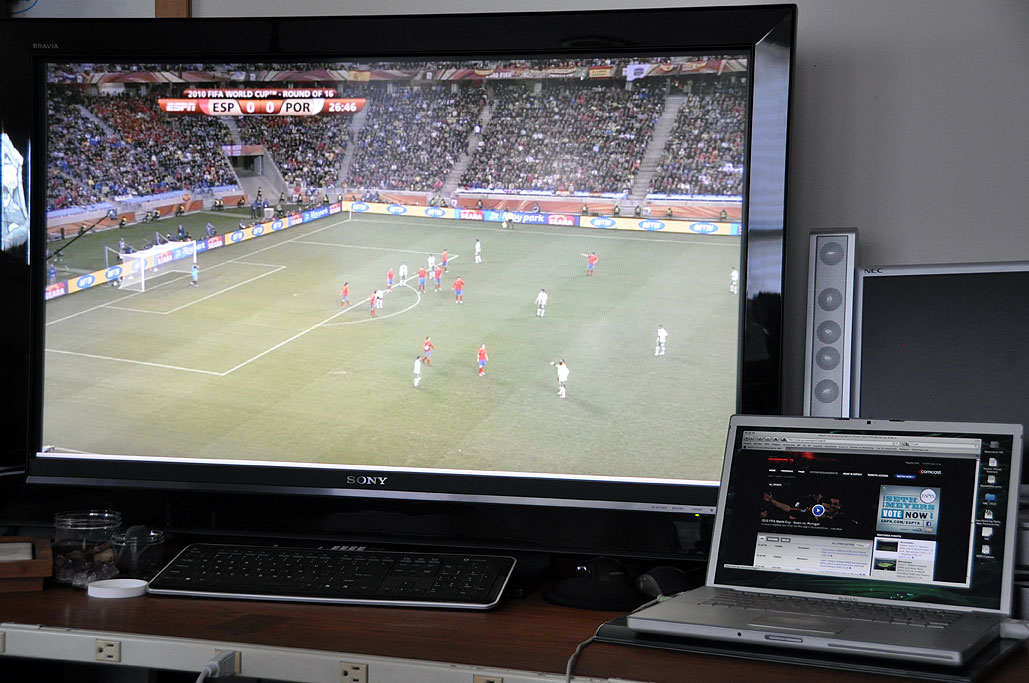
This was the first year that we'd ever watched the FIFA World Cup, and we wouldn't have watched so many matches if it hadn't been for the Internet. We only have basic cable for the office and none of the extra sports packages, so if we wanted to watch anything that we couldn't pull off the air, we had to find it online. Fortunately for us, all of the matches were available live on ESPN3.com! The matches were not some cheesy broadcast like those of local cable channels with a single camera angle, low production values, and awful sound. The ESPN web broadcasts and commentaries rivaled those of the major networks on prime time.
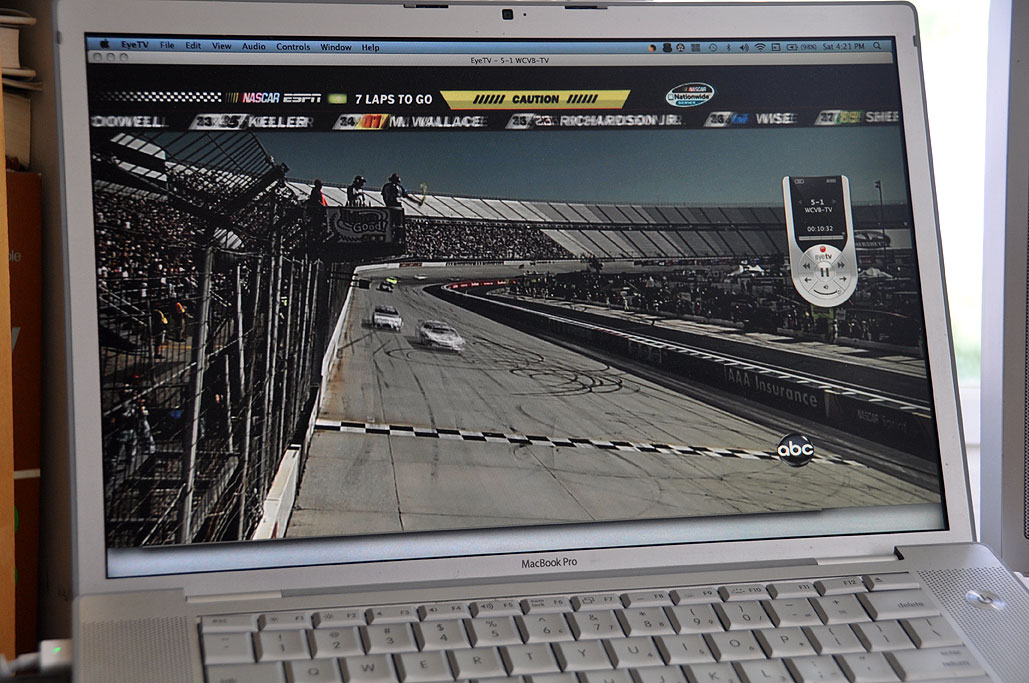
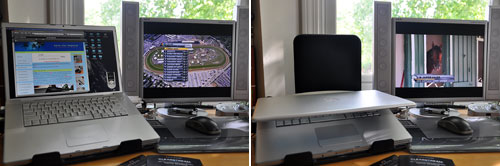
Watching a sports event on the computer is OK, but it does not compare with watching it on a big screen. The ideal situation would be to take the game being streamed to our computer and display it on the 46" LCD screen. When TVs were analog, this was a cumbersome digital to analog conversion process involving A/D boards and various cables. Since the digital TV conversion, all of the new TVs can directly handle video output from a computer. All we have to do now to see the game on a larger screen is to connect the "video out" from a laptop to our LCD TV using a DVI cable. The images we see on the big TV screen are every bit as crisp and sharp as that of the laptop, just really really BIG :-) Since our Apple laptop supports dual screens, we could still... [more] -Watching the World Cup 2010
|
|
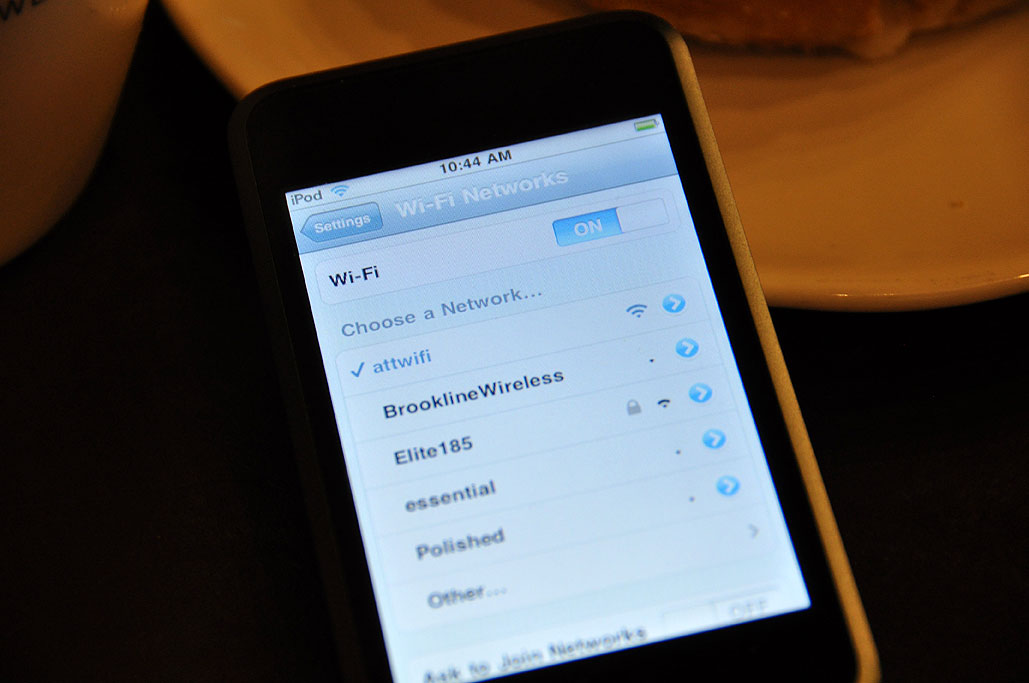
| July 2,2010 - Free WiFi ... | |
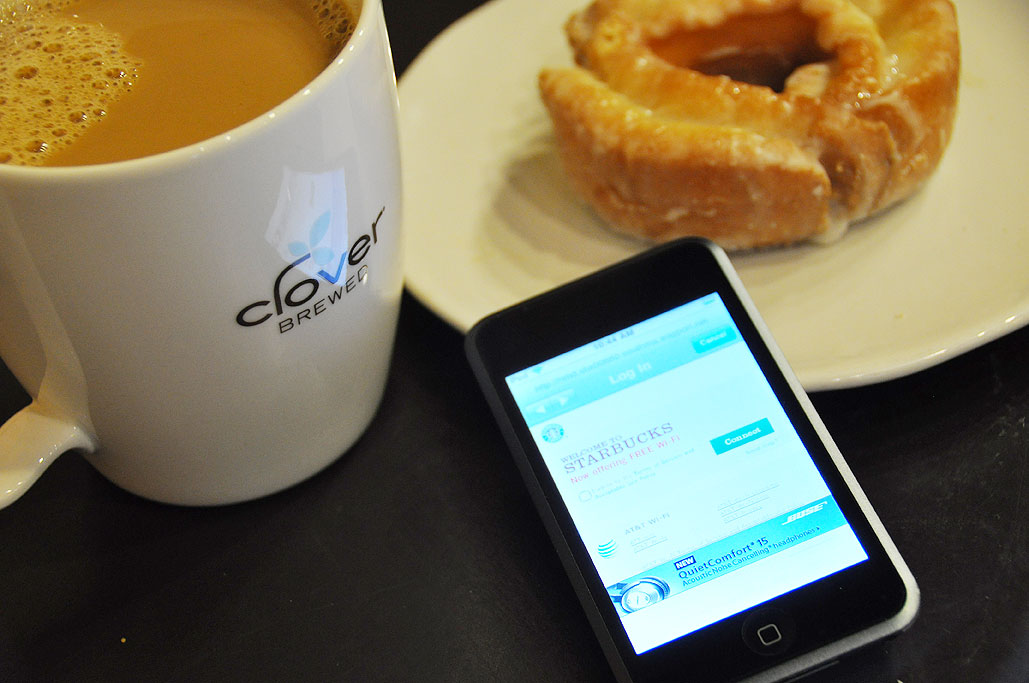
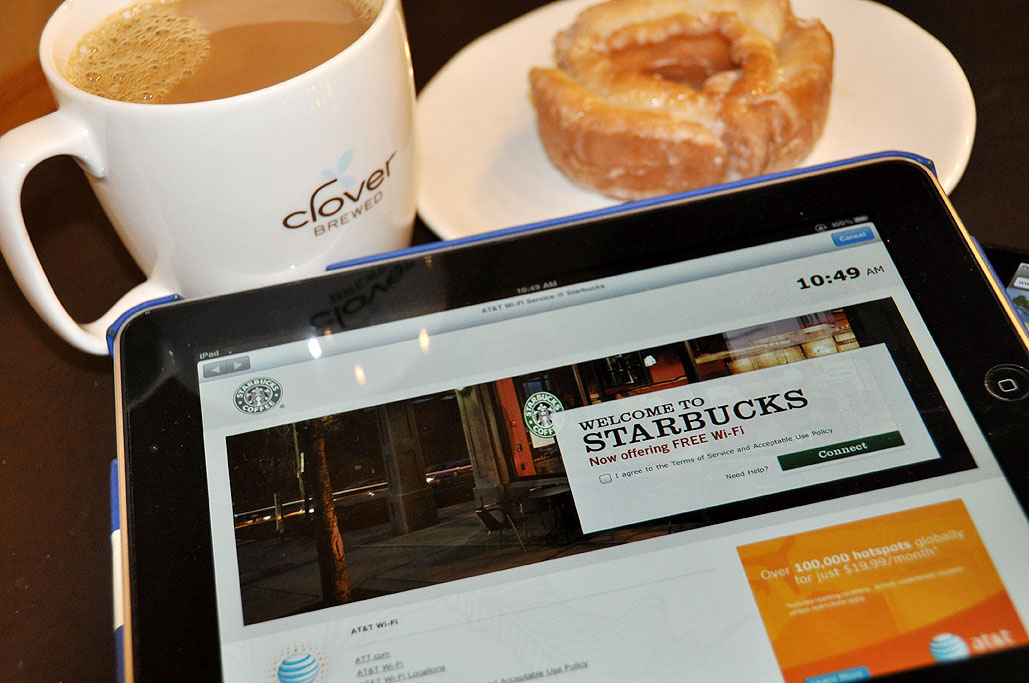
Starbucks announced that starting on July 1st, WiFi will be available at all of its stores free of charge. Businesses such McDonald's and various bookstores have been providing free WiFi for a while now. However, unlike a coffee shop, they are not really comfortable places to hangout. We stopped by our favorite Starbucks to see if this deal was for real. We like this Starbucks because we can get there in a few minutes on our Vespa, there is always a table available, and they have one of those new Clover coffee makers. Another plus for this location is there aren't a lot of folks using it as their office, so going there does not feel like we are going to work. However, this free WiFi thing may change that.
To test the free WiFi, we brought with us the iPod Touch and the iPad. Both machines had no problems logging on and establishing a WiFi connection. We were connected and online in less than four minutes (including taking the time to document the effort)! The whole process was... [more] -Free WiFi
|
|
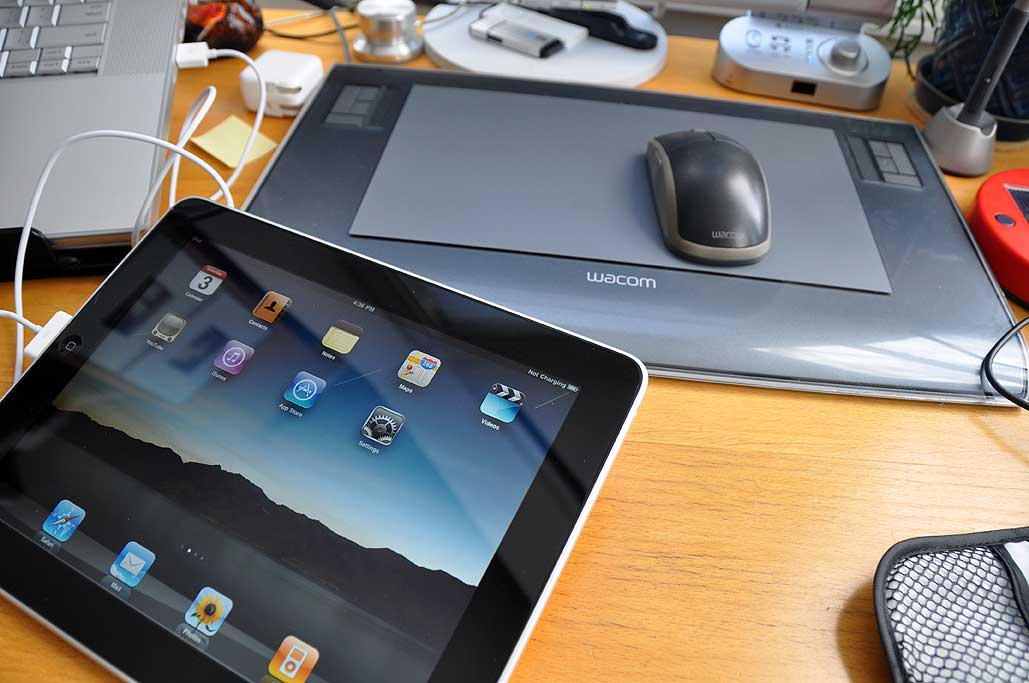
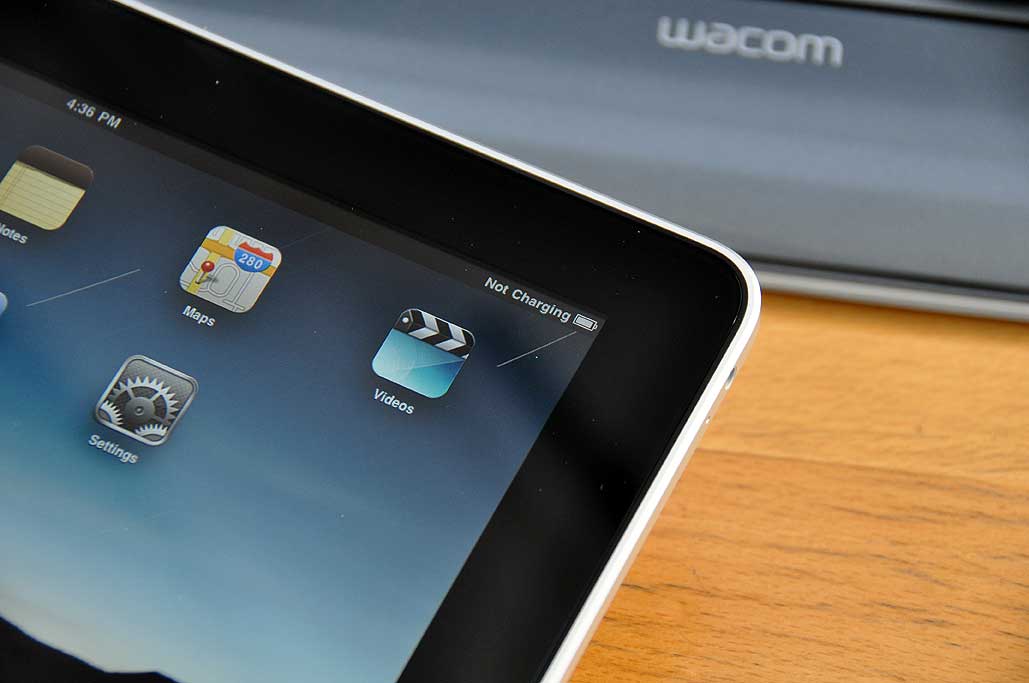
| June 29,2010 - Wacom Bamboo Craft: InTheWild ... | |
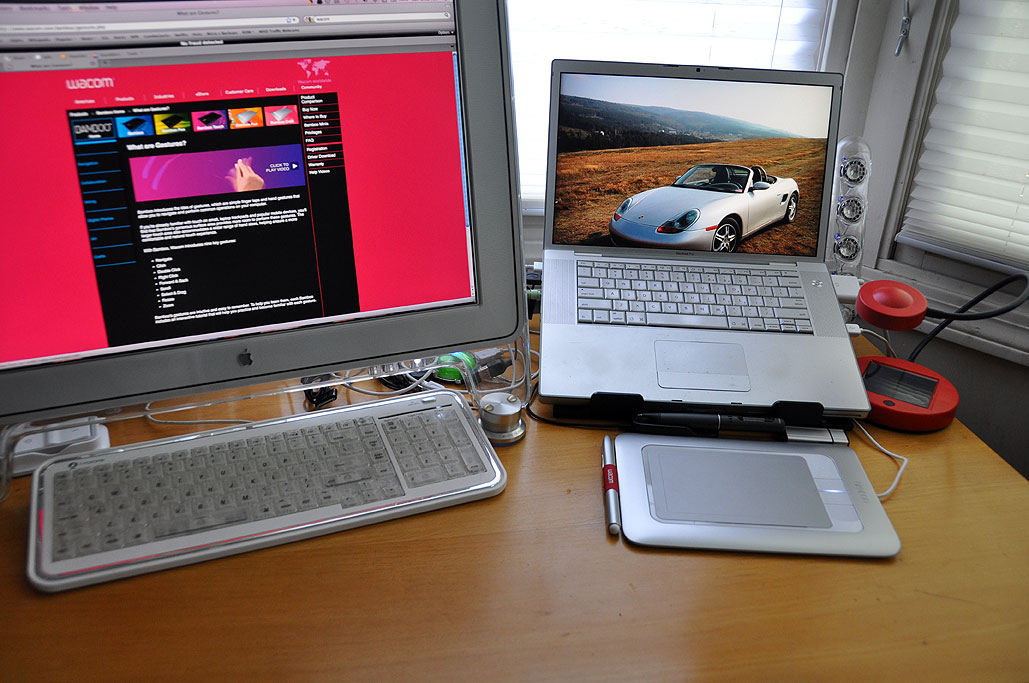
Wacom is the acknowledged leader in graphics tablets. There are other tablet makers on the market, but none of them can compete with Wacom in terms of features, sensitivity, and variety of offerings. We have been using Wacom tablets since the early 1990s. It has been interesting to see how Wacom has grown, adapted, and maintained their lead in this product category. They made tablets affordable, reliable, and convenient to use for the graphic artist. The key differentiator between Wacom and its competitors has been and continues to be their proprietary wireless input technology. It has enabled Wacom to make lighter, more sensitive pens and mice, none of which need to be charged or require batteries.
We have reviewed many Wacom tablets (Graphire, Intuos, Bamboo) over the years. The most recent was a FirstLook review of Wacom's Bamboo Craft in November 2009. The Bamboo Craft is a $130 tablet that can do double duty as a giant multi-touch trackpad. This capability is uniquely available from Wacom, and its utility was something we had not fully appreciated. Until recently, our Bamboo did not get much use because it was attached to a Mac which mainly functioned as a media server. Most of the graphics work was done using the larger Wacom Intuos tablet attached to the Macbook Pro laptop. An office clean up and equipment reorganization gave us the impetus to optimize the layout of a few workstations. We realized it made more sense to move the... [more] -Wacom Bamboo Craft : InTheWild
|
|
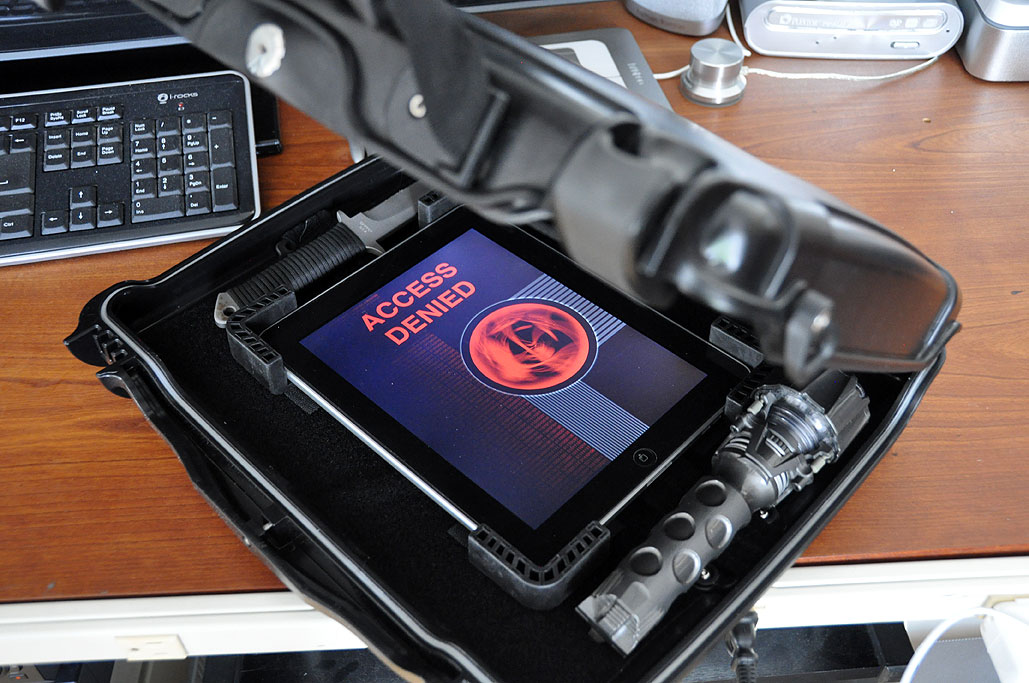
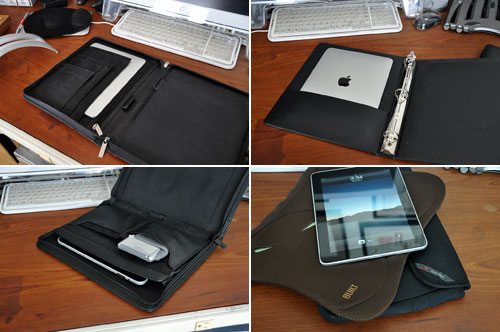
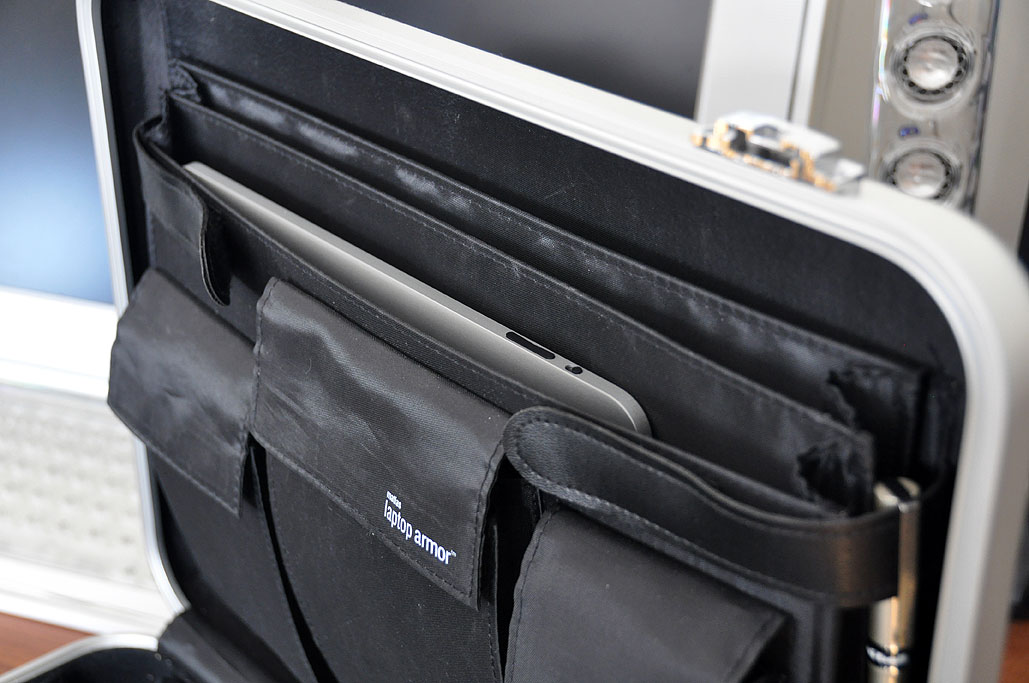
| June 24,2010 - iPad Armor... | |
When we slipped out to pick up some late-breaking gadget info at our local dead drop, someone slipped into our hotel room and attempted to gain access to the contents on our iPad. Fortunately, the palm scanner security program, not recognizing their hand print, denied them access.
Just to confirm that the iPad had not been compromised, we followed protocol, activated scanner, and ran a Level One security check on the content. The sweep came back clean. None of the security layers were breached, no files or programs had been added, deleted, or accessed. The iPad was clean. We have to be careful as we all learned a valuable lesson from... [more] -iPad Armor
|
|
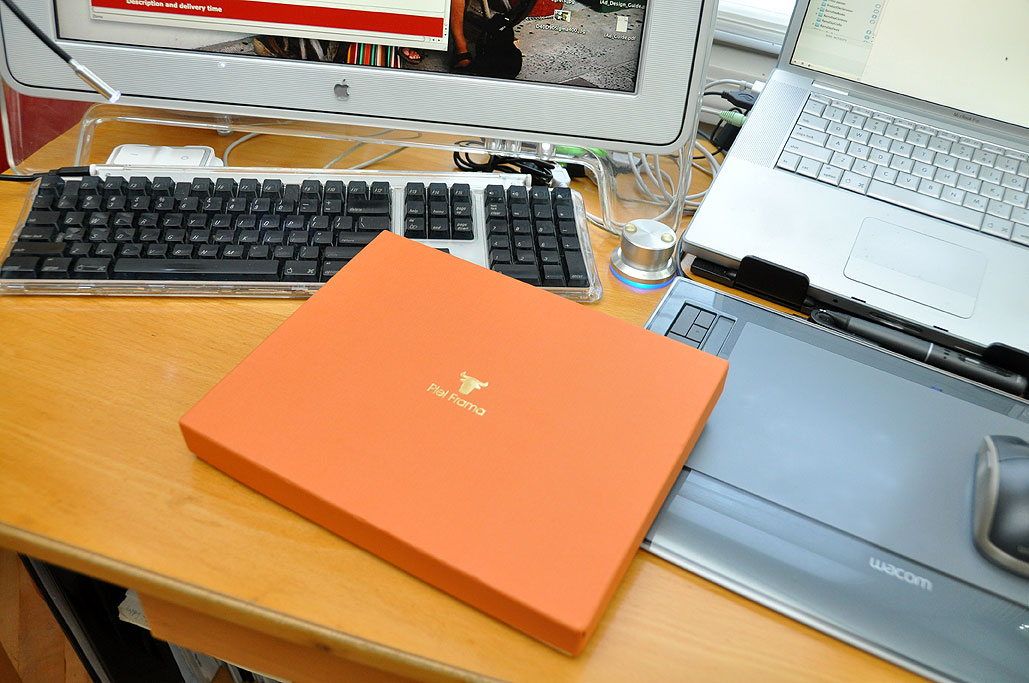
| June 22,2010 - Piel Frama iPad Case... | |
When the Apple iPad was released many of the makers of iPod cases had to scramble to redesign their offerings for the new larger multi-touch device. This was because Apple did not release the final specs of the iPad ahead of time to any of the accessories vendors. We knew there would be a deluge of skins, sleeves, and covers all clamoring to be reviewed shortly after the launch. Since we have limited personnel, we have to be very selective in our choice of covers to review. For skin-tight scratch protection, the obvious pick was the InvisibleShield. For travel protection, we opted for the Vaja iVolution. We liked the two-piece design because it gave us the option of going with either the front or rear cover when a thinner profile was desired. A few readers asked what would be our choice for a one-piece design. Today, readers will get a FirstLook at our recommendation.
Piel Frama got their start in manufacturing leather covers for gadgets with mobile phones in 1984, but have been a maker of leather goods since the Forties. They purchase their leather locally in Spain so they can hand select for quality. To ensure the high standards of their products, the company currently employs over 150 skilled craftsmen and... [more] -Piel Frama: iPad Case FirstLook
|
|
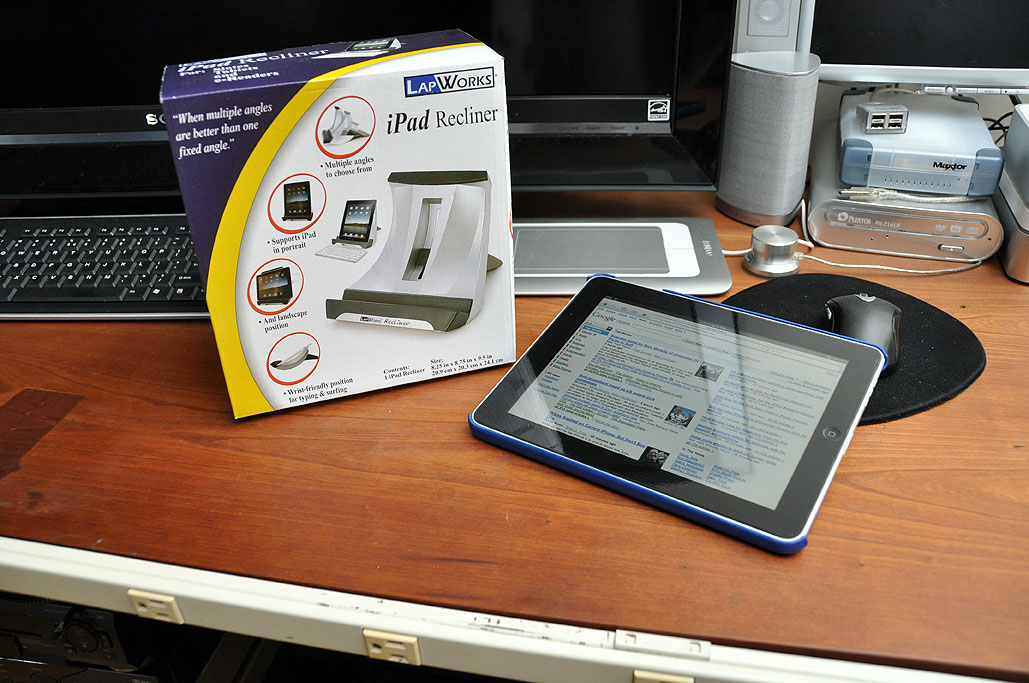
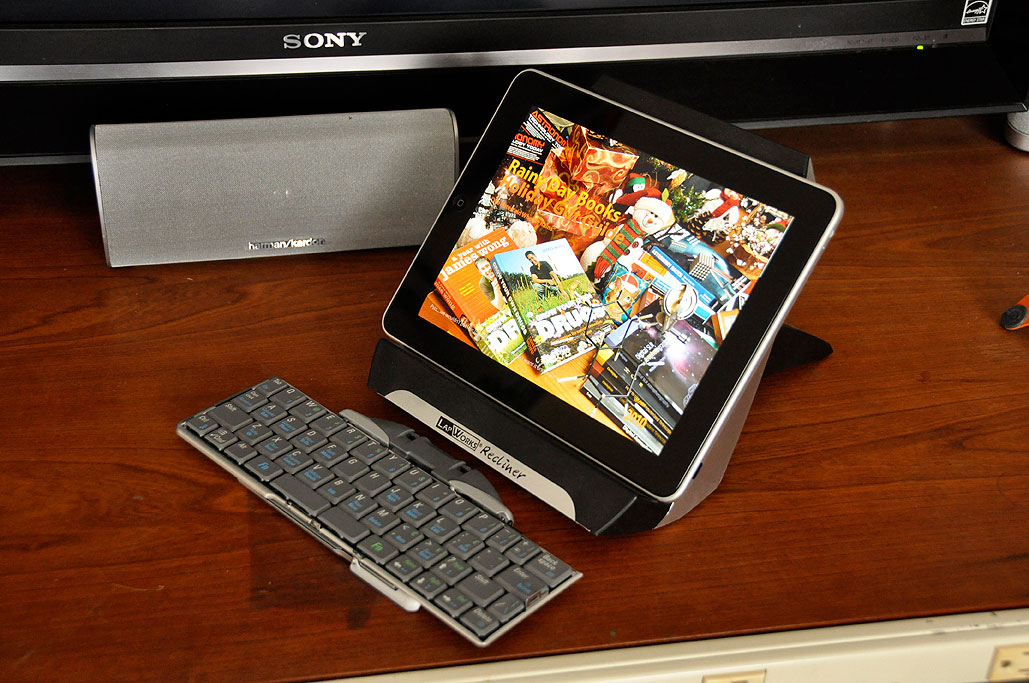
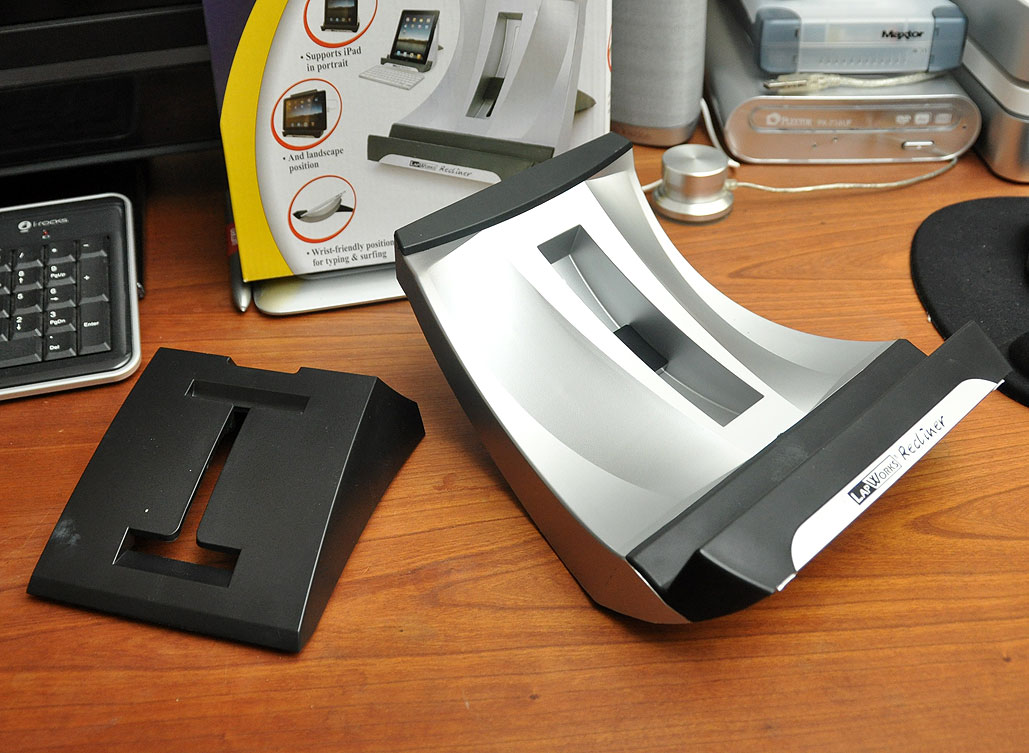
| June 17,2010 - LapWorks iPad Recliner... | |
iPad accessories have been coming at us from all directions since April. We could tell you about all of the gear we have seen, but then we would not have time for anything else. Instead, we like to filter out the noise, screen out the unworthy, and cut though the clutter. The gear that make it past the gaunlet are the ones we tell readers about. While the iPad is designed to be used while being held, sometimes you want to put it down somewhere, especially when typing or using it to watch a movie. In those situations, it is best to put it on a stand. We looked at one a few months ago. Today, we'll take a look at another.
Today is our FirstLook at the LapWorks iPad Recliner. No, it is not a comfy chair from La-Z-Boy. However, with it you can sit back, put your feet up, and position your iPad in a variety of positions. The Recliner cradle is molded from high impact plastic. It has an angled... [more] -LapWorks Recliner
|
|
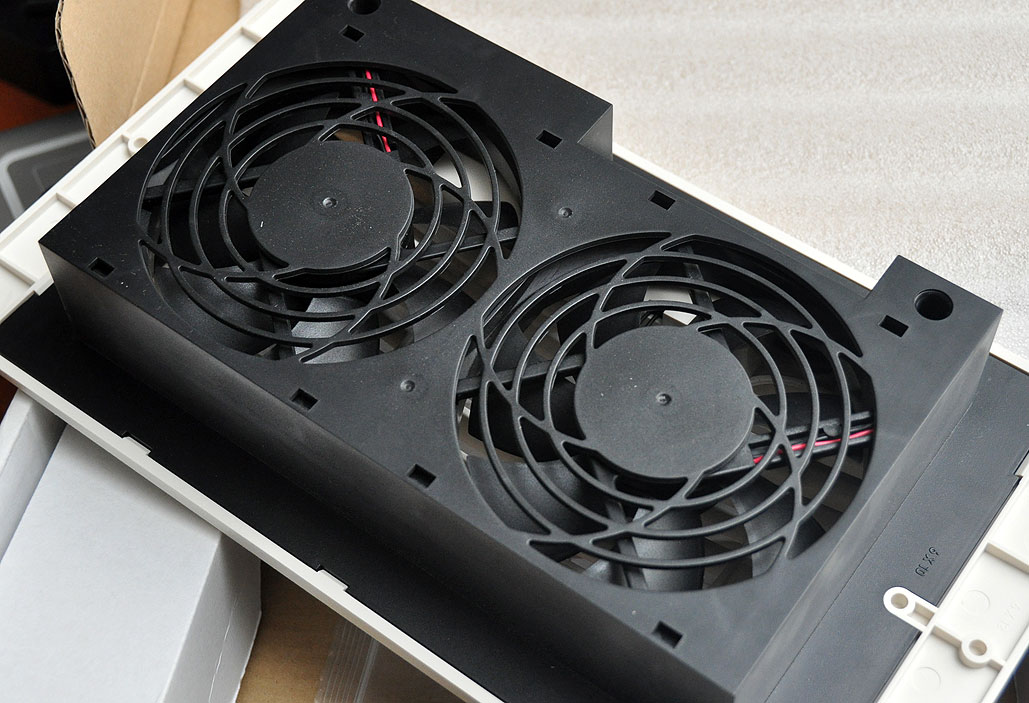
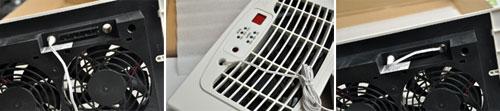
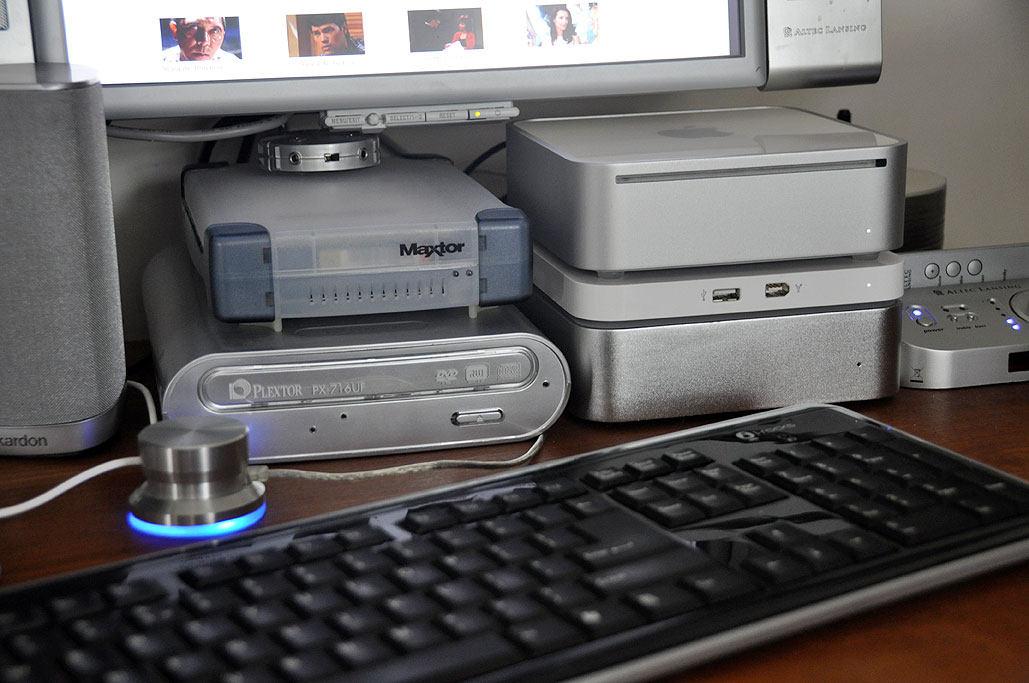
| June 04,2010 - Mac Mini Temp Control ... | |
Last August we posted a possible reason and a temporary fix to our Mac mini's WiFi problem. Our solution worked only if we kept the Mac mini in front of a fan. Obviously, it was not practical to have the computer in front of a fan during the New England Winter. So, our Mac mini's WiFi worked until the machine got warmed up, which typically was around five minutes. This was not a huge problem as we mostly used the Mac mini to burn DVDs, convert movies for playing on the iPod, and other such tasks. However, now that we have a large screen LCD in the office, we want to use the Mac mini as a media server for our new LCD TV. As part of its media serving function, we want to be able to access Hulu, Netflix, and other video streaming sites. To do that we needed to REALLY find a solution for the Mac mini's spotty WiFi problem. So, over Memorial Day weekend, we decided to revisit the problem, work through some possible solutions, and see if we could come up with a more permanent fix.
The first thing we did was to move the Mac mini from its current location underneath the table to the top of the desk. It was mounted below to save desktop space, but we thought the better air circulation on top may be... [more] -Mac mini temperature control
|
|
| June 03,2010- Hang&Leve FirstUse ... | |
When we brought a 46" screen in to the office, we realized the logical place to put it was on the wall. The only suitable wall already had a bunch of frames on it. Relocating the frames would not be a difficult DIY project, but re-aligning them would be a chore. Getting the frames just so had always been a lot of trial and error. Fortunately, we got a Hang&Level picture hanger a few months back, and this is the perfect opportunity to give it a FirstUse test.
To properly hang a group of frames, we used to measure, mark, nail, and readjust the frames many times before we were satisfied with how they looked. The issue was two-fold: the right spot for the nail was located behind the frame, so centering the frame and marking the spot was difficult. There was usually slack in the wire in the back of the frame, and that made aligning and spacing of the frames difficult.
The Hang & Level tool was invented to address these problems. The steps were simple and intuitive. The frame to be hung is placed on the tool. The frame/tool is placed against the wall. Once we were satisfied with the frame's placement, we removed the picture from the tool but... [more] -Hang&Level FirstUse
|
|
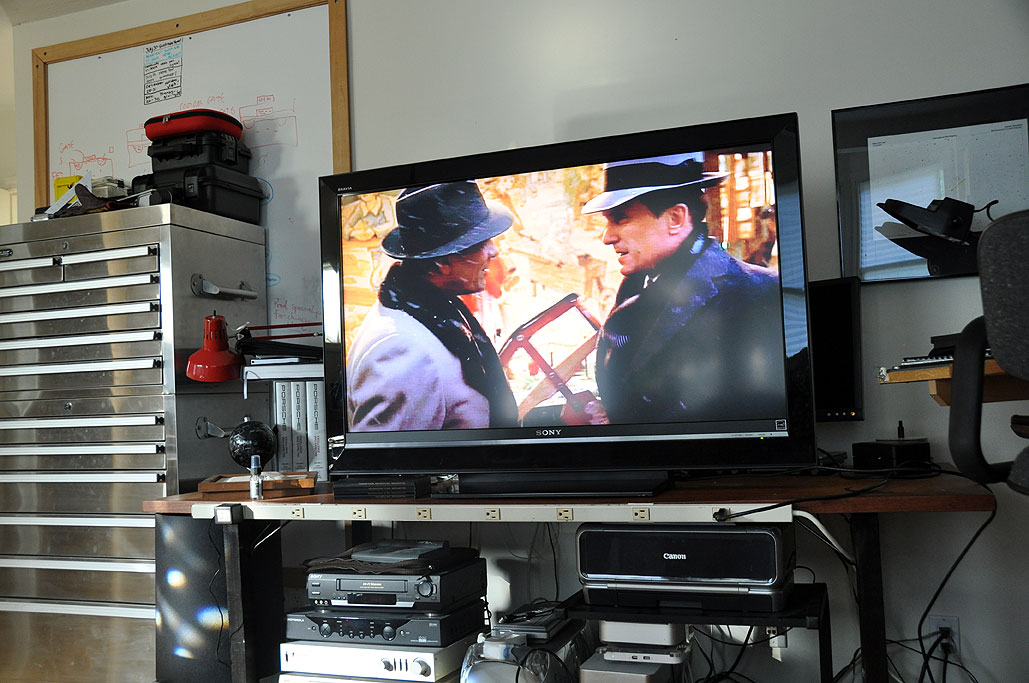
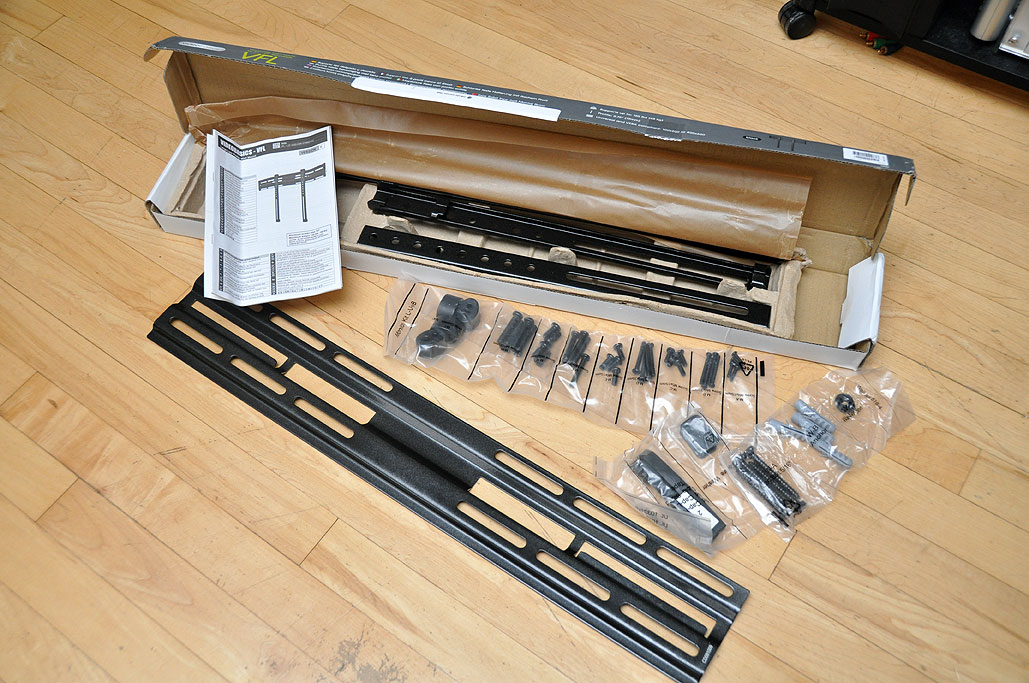
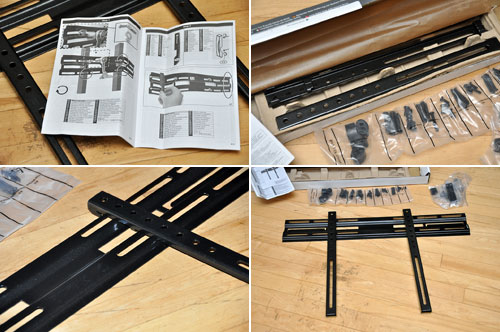
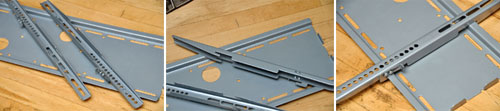
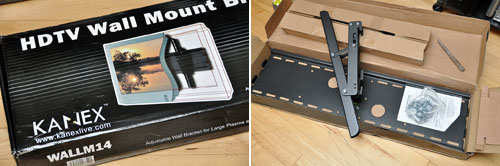
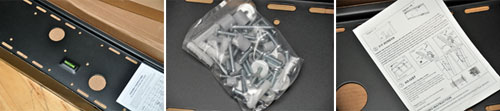
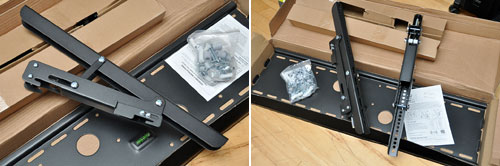
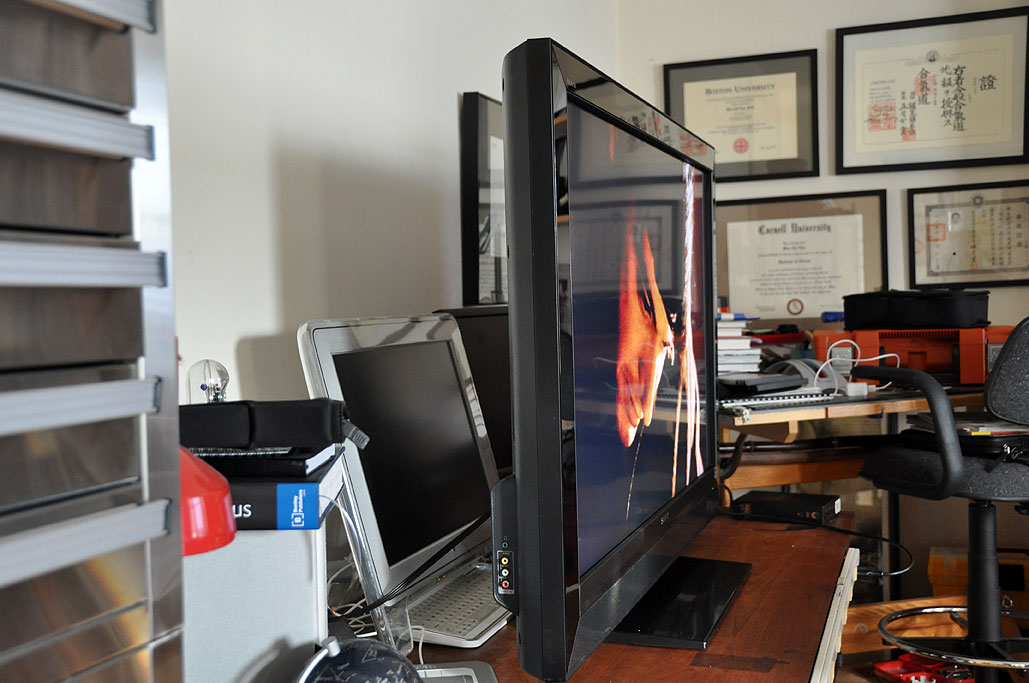
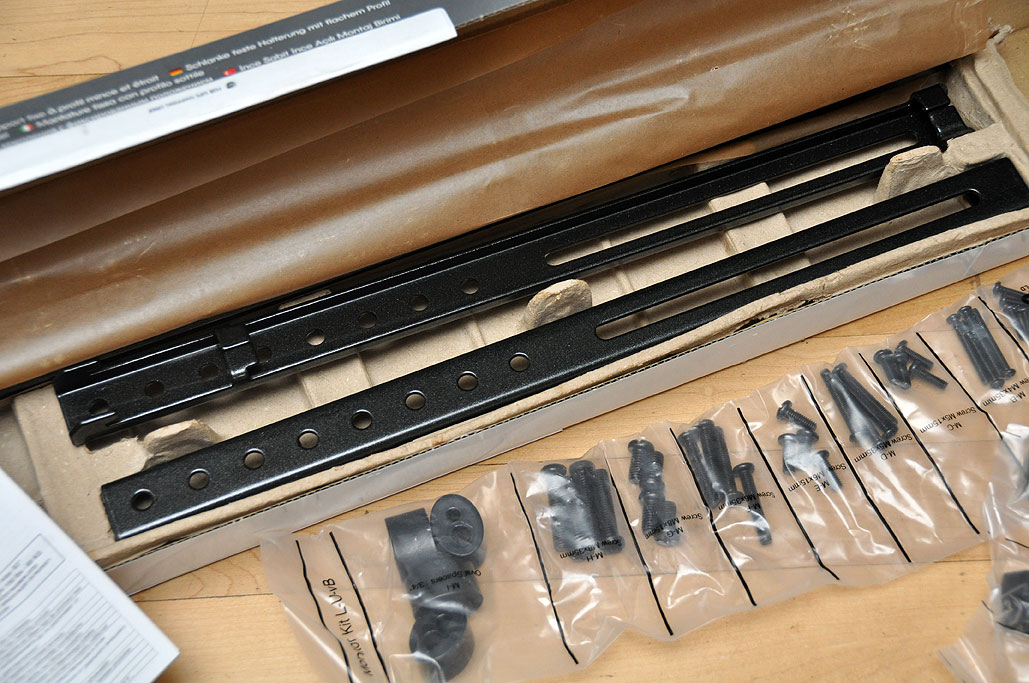
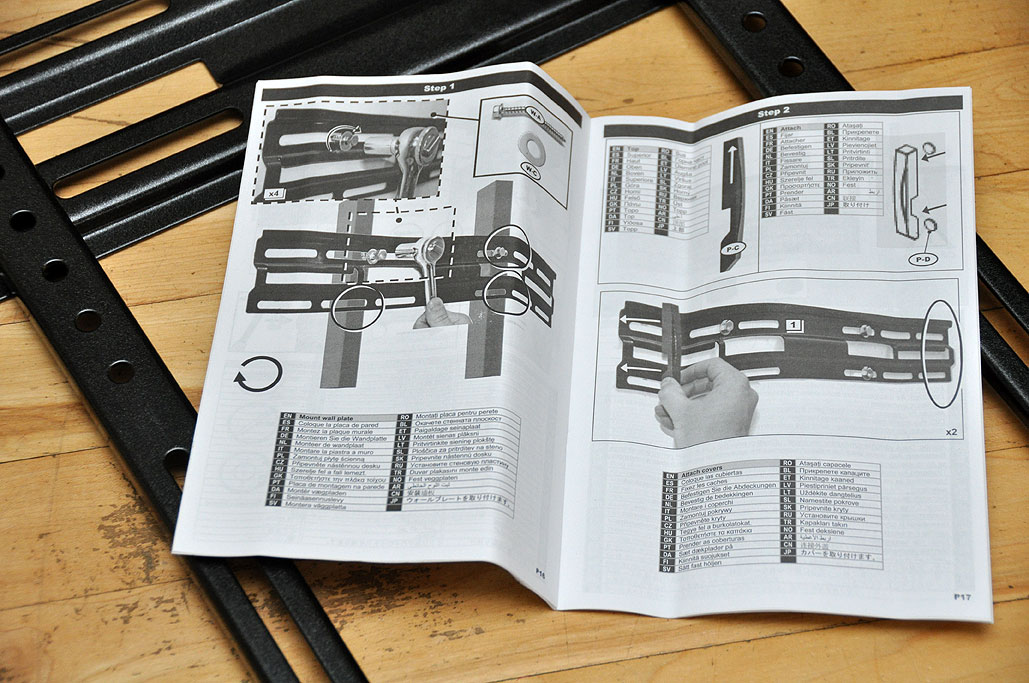
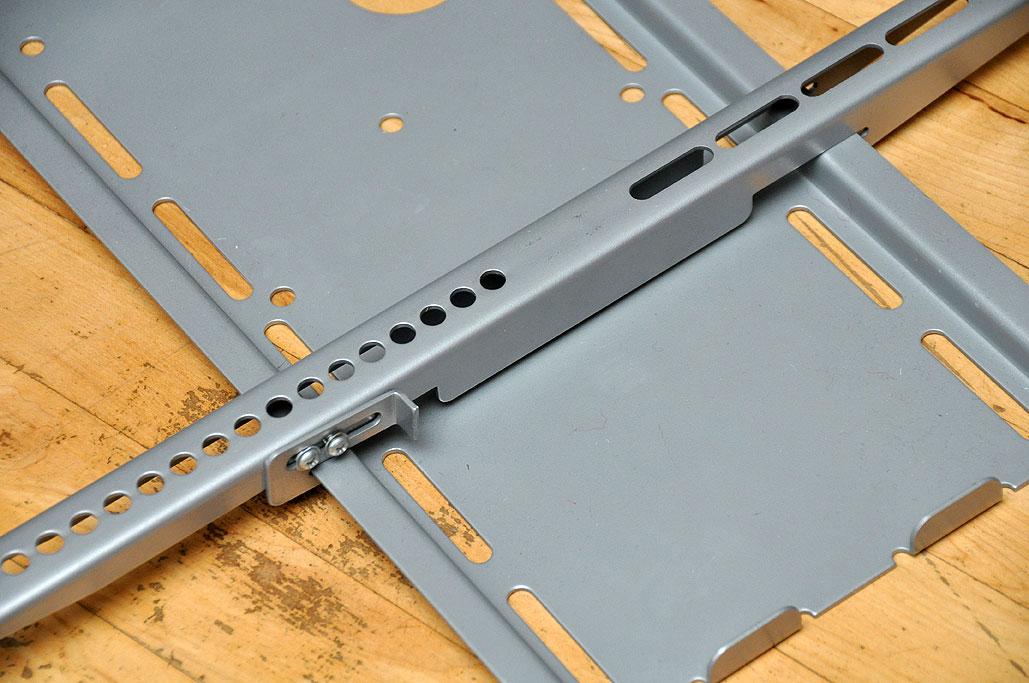
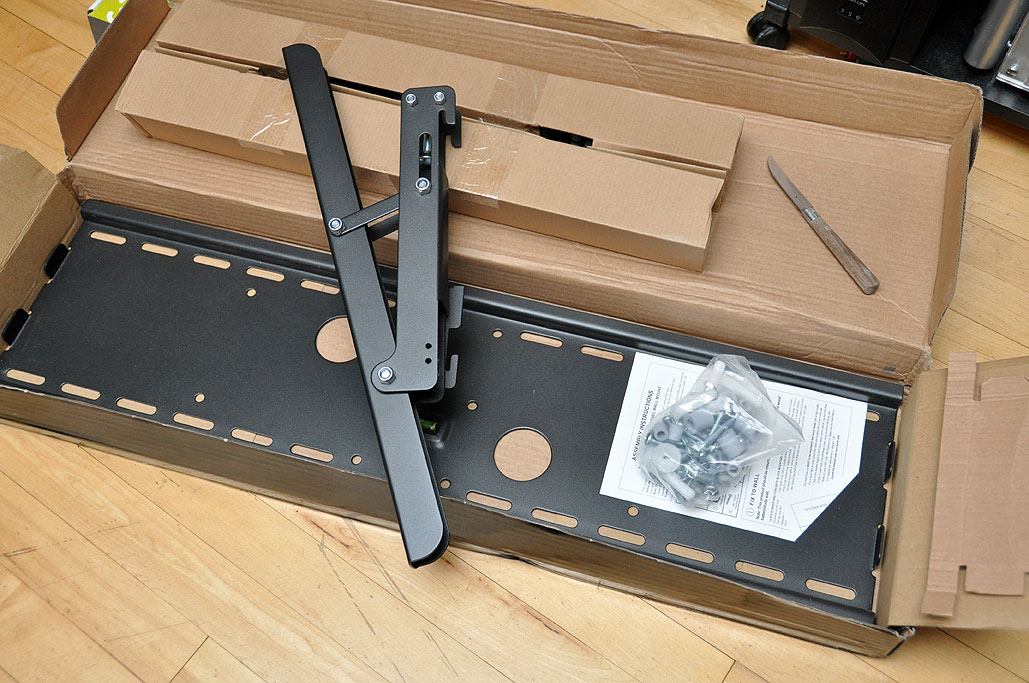
| June 1,2010- Articulated LCD Mount ... | |
We used to have a huge projection TV screen in our office. While it was great to watch movies on it, it weighed over 200 lbs and took up an entire corner of the room. When it stopped working, we had to take it apart in the room in order to get it out to the trash. A week ago, we got ourselves a nice 46" LCD panel television via Craigslist. The great thing about LCD TVs--even with larger ones--is that they are relatively thin (less than 2" thick) and comparative light (less than 50 lbs). Even though they are thin, they still take up quite a bit of room on the desk.
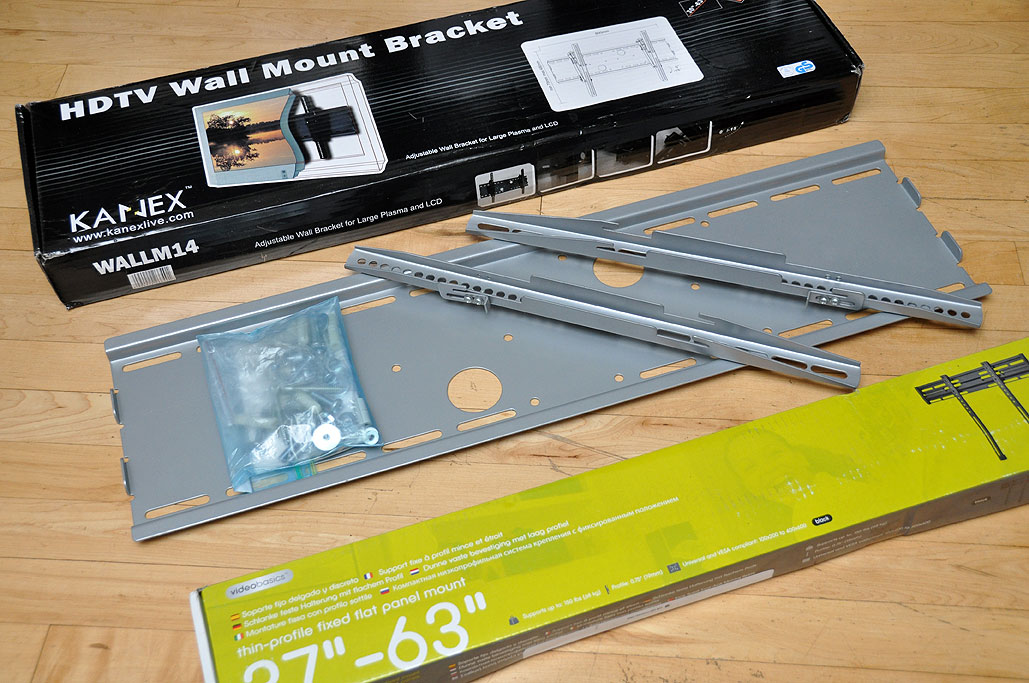
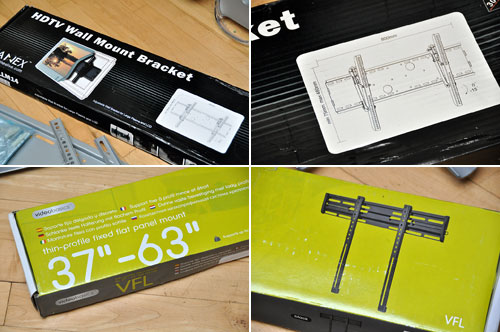
One solution to the problem is to mount the LCD panel on the wall, something which was not be possible with CRTs and projection TVs. We reviewed a few different types of LCD mounts last month, but we needed something a little more adjustable for the 46" Sony Bravia screen. Because we plan on putting the tv above the desk, we need an articulated mount with tilt, angle, and extension adjustments. The one we got was this one from... [more] -Articulated LCD Mount FirstLook
|
|
| May 25,2010- LCD TV Hunting ... | |
Last month we purchased a broken 46" Samsung LCD TV for a DIY repair project. When we realized that fixing the screen was cost prohibitive (i.e., way, way too expensive), we managed to sell it for parts (at a profit, no less) to someone looking to swap out some boards in another unit that had a working screen. This past month, the interns have been scanning Craigslist looking for another unit for a repair project and they started seeing something interesting: more and more working LCD units were showing up at very reasonable prices. The sizes ranged from 40" to 52" with prices from $400 to $750. The LCDs for sale were not off-brands neither. They were Sony, Samsung, Sharp, etc...
We found another surprise when we emailed many of the sellers. Most of them were open to further price negotiations. And then it dawned on us: it was the end of the university school year and many of the students realized that moving a large-screen TV would be both... [more] -LCD TV Hunting
|
|
| May 24,2010- Vaja ivolution FirstLook ... | |
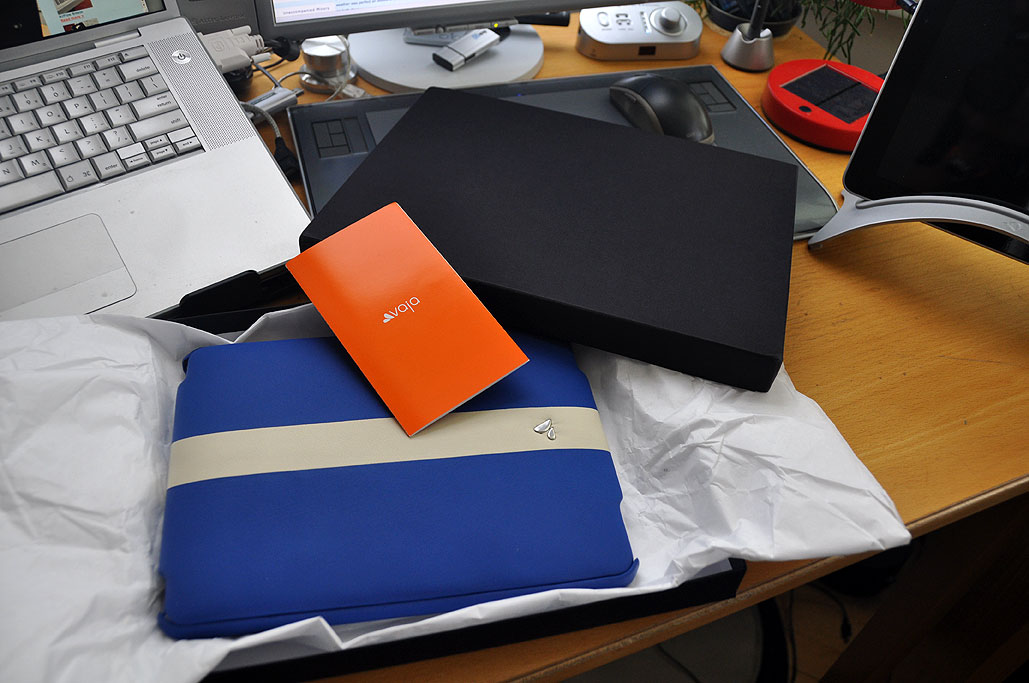
Can a protective case for a gadget make you want to buy the gadget just so you can justify buying the case? If the case was made by Vaja, it just might. Vaja products may cost more than similar products on the market, but they command a premium because they are thoughtfully designed, made using high quality materials, and are expertly hand-crafted. Vaja has now released the ivolution line of covers for the iPad.
We got a Vaja ivolution in house last week and was blown away by it as soon as we opened the box. The ivolution comes in two pieces, a front and a back cover. It is possible to get just the back cover, but if you are going to invest in a Vaja case, get the set (we'll show you why later). Vaja uses only full grain cowhide for the covers. They do not alter their leather, thereby retaining its natural character, markings, and qualities. Leather has many advantages over other materials. It is a very durable, non-allegenic, and unlike synthetics, will... [more] -Vaja ivoluiton FirstLook
|
|
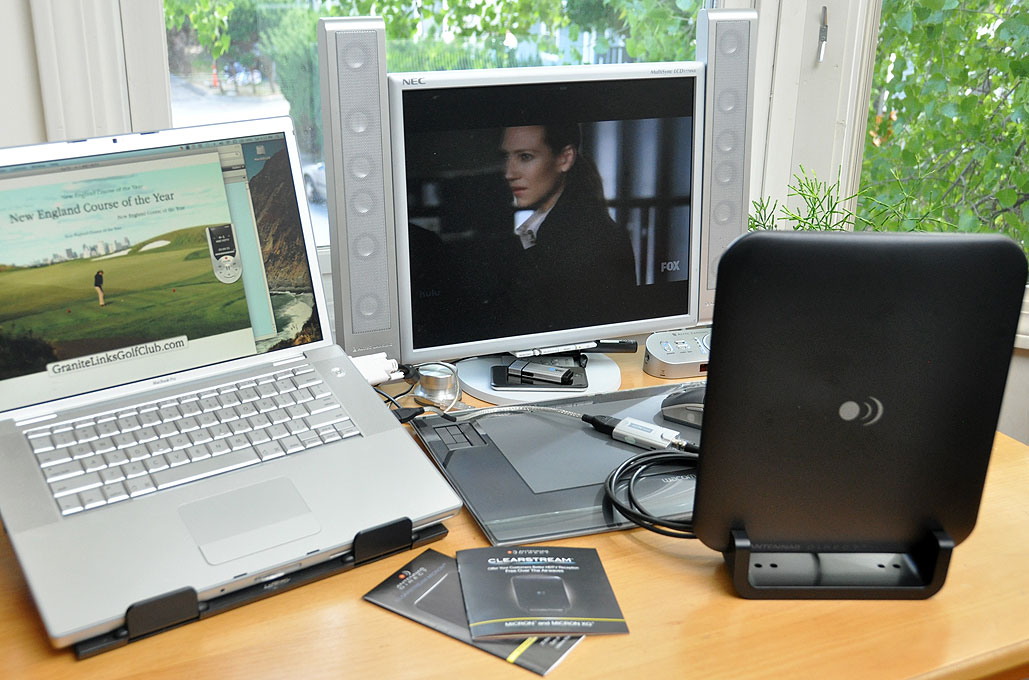
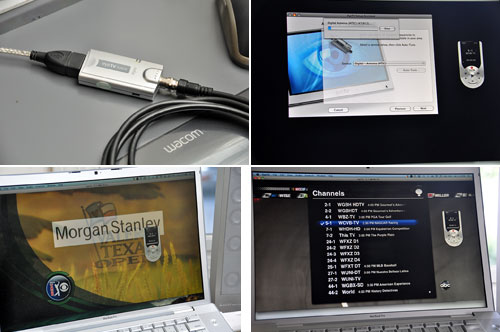
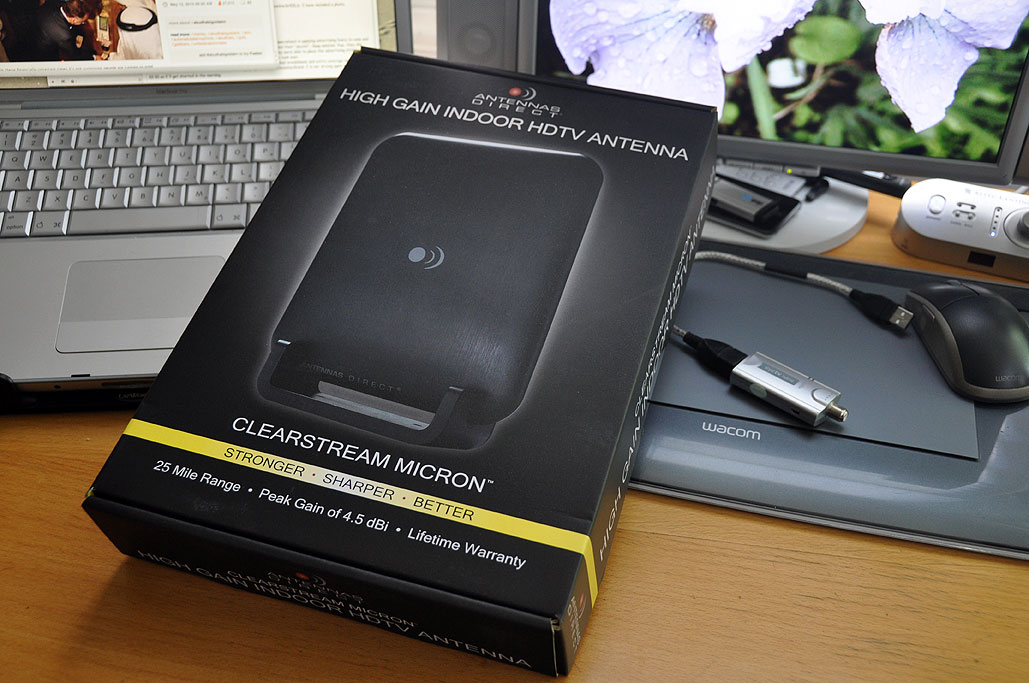
| May 20,2010- ClearSteam Micron FirstUse ... | |
|
|
| May 14,2010- ClearStream Micron ... | |
|
|
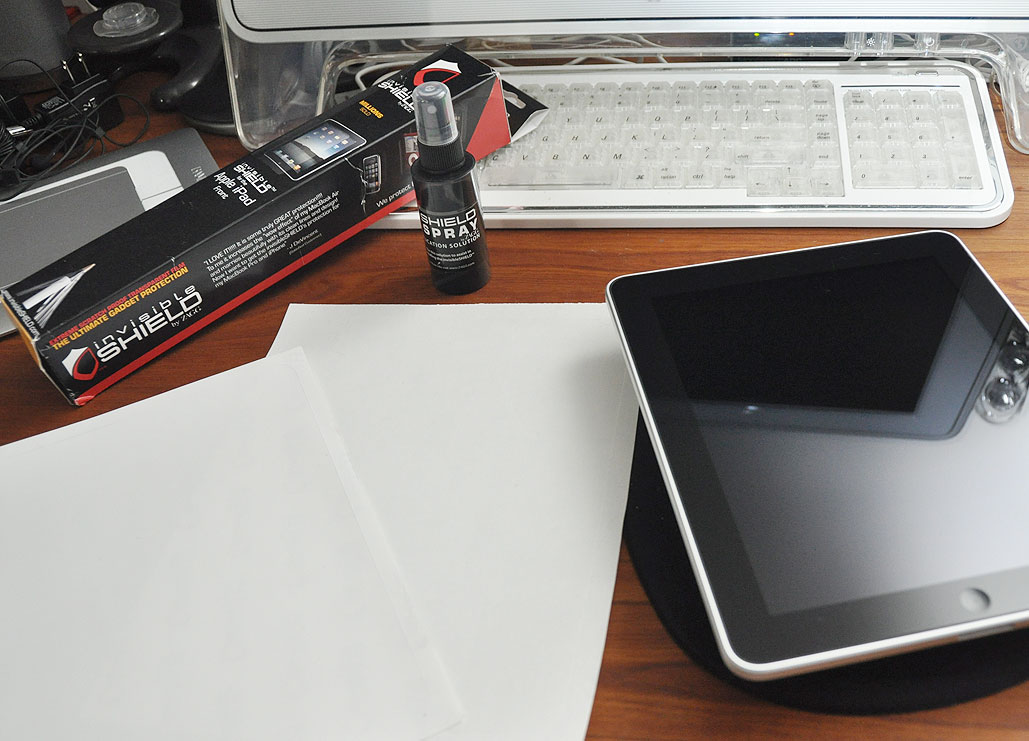
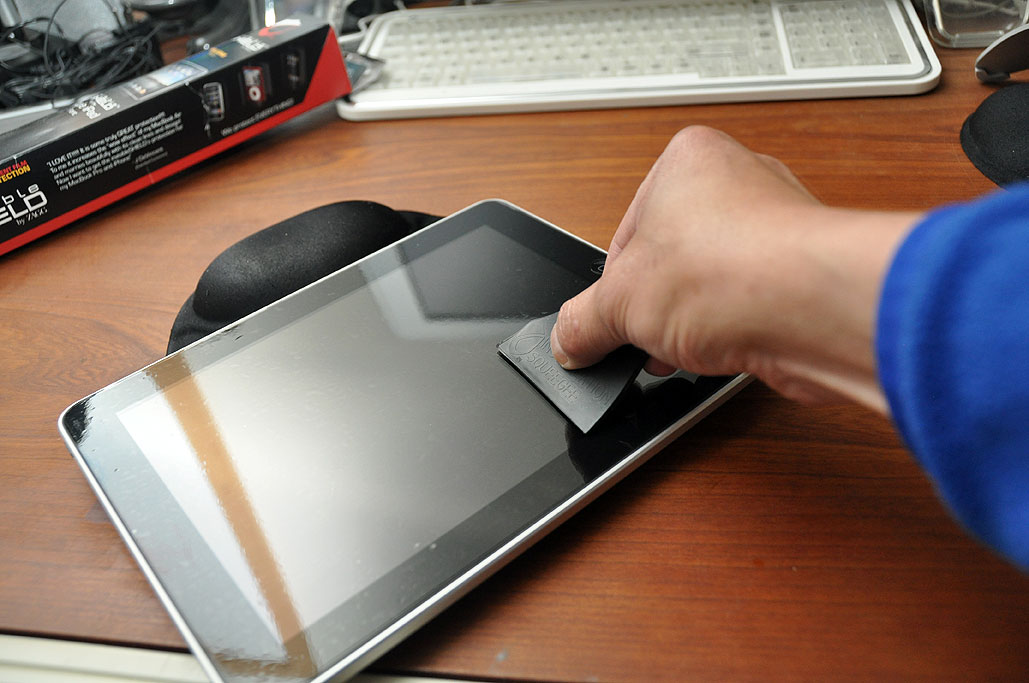
| May 12,2010- iPad InvisibleShield Install... | |
|
|
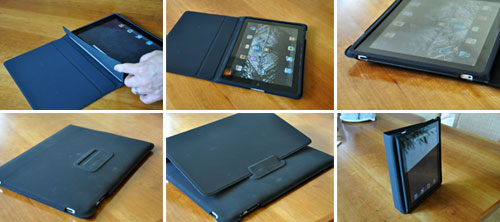
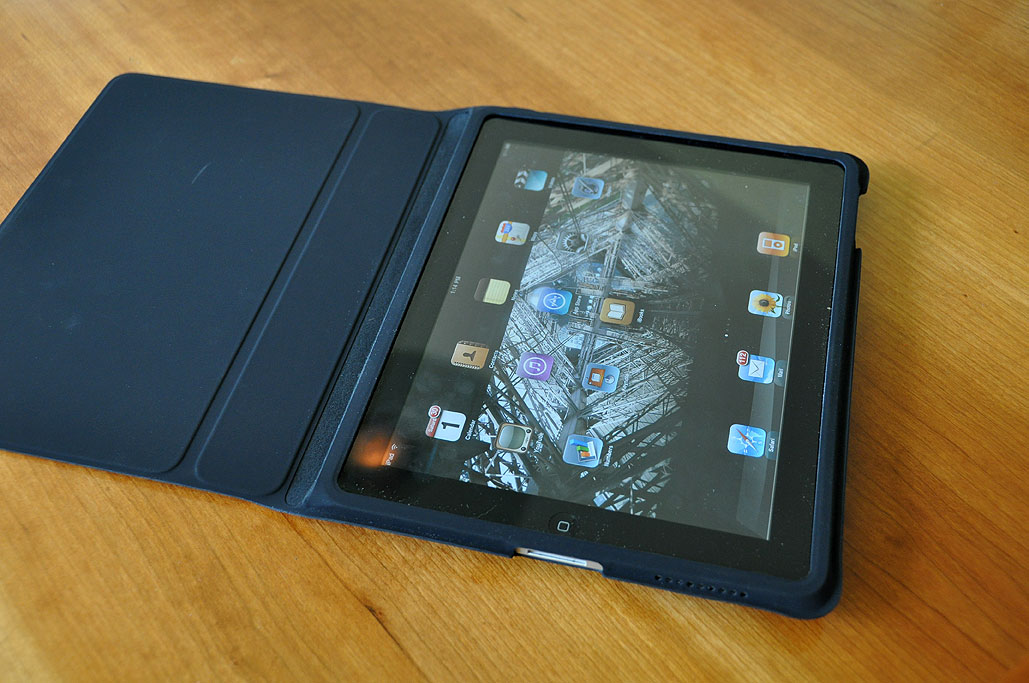
| May 11,2010- iPad Covers ... | |
|
|
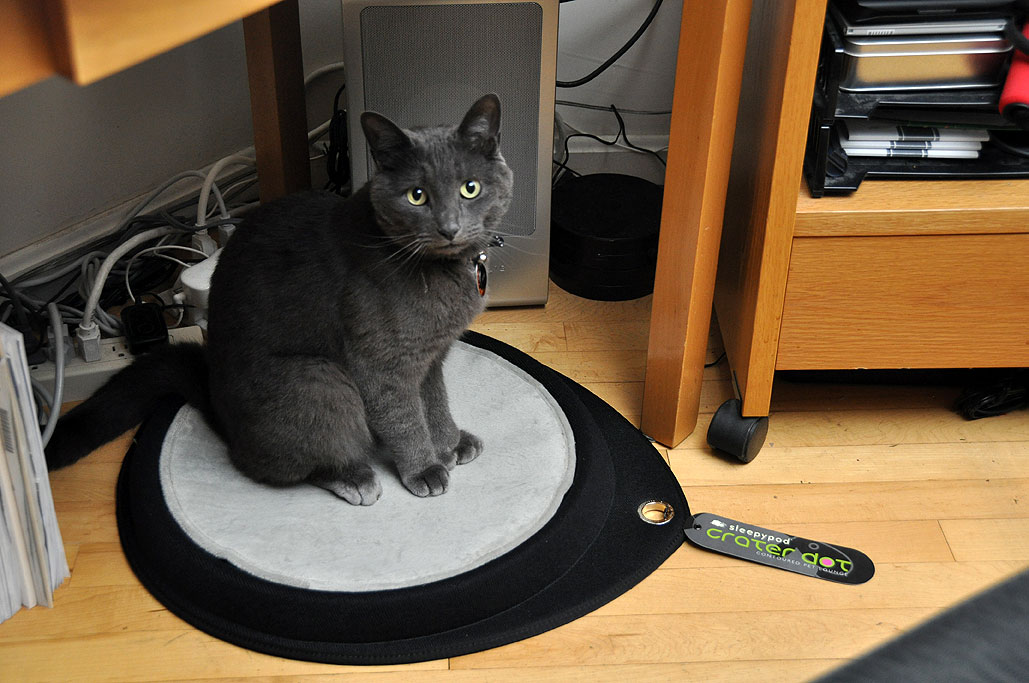
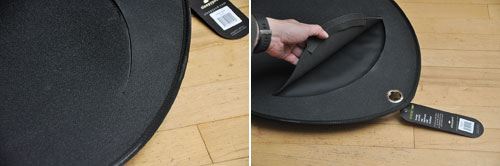
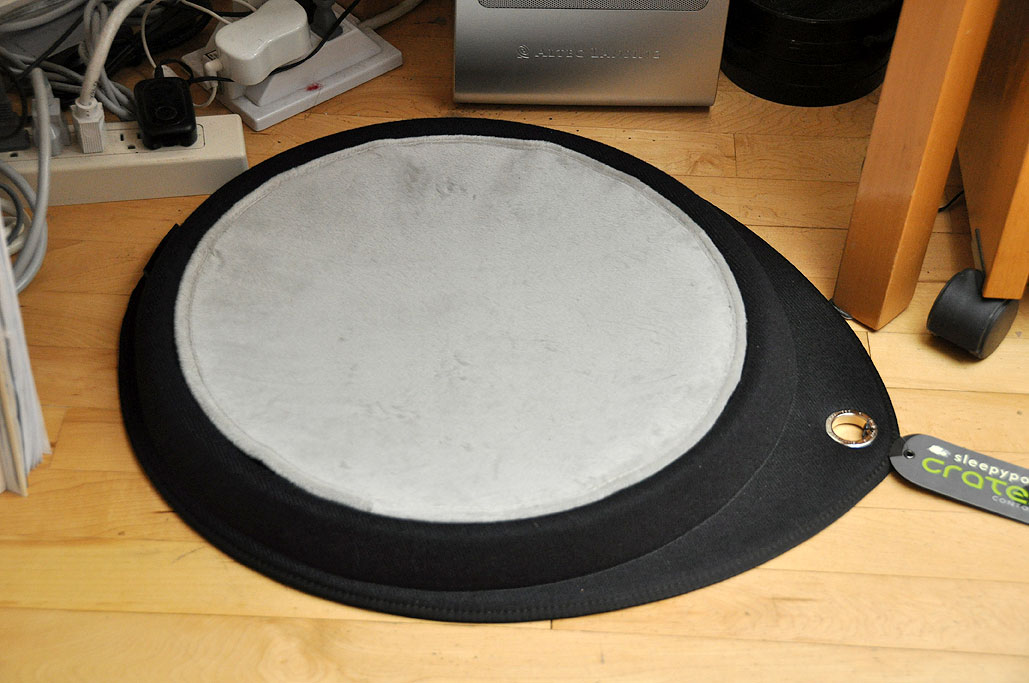
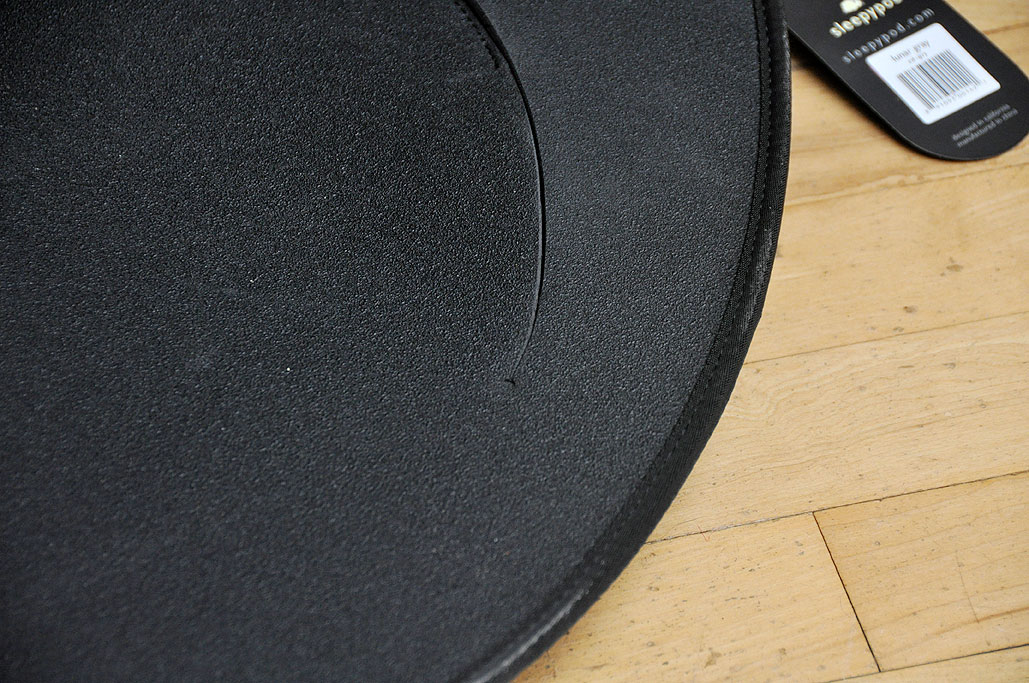
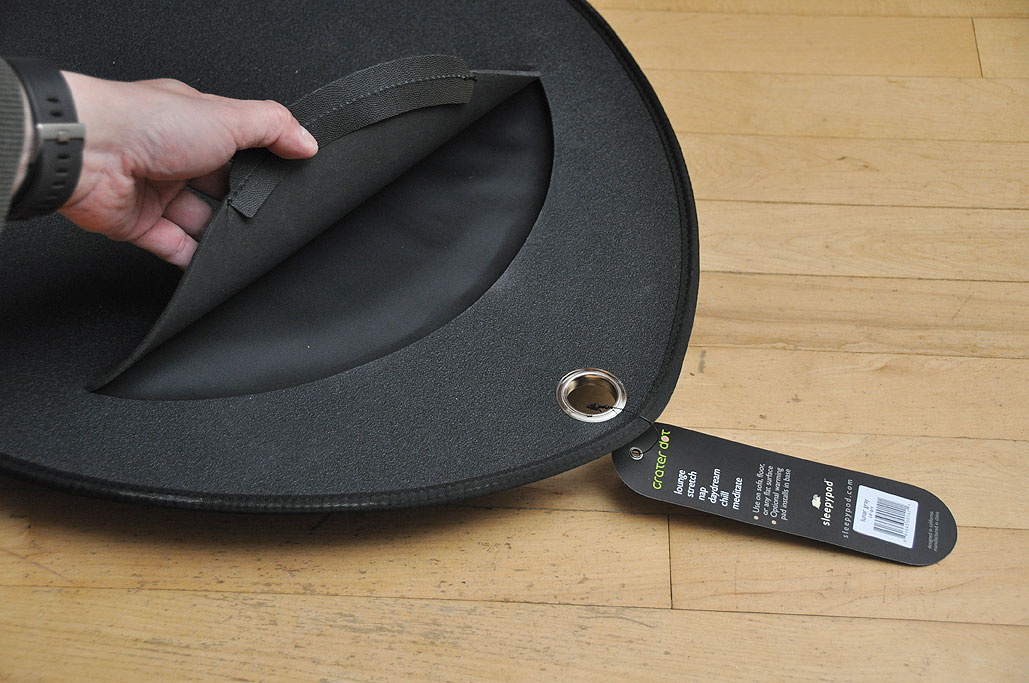
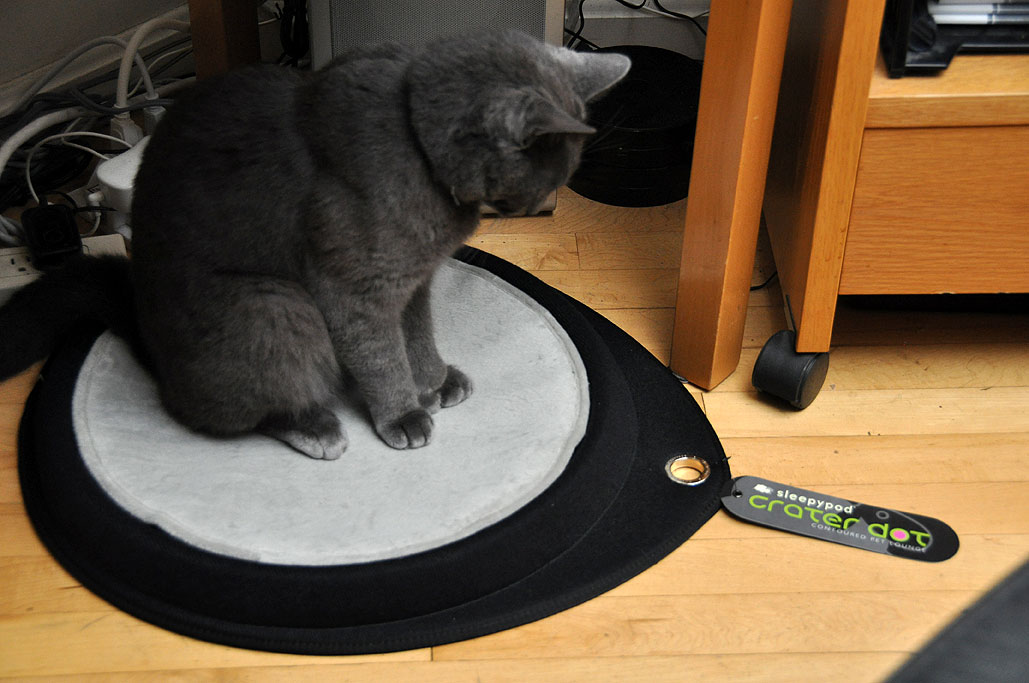
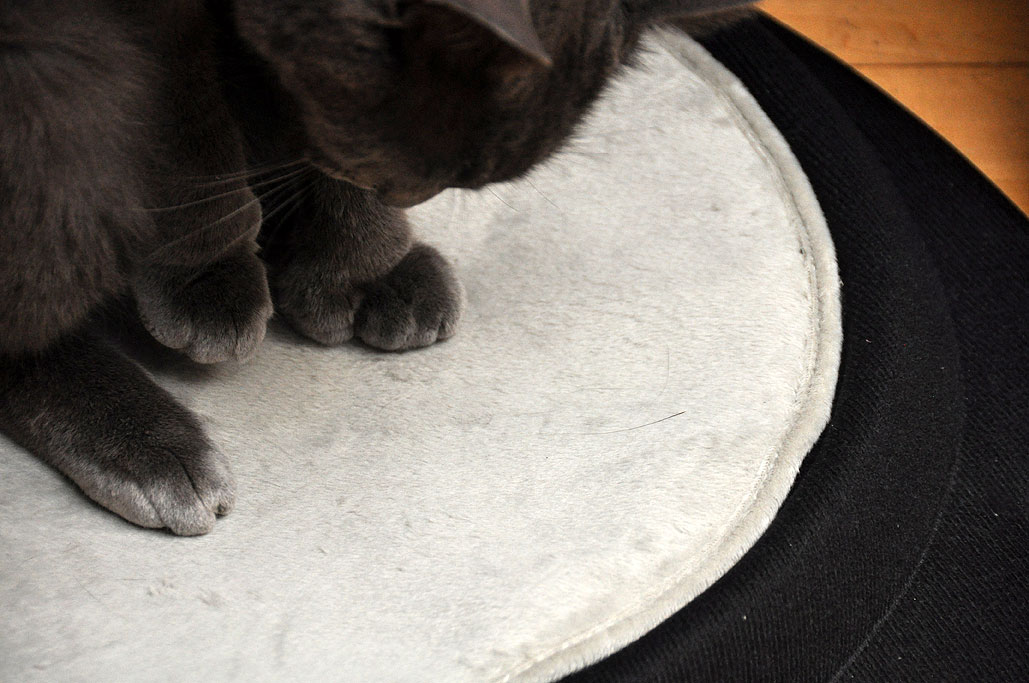
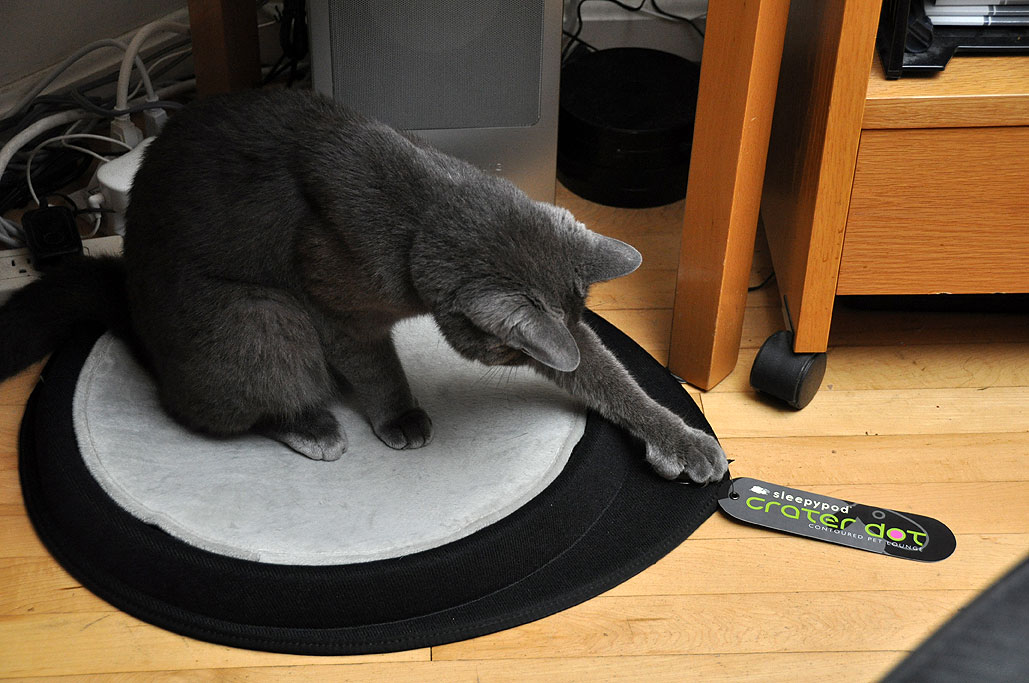
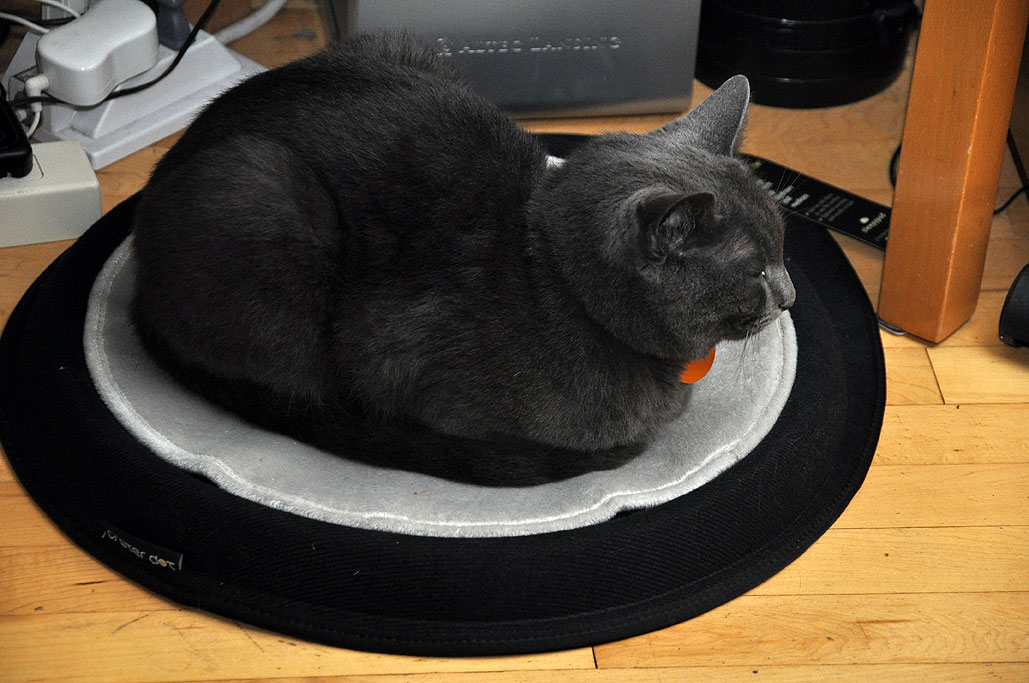
| May 10,2010- SleepyPod CraterDot ... | |
|
|
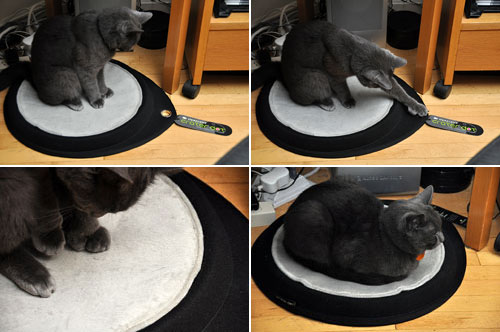
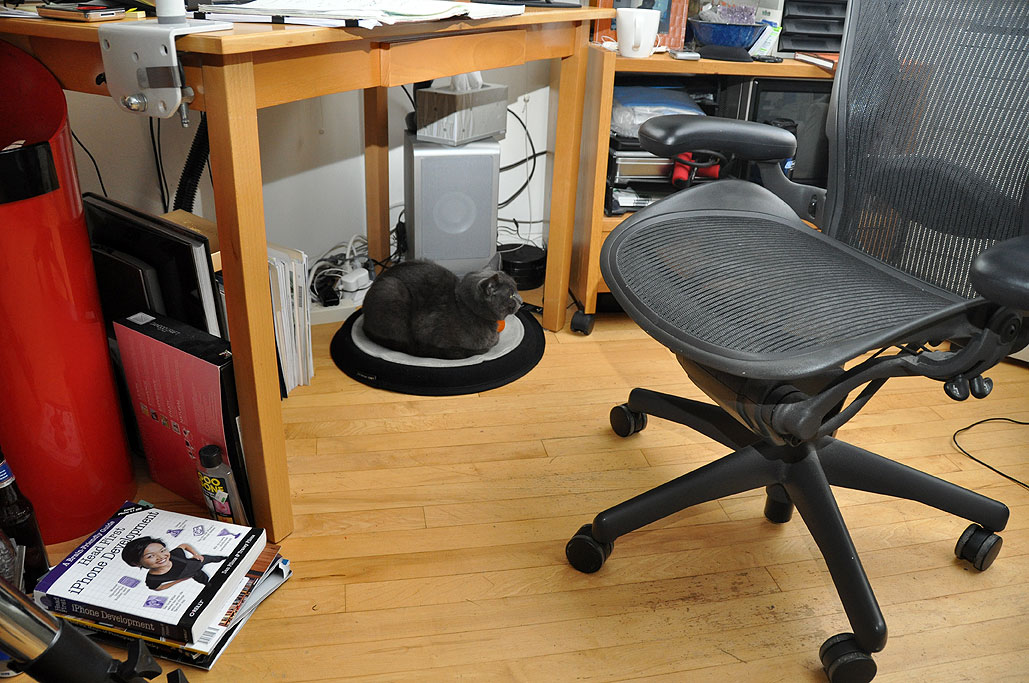
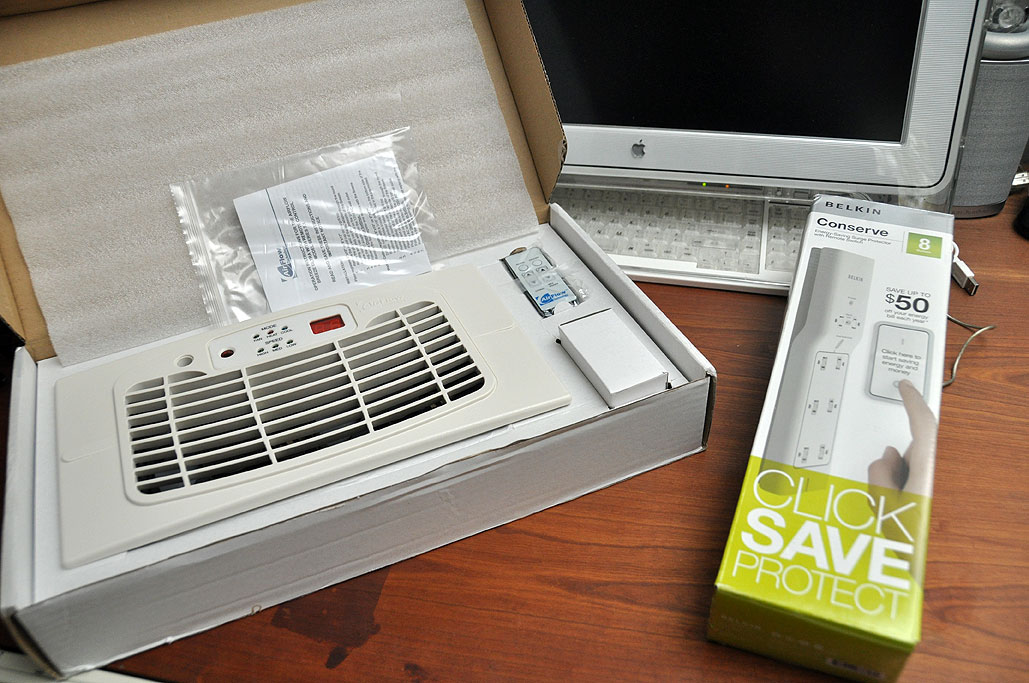
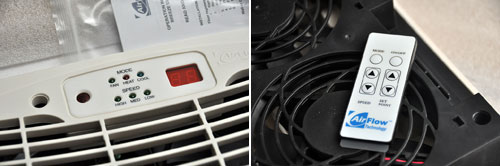
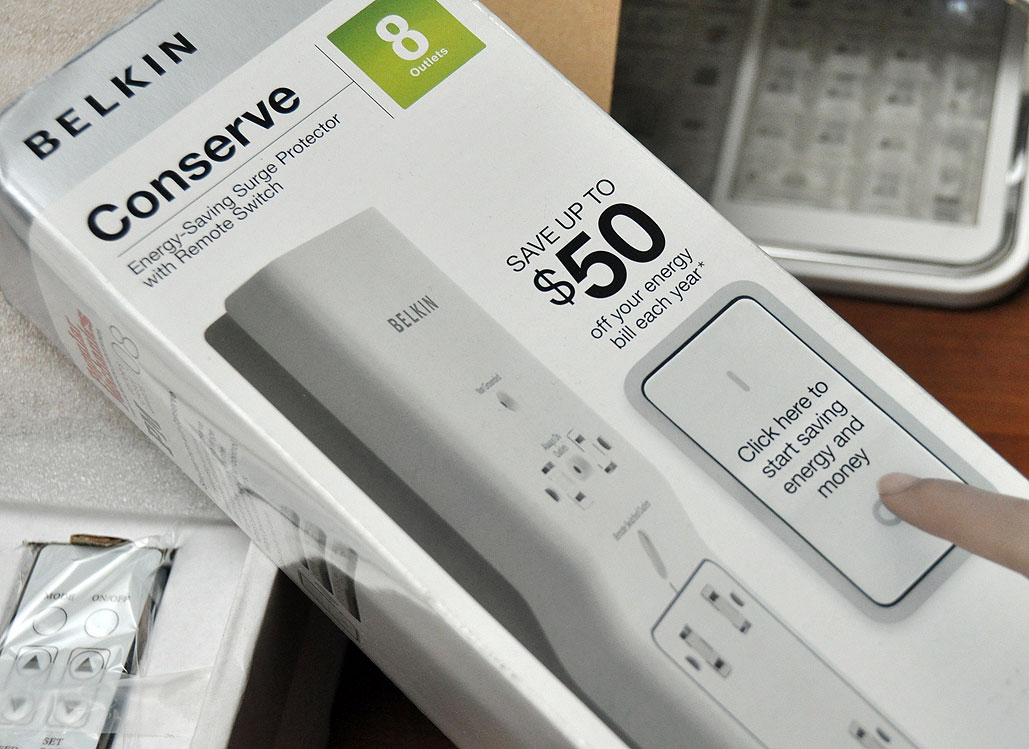
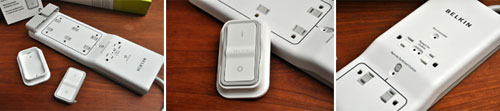
| April 28,2010- Energy Savers... | |
|
|
| April 26,2010- iPad Protection ... | |
|
|
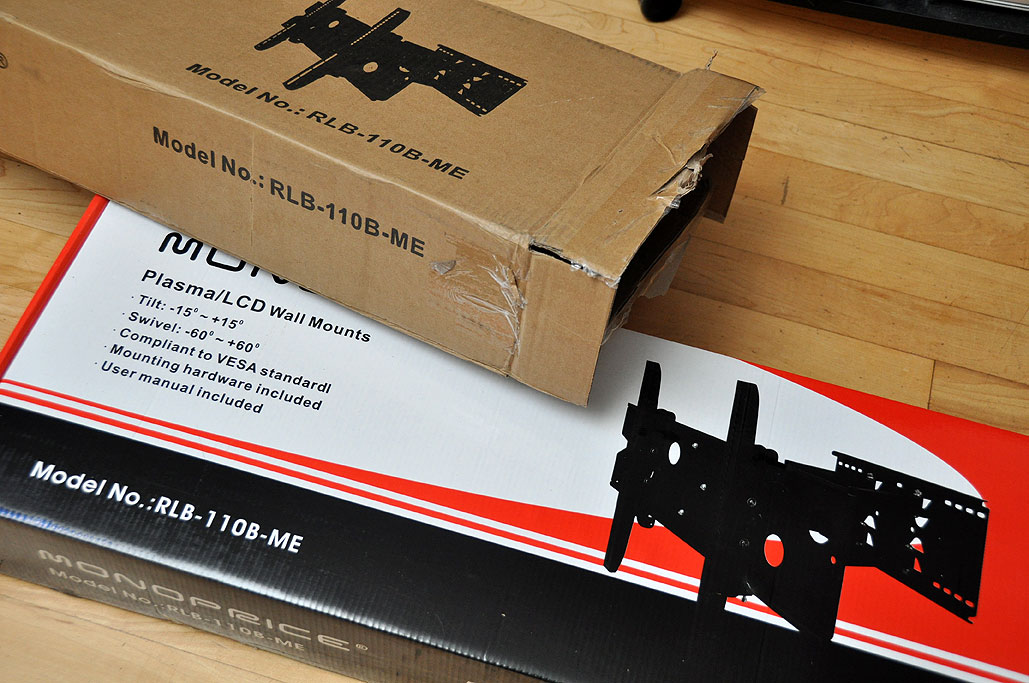
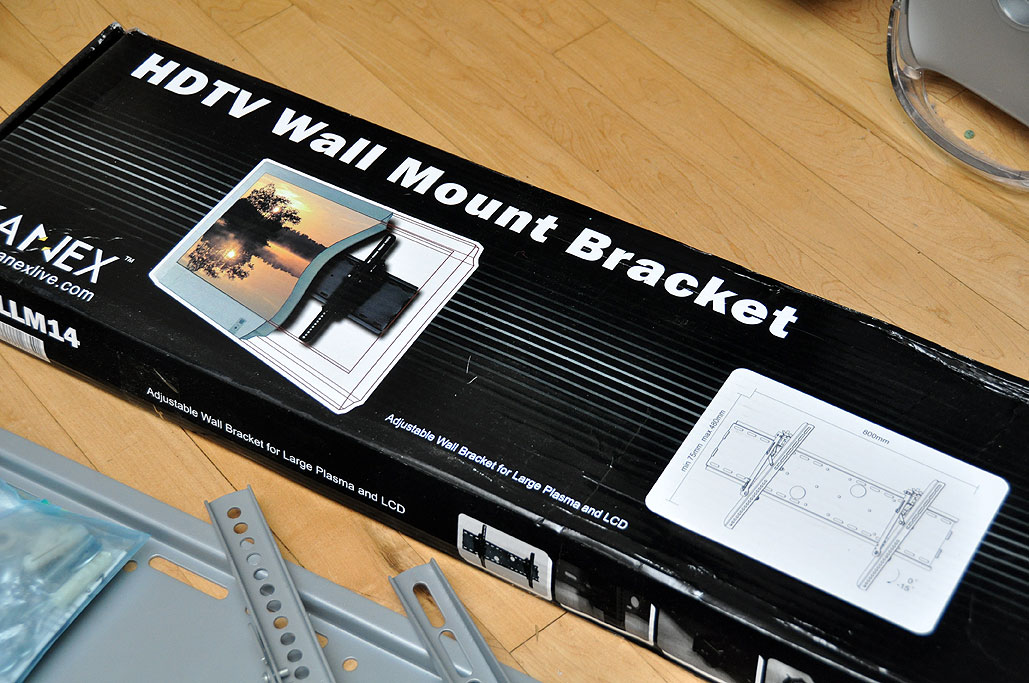
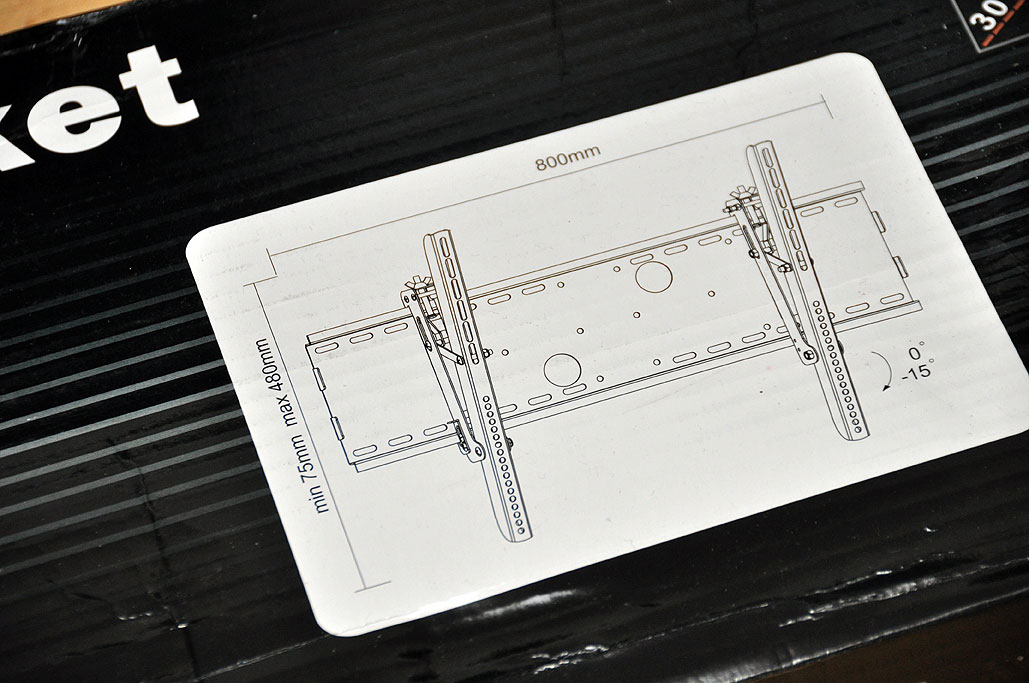
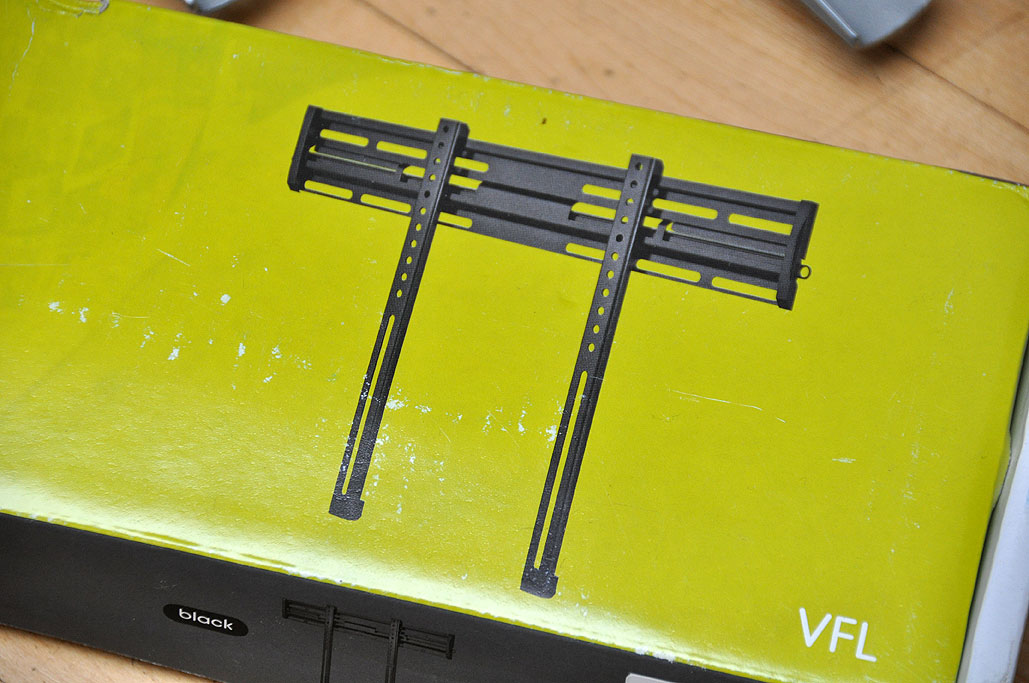
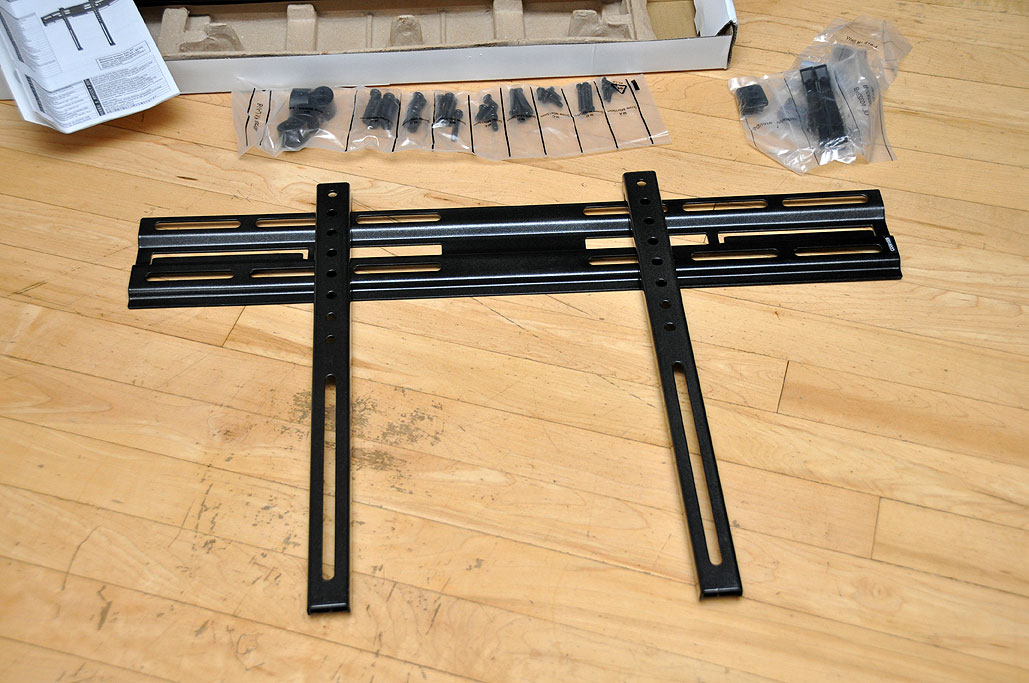
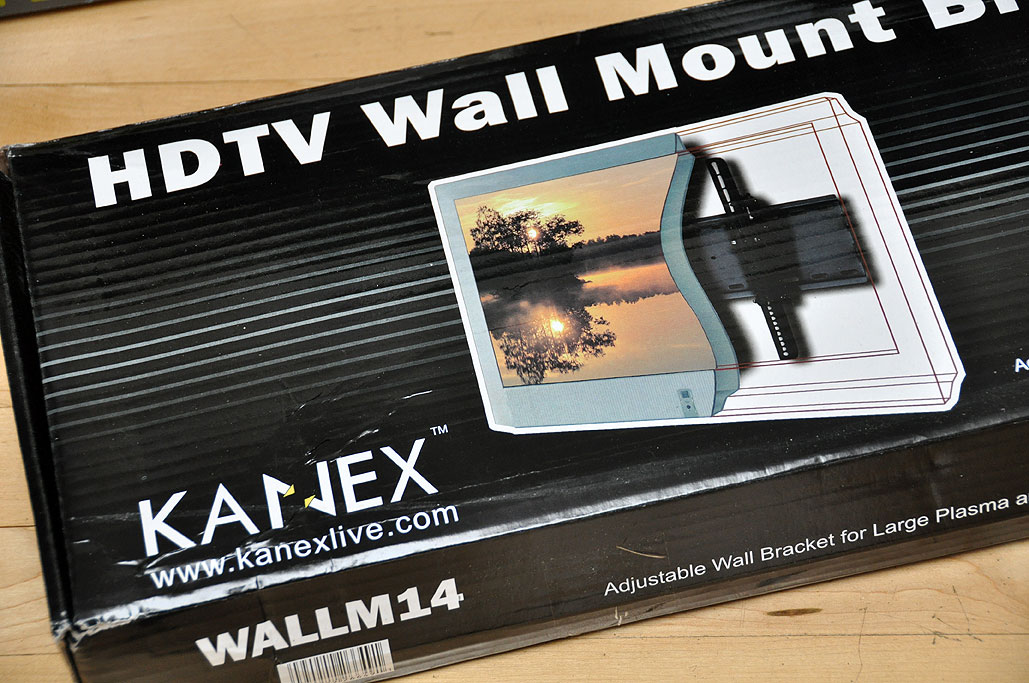
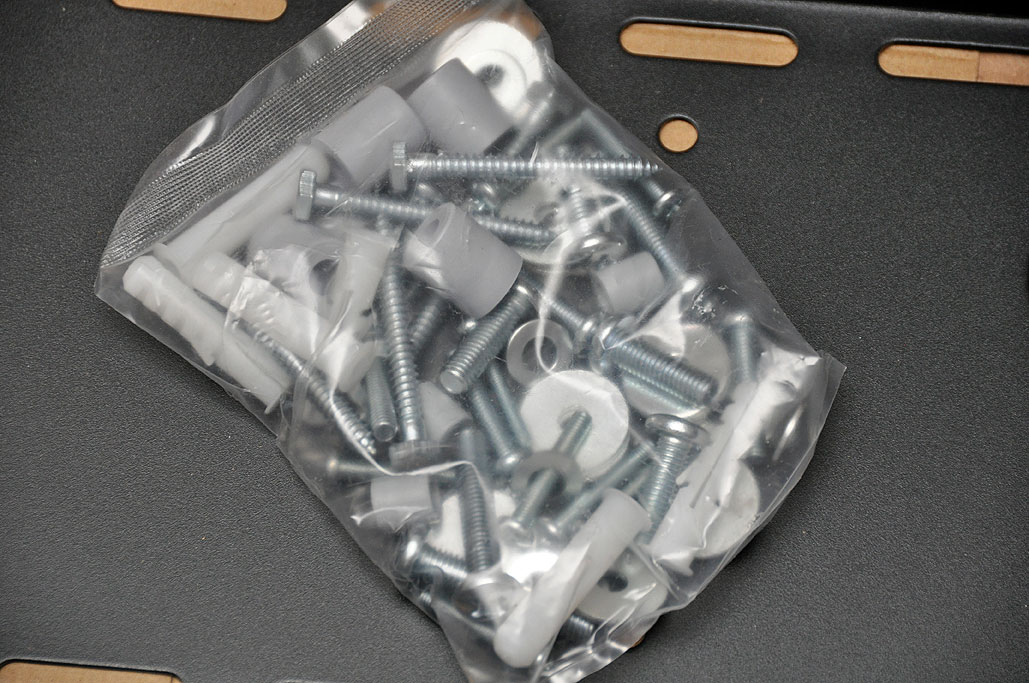
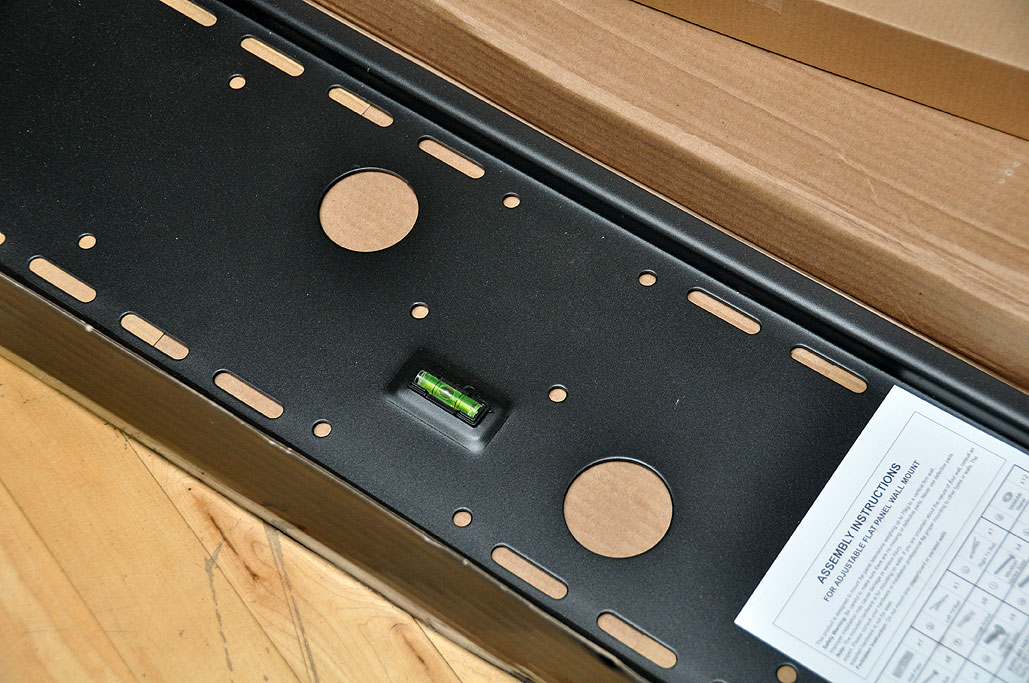
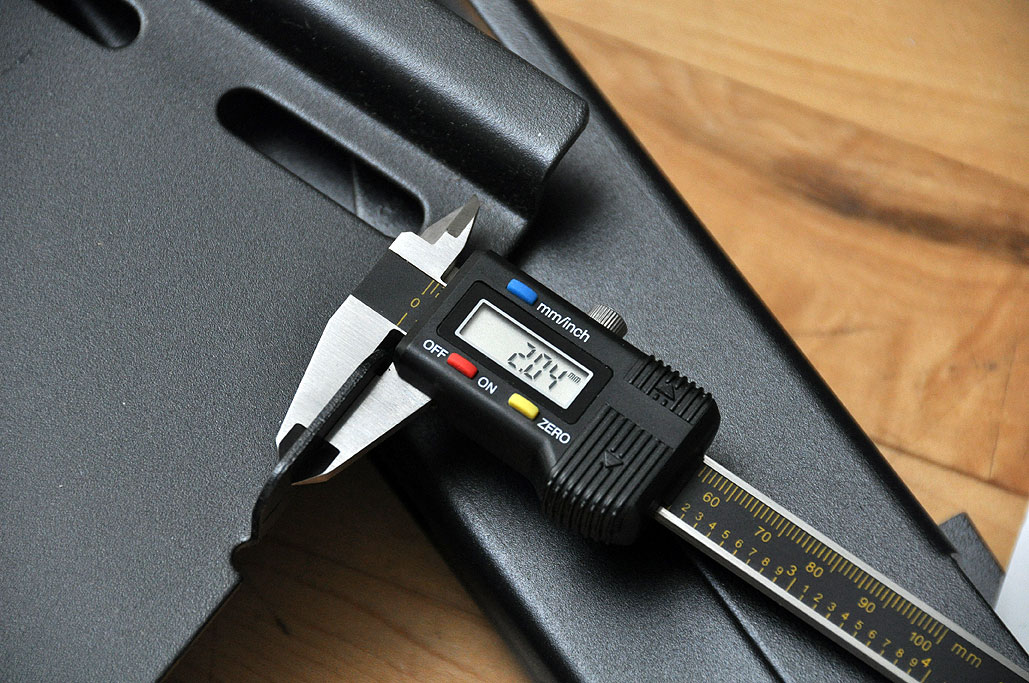
| April 21,2010- LCD TV Wall Mounts... | |
|
|
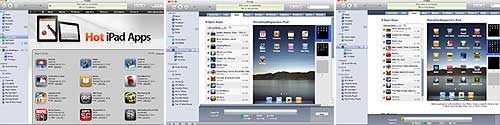
| April 7,2010- Free iPad Apps ... | |
|
|
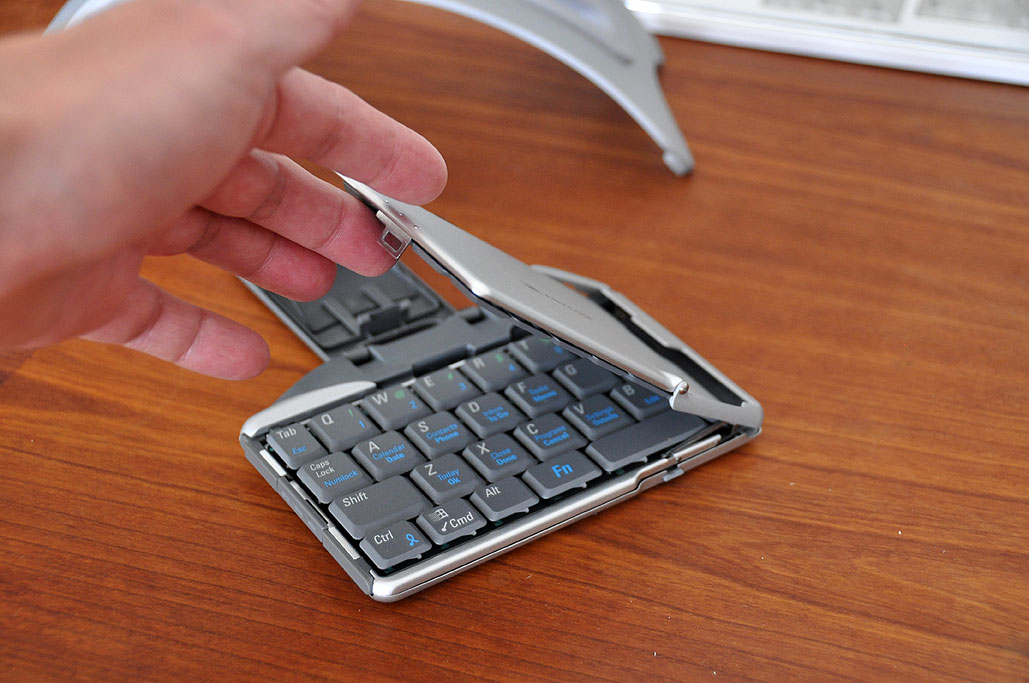
| April 6,2010- iPad accessories you already have... | |
|
|
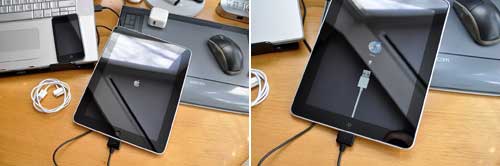
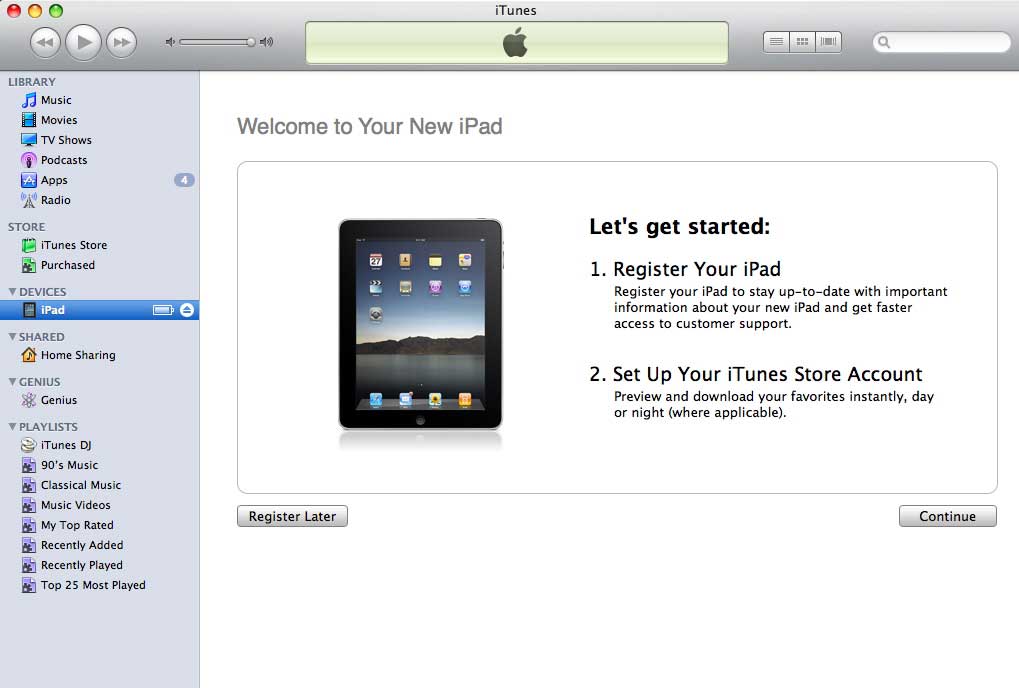
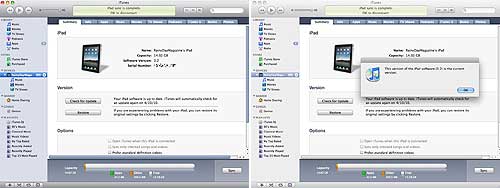
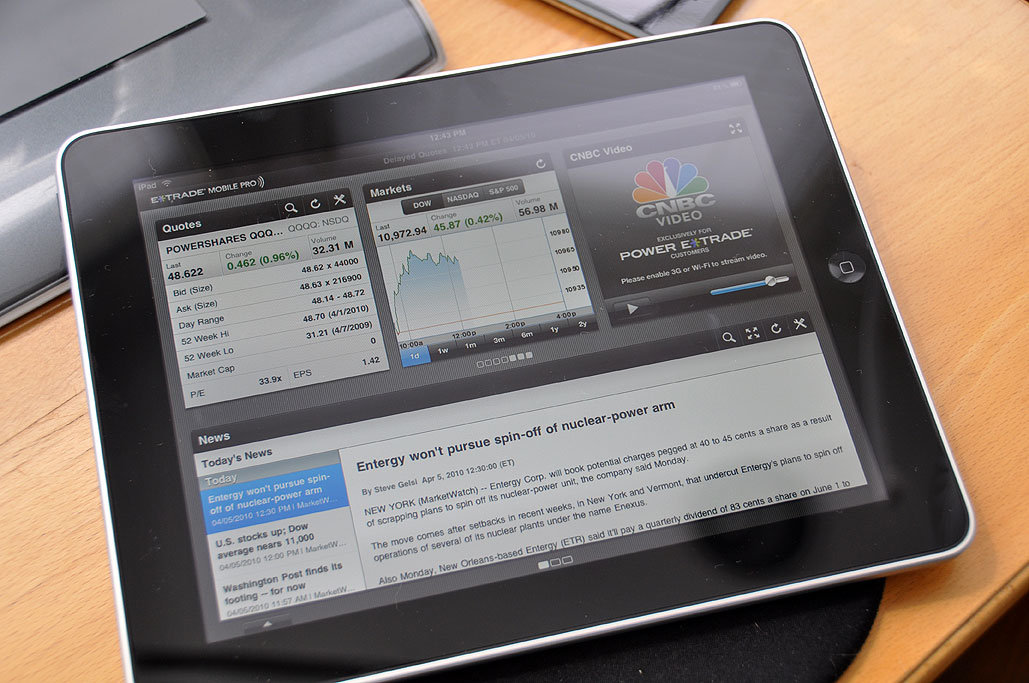
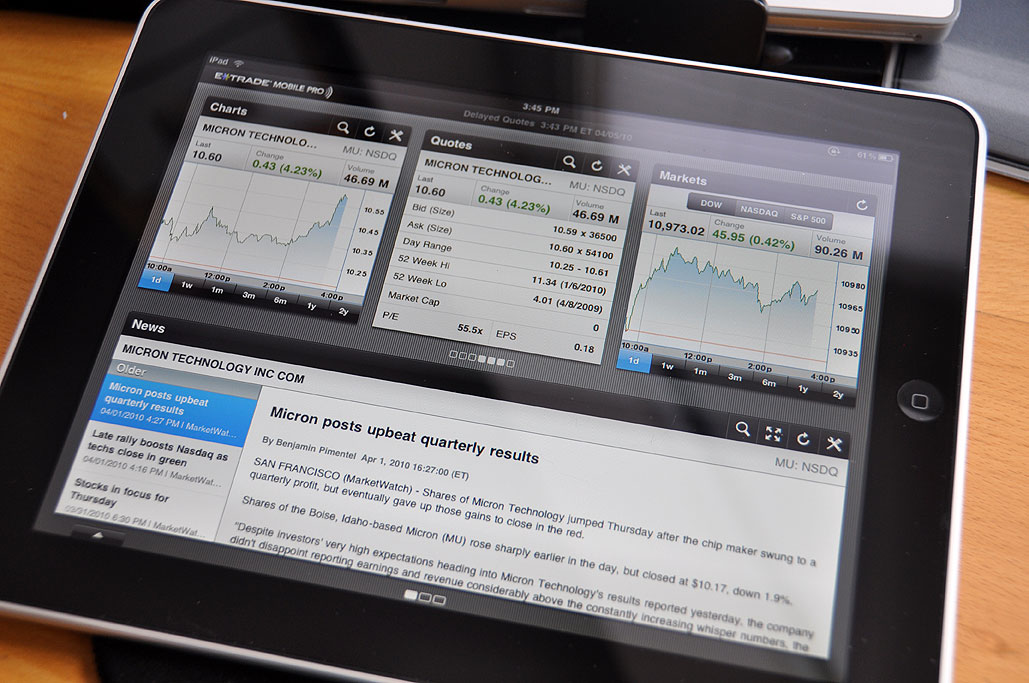
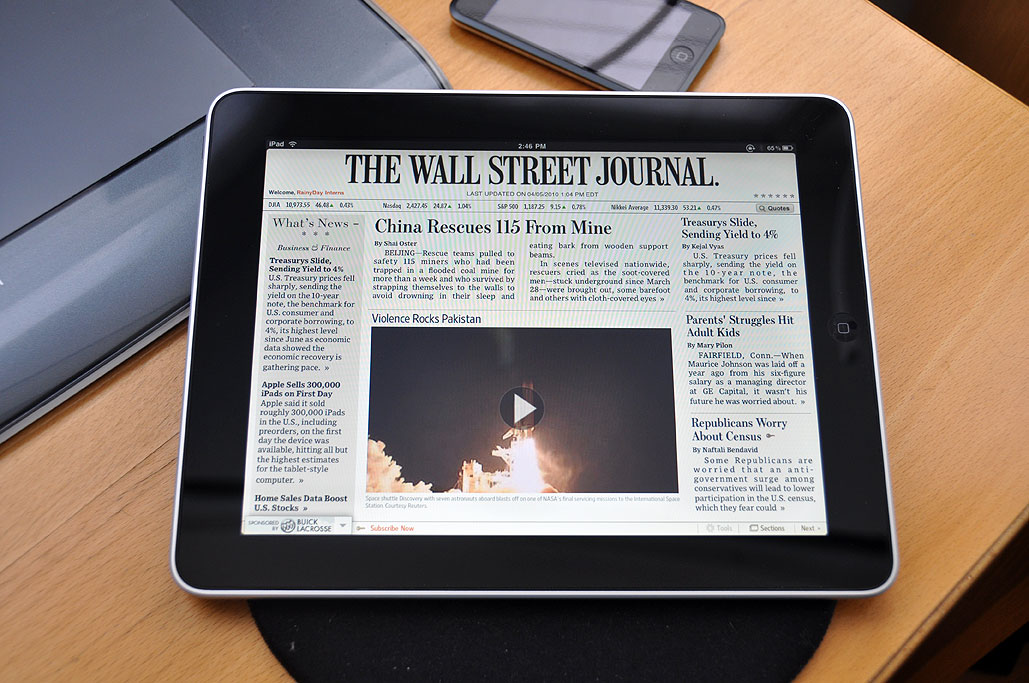
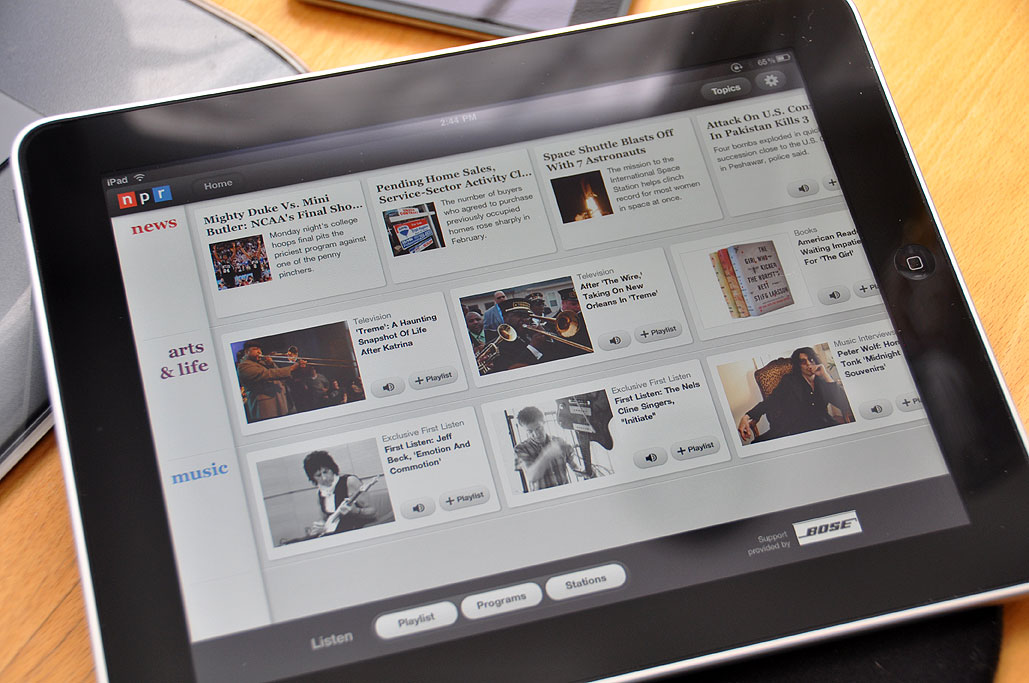
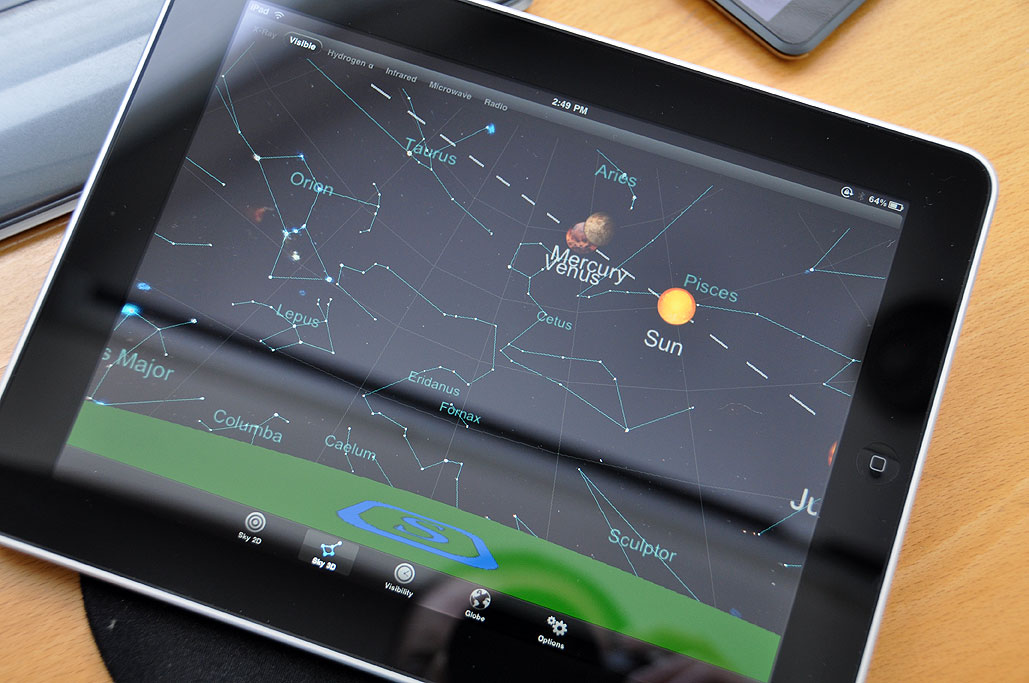
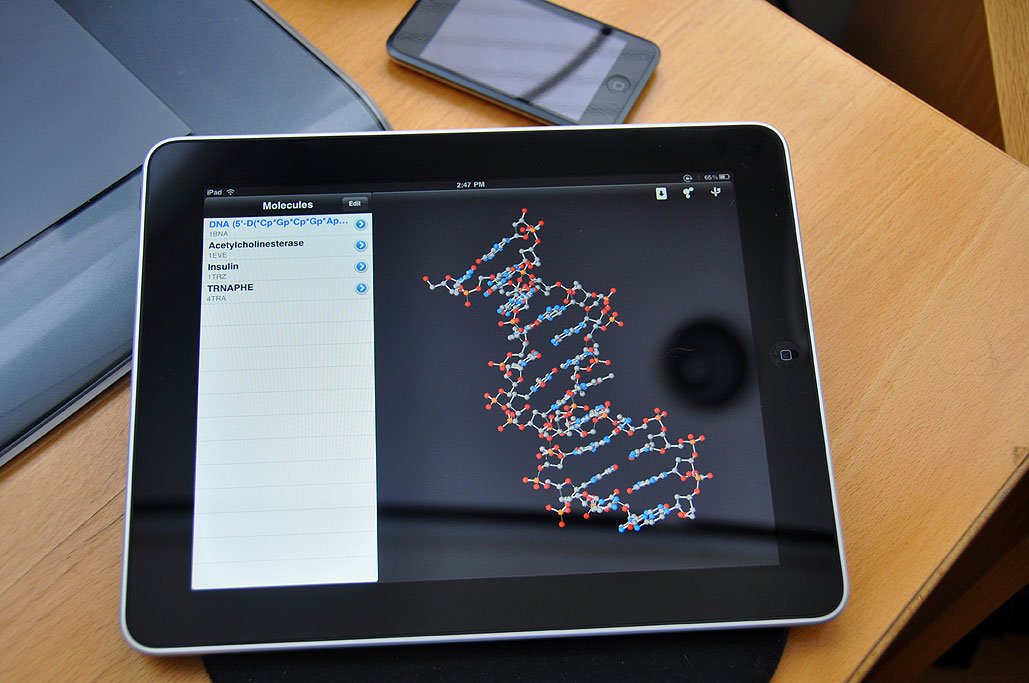
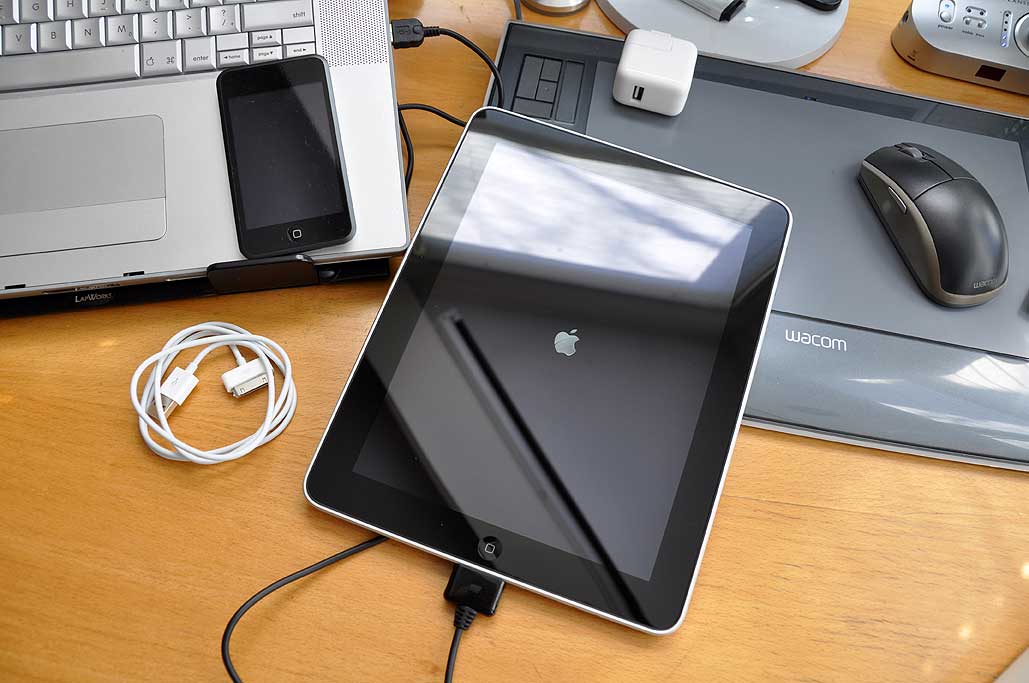
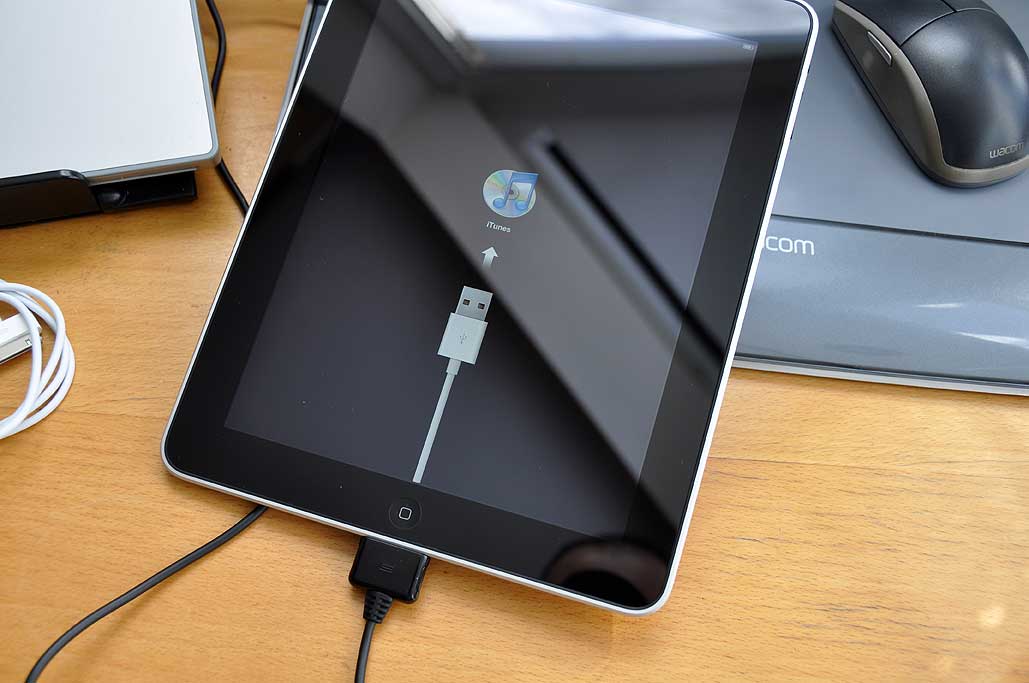
| April 5,2010- iPad FirstLook.. | |
|
|
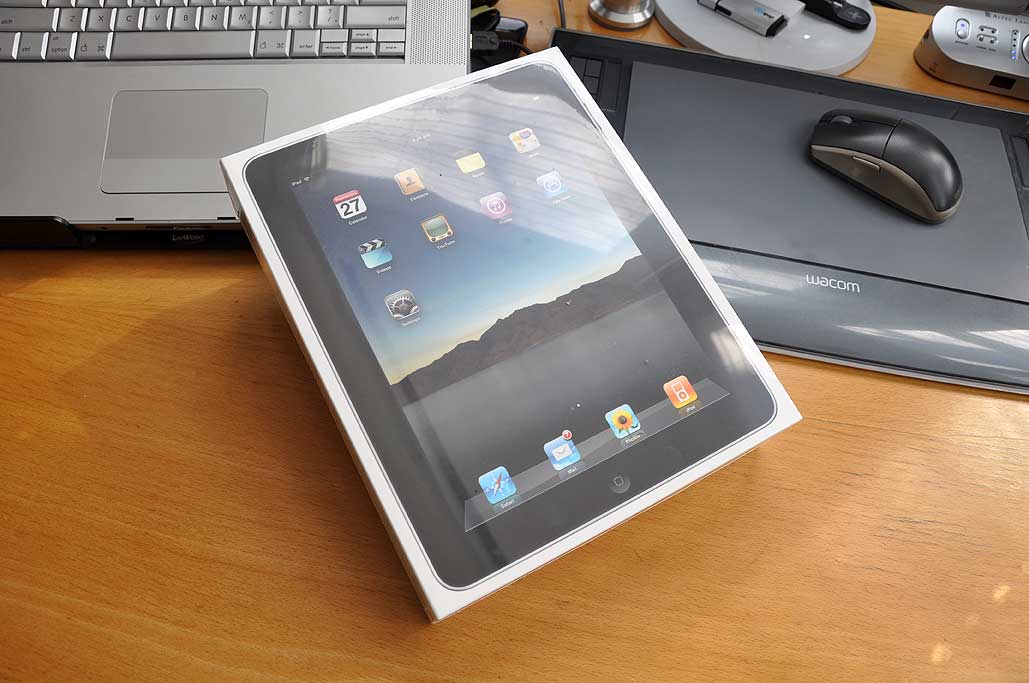
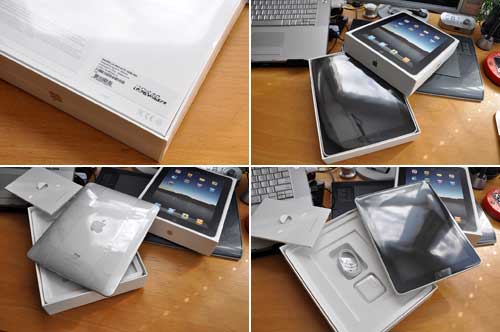
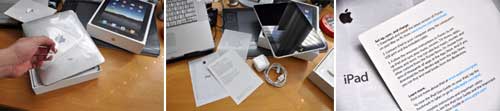
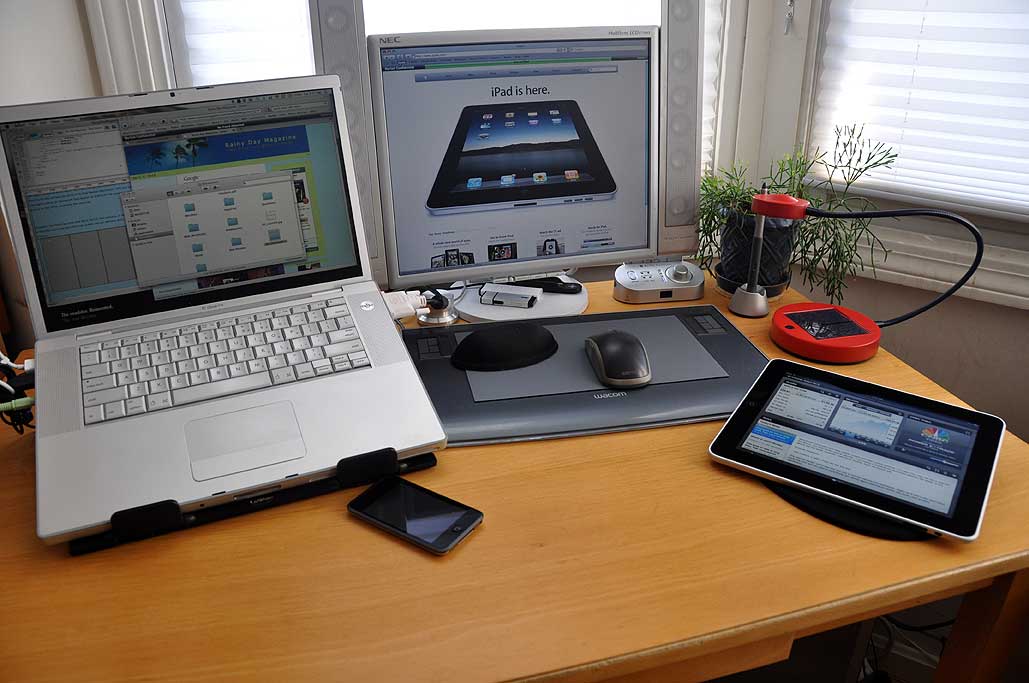
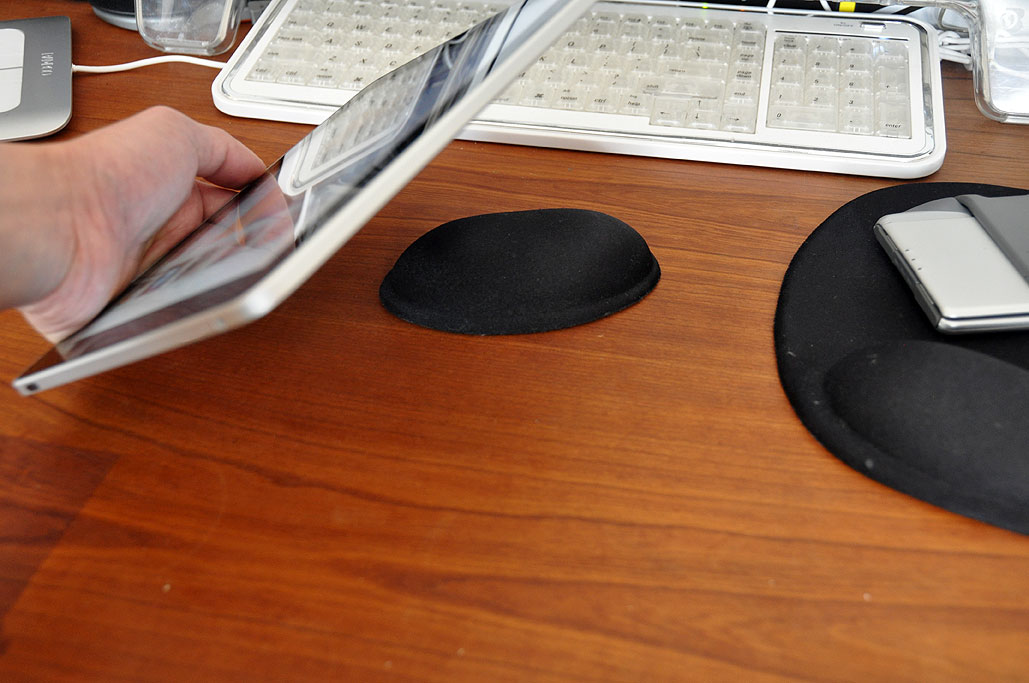
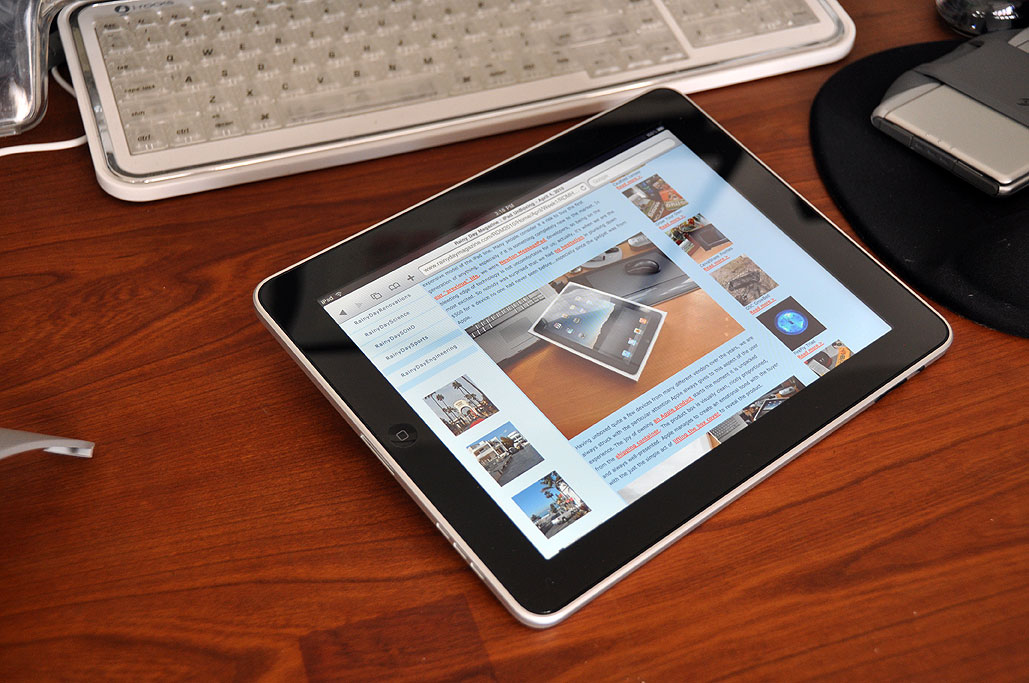
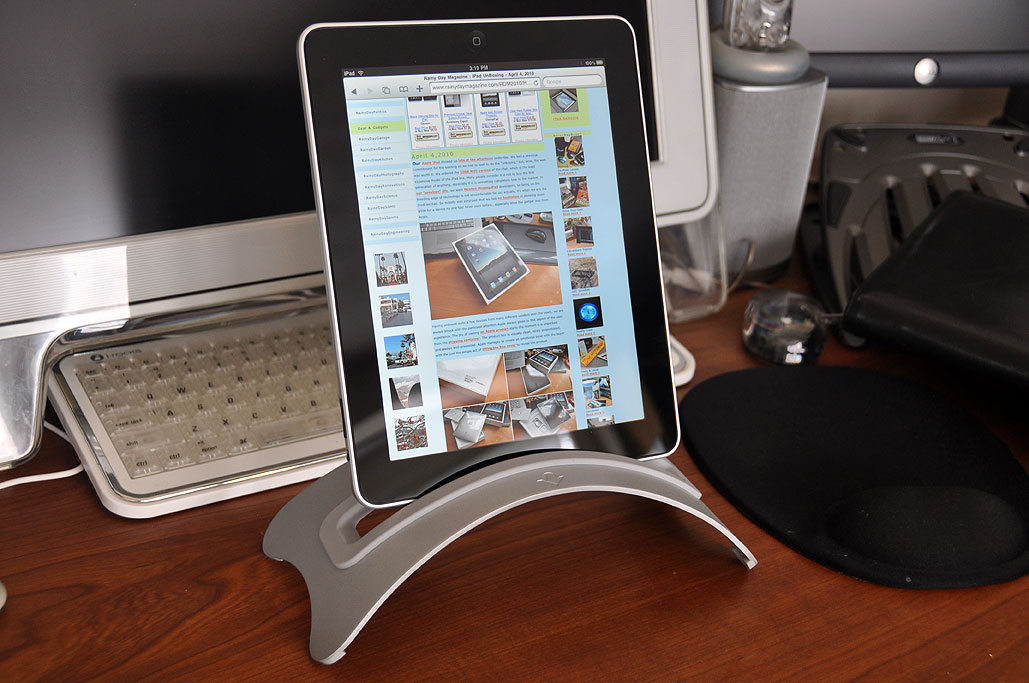
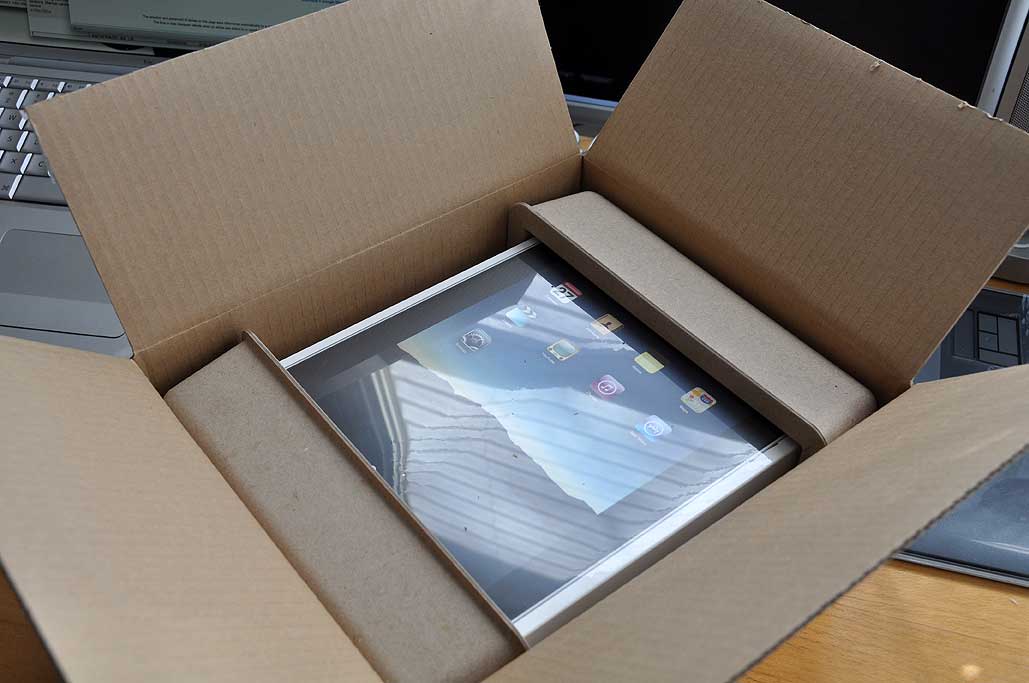
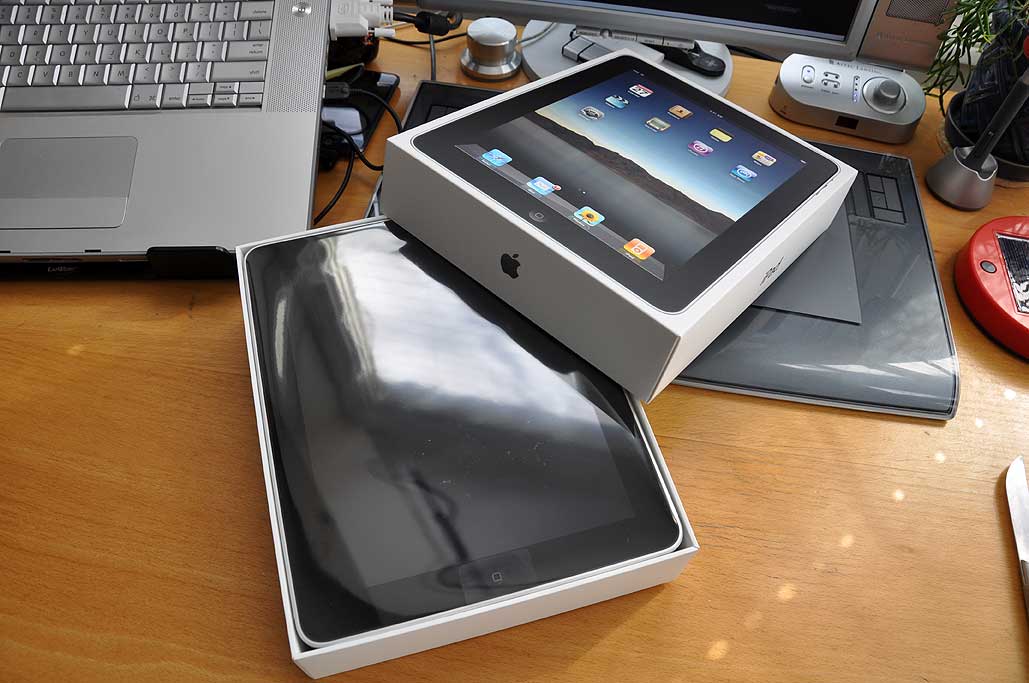
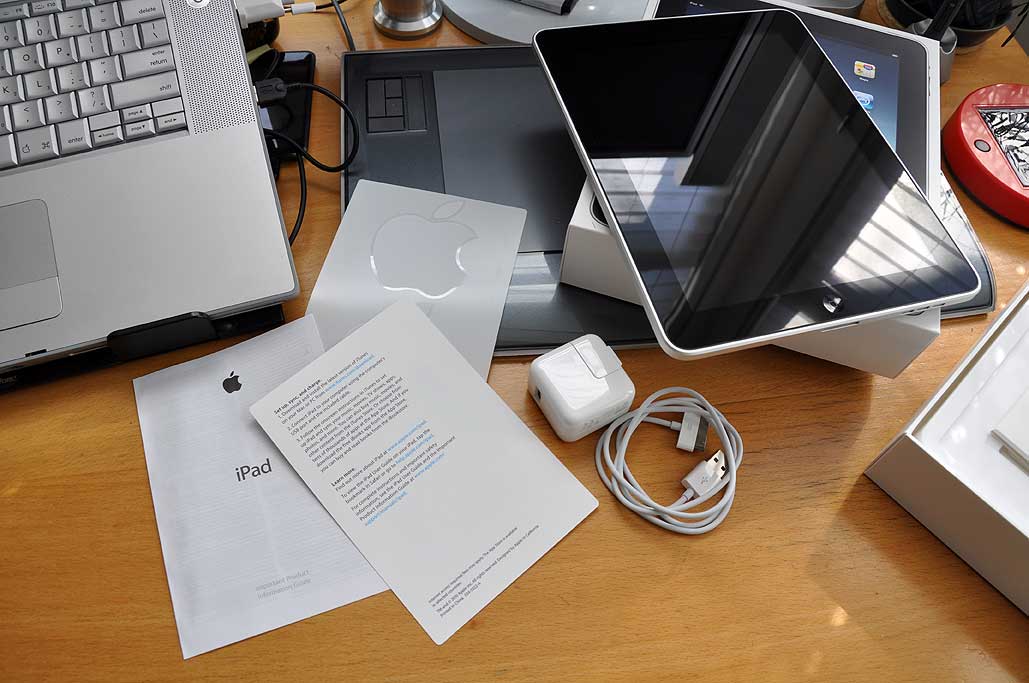
| April 4,2010- iPad Unboxing.. | |
|
|
| April 3,2010- iPad Delivery.. | |
The much anticipated iPad delivery date has arrived. We had been tracking the package's progress since March 29th, when it left Shenzhen China, and followed its progress across the world to its final Boston destination. UPS last updated its delivery status as having left East Boston at 8:09 A.M. We expected to see the truck pull up to the office sometime this morning...
However, the morning came and went, but no iPad delivery. It wasn't until much later in the afternoon that the UPS truck pulled into our delivery dock. Ours was his last iPad delivery of the day.[Permalink] -iPad Delivery
|


| February 16,2010 |
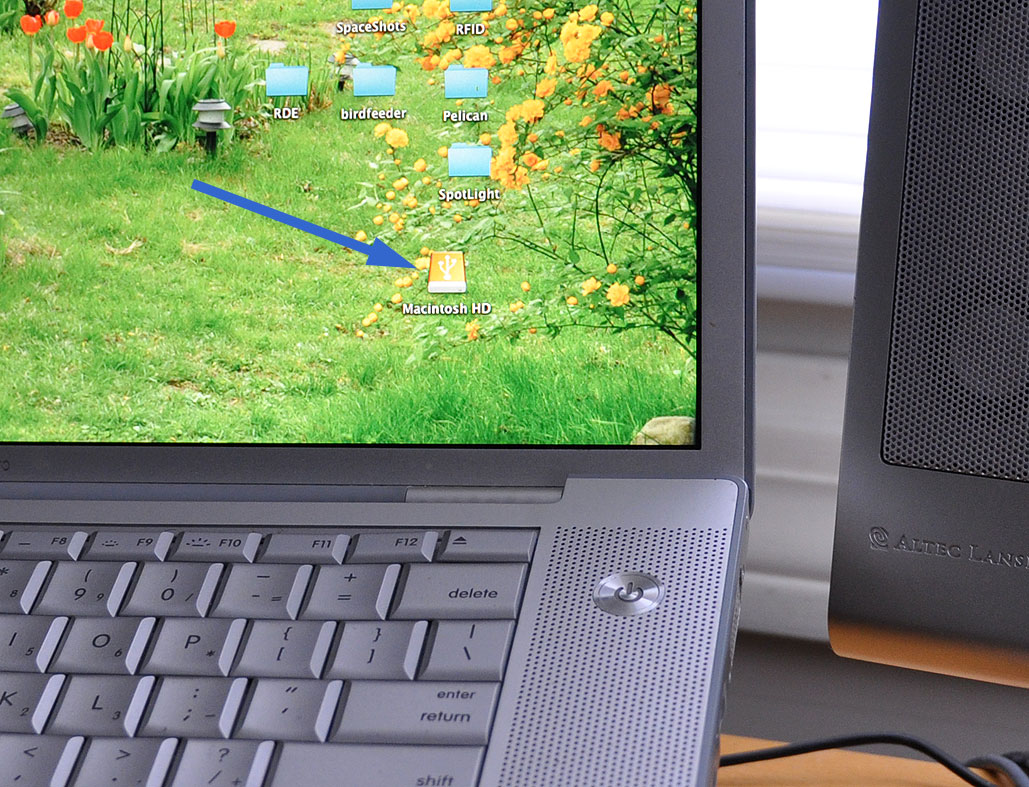
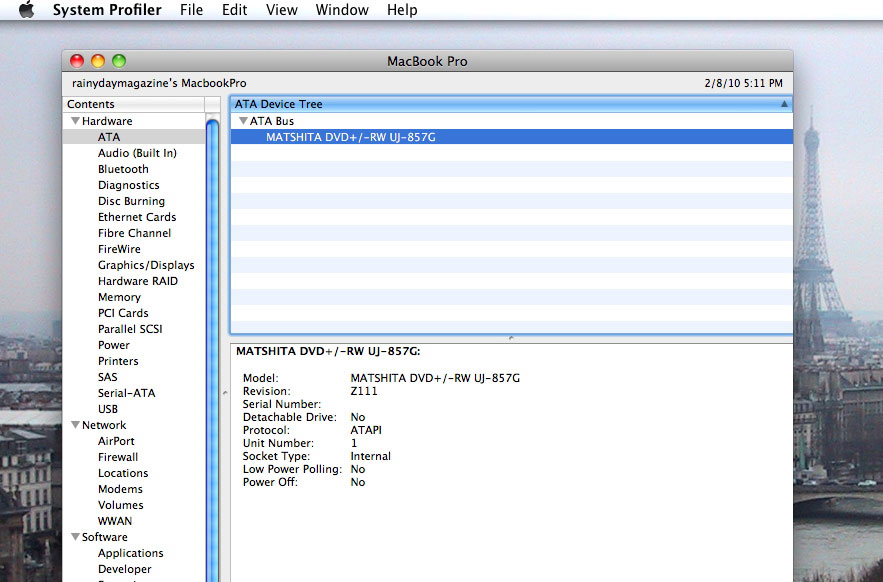
Our MacBook Pro drive upgrade project hit a snag when we tried to boot the system. The first thing we did was to confirm whether there was a problem with our laptop. Without changing anything, we were able to successfully boot from the original drive housed in the USB case. This told us the problem must be with the SSD.
We had previously confirmed that the SSD had a system which could boot the laptop, we reconfirmed it by putting back into the USB case and using it as a boot drive. Next we reformatted the SSD drive, cloned the system, and tried our tests again. Same results: not recognized when installed internally, functional when booting externally via USB.
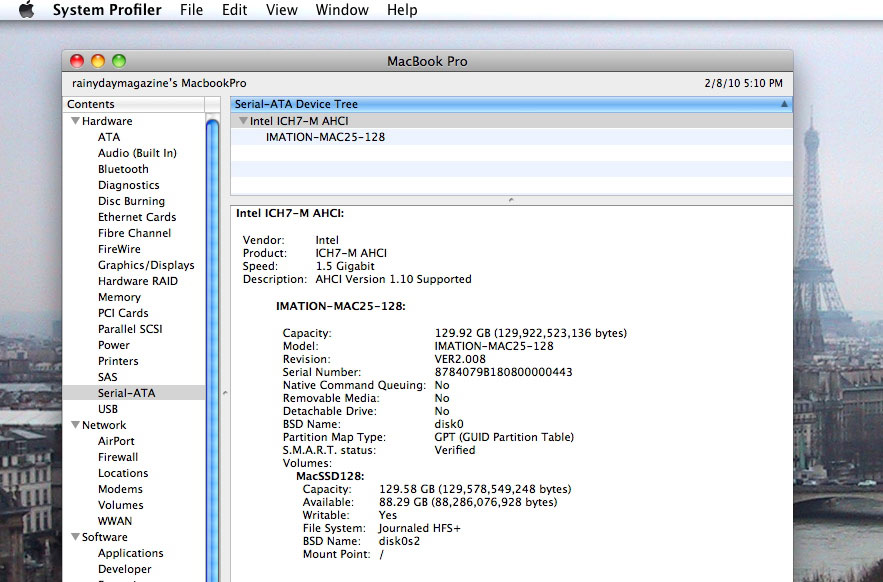
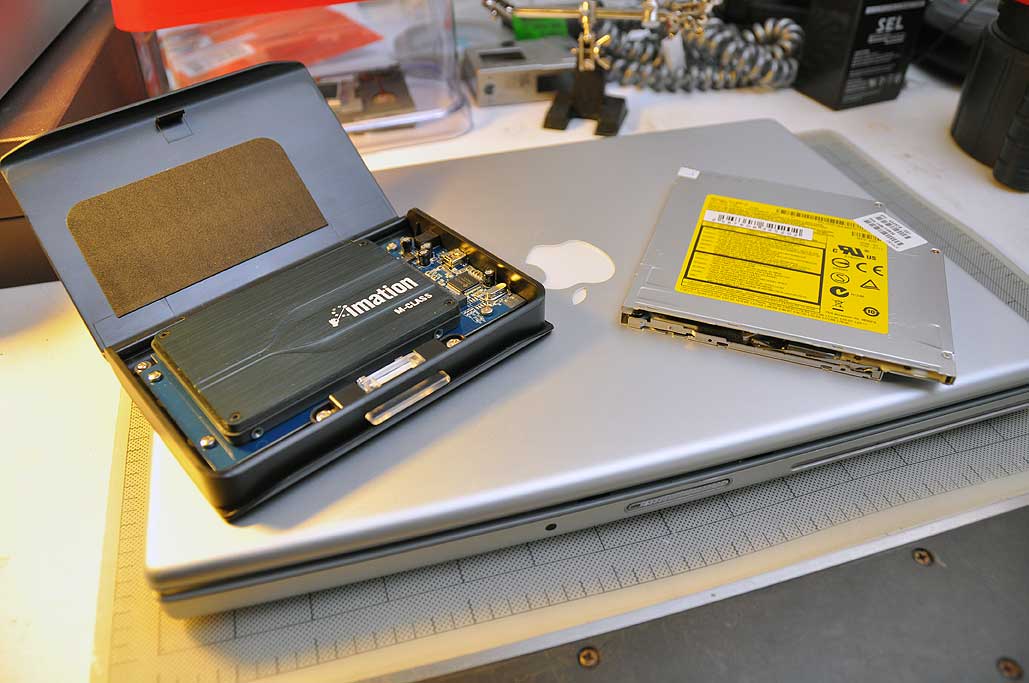
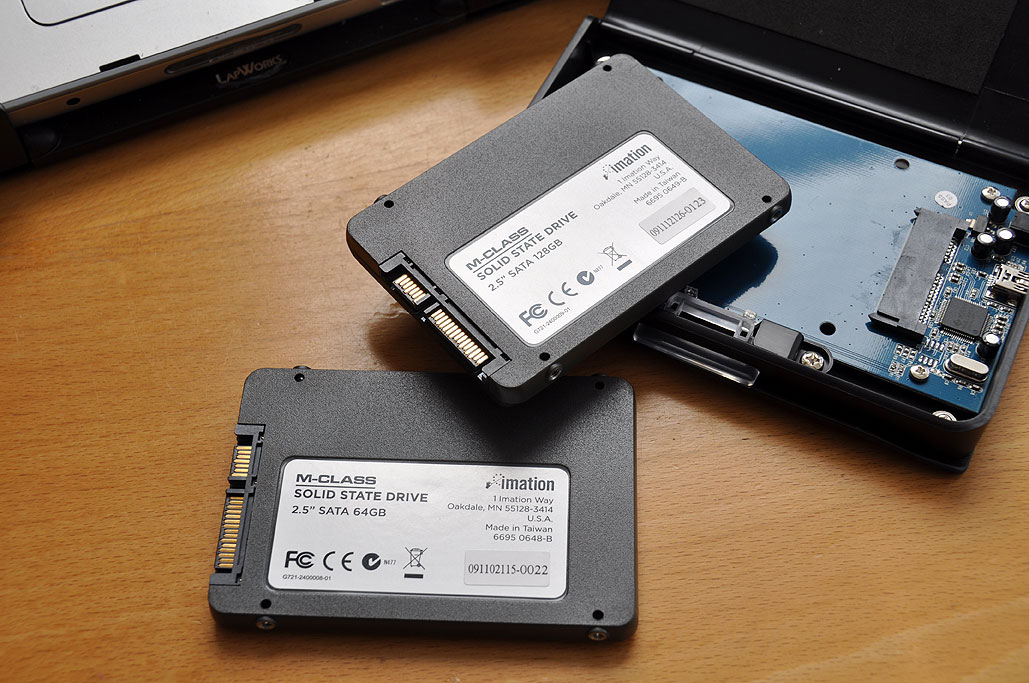
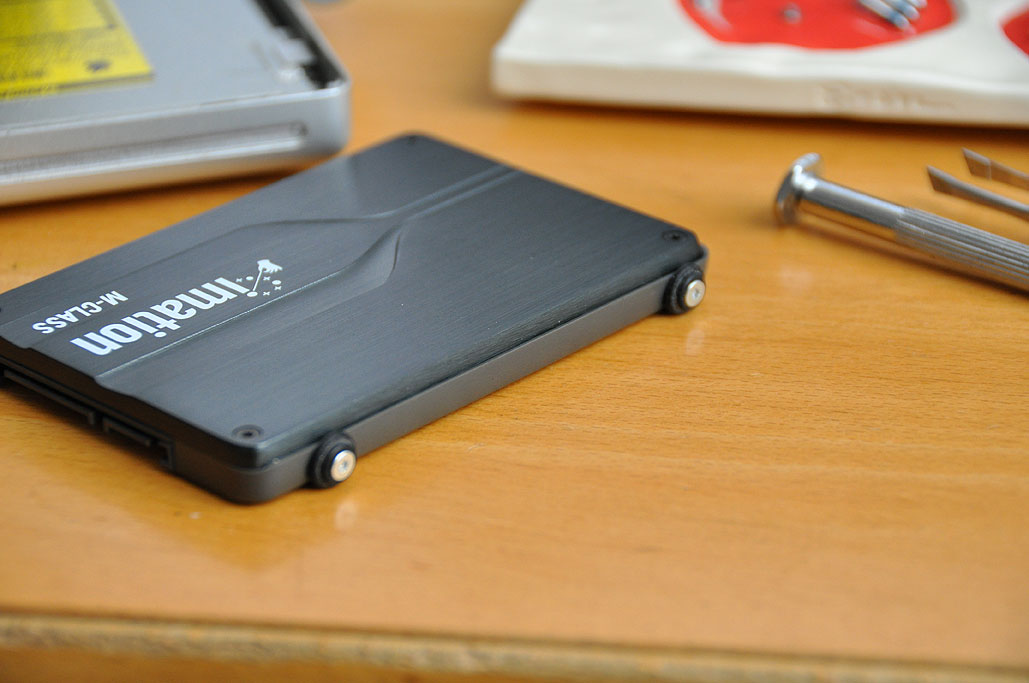
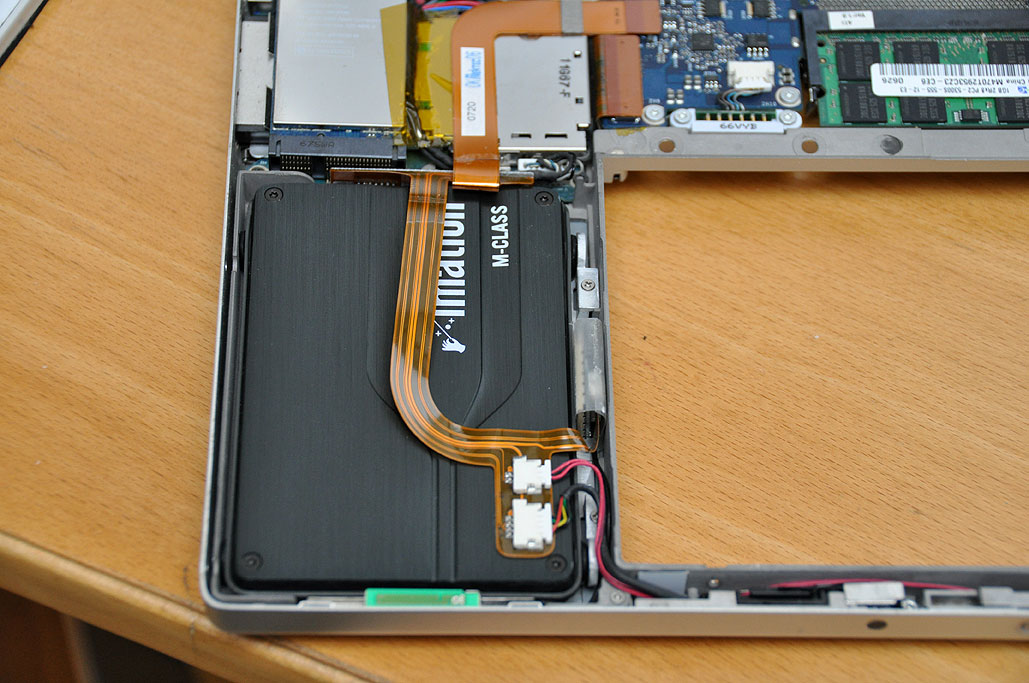
At this point, we were stumped. So we contacted imation tech support, described the problem, and waited. A few days later, the folks at imation confirmed that there was a problem with the firmware and provided a patch. If you have a problem with getting your imation SSD to work with your MacBook Pro, don't bang your head...contact imation tech support and they'll get you straightened out fast. imation SSDs come in a few sizes (32GB, 64GB, 128GB). We started this project with the 64GB unit, but got a 128GB unit from imation with the upgraded firmware for this second installation. We'll go back and upgrade the 64GB unit with the new firmware at some point.
The new 128GB imation SSD with the new firmwared worked on the first try. Once we were satisfied that things were working, we closed up the laptop, replaced all the screws, and put the drives through some standard r/w tests. The SSD drive worked perfectly. The best part was after an hour of intense drive-intensive activities, the left side of the machine was still cool. This was not the case with a spinning hard drive.
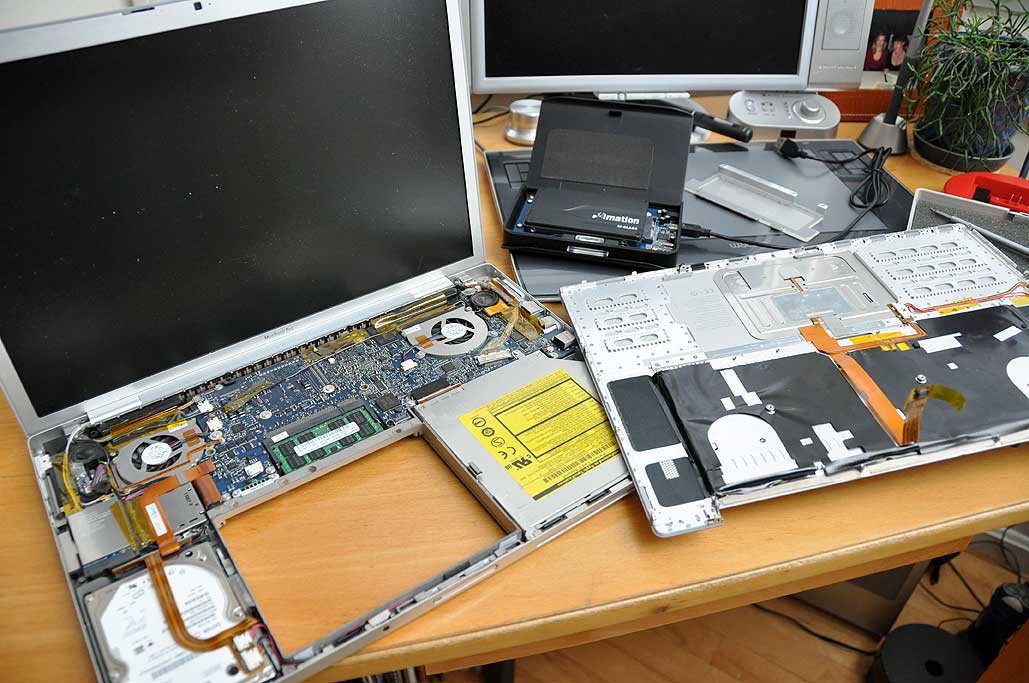
The SuperDrive we got from PowerBookMedic was an OEM part so it had no compatibility problems. The SuperDrive played every kind of discs we tried, was able to write to all of the CDs and DVDs we had available, and passing all of the post-installation tests. At some point, Apple will make a version of OSX which will be incompatible with our MBP, but until then we'll happily use it until it completely falls apart. However, now that our MacBook Pro has a super rugged 128GB of solid-state storage and a brand new SuperDrive, we expect it to be our mobile workhorse for many more years. [Permalink] -MacBook Pro Post-Installation Test |
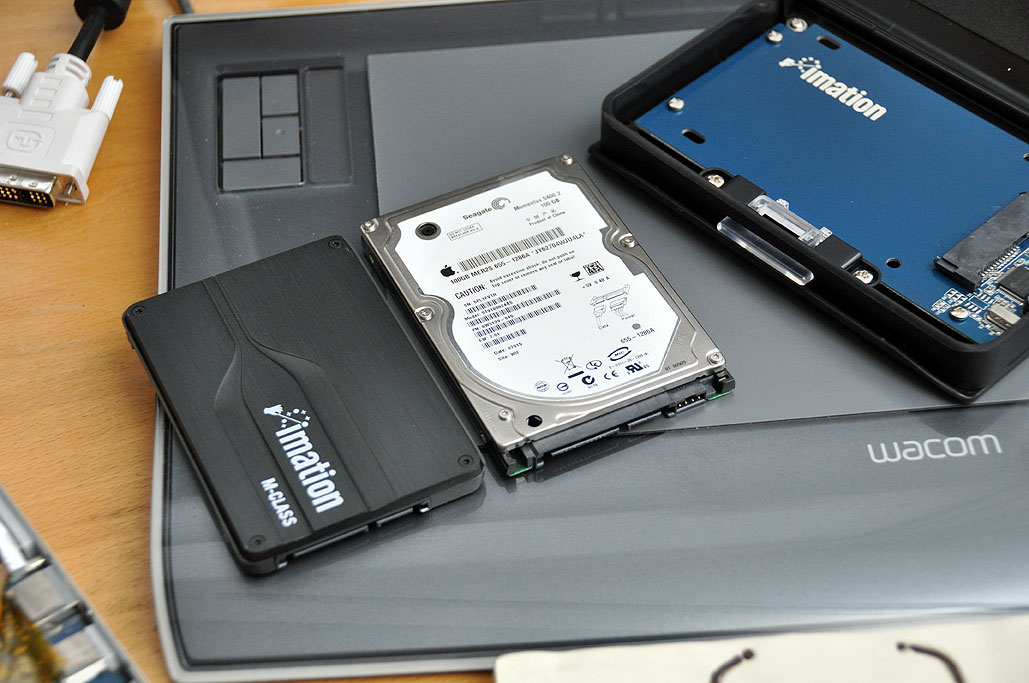
| February 15,2010 |
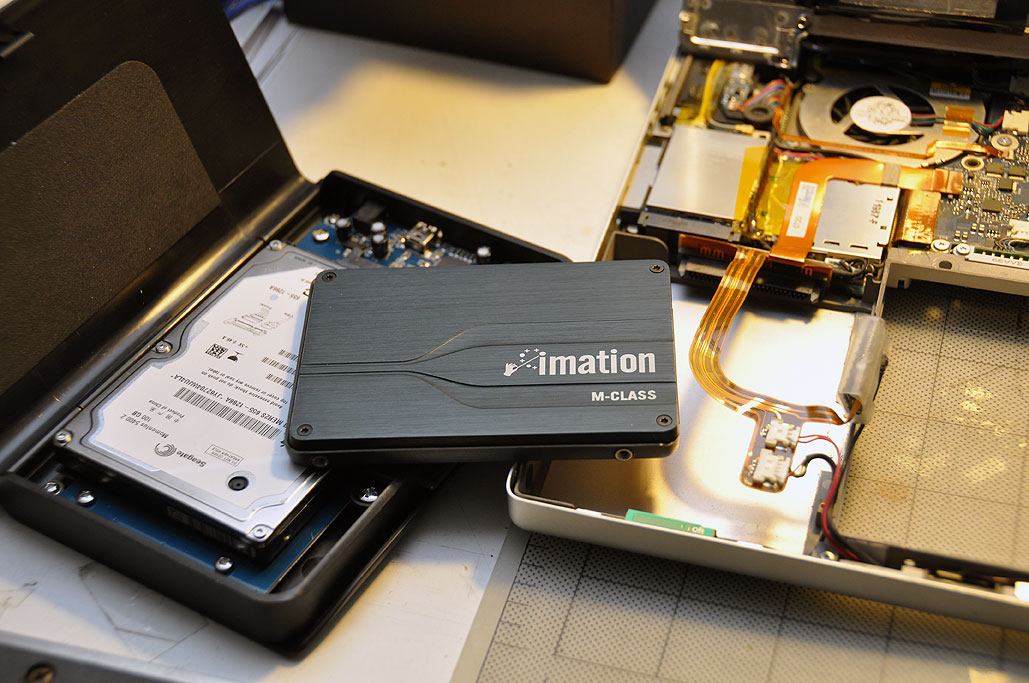
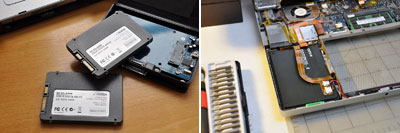
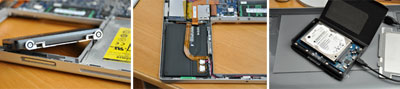
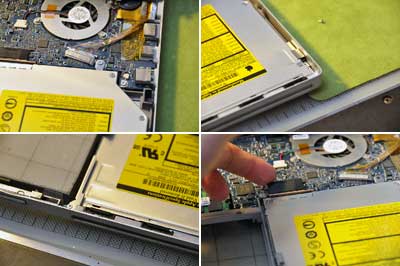
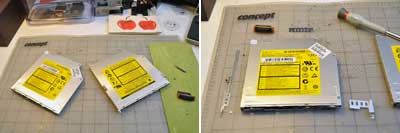
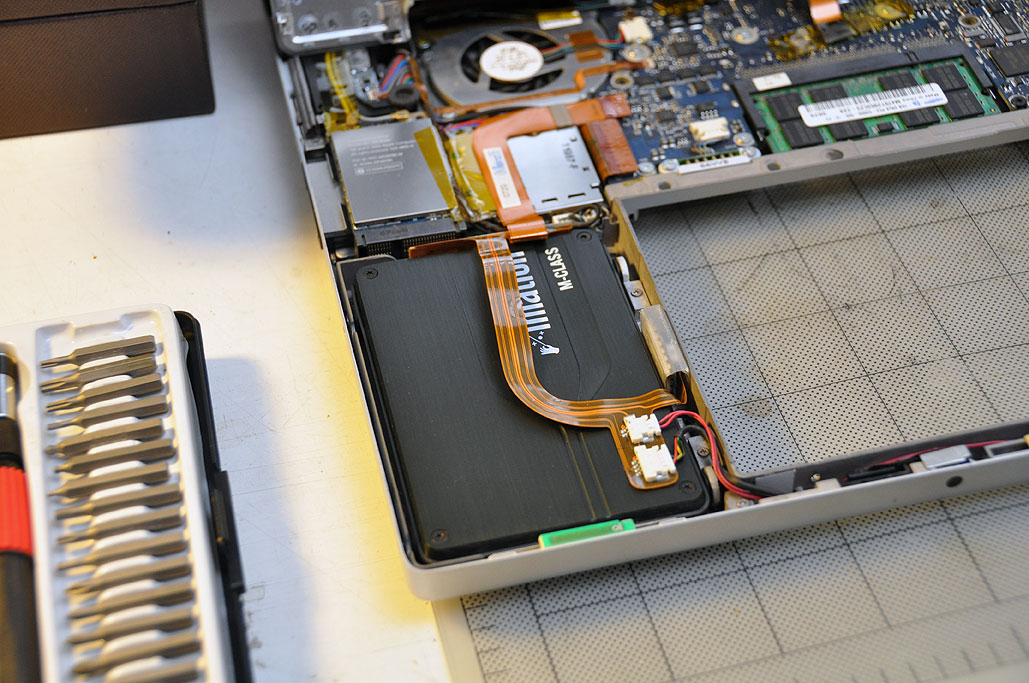
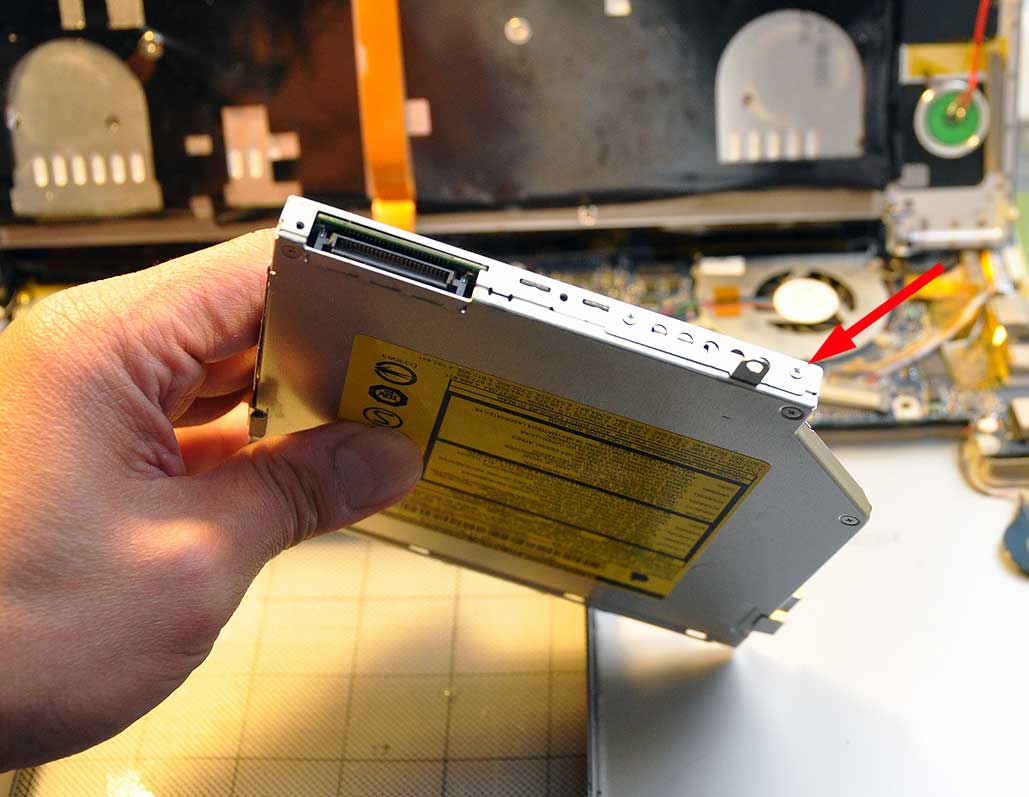
Last Friday we left off after we had both the internal and the ComboDrive removed from the MacBook Pro laptop. Today we'll show the installation of the imation SSD and the SuperDrive.
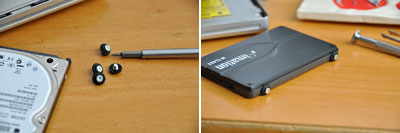
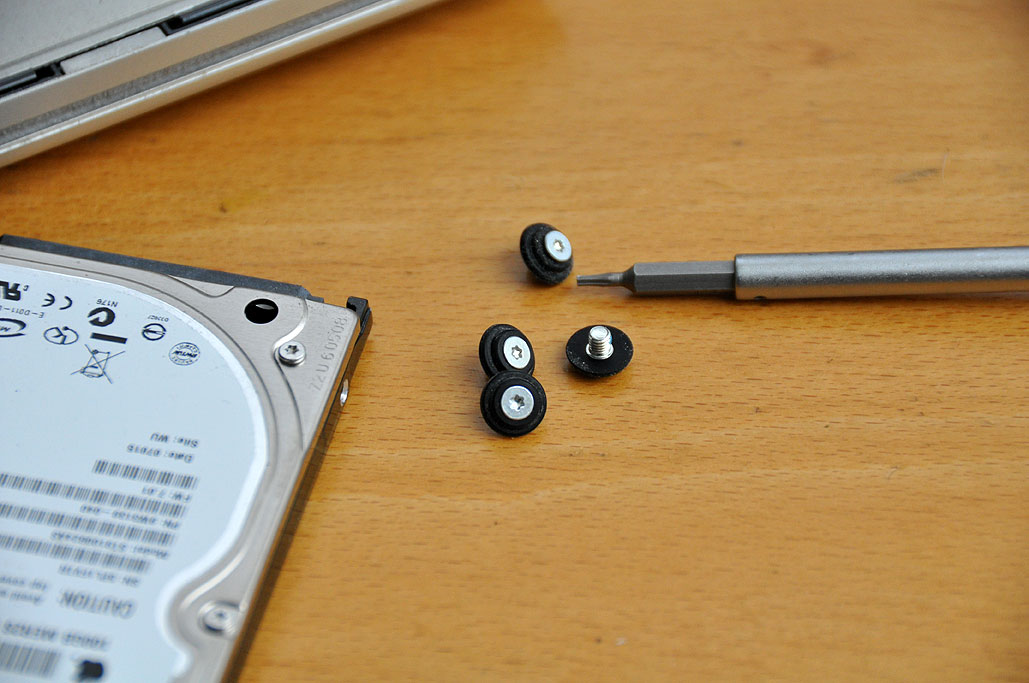
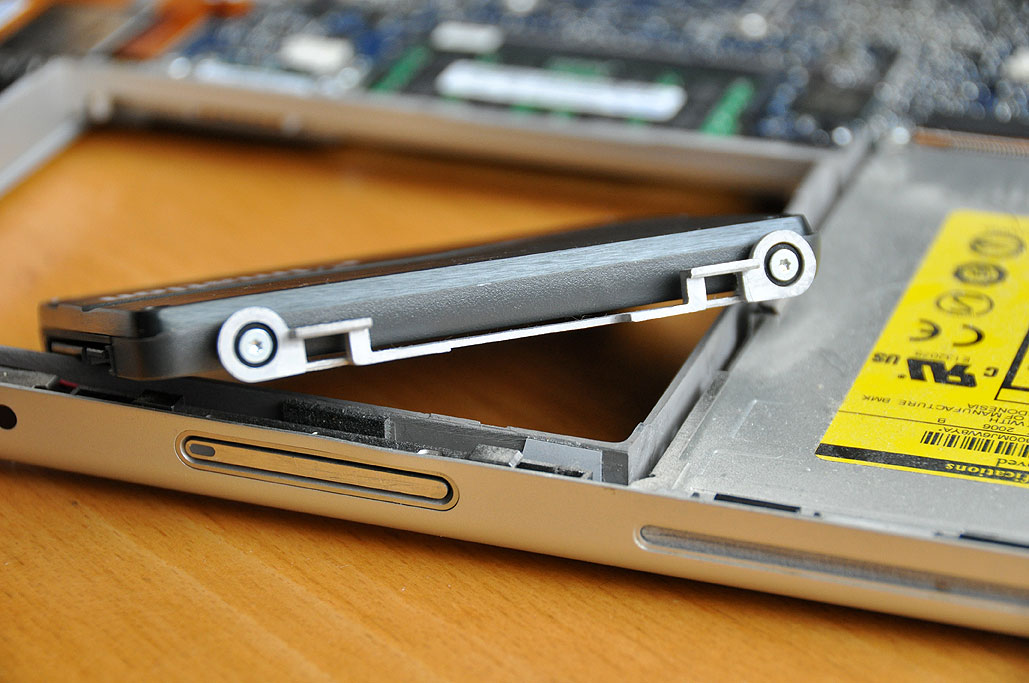
Both drives were attached to the frame of the laptop via mounting brackets. There were three brackets for the SuperDrive. There is only one for the hard drive. In order to protect the original drive from hard knocks, four rubber "shock absorbing" screws were used to isolate the drive from the frame. These four screws are necessary for mounting the SSD onto the laptop.
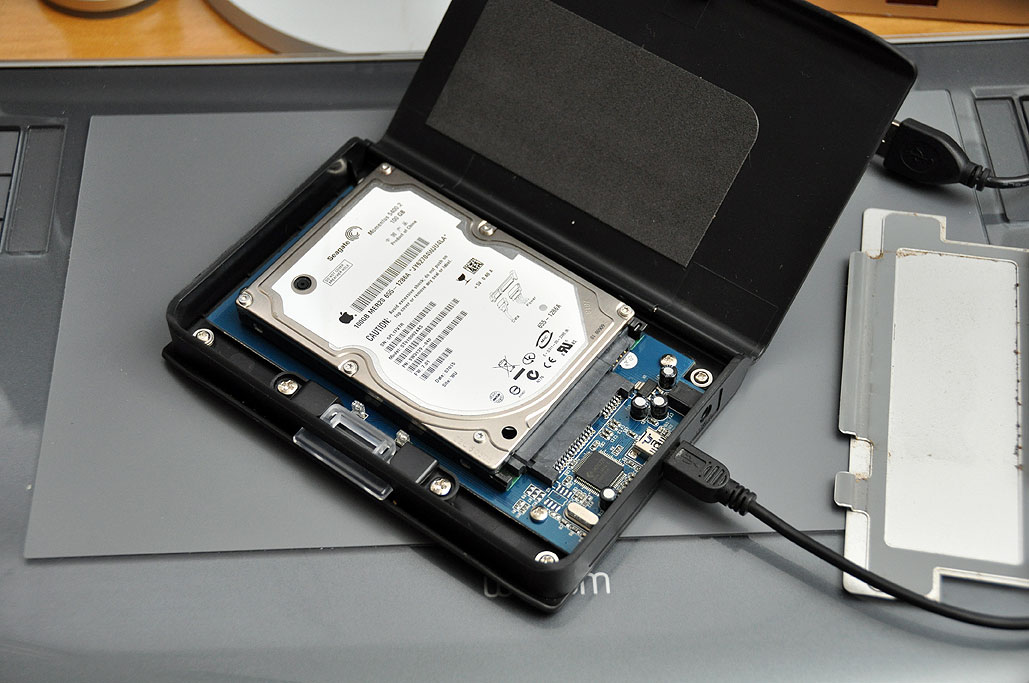
Shock absorbers are not necessary as SSDs have no moving parts and are thus impervious to knocks. However, these screws are necessary in this case only because of the mounting bracket. The bracket has loops which fit the screws and mount the drive to the frame of the laptop. The harddrive removed from the laptop may be placed in the imation case and used as a bootable external USB drive...very convenient to have for backups and emergencies.
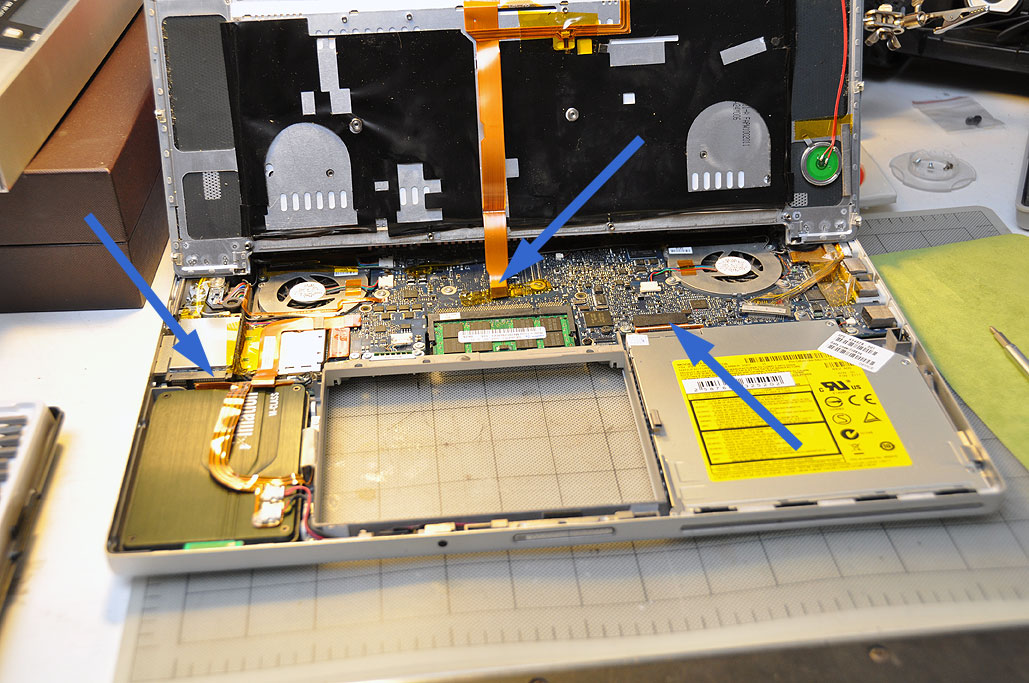
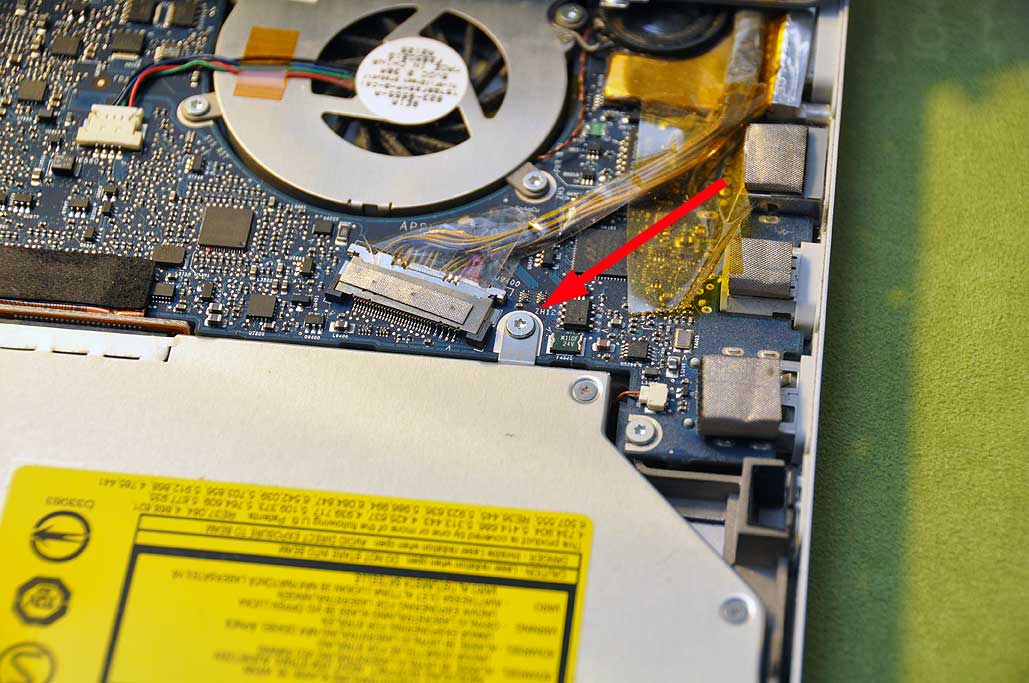
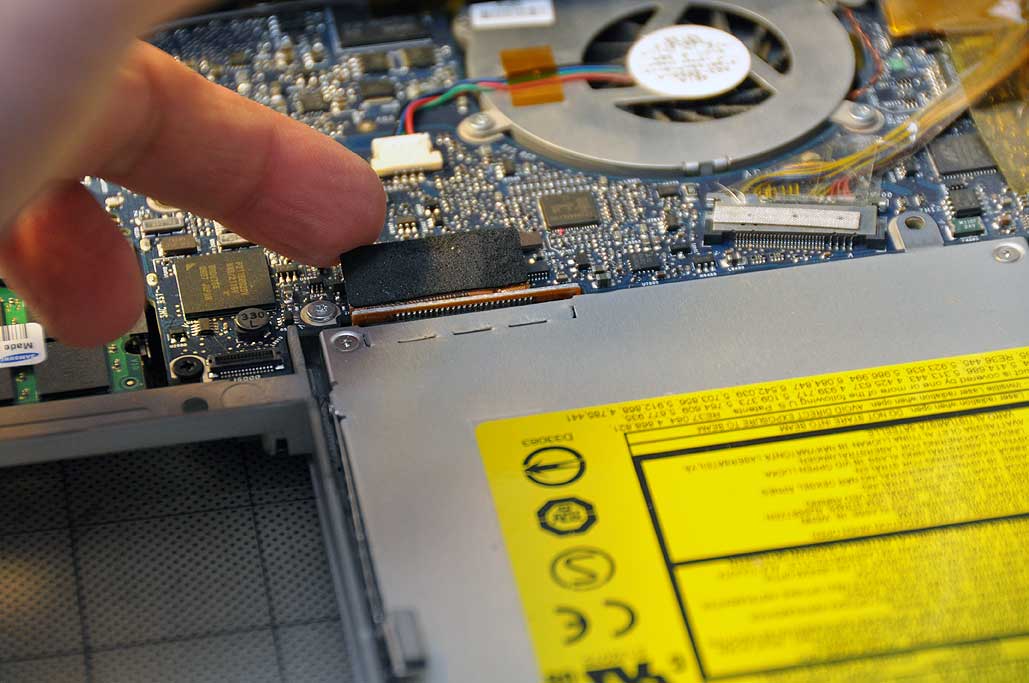
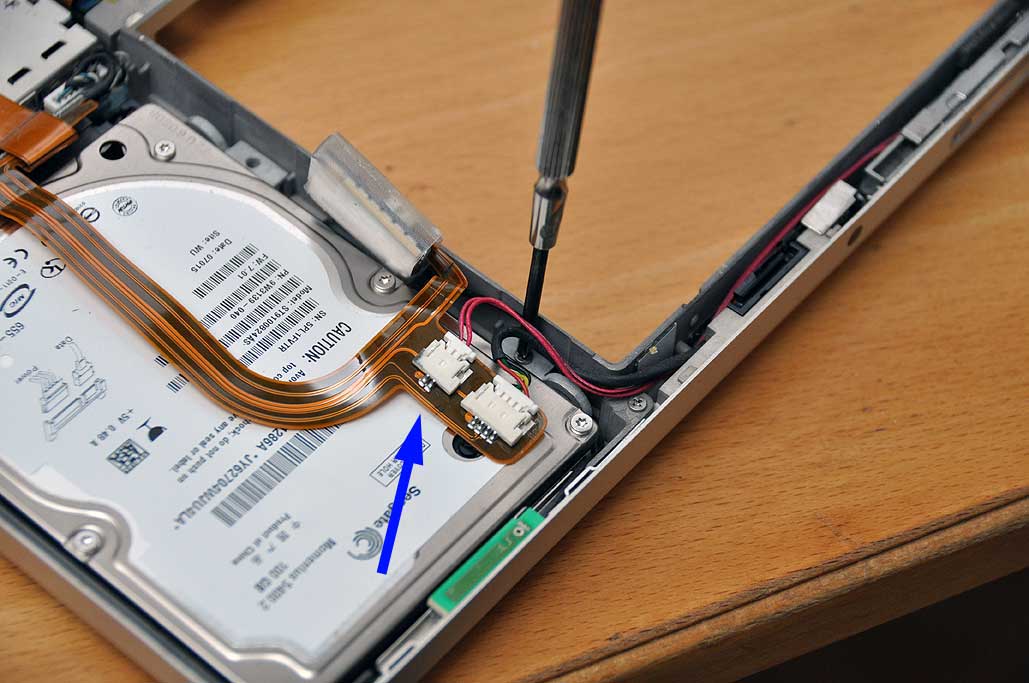
The process for reinserting the SSD and the SuperDrive is much easier than taking them out. Just reverse the removal steps. Take care to tighten just until you get resistance. There is no need to force anything. The only things to check are the three points of connection (blue arrows) to the motherboard before replacing the cover. One tip...do a power-up test before replacing the screws to the casing. This will save you a lot of work should you need to troubleshoot the installation. We go into further details tomorrow.
As always, if you need more info, check with the PowerBookMedics. Those guys are the pros when it comes to Powerbook/iPod related repairs and service. They are our first and last stop when we need parts. If we can't find it there, it is unlikely we would find it anywhere. [Permalink] -MacBook Pro SSD and Superdrive Installation |
| February 12,2010 |
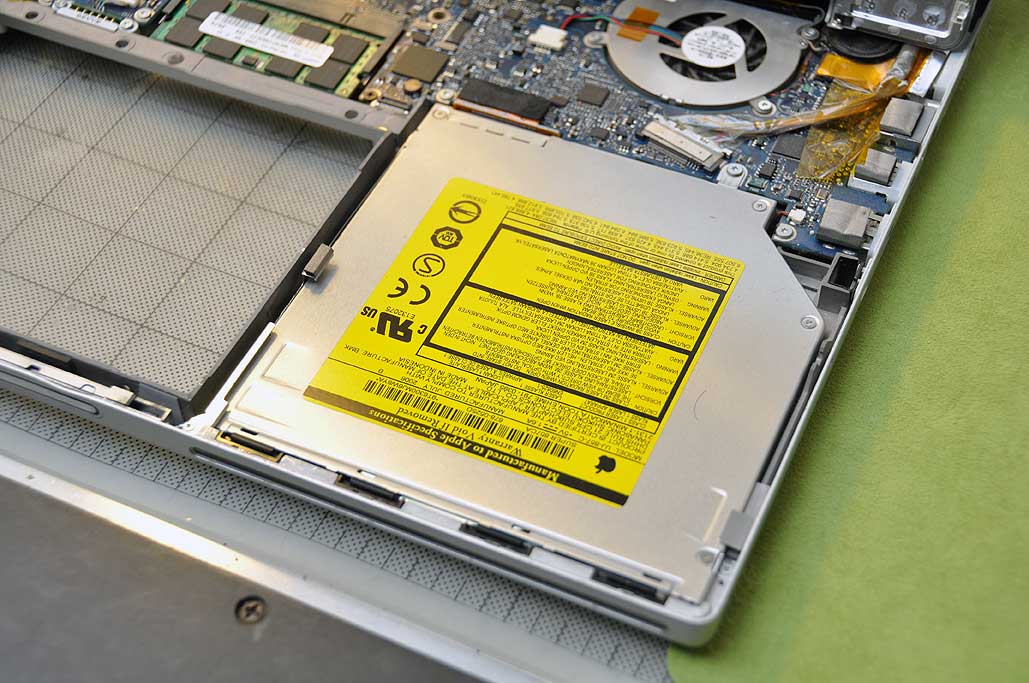
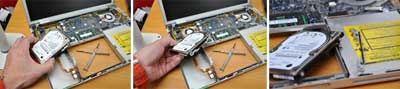
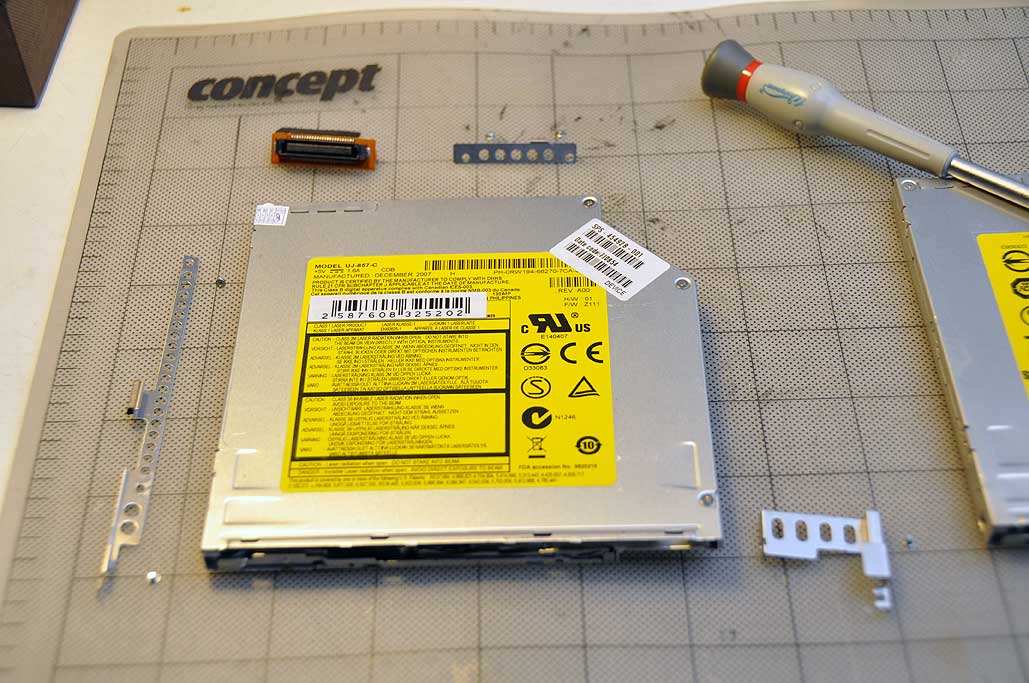
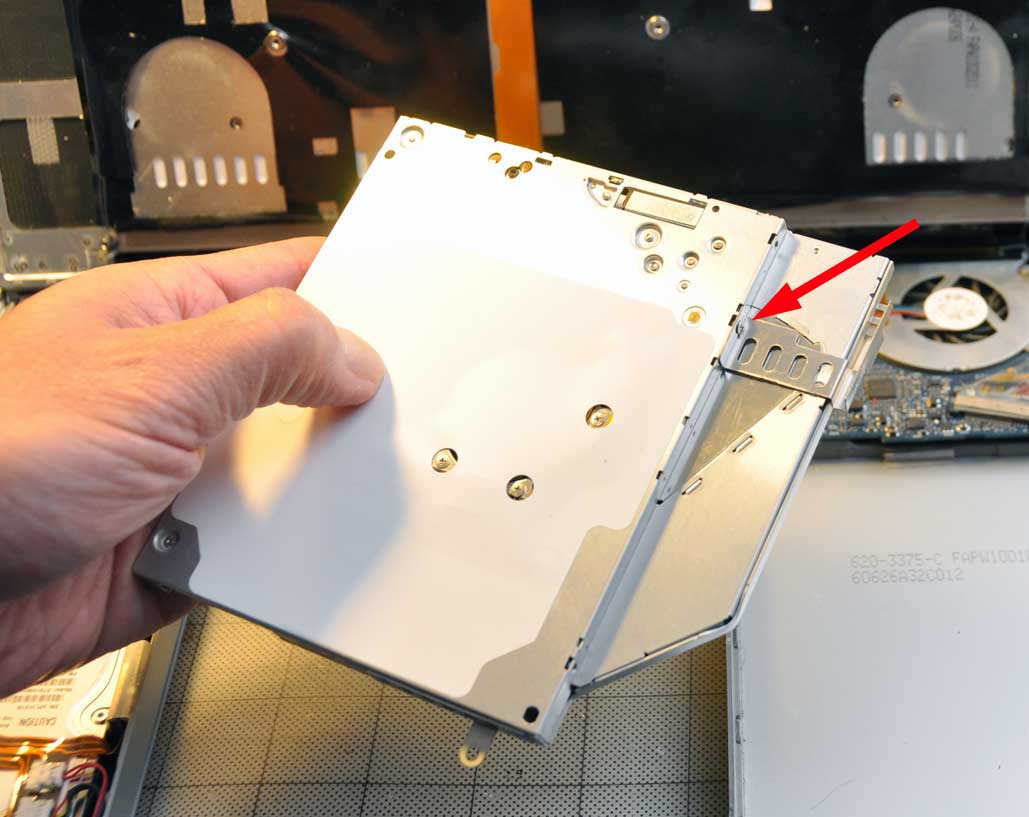
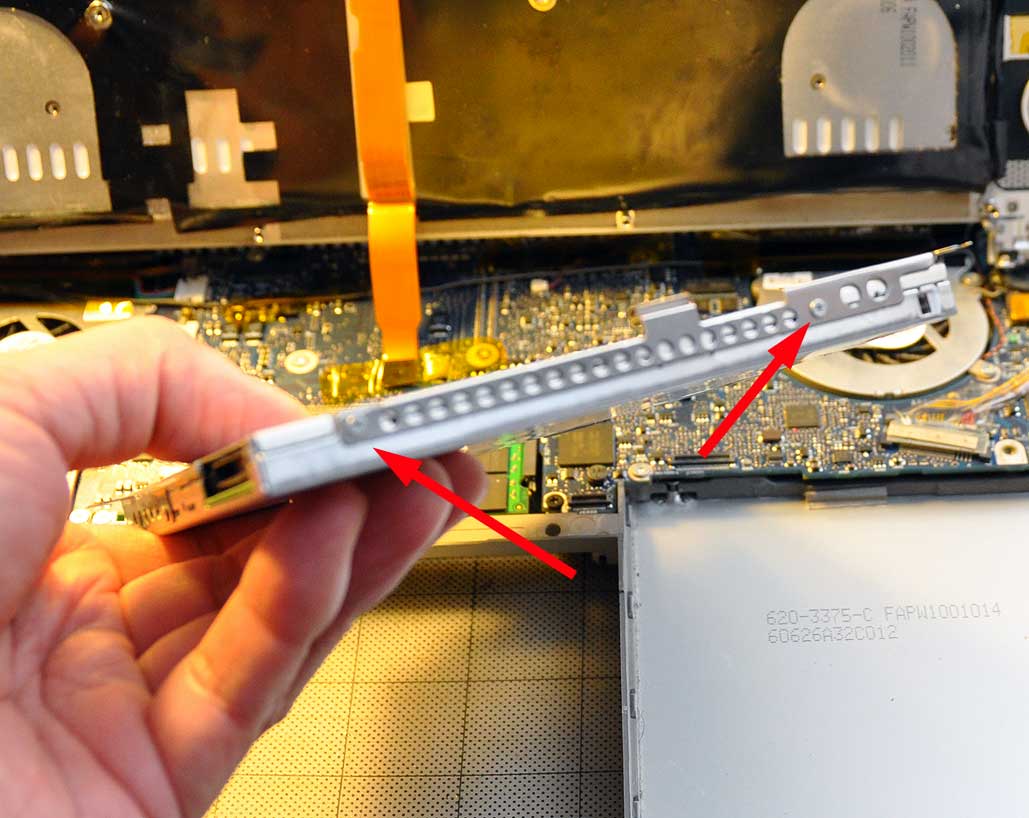
Yesterday we showed how to remove the MacBook Pro's internal hard drive. Today we'll show how to take out the front-loading Combo drive, remove the various mounting brackets, and get the SuperDrive ready for installation.
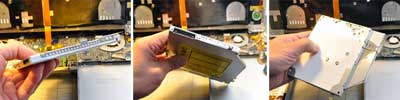
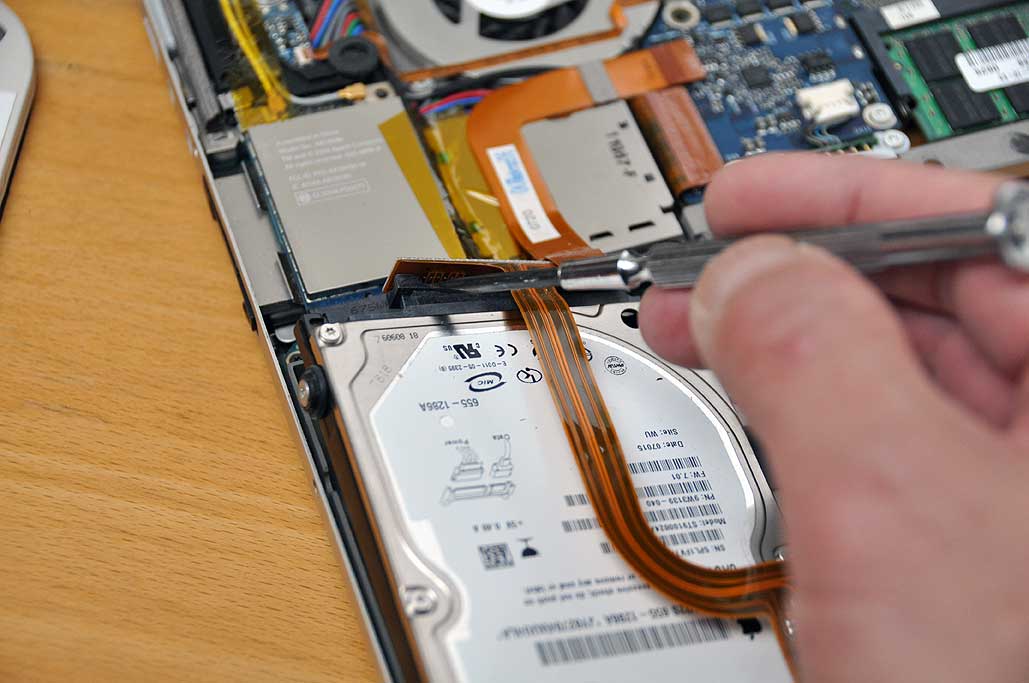
The ComboDrive, like the internal hard drive, is attached to the frame by several removable mounting brackets, one on the side (right, left) and one in the back. There is also a removable data connector at the rear left.
With the screws removed and the cable to the motherboard disconnected, the drive may now be lift out of the laptop. The screws for the mounting brackets (left, top, right) are now accessible.
It is important to note the holes used and orientation of the bracket relative to the drive as they must be remounted the same way onto the SuperDrive.
These drives are flexible and can be damaged. Care should be taken to not press on or bend them during handling. When reattaching the brackets, there is no need to tighten the screws very much. Just enough so the bracket does not move will be sufficient.
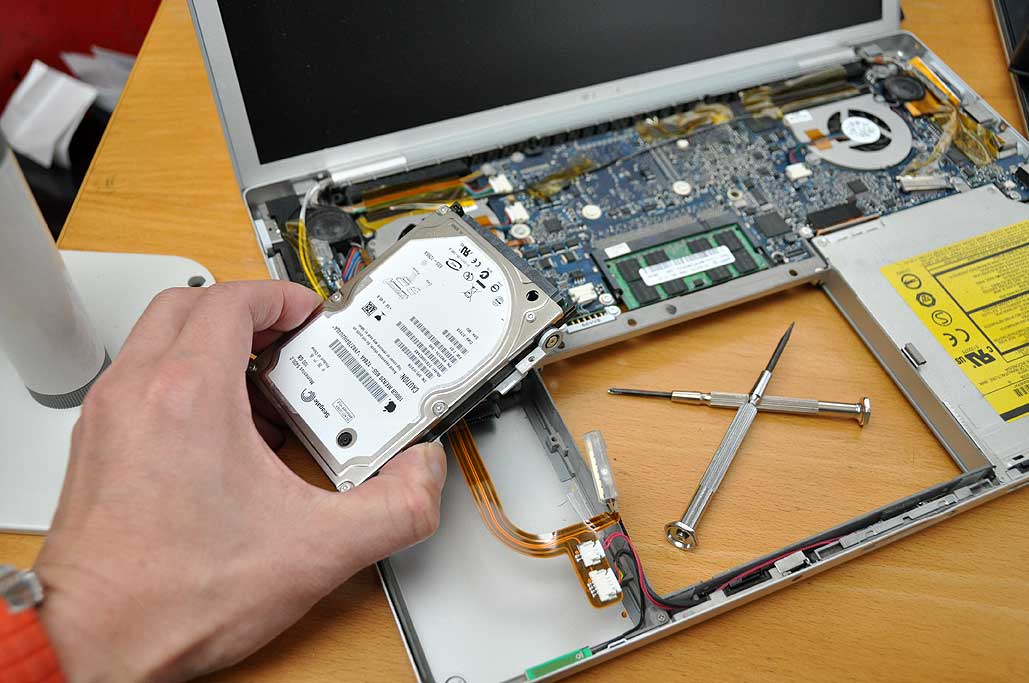
We are now ready to upgrade both of the MacBook Pro's drives. The final part of this series will be posted on Monday. We will show how to install the imation SSD and the SuperDrive. For parts and detail video instructions, check out the PowerBookMedic site. They have everything you will need to keep you Mac laptops and ipods going a long long time. [Permalink] -MacBook Pro ComboDrive Removal
|
| February 11,2010 |
We prepped for a huge storm yesterday, and while New York and other states got hit pretty hard, things kind of fizzled out up here in Boston. It rained a bit in the morning and snowed lightly for the rest of the day, but there probably wasn't more than a few inches of the white stuff on the ground when it was over...hardly even worth breaking out the shovel.
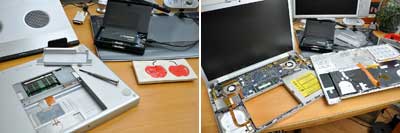
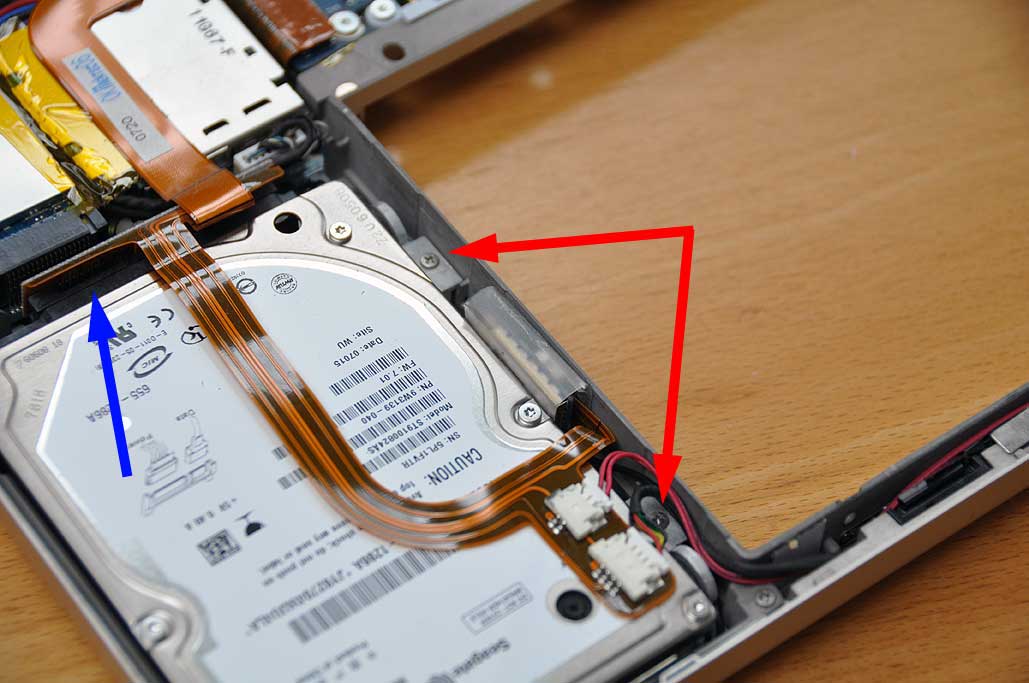
To make sure we had something to do while riding out the storm, we scheduled a few MacBook Pro upgrade projects for yesterday. The first project was to swap out the internal hard drive for the imation SSD. Since we were going to have the MBP open, we thought we would also upgrade the combo drive (which had been making some pretty bad grinding sounds) to a SuperDrive. As with many of our past projects, when we needed a part, we headed to the PowerBookMedic. The site is well organized, which helps us quickly find the exact part we need. They have everything (parts, instructions, service) needed to get our laptops, iPods, and iPhones up and running again. When we fixed our MBP's keyboard we did a fairly detailed write-up on the disassembly of the MBP. We refer readers to those instructions and will not repeat them here. Instead, we will focus on the specifics of removing the hard and CDROM drives in this article. Tomorrow we will show the installation and tests. From experiene, we found that it pays to get a good quality set of torx and mini screwdrivers, a few pairs of tweezers, and have a clean place to work. Tiny screws will be dropped. Finding them will be much easier when there isn't a lot of clutter around.
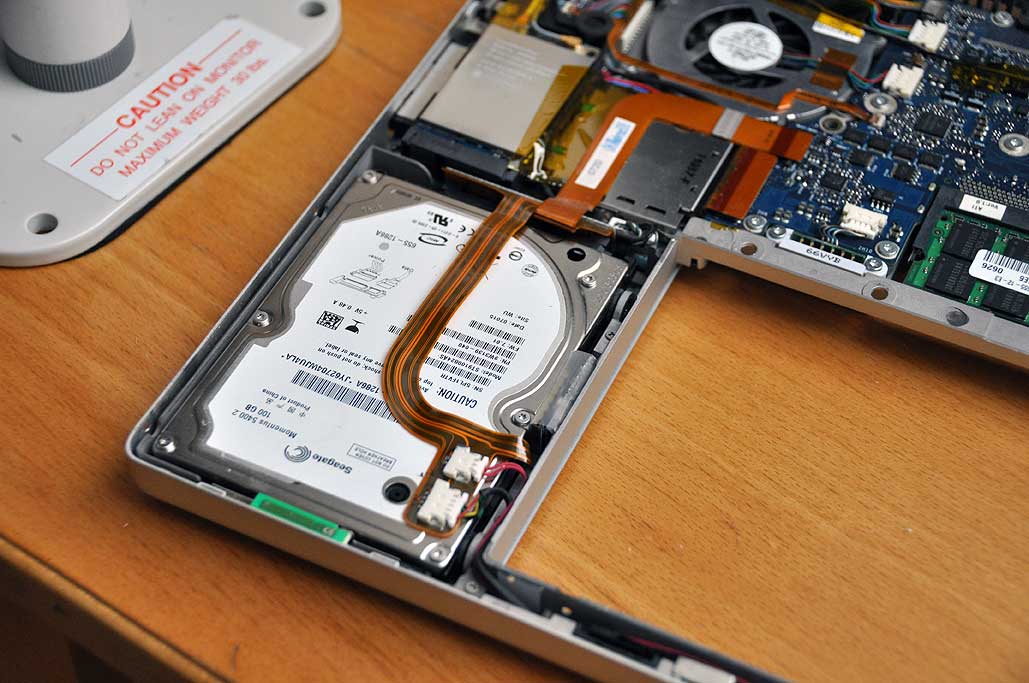
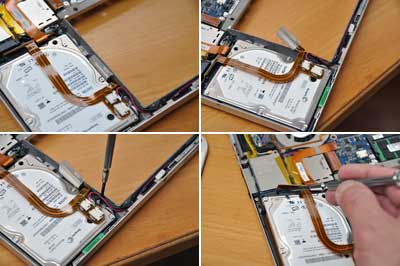
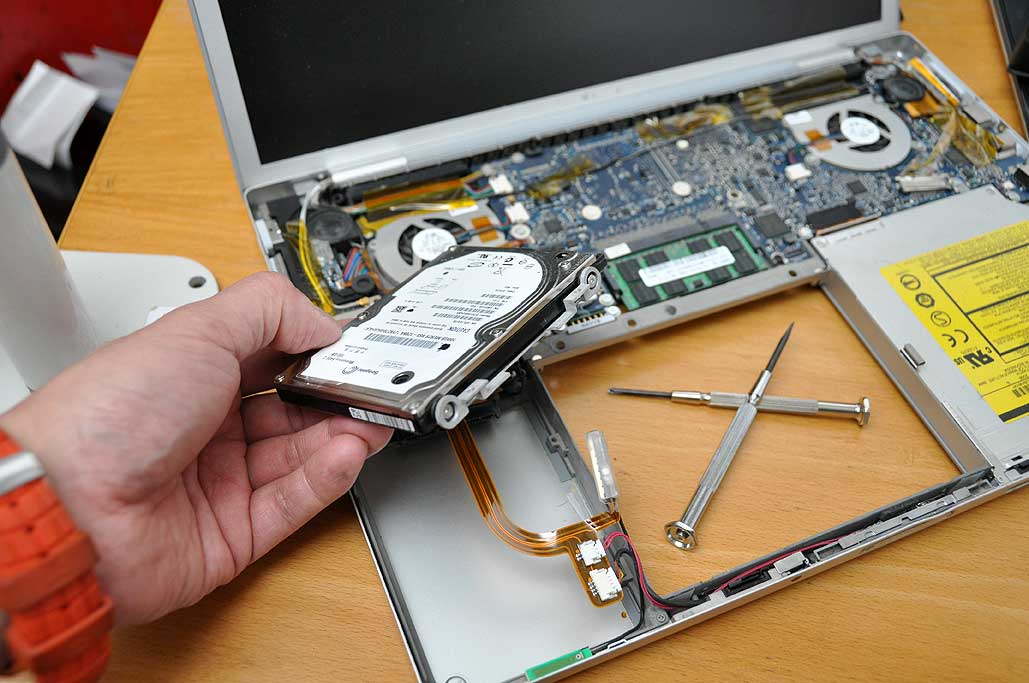
Once the lid has been lifted, the removal of either the internal hard drive or the CDROM drive is relatively easy. Both drives are attached to mounting brackets. The brackets are secured to the frame of the laptop by just a few screws. As one can see, things are packed pretty tightly in the laptop. The tricky part to removing either drive is to do as little as possible and not to break any of the things jammed around these components.
There are two things to move (Bluetooth antenna, ribbon cable) aside and three items to remove (two screws on the right side, the connector at end of the drive). The antenna block was just wedged in. It came out without any problems. Our cable was attached with some two-sided tape. We used a wide flat-head screwdriver to gently lift it off the drive.
Once the ribbon cable has been moved, connector freed, and the screws out, there will be nothing else holding the drive in place. Note that the mounting bracket is only held in place by the screwed-in rubber shock absorbers on the side. We found it easier to lift from the right side. Space is tight so care must be taken in lifting out the drive. With the drive removed, we are ready for the SSD installation. Tomorrow we'll show how we removed the ComboDrive, installed the SSD and SuperDrive, and put everything back together. [Permalink] -MacBook Pro Internal Drive Removal |
| February 9,2010 |
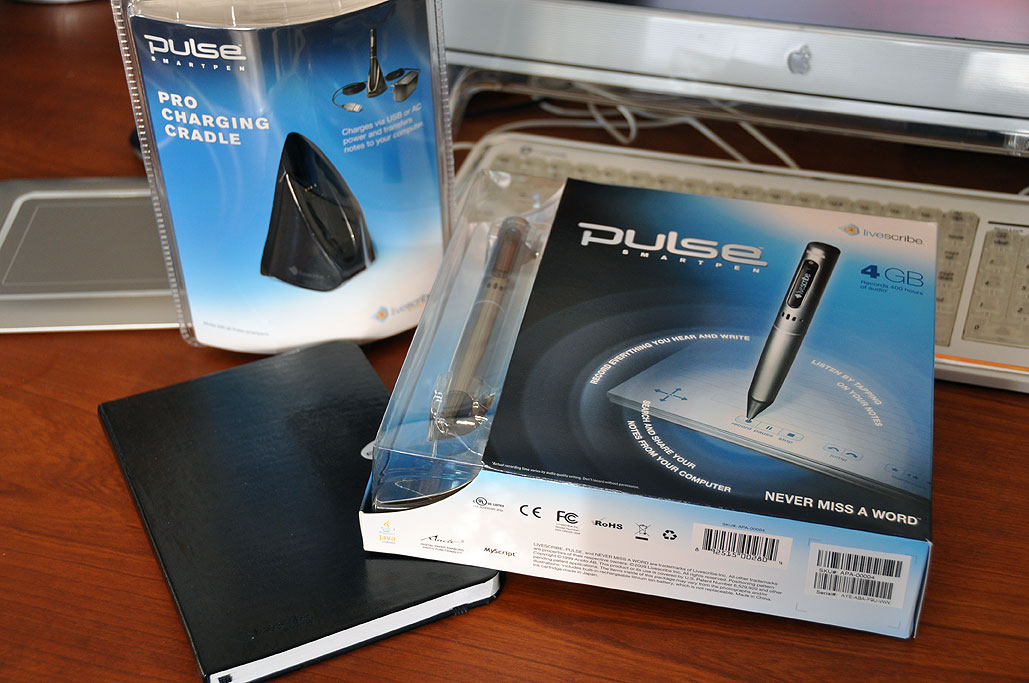
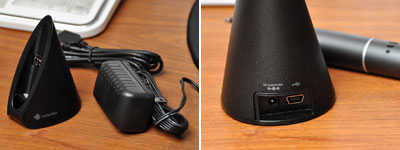
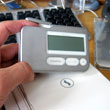
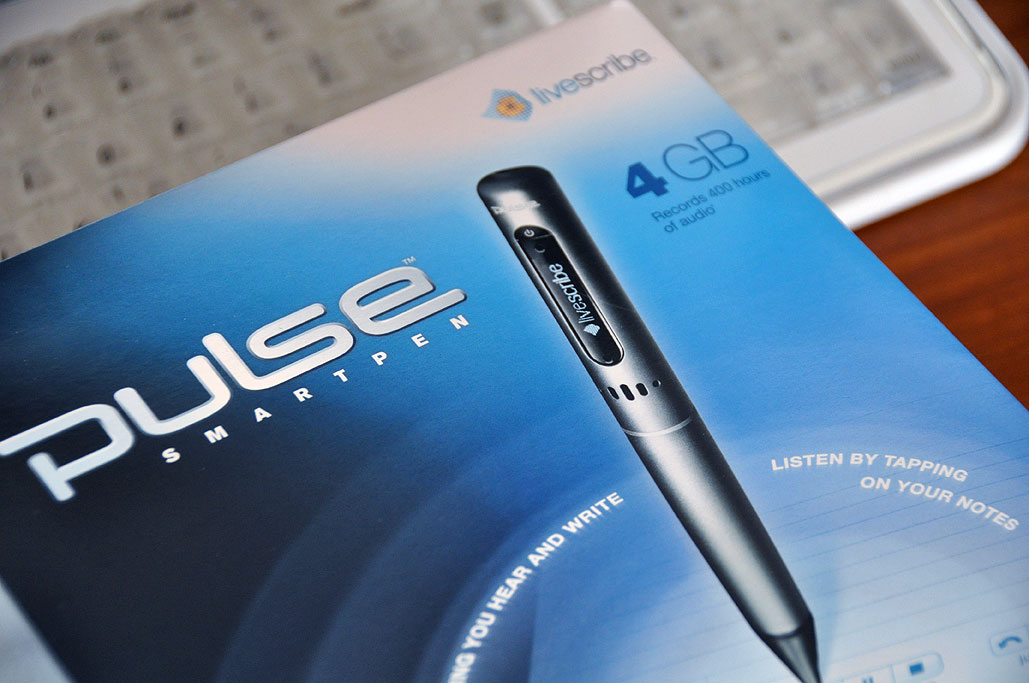
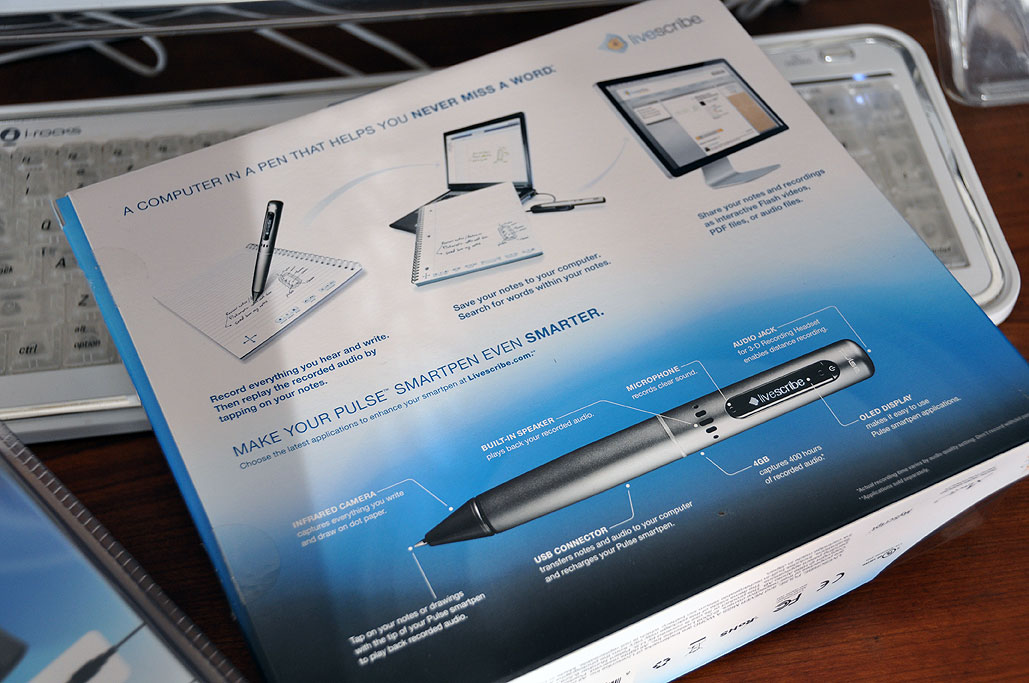
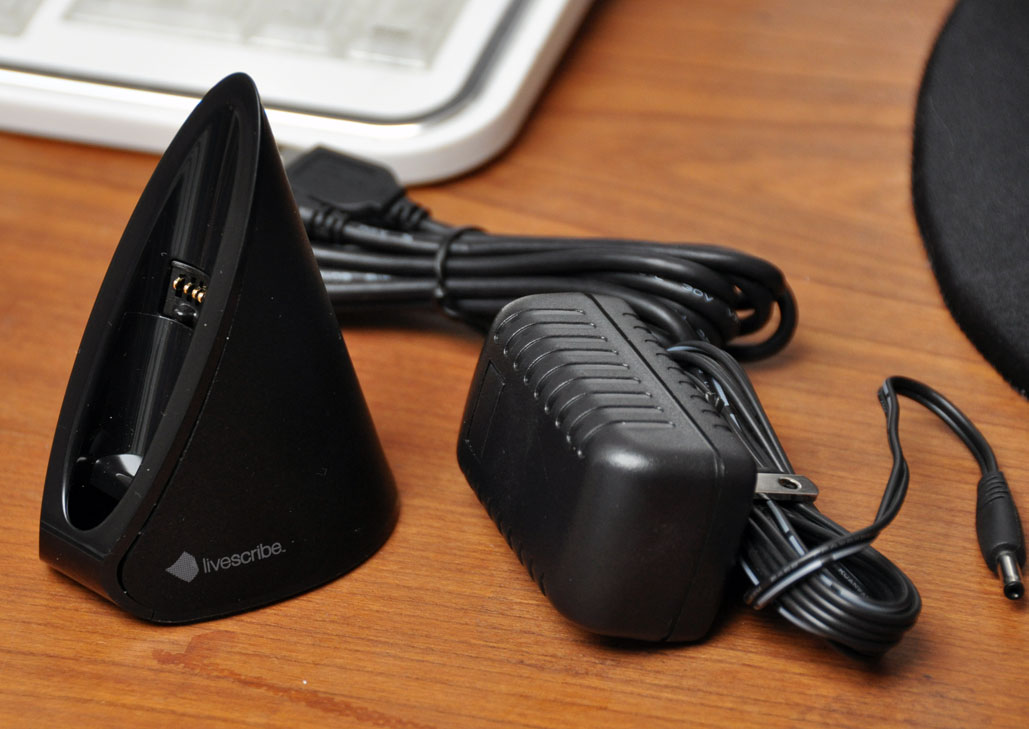
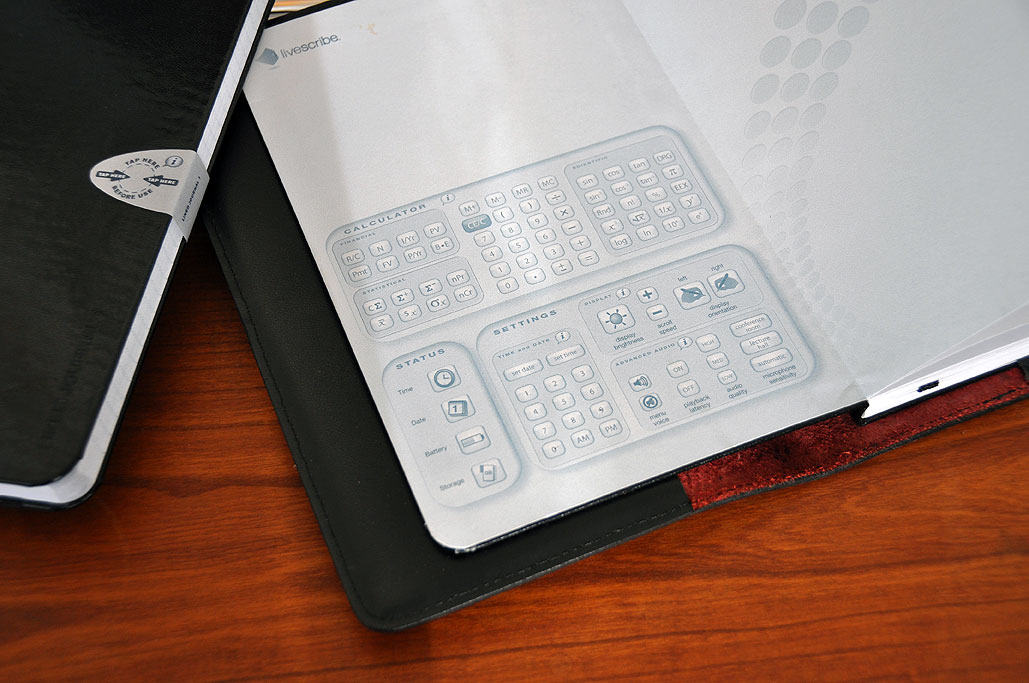
Apple has pretty much sucked the air out of the room when it comes to anything "tablet" related. However, until the iPad actually ships, all the buzz is good for is generating comments and opinions on blogs. Fortunately, there are many companies out there besides Apple making all kinds of cool digital gear worthy of mention. One of our favorite is Livescribe, makers of the Pulse SmartPen.
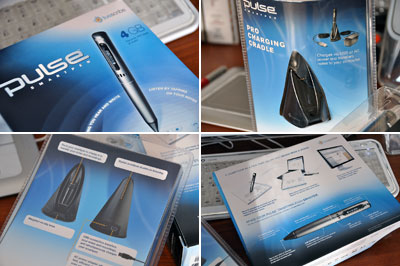
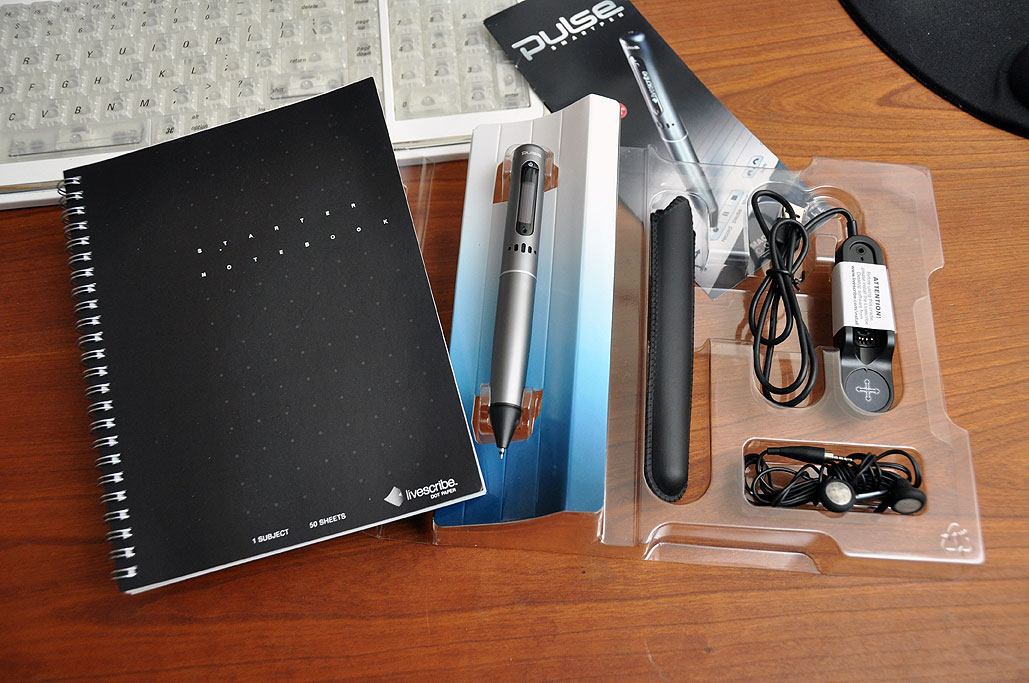
We mentioned the Pulse a few times last year (Intro, FirstLook, FirstUse, journal, Online, SDK) because we felt it was an extraordinary piece of tech. Of course, there were additional features we hoped we would soon see in the product. It has been a year, so we thought it was time for us to check and see what's new with the Pulse. The short version is: more memory, new charging cradle.
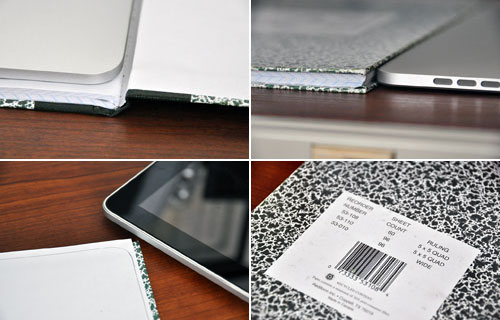
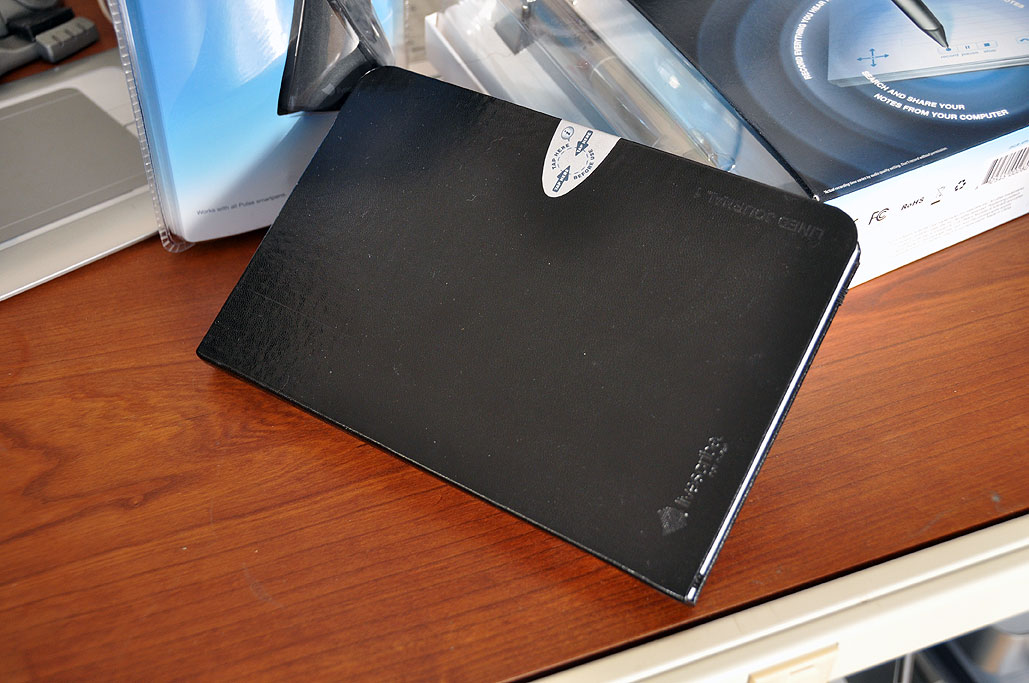
There is now a larger 4GB version of the pen, which is great news as we hated deleting anything off our Pulse pen (more on why later). The other items in the package were the same except it now contains a journal instead of a full-size notebook. We prefer the smaller journal over the larger notebook, so we were happy with the change.
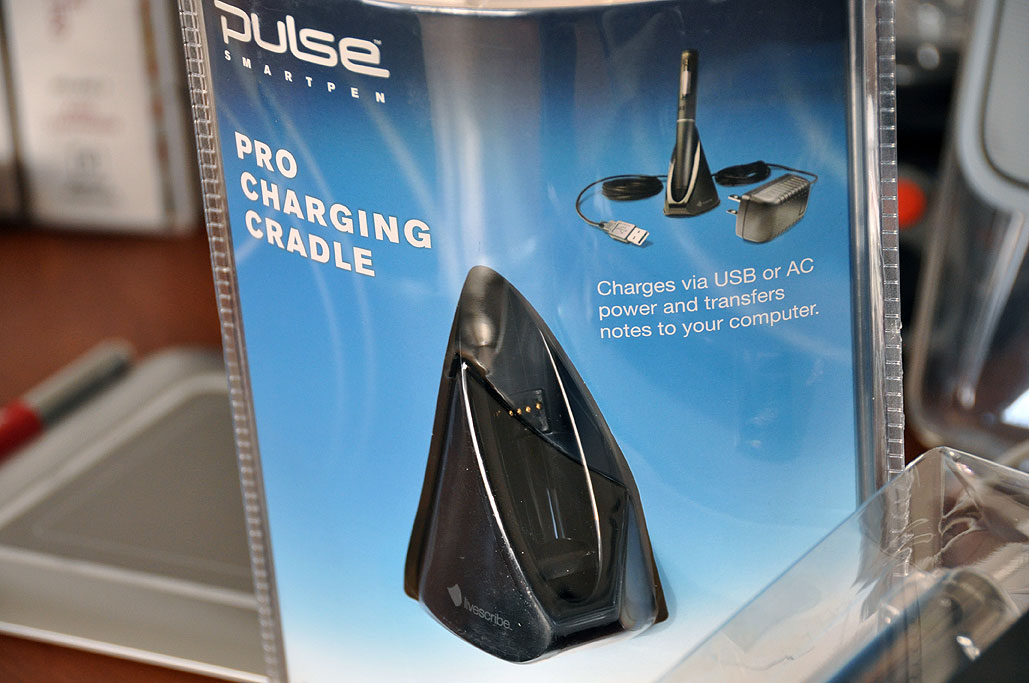
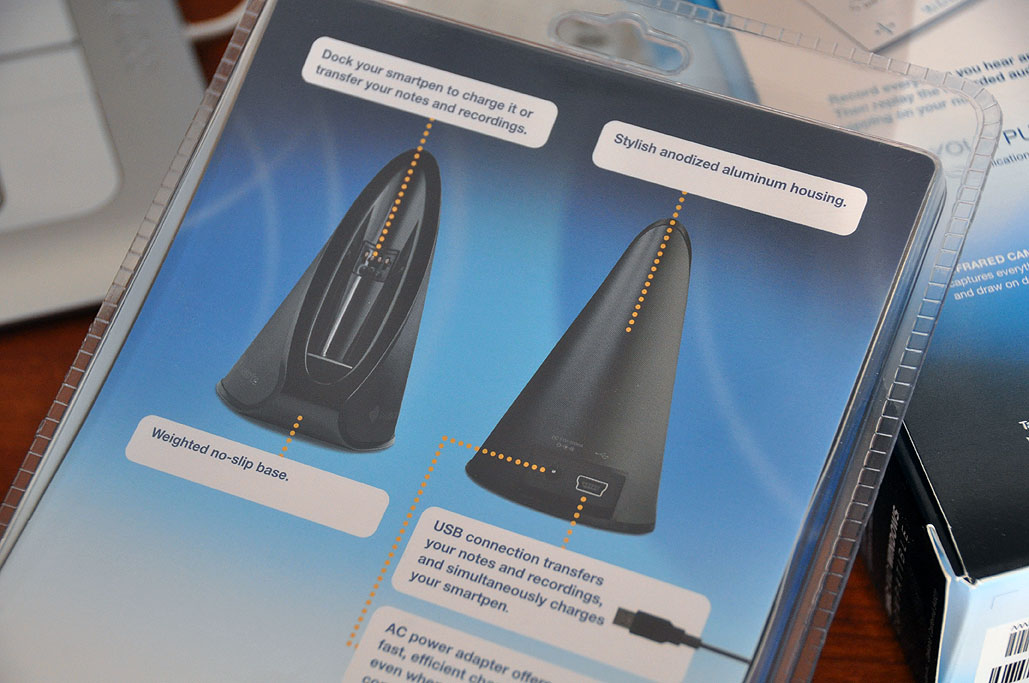
Some of us just use the Pulse SmartPen as a note taker/recorder. We don't need to upload the audio data to a computer at all. However, in order to recharge the pen, we had to hook the pen/charging base combo to a computer. Livescribe now offers a charging cradle which is powered by an AC outlet. This cradle is shaped to stand the pen upright and weighed so it cannot be easily tipped over. There is still an USB port in the back for downloading data to the computer, but the Pulse may now be untethered from the laptop if only a recharge is needed.
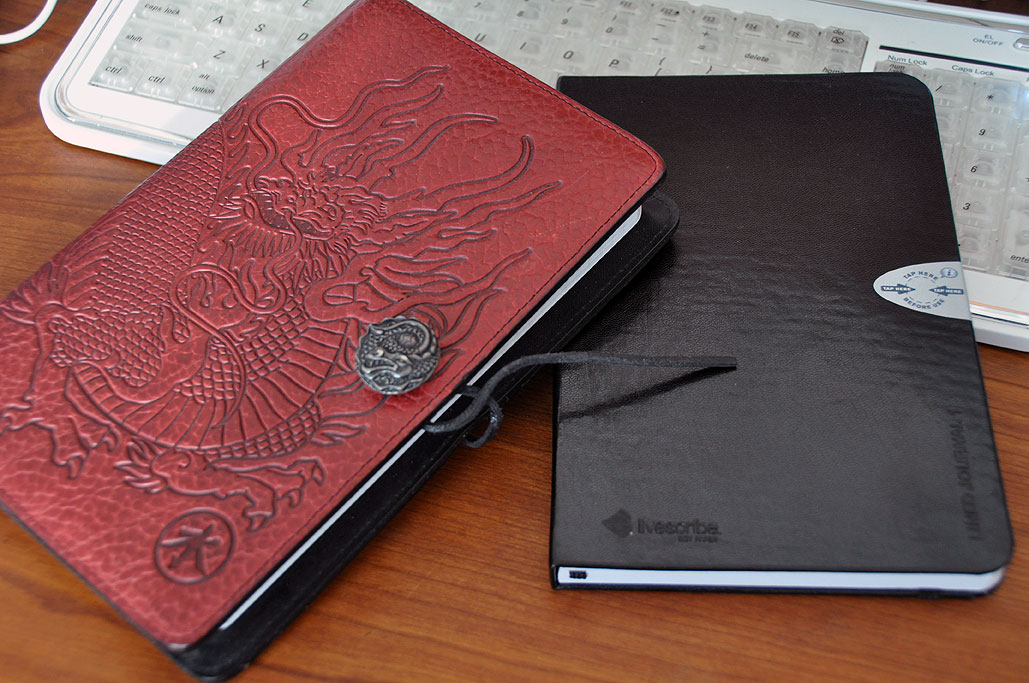
Livescribe discoverd that some would prefer a more upscale look and are now offering a leather-bound version of their journals. These journals are the same size as the previous ones, but now have a richer more "executive" look to them. We liked the previous ones, but did covered them up with an embossed cover, mostly because we wanted a way to secure the pen with the notebook. We would have liked an elastic loop or some way to attach the pen to the journal.
The biggest weakness with the Livescribe Pulse for us at present is the inability to "reload" the data back onto the pen. The current Livescribe software does allow the user to "archive" the data for review on the computer, but that action is unidirectional. The inability to reload the archived data meant we have lost the ability to click on the notes in our notebooks and hear the audio once we have archived it. The only way to access the archived audio is via the Livescribe Desktop software. For some users, this will not be an issue, but it is a big problem for us. We have non-Livescribe notebooks that are 20 years old which contain notes that we still reference. We would love to have a removable micro-flash chip which can be taken out of the Pulse and paired with the notebook so we can swap memory chips when we swap notebooks. The perfect analogy is that of a digital camera. How much more limiting would a digital camera be if they had no removable flash memory? We love how the Pulse pen can capture both audio and written data, but we look forward to the day when the data is no longer held captive by the pen. [Permalink] -Livescribe Pulse 4GB |


| RainyDayBuzz* | ||
|
|
||
| GET GEAR* | ||
|
||
| RECENT TRIPS* | ||
|
|
||


| GO PLAY* | ||
|
||


